Lesson Contents
In this lesson, I will show you how to configure two Cisco IOS routers to use IPSec in Tunnel mode. This means that the original IP packet will be encapsulated in a new IP packet and encrypted before it is sent out of the network. For this demonstration, I will be using the following three routers:
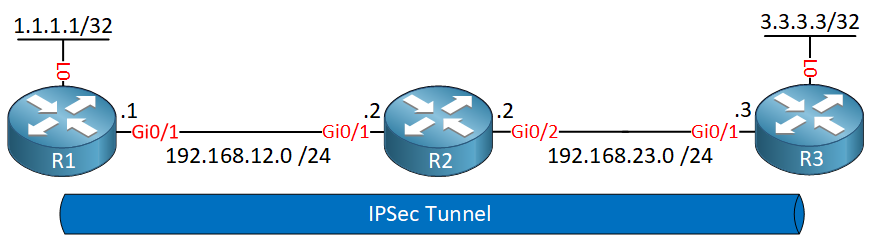
R1 and R3 each have a loopback interface behind them with a subnet. We’ll configure the IPsec tunnel between these two routers so that traffic from 1.1.1.1/32 to 3.3.3.3/32 is encrypted. R2 is just a router in the middle, so that R1 and R3 are not directly connected. Let’s start with the configuration on R1!
Configuration
First, we will configure the phase 1 policy for ISAKMP, where we configure the encryption (AES) and use a pre-shared key for authentication. We use DH group 2:
R1(config)#crypto isakmp policy 1
R1(config-isakmp)#encryption aes
R1(config-isakmp)#hash sha
R1(config-isakmp)#authentication pre-share
R1(config-isakmp)#group 2
For each peer, we need to configure the pre-shared key. I’ll pick something simple like “MYPASSWORD” :
R1(config)#crypto isakmp key 0 MYPASSWORD address 192.168.23.3Now we’ll configure phase 2 with the transform-set:
R1(config)#crypto ipsec transform-set MYTRANSFORMSET esp-aes esp-sha-hmacAnd put everything together with a crypto map. Our peer is 192.168.23.3, the transform-set is called MYTRANSFORMSET, and everything that matches access-list 100 should be encrypted by IPSEC:
R1(config)#crypto map CRYPTOMAP 10 ipsec-isakmp
R1(config-crypto-map)#set peer 192.168.23.3
R1(config-crypto-map)#set transform-set MYTRANSFORMSET
R1(config-crypto-map)#match address 100
The access-list matches all traffic between 1.1.1.1 and 3.3.3.3:
R1(config)#access-list 100 permit ip host 1.1.1.1 host 3.3.3.3We need to make sure our router knows how to reach 192.168.23.3 and also tell it that it can reach 3.3.3.3 through 192.168.23.3:
R1(config)#ip route 192.168.23.0 255.255.255.0 192.168.12.2
R1(config)#ip route 3.3.3.3 255.255.255.255 192.168.23.3
Last but not least, we’ll activate the crypto map on the interface:
R1(config)#interface gi0/1
R1(config-if)#crypto map CRYPTOMAP
That’s all we have to do on R1. Now we’ll create a similar configuration on R3:
what is the configuration of R2?
Nothing has been configured on R2, just the IP addresses on its FastEthernet interfaces.
Rene ..Not working for me. 1.1.1.1/32 and 3.3.3.3/32 are not reachable. i checked all configuration , almost same as above. But not working
... Continue reading in our forum**
Hi Amit,
This show command only tells you that no packets are encrypted or decrypted. You need to check the following in order:
Is routing configured correctly?
Are your ACLs for the VPN configured correctly?
Are the crypto maps configured correctly?
Do you have a security association?
If those are all OK…do a debug for the security association to see what is wrong.
Hi
Don’t you need the tunnel ip address, so you can use that as next hop.
R1(config)#ex. ip route 3.3.3.3 255.255.255.255 192.168.13.3best regards mpo