Lesson Contents
IPV6 over IPV4 GRE with IPSec allows us to securely transport IPv6 unicast and multicast packets over an IPv4 network. We use GRE to tunnel all IPv6 packets since IPSec does not support multicast. We do use IPSec to encrypt the entire GRE tunnel.
In this lesson, I’ll show you how to configure a GRE tunnel between two routers, encrypt it with IPSec, and run OSPFv3 to prove that we can transmit both IPv6 unicast and multicast packets.
Configuration
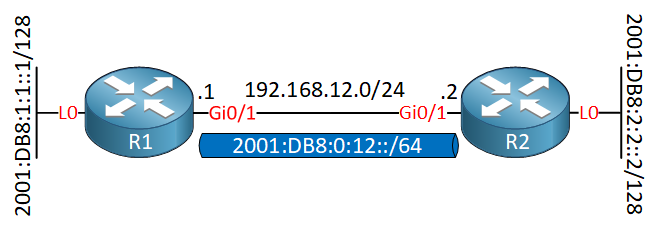
Here is the topology we’ll use:

I only need two routers to demonstrate this. R1 and R2 use IPv4 addresses on the Gigabit interfaces. Each router has a loopback interface with an IPv6 address that we will advertise in OSPFv3.
R1
Let’s start with R1. First, we’ll enable IPv6 unicast routing:
R1(config)#ipv6 unicast-routingNow we can create the tunnel interface:
R1(config)#interface Tunnel 0
R1(config-if)#ipv6 address 2001:DB8:0:12::1/64
R1(config-if)#tunnel mode gre ip
R1(config-if)#tunnel source GigabitEthernet 0/1
R1(config-if)#tunnel destination 192.168.12.2
The tunnel mode is “gre ip”. I added an IPv6 unicast address even though technically we don’t need it (OSPFv3 uses link-local addresses for the neighbor adjacency). But, it gives us an easy to remember IPv6 address that we can use to quickly test our tunnel.
Let’s encrypt the GRE tunnel. We need an ISAKMP policy:
R1(config)#crypto isakmp policy 10
R1(config-isakmp)#authentication pre-share
R1(config-isakmp)#hash md5
R1(config-isakmp)#group 2
R1(config-isakmp)#encryption aes
Let’s configure a pre-shared key:
R1(config)#crypto isakmp key R1_R2_KEY address 192.168.12.2We need a transform-set:
R1(config)#crypto ipsec transform-set MY_TRANSFORM_SET ah-sha-hmac esp-aesAnd an access-list that defines the traffic that we want to encrypt. We are going to encrypt all GRE traffic:
R1(config)#ip access-list extended R1_R2_GRE
R1(config-ext-nacl)#permit gre host 192.168.12.1 host 192.168.12.2
Last but not least, we need a crypto map that pulls everything together and we activate it on the physical interface:
R1(config)#crypto map MY_CRYPTO_MAP 10 ipsec-isakmp
R1(config-crypto-map)#set peer 192.168.12.2
R1(config-crypto-map)#set transform-set MY_TRANSFORM_SET
R1(config-crypto-map)#match address R1_R2_GRE

R1(config)#interface GigabitEthernet 0/1
R1(config-if)#crypto map MY_CRYPTO_MAP
That completes the tunnel and IPSec configuration. Let’s add OSPFv3 to advertise the prefixes on the loopback and tunnel interface:
R1(config)#ipv6 router ospf 1
R1(config-rtr)#router-id 1.1.1.1

R1(config)#interface Loopback 0
R1(config-if)#ipv6 ospf 1 area 0

R1(config)#interface Tunnel 0
R1(config-if)#ipv6 ospf 1 area 0/code>
That’s all we need.
R2
We configure the exact same thing on R2:
R2(config)#ipv6 unicast-routing

R2(config)#interface Tunnel 0
R2(config-if)#ipv6 address 2001:DB8:0:12::2/64
R2(config-if)#tunnel mode gre ip
R2(config-if)#tunnel source GigabitEthernet 0/1
R2(config-if)#tunnel destination 192.168.12.1

R2(config)#crypto isakmp policy 10
R2(config-isakmp)#authentication pre-share
R2(config-isakmp)#hash md5
R2(config-isakmp)#group 2
R2(config-isakmp)#encryption aes
R2(config-isakmp)#exit

R2(config)#crypto isakmp key R1_R2_KEY address 192.168.12.1

R2(config)#crypto ipsec transform-set MY_TRANSFORM_SET ah-sha-hmac esp-aes

R2(config)#ip access-list extended R1_R2_GRE
R2(config-ext-nacl)#permit gre host 192.168.12.2 host 192.168.12.1

R2(config)#crypto map MY_CRYPTO_MAP 10 ipsec-isakmp
R2(config-crypto-map)#set peer 192.168.12.1
R2(config-crypto-map)#set transform-set MY_TRANSFORM_SET
R2(config-crypto-map)#match address R1_R2_GRE
R
R2(config)#interface GigabitEthernet 0/1
R2(config-if)#crypto map MY_CRYPTO_MAP

R2(config)#ipv6 router ospf 1
R2(config-rtr)#router-id 2.2.2.2

R2(config)#interface Loopback 0
R2(config-if)#ipv6 ospf 1 area 0

R2(config)#interface Tunnel 0
R2(config-if)#ipv6 ospf 1 area 0
That’s it.
Verification
Let’s verify our work. First, I’ll do a quick ping using the IPv6 addresses on the tunnel interfaces:


Quick question Rene, if you were to omit the IPv6 global unicast address on the tunnel interface, would you need to use “ipv6 enable” instead so OSPFv3 could use a link local address? Or does enabling OSPFv3 on the interface automatically generate a link local address?
Hi Chris,
You’ll need to configure an IPv6 address or use “ipv6 enable”. Without an address, you get an error:
Rene
Hi Rene
... Continue reading in our forumI use virtual tunnel interface and i seem to work, it is correct ?
Hi Fabrice,
This is looking good, the number of packets encrypted/decrypted tells you your VPN is working.
The overhead of IPSec depends whether you use AH, ESP, AH+ESP, tunnel or transport mode, and the algorithms you use. Cisco has a very nice calculator that shows you exactly how much overhead you’ll have. Here is a screenshot:
https://cdn-forum.networklessons.com/uploads/default/original/2X/b/bd89a4e17185f57550a5c06e398380fc6160524d.jpeg
Rene