Lesson Contents
Multicast PIM has three modes:
- PIM sparse mode: this is a “pull” model where we only forward multicast traffic when requested.
- PIM dense mode: this is a “push” model where we flood multicast traffic everywhere and then prune it when it’s not needed.
The third one is PIM sparse-dense mode where we can use sparse or dense mode for each multicast group. Why do you want to use this?
When you use PIM sparse mode, our multicast routers need to know where the RP (Rendezvous Point) is in the network and which groups they serve. There are two methods:
When you use PIM sparse mode and Auto RP, the group-to-RP mapping is sent to the multicast 224.0.1.40 address. This is a classic chicken and egg problem…how do we receive traffic from 224.0.1.40 when we don’t know where the RP is? There are two methods to solve this:
- Use the ip pim autorp listener command.
- Use PIM sparse-dense mode.
The ip pim autorp listener command floods auto RP 224.0.1.39 and 224.0.1.40 multicast groups on sparse mode interfaces, allowing all routers to receive the group-to-RP mapping information.
PIM sparse-dense mode also allows us to flood the auto RP 224.0.1.39 and 224.0.1.40 multicast groups but in addition, it also floods all multicast traffic that we don’t have an RP for.
In this lesson, I’ll show you how PIM sparse-dense mode forwards some traffic with sparse mode and other traffic with dense mode.
Configuration
Here is the topology we will use:
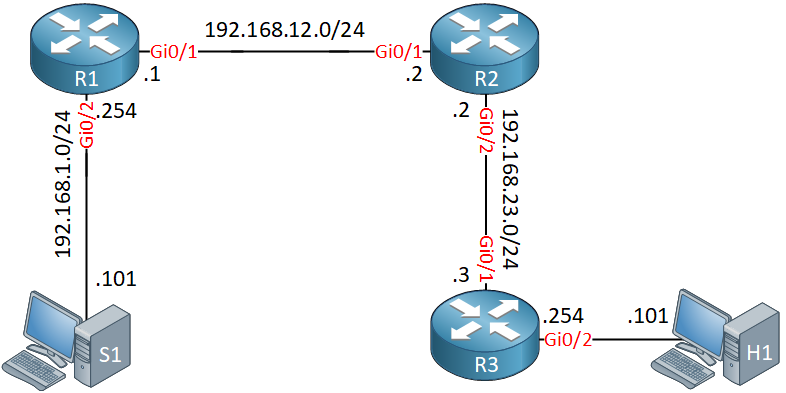
R1, R2, and R3 are multicast routers and we use Auto RP on R1 for both the mapping agent and RP role. S1 is used to source some multicast traffic, H1 is our receiver.
Configurations
Want to take a look for yourself? Here you will find the startup configuration of each device.
R1
hostname R1
!
no ip domain lookup
ip cef
!
interface Loopback0
 ip address 1.1.1.1 255.255.255.255
!
interface GigabitEthernet0/1
 ip address 192.168.12.1 255.255.255.0
!
interface GigabitEthernet0/2
 ip address 192.168.1.254 255.255.255.0
!
router ospf 1
 router-id 1.1.1.1
 network 1.1.1.1 0.0.0.0 area 0
 network 192.168.1.0 0.0.0.255 area 0
 network 192.168.12.0 0.0.0.255 area 0
!
end
R2
hostname R2
!
no ip domain lookup
ip cef
!
interface GigabitEthernet0/1
 ip address 192.168.12.2 255.255.255.0
!
interface GigabitEthernet0/2
 ip address 192.168.23.2 255.255.255.0
!
router ospf 1
 router-id 2.2.2.2
 network 192.168.12.0 0.0.0.255 area 0
 network 192.168.23.0 0.0.0.255 area 0
!
end
R3
hostname R3
!
no ip domain lookup
ip cef
!
interface GigabitEthernet0/1
 ip address 192.168.23.3 255.255.255.0
!
interface GigabitEthernet0/2
 ip address 192.168.3.254 255.255.255.0
!
router ospf 1
 router-id 3.3.3.3
 network 192.168.3.0 0.0.0.255 area 0
 network 192.168.23.0 0.0.0.255 area 0
!
end
S1
hostname S1
!
no ip routing
!
no ip cef
!
interface GigabitEthernet0/1
 ip address 192.168.1.101 255.255.255.0
!
ip default-gateway 192.168.1.254
!
end
H1
hostname H1
!
no ip routing
!
no ip cef
!
interface GigabitEthernet0/1
 ip address 192.168.3.101 255.255.255.0
!
ip default-gateway 192.168.3.254
!
end
First, we need to enable multicast routing globally on all routers:
R1, R2 & R3
(config)#ip multicast-routing
All interfaces that process multicast traffic need PIM sparse-dense mode enabled. Here’s R1:
R1(config)#interface GigabitEthernet 0/1
R1(config-if)#ip pim sparse-dense-mode

R1(config)#interface GigabitEthernet 0/2
R1(config-if)#ip pim sparse-dense-mode

R1(config)#interface Loopback 0
R1(config-if)#ip pim sparse-dense-mode
And R2:
R2(config)#interface GigabitEthernet 0/1
R2(config-if)#ip pim sparse-dense-mode

R2(config)#interface GigabitEthernet 0/2
R2(config-if)#ip pim sparse-dense-mode
Last but not least, R3:
R3(config)#interface GigabitEthernet 0/1
R3(config-if)#ip pim sparse-dense-mode

R3(config)#interface GigabitEthernet 0/2
R3(config-if)#ip pim sparse-dense-mode
We configure R1 so that it’s the Auto RP mapping agent and that it advertises itself as the RP:
R1(config)#ip pim send-rp-announce loopback 0 scope 5
R1(config)#ip pim send-rp-discovery loopback 0 scope 5
Everything is now in place. Let’s make sure we see PIM neighbors:
R2#show ip pim neighbor
PIM Neighbor Table
Mode: B - Bidir Capable, DR - Designated Router, N - Default DR Priority,
      P - Proxy Capable, S - State Refresh Capable, G - GenID Capable,
      L - DR Load-balancing Capable
Neighbor          Interface                Uptime/Expires    Ver   DR
Address                                                            Prio/Mode
192.168.12.1      GigabitEthernet0/1       00:27:17/00:01:33 v2    1 / S P G
192.168.23.3      GigabitEthernet0/2       00:26:00/00:01:23 v2    1 / DR S P G
Discovering the RP
Do all routers have group-to-RP mapping? Let’s find out:
R2#show ip pim rp mapping
PIM Group-to-RP Mappings

Group(s) 224.0.0.0/4
  RP 1.1.1.1 (?), v2v1
    Info source: 1.1.1.1 (?), elected via Auto-RP
Uptime: 00:00:35, expires: 00:02:23R3#show ip pim rp mapping
PIM Group-to-RP Mappings
Group(s) 224.0.0.0/4
RP 1.1.1.1 (?), v2v1
Info source: 1.1.1.1 (?), elected via Auto-RP
Uptime: 00:00:46, expires: 00:02:10Both R2 and R3 have learned the group-to-RP mapping. How did they learn this? Let’s find out:
R1#show ip mroute 224.0.1.40
IP Multicast Routing Table
Flags: D - Dense, S - Sparse, B - Bidir Group, s - SSM Group, C - Connected,
       L - Local, P - Pruned, R - RP-bit set, F - Register flag,
       T - SPT-bit set, J - Join SPT, M - MSDP created entry, E - Extranet,
       X - Proxy Join Timer Running, A - Candidate for MSDP Advertisement,
       U - URD, I - Received Source Specific Host Report,
       Z - Multicast Tunnel, z - MDT-data group sender,
       Y - Joined MDT-data group, y - Sending to MDT-data group,
       G - Received BGP C-Mroute, g - Sent BGP C-Mroute,
       N - Received BGP Shared-Tree Prune, n - BGP C-Mroute suppressed,
       Q - Received BGP S-A Route, q - Sent BGP S-A Route,
       V - RD & Vector, v - Vector, p - PIM Joins on route,
       x - VxLAN group
Outgoing interface flags: H - Hardware switched, A - Assert winner, p - PIM Join
 Timers: Uptime/Expires
 Interface state: Interface, Next-Hop or VCD, State/Mode

(*, 224.0.1.40), 00:07:15/stopped, RP 0.0.0.0, flags: DCL
  Incoming interface: Null, RPF nbr 0.0.0.0
  Outgoing interface list:
    Loopback0, Forward/Sparse-Dense, 00:02:31/stopped
    GigabitEthernet0/1, Forward/Sparse-Dense, 00:07:15/stopped

(1.1.1.1, 224.0.1.40), 00:01:36/00:02:22, flags: LT
  Incoming interface: Loopback0, RPF nbr 0.0.0.0
  Outgoing interface list:
    GigabitEthernet0/1, Forward/Sparse-Dense, 00:01:36/stopped
The multicast 224.0.1.40 address is used to share group-to-RP mapping information and as you can see above, this is flooded using dense mode.
Here’s the output on R2:
R2#show ip mroute 224.0.1.40

(*, 224.0.1.40), 00:05:46/stopped, RP 0.0.0.0, flags: DCL
  Incoming interface: Null, RPF nbr 0.0.0.0
  Outgoing interface list:
    GigabitEthernet0/2, Forward/Sparse-Dense, 00:04:28/stopped
    GigabitEthernet0/1, Forward/Sparse-Dense, 00:05:46/stopped

(1.1.1.1, 224.0.1.40), 00:02:03/00:02:56, flags: LT
  Incoming interface: GigabitEthernet0/1, RPF nbr 192.168.12.1
  Outgoing interface list:
    GigabitEthernet0/2, Forward/Sparse-Dense, 00:02:03/stopped
Above we see that R2 has received traffic to 224.0.1.40 using dense mode. For R2, it doesn’t matter if we use sparse or dense mode since it is directly connected to R1. It would have received traffic to 224.1.0.40 anyway.
For R3, we do need dense mode since R2 has to flood the traffic it receives from R1 to R3. Here’s the output of R3:
R3#show ip mroute 224.0.1.40

(*, 224.0.1.40), 00:04:33/stopped, RP 0.0.0.0, flags: DCL
  Incoming interface: Null, RPF nbr 0.0.0.0
  Outgoing interface list:
    GigabitEthernet0/1, Forward/Sparse-Dense, 00:04:33/stopped

(1.1.1.1, 224.0.1.40), 00:02:08/00:02:51, flags: PLTX
  Incoming interface: GigabitEthernet0/1, RPF nbr 192.168.23.2
  Outgoing interface list: Null
R3 also has received traffic to 224.0.1.40. This is looking good.
Traffic with sparse mode
Let’s try to send some multicast traffic. Remember our group-to-RP mapping?
R3#show ip pim rp mapping | include Group
PIM Group-to-RP Mappings
Group(s) 224.0.0.0/4
R1 is willing to be the RP for the entire 224.0.0.0/4 multicast range. This means that all groups are forwarded with PIM sparse mode.To test if this is true, I will let H1 join a multicast group:
Hi Rene.
Thank for great explain, How ever i still confuse. Can you explain what is RP mapping agent ? and why we need it ?
Thank
Sovandara
Hello Heng
In the first version of PIM-SM, all routers were required to be manually configured with the IP address of the RP. This does not scale well for a large complex network.
After this, Cisco implemented the Auto-RP feature which automates the distribution of group-to-RP mappings in a PIM network. To make Auto-RP work, there must be an RP mapping agent which receives the RP announcement messages from the RPs and arbitrates conflicts. The RP mapping agent then sends the consistent group to RP mappings to all other routers by dense mode flooding. This w
... Continue reading in our forumI have a very basic topology of router on a stick so two VLANS (10 and 20) can communicate. What type of multicasting (SPARSE / DENSE) should I configure on my router (C2900 V15.2) to enable a server in one VLAN (VLAN 10) to send multicast traffic to devices in its own VLAN and devices in the other VLAN (VLAN 20) - that is connected via Router on a stick (sub – interfaces)
Hello Jason
If your topology only consists of a single router with two VLANs, then DENSE mode would be preferable. Arguably, this is the simplest mechanism as it doesn’t require an RP (since you only have one router). In such a case, dense mode forwards multicast traffic on all interfaces until we are requested to stop forwarding. For more info on dense mode, take a look at the following:
https://networklessons.com/cisco/ccie-routing-switching-written/multicast-pim-dense-mode
I hope this has been helpful!
Laz
Hello, is the
ip pim autorp listenercommand only needed in one adj PIM router or Do I needed it everywhere in order to get the RP?