GRE tunnels allow to tunnel unicast, multicast, and broadcast traffic between routers and are often used for routing protocols between different sites. The downside of GRE tunneling is that it is clear text and offers no protection. On Cisco IOS routers however we can use IPSEC to encrypt the entire GRE tunnel, this allows us to have a safe and secure site-to-site tunnel. In this lesson, I will show you how to configure an encrypted GRE tunnel with IPSEC. This is the topology that we will use:
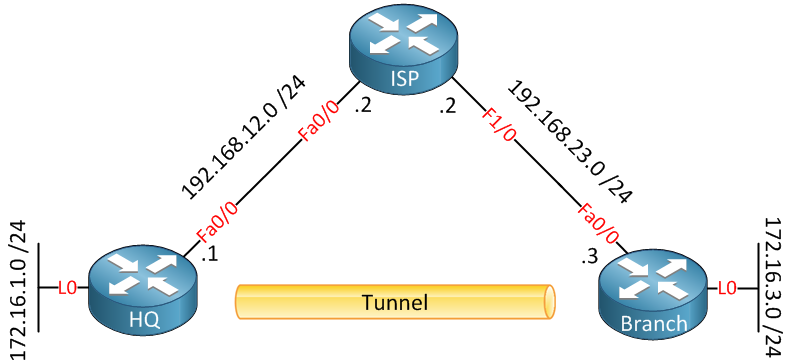
Above, we have three routers. The HQ and Branch router each have a loopback interface representing their LAN connection. Both routers are connected to “the Internet” using the ISP router.
We will create a GRE tunnel between the HQ and Branch router and ensure that the 172.16.1.0 /24 and 172.16.3.0 /24 can reach each other while all traffic between the two networks is encrypted with IPSEC. Let’s start with the configuration of the interfaces:
HQ(config)#interface fastEthernet 0/0
HQ(config-if)#ip address 192.168.12.1 255.255.255.0
HQ(config-if)#exit
HQ(config)#interface loopback0
HQ(config-if)#ip address 172.16.1.1 255.255.255.0
HQ(config-if)#exit
HQ(config)#ip route 192.168.23.3 255.255.255.255 192.168.12.2ISP(config)#interface fastEthernet 0/0
ISP(config-if)#ip address 192.168.12.2 255.255.255.0
ISP(config-if)#exit
ISP(config)#interface fastEthernet 1/0
ISP(config-if)#ip address 192.168.23.2 255.255.255.0Branch(config)#interface fastEthernet 0/0
Branch(config-if)#ip address 192.168.23.3 255.255.255.0
Branch(config-if)#exit
Branch(config)#interface loopback 0
Branch(config-if)#ip address 172.16.3.3 255.255.255.0
Branch(config-if)#exit
Branch(config)#ip route 192.168.12.1 255.255.255.255 192.168.23.2I will use a simple static route on the HQ and Branch router so that they can reach each other. Now let’s create the GRE tunnel between the two routers:
HQ(config)#interface tunnel 1
HQ(config-if)#tunnel source fastEthernet 0/0
HQ(config-if)#tunnel destination 192.168.23.3
HQ(config-if)#ip address 192.168.13.1 255.255.255.0Branch(config)#interface tunnel 1
Branch(config-if)#tunnel source fastEthernet 0/0
Branch(config-if)#tunnel destination 192.168.12.1
Branch(config-if)#ip address 192.168.13.3 255.255.255.0We will use the IP addresses on the FastEthernet interfaces of the HQ and Branch router as the destination for the tunnel. On the tunnel itself, we’ll use network 192.168.13.0 /24.
With the tunnel operational, let’s configure a routing protocol so that the HQ and Branch router can learn about each other’s network on the loopback interfaces:
HQ(config)#router ospf 1
HQ(config-router)#network 192.168.13.0 0.0.0.255 area 0
HQ(config-router)#network 172.16.1.0 0.0.0.255 area 0Branch(config)#router ospf 1
Branch(config-router)#network 192.168.13.0 0.0.0.255 area 0
Branch(config-router)#network 172.16.3.0 0.0.0.255 area 0So far, so good. We have a GRE tunnel, and the two routers will form an OSPF neighbor adjacency and exchange routing information:
HQ#show ip route ospf
     172.16.0.0/16 is variably subnetted, 2 subnets, 2 masks
O       172.16.3.3/32 [110/11112] via 192.168.13.3, 00:00:38, Tunnel1
Branch#show ip route ospf
172.16.0.0/16 is variably subnetted, 2 subnets, 2 masks
O 172.16.1.1/32 [110/11112] via 192.168.13.1, 00:00:50, Tunnel1So everything is working, but right now, everything will be transferred in clear text. Time to get IPSEC up and running to encrypt our GRE tunnel! There are a couple of things that we have to configure to achieve this. Let me show you what to do:
HQ(config)#crypto isakmp policy 10
HQ(config-isakmp)# encr aes 256
HQ(config-isakmp)# authentication pre-share
HQ(config-isakmp)# group 5
HQ(config-isakmp)# lifetime 3600Branch(config)#crypto isakmp policy 10
Branch(config-isakmp)# encr aes 256
Branch(config-isakmp)# authentication pre-share
Branch(config-isakmp)# group 5
Branch(config-isakmp)# lifetime 3600First of all, we have to configure an ISAKMP policy. In the example above, I specify that I want to use 256-bit AES encryption and that we want to use a pre-shared key. We use Diffie-Hellman Group 5 for the key exchange process. The lifetime for the ISAKMP security association is 3600 seconds. Don’t forget to configure the pre-shared key on both routers:
HQ(config)#crypto isakmp key PASS address 192.168.23.3Branch(config)#crypto isakmp key PASS address 192.168.12.1I will use ‘PASS” as the pre-shared key on both routers. The next step is to create an IPSec transform-set:
HQ(config)#crypto ipsec transform-set TRANS esp-aes 256 esp-sha-hmacBranch(config)#crypto ipsec transform-set TRANS esp-aes 256 esp-sha-hmacAbove, I created a transform-set called ‘TRANS’ that specifies we want to use ESP AES 256-bit and HMAC-SHA authentication.
Now we can create a crypto map that tells the router what traffic to encrypt and what transform-set to use:
HQ(config)#crypto map MYMAP 10 ipsec-isakmp
HQ(config-crypto-map)# set peer 192.168.23.3
HQ(config-crypto-map)# set transform-set TRANS
HQ(config-crypto-map)# match address 100Branch(config)#crypto map MYMAP 10 ipsec-isakmp
Branch(config-crypto-map)# set peer 192.168.12.1
Branch(config-crypto-map)# set transform-set TRANS
Branch(config-crypto-map)# match address 100Above is a crypto-map called ‘MYMAP’ specifying the transform-set ‘TRANS’ and what traffic it should encrypt. I used access-list 100 for this, but I still have to create it:
HQ(config)#access-list 100 permit gre any anyBranch(config)#access-list 100 permit gre any anyWe will use a permit statement that only matches GRE traffic. Now the final step is to activate the crypto map by applying it to the FastEthernet interfaces:
Nice man, a quick & easy way to show off IPsec in Wireshark, love it!
Exclent Artical…
Good one.
great write up…
just one question… can you apply crypto map to the tunnel interface? what is the difference between that, and applying it on the interface (f0/0) itself?
thanks!
Better than 1 hour boring INE training.