Static routes have a very low administrative distance of 1, this means that your router will prefer a static route over any routes that were learned through a dynamic routing protocol. If we want to use a static route as a backup route, we’ll have to change its administrative distance. This is called a floating static route.
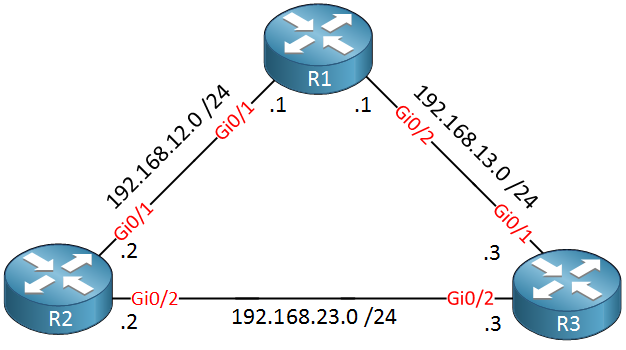
In this lesson, I’ll show you how to do this. We will use the following topology for this:

R1 can use R2 or R3 to get to the 192.168.23.0/24 network.
Configuration
Let’s configure R1 and R2 to use RIP so that it can reach this network:
R1(config)#router rip
R1(config-router)#version 2
R1(config-router)#no auto-summary
R1(config-router)#network 192.168.12.0R2(config-router)#version 2
R2(config-router)#no auto-summary
R2(config-router)#network 192.168.12.0
R2(config-router)#network 192.168.23.0R1 should now be able to reach this network through R2:
R1#show ip route | begin 192.168.23.0
R     192.168.23.0/24 [120/1] via 192.168.12.2, 00:00:22, GigabitEthernet0/1
There we go, R1 has a route. What if we want to use R3 as a backup? R3 is not running any routing protocols, so we have to use a static route. This is a possibility when the router is outside of your control.
Let’s create a static route for 192.168.23.0/24 through R3:
R1(config)#ip route 192.168.23.0 255.255.255.0 192.168.13.3This static route works but there’s one catch, check the routing table:
R1#show ip route | begin 192.168.23.0

S     192.168.23.0/24 [1/0] via 192.168.13.3
Because of the lower administrative distance (1 for a static route), our RIP route is now gone…let’s remove this static route:
R1(config)#no ip route 192.168.23.0 255.255.255.0 192.168.13.3The trick is that you need to configure an AD when you configure your static route. Here’s how:
R1(config)#ip route 192.168.23.0 255.255.255.0 192.168.13.3 ?
  <1-255>    Distance metric for this route
  multicast  multicast route
  name       Specify name of the next hop
  permanent  permanent route
  tag        Set tag for this route
  track      Install route depending on tracked item
  <cr>
The administrative distance of RIP is 120 so if we pick a higher number, our static route will be used as a backup. Let’s try 121:
R1(config)#ip route 192.168.23.0 255.255.255.0 192.168.13.3 121When we now check our routing table:
R1#show ip route | begin 192.168.23.0

R     192.168.23.0/24 [120/1] via 192.168.12.2, 00:00:26, GigabitEthernet0/1
We see that the RIP entry is used again. The static route is still there somewhere behind the scenes…let’s see if that is true. To test this, I will shut the interface on R2 that connects to R1:
R2(config)#interface GigabitEthernet 0/1
R2(config-if)#shutdown
RIP is a pretty slow routing protocol, so you have to wait awhile for the route to disappear. After awhile, you will see the changes in the routing table of R1:
R1#show ip route | begin 192.168.23.0
S     192.168.23.0/24 [121/0] via 192.168.13.3
There it is, our floating static route is now installed in the routing table. You can see it shows the AD of 121. If you would un-shut the interface of R2, it will install the RIP route again.


Hi,
I have question here if I’m ISP With two PE going to customer and need static route from PE to customer and need both PE active how can i deploy it
Hello Mohammed
It really depends on the topology at the edge of the customer’s network, and the direction of the traffic. For traffic originating from the customer, there must be a mechanism with which there will be load balancing between the two PE routers. This can be either a redundant gateway protocol like HSRP or VRRP, using equal or unequal cost load balancing from an IGP, or by using BGP on the edge.
For traffic originating on the Internet and coming into the customer’s premises, static routes on the PE routers won’t be able to provide load balancing a
... Continue reading in our forumHi Team ,
Always recommended Network lesson for deep drive about networking concepts ,well appreciated to the team and specially thanks to Rene and Laz .
Rgds
Shivam Chahal
Hello Shivam
Thank you so much for your kind words! It’s posts like this that make it all worth it!
Keep healthy and safe!
Laz
Hello Network Lessons. Unless I’m missing something this lab doesn’t make sense.
There is no Rip protocol running on R3, so even though the 192.168.23.0 network shows up in the routing table on R1 from it’s relationship with R2, that network is unreachable from R1 to R3 interface of 192.168.23.3. You cannot ping that IP, as R3 as no idea about the 12.0 network:
The only way I can reach 23.3 on R3 fro
... Continue reading in our forum