Lesson Contents
SPAN and RSPAN allow us to copy traffic from one interface to another. This is great if you want to send traffic to a sensor or if you want to take a closer look at it with a packet analyzer like Wireshark. SPAN is however limited to one switch, RSPAN is able to send traffic between switches but this traffic can’t be routed.
ERSPAN (Encapsulated Remote Switched Port Analyzer) solves this issue! It uses GRE encapsulation, this allows us to route SPAN traffic from a source to a destination. You can use ERSPAN on IOS XE, NX-OS and the Catalyst 6500/7600 switches. Unfortunately, It’s not supported on the “smaller” IOS switches and routers.
When you want to configure ERSPAN, there’s a couple of things you have to keep in mind. For the source session, we have to configure:
- Unique session ID.
- List of source interfaces or source VLANs that you want to monitor. Not all platforms support every possible source.
- What traffic we want to capture: tx, rx or both.
- Destination IP address for the GRE tunnel.
- Origin IP address which is used as the source for the GRE tunnel.
- Unique ERSPAN flow ID.
- Optional: you can specify attributes like the ToS (Type of Service), TTL, etc.
For the destination we have to specify:
- Unique session ID, doesn’t have to match with the source session.
- Destination interface(s) where you want to forward the traffic to.
- Source IP address, which is the same as the destination IP address of the corresponding source session
- Unique ERSPAN flow ID, has to match with the source session.
Let’s look at an example so we can see how ERSPAN works in action.
Configuration
I will use the following topology for this example:
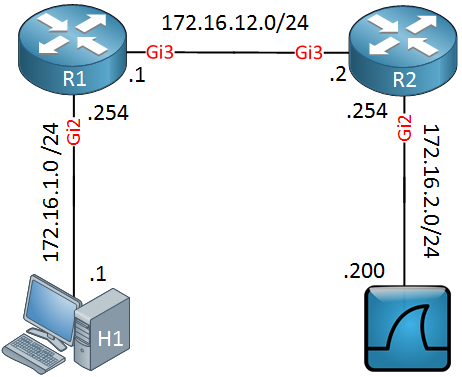
Above we have two routers, R1 and R2. On the left side, there’s a host (H1) and on the right side, I have a machine running Wireshark. I will show you how to capture traffic on the Gigabit 2 interface of R1 and send it to the Wireshark machine behind R2.
Let’s start with the configuration on R1:
R1(config)#monitor session 1 type erspan-source
R1(config-mon-erspan-src)#source interface GigabitEthernet 2 rx
R1(config-mon-erspan-src)#no shutdown
R1(config-mon-erspan-src)#destination
R1(config-mon-erspan-src-dst)#erspan-id 100
R1(config-mon-erspan-src-dst)#ip address 172.16.2.200
R1(config-mon-erspan-src-dst)#origin ip address 172.16.12.1
Above you can see that we capture incoming traffic on the Gigabit 2 interface of R1. We use ERSPAN ID 100, the source IP address will be 172.16.12.1 and the destination is 172.16.2.200 (Wireshark).
Here’s the configuration of R2:
R2(config)#monitor session 1 type erspan-destination
R2(config-mon-erspan-dst)#no shutdown
R2(config-mon-erspan-dst)#destination interface GigabitEthernet 2
R2(config-mon-erspan-dst)#source
R2(config-mon-erspan-dst-src)#erspan-id 100
R2(config-mon-erspan-dst-src)#ip address 172.16.2.200
Above we configure the same ERSPAN ID, the destination IP address and the destination interface.
Verification
Let’s verify our work. First we will check the routers:
R1#show monitor session 1
Session 1
---------
Type                   : ERSPAN Source Session
Status                 : Admin Enabled
Source Ports           :
    RX Only            : Gi2
Destination IP Address : 172.16.2.200
Destination ERSPAN ID  : 100
Origin IP Address : 172.16.12.1R2#show monitor session 1
Session 1
---------
Type : ERSPAN Destination Session
Status : Admin Enabled
Destination Ports : Gi2
Source IP Address : 172.16.2.200
Source ERSPAN ID : 100Above you can see the ERSPAN configuration. Let’s see if it works…I will send a ping from H1 to R1:
H1#ping 172.16.1.254
Type escape sequence to abort.
Sending 5, 100-byte ICMP Echos to 172.16.1.254, timeout is 2 seconds:
!!!!!
Success rate is 100 percent (5/5), round-trip min/avg/max = 4/6/16 ms
These packets should be encapsulated by ERSPAN and forwarded towards our Wireshark machine. Here’s what the packet capture looks like:
Frame 1: 164 bytes on wire (1312 bits), 164 bytes captured (1312 bits) on interface 0
Ethernet II, Src: fa:16:3e:19:4e:4f (fa:16:3e:19:4e:4f), Dst: Vmware_8e:6d:0d (00:50:56:8e:6d:0d)
Internet Protocol Version 4, Src: 172.16.12.1, Dst: 172.16.2.200
Generic Routing Encapsulation (ERSPAN)
    Flags and Version: 0x1000
        0... .... .... .... = Checksum Bit: No
        .0.. .... .... .... = Routing Bit: No
        ..0. .... .... .... = Key Bit: No
        ...1 .... .... .... = Sequence Number Bit: Yes
        .... 0... .... .... = Strict Source Route Bit: No
        .... .000 .... .... = Recursion control: 0
        .... .... 0000 0... = Flags (Reserved): 0
        .... .... .... .000 = Version: GRE (0)
    Protocol Type: ERSPAN (0x88be)
    Sequence Number: 2
Encapsulated Remote Switch Packet ANalysis
    0001 .... .... .... = Version: Type II (1)
    .... 0000 0000 0001 = Vlan: 1
    000. .... .... .... = Priority: 0
    ...0 .... .... .... = Unknown2: 0
    .... 0... .... .... = Direction: Incoming (0)
    .... .0.. .... .... = Truncated: Not truncated (0)
    .... ..00 0110 0100 = SpanID: 100
    Unknown7: 00000000
Ethernet II, Src: fa:16:3e:ac:62:4f (fa:16:3e:ac:62:4f), Dst: fa:16:3e:e2:1f:31 (fa:16:3e:e2:1f:31)
Internet Protocol Version 4, Src: 172.16.1.1, Dst: 172.16.1.254
Internet Control Message Protocol
Above you can see the source and destination IP addresses of our GRE tunnel. You can also see the GRE header and the ID (100) that we configured.
That’s all there is to it. We succesfully routed our ERSPAN traffic from one router to another.
Configurations
Want to take a look for yourself? Here you will find the final configuration of each device.
You say for the destination you have to specify the source IP address, but I don’t see that anywhere in the config?
Also is the GRE tunnel between the wireshark server and R1, rather than R1 and R2?
Thanks
Hello Chris.
Yes, you are correct. @ReneMolenaar states that:
It should read:
as stated in Cisco Documentaiton.
So, the Source IP address stated should be the IP address of the Wireshark PC as shown in the last line of Rene’s configuration:
https://cdn-forum.networklessons.com/uploads/default/original/1X/3dd40bb142c45b5059ea3b5
... Continue reading in our forumHello Micah
Yes I stand corrected, the GRE header is included as the tunnel used by ERSPAN.
Thanks!
Laz
There is also a slightly different way to configure the “sniffer” as a layer 2 device.
Many sniffers will not use a layer 3 IP address on the network to sniff traffic, they will have an IP for management, but layer 2 interfaces with no IP for capturing network traffic.
In this case you can configure the source and destination IP as a loopback on the remote router, and the destination interface as the layer 2 interface of the sniffer. In this case, the GRE header would surely be stripped on the router.
You can also combine RSPAN and ERSPAN. For example it’s possible to create a rspan vlan and then use this vlan as source for the ERSPAN session. Later you can cut off the GRE Header to get the original frame:
editcap -C 50 capture.pcap caputure_filtered.pcap