Lesson Contents
OpenDaylight is an open-source SDN controller / framework hosted by the Linux Foundation. One of the southbound interface protocols it supports is OpenFlow. To test OpenDaylight, we’ll need some switches that support OpenFlow. A great way to test this is to use Open vSwitch. This is an open source virtual switch that supports OpenFlow.
In this lesson, I’ll show you how to set up a virtual network with three OpenFlow switches controlled by our OpenDaylight SDN controller. You will also see some examples of how you can use the RESTCONF API to interact with your controller.
Configuration
The easiest way to run OpenDaylight is to use a Docker container. For this particular lesson, I built a container based on Ubuntu Server 16.0.4 LTS with OpenDaylight 0.5.0 Boron. This is an old Ubuntu version, and it’s also an old OpenDaylight version. This one still has a UI, though, which was removed in newer versions. This container is only suitable for labs because it’s not actively maintained. Never use it in production.
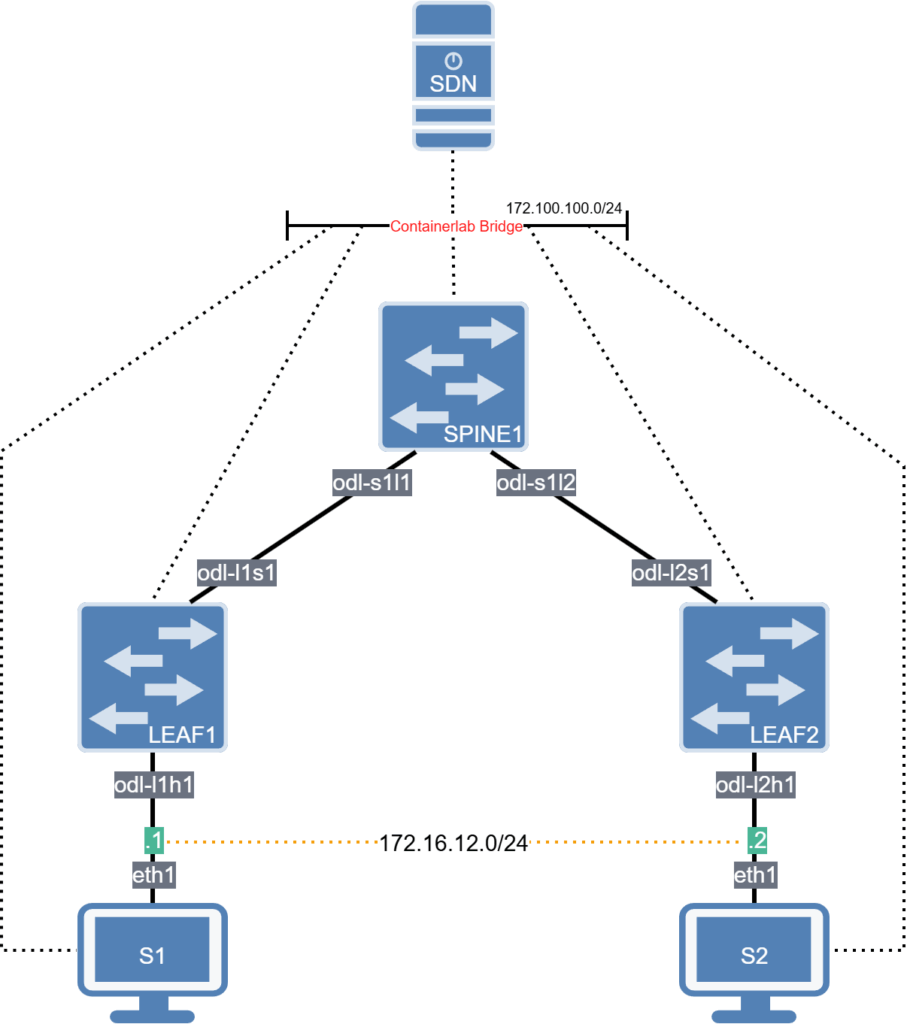
We’ll run this in Containerlab. We’ll create a single topology with the OpenDaylight SDN controller and a number of switches. Everything you need is in the Networklessons Github lab repository. Here is the topology:
Open vSwitch
We’ll use Open vSwitch. You need to run these commands with sudo permission.
First, install:
# apt install openvswitch-switchFirst, we’ll create three switches:
# ovs-vsctl --may-exist add-br sdn-spine1
# ovs-vsctl --may-exist add-br sdn-leaf1
# ovs-vsctl --may-exist add-br sdn-leaf2
I also like to set the MAC addresses to static addresses so that it’s easier to recognize devices in packet captures or debugging:
# ovs-vsctl set bridge sdn-spine1 other-config:hwaddr=00:50:c2:53:10:01
# ovs-vsctl set bridge sdn-leaf1 other-config:hwaddr=00:50:c2:53:20:01
# ovs-vsctl set bridge sdn-leaf2 other-config:hwaddr=00:50:c2:53:30:01
We need to tell the switches what protocol to use, in this case OpenFlow 1.3. They also need to know how to reach the SDN controller and what to do when they can’t connect to the SDN controller. In this case, the fail_mode is set to secure which means they won’t do anything. Here are the commands:
# ovs-vsctl set bridge sdn-spine1 fail_mode=secure
# ovs-vsctl set bridge sdn-spine1 protocols=OpenFlow13
# ovs-vsctl set-controller sdn-spine1 tcp:172.100.100.10:6653

# ovs-vsctl set bridge sdn-leaf1 fail_mode=secure
# ovs-vsctl set bridge sdn-leaf1 protocols=OpenFlow13
# ovs-vsctl set-controller sdn-leaf1 tcp:172.100.100.10:6653

# ovs-vsctl set bridge sdn-leaf2 fail_mode=secure
# ovs-vsctl set bridge sdn-leaf2 protocols=OpenFlow13
# ovs-vsctl set-controller sdn-leaf2 tcp:172.100.100.10:6653
That’s all we need to do to prepare the switches.
Containerlab
We’ll use containerlab.
# SDN Lab

name: sdn-opendaylight

mgmt:
  network: statics
  ipv4-subnet: 172.100.100.0/24

topology:
  kinds:
    linux:
      image: networklessons/lab-node-ubuntu:270
  nodes:
    controller:
      kind: linux
      image: networklessons/opendaylight:0.5.0-Boron
      mgmt-ipv4: 172.100.100.10
      ports:
      - "8181:8181"
      - "6633:6633"
      - "6653:6653"
      - "8101:8101"
    sdn-spine1:
      kind: ovs-bridge
    sdn-leaf1:
      kind: ovs-bridge
    sdn-leaf2:
      kind: ovs-bridge
    s1:
      kind: linux
      mgmt-ipv4: 172.100.100.51
      exec:
      - ip link set dev eth1 address 00:50:c2:53:40:01
      - ip addr add 172.16.12.1/24 dev eth1
    s2:
      kind: linux
      mgmt-ipv4: 172.100.100.52
      exec:
      - ip link set dev eth1 address 00:50:c2:53:50:01
      - ip addr add 172.16.12.2/24 dev eth1
  links:
    # Spine-to-Leaf links (controller-facing)
    - endpoints: ["sdn-spine1:odl-s1l1", "sdn-leaf1:odl-l1s1"]
    - endpoints: ["sdn-spine1:odl-s1l2", "sdn-leaf2:odl-l2s1"]
    # Leaf-to-Server links (access ports)
    - endpoints: ["sdn-leaf1:odl-l1h1", "s1:eth1"]
    - endpoints: ["sdn-leaf2:odl-l2h1", "s2:eth1"]
This topology defines a network with the SDN controller, a spine switch, two leaf switches, and two hosts. Let’s deploy it:
# clab deploy
13:02:09 INFO Containerlab started version=0.72.0
13:02:09 INFO Parsing & checking topology file=sdn-opendaylight.clab.yml
13:02:09 INFO Creating docker network name=statics IPv4 subnet=172.100.100.0/24 IPv6 subnet="" MTU=0
13:02:09 INFO Creating lab directory path=/home/ubuntu/labs/containerlab/labs/sdn/opendaylight/clab-sdn-opendaylight
13:02:09 INFO Creating container name=controller
13:02:09 INFO Creating container name=s2
13:02:09 INFO Creating container name=s1
13:02:09 INFO Created link: sdn-spine1:odl-s1l2 ▪┄┄▪ sdn-leaf2:odl-l2s1
13:02:09 INFO Created link: sdn-spine1:odl-s1l1 ▪┄┄▪ sdn-leaf1:odl-l1s1
13:02:09 INFO Created link: sdn-leaf2:odl-l2h1 ▪┄┄▪ s2:eth1
13:02:09 INFO Created link: sdn-leaf1:odl-l1h1 ▪┄┄▪ s1:eth1
13:02:09 INFO Executed command node=s2 command="ip link set dev eth1 address 00:50:c2:53:50:01" stdout=""
13:02:09 INFO Executed command node=s2 command="ip addr add 172.16.12.2/24 dev eth1" stdout=""
13:02:09 INFO Executed command node=s1 command="ip link set dev eth1 address 00:50:c2:53:40:01" stdout=""
13:02:09 INFO Executed command node=s1 command="ip addr add 172.16.12.1/24 dev eth1" stdout=""
13:02:09 INFO Adding host entries path=/etc/hosts
13:02:09 INFO Adding SSH config for nodes path=/etc/ssh/ssh_config.d/clab-sdn-opendaylight.conf
╭──────────────────────────────────┬─────────────────────────────────────────┬─────────┬────────────────╮
│               Name               │                Kind/Image               │  State  │ IPv4/6 Address │
├──────────────────────────────────┼─────────────────────────────────────────┼─────────┼────────────────┤
│ clab-sdn-opendaylight-controller │ linux                                   │ running │ 172.100.100.10 │
│                                  │ networklessons/opendaylight:0.5.0-Boron │         │ N/A            │
├──────────────────────────────────┼─────────────────────────────────────────┼─────────┼────────────────┤
│ clab-sdn-opendaylight-s1         │ linux                                   │ running │ 172.100.100.51 │
│                                  │ networklessons/lab-node-ubuntu:270      │         │ N/A            │
├──────────────────────────────────┼─────────────────────────────────────────┼─────────┼────────────────┤
│ clab-sdn-opendaylight-s2         │ linux                                   │ running │ 172.100.100.52 │
│                                  │ networklessons/lab-node-ubuntu:270      │         │ N/A            │
╰──────────────────────────────────┴─────────────────────────────────────────┴─────────┴────────────────╯
There we go, it’s up and running.
Let’s access the OpenDaylight SDN controller:
# docker exec -it clab-sdn-opendaylight-controller bin/client
client: JAVA_HOME not set; results may vary
Logging in as karaf
490 [sshd-SshClient[6a38e57f]-nio2-thread-3] WARN org.apache.sshd.client.keyverifier.AcceptAllServerKeyVerifier - Server at [/0.0.0.0:8101, RSA, 4c:1c:14:dd:82:1d:f6:5c:3e:93:bc:2f:6f:07:8a:df] presented unverified {} key: {}

    ________                       ________                .__  .__       .__     __
    \_____  \ ______   ____   ____ \______ \ _____  ___.__.|  | |__| ____ |  |___/  |_
     /   |   \\____ \_/ __ \ /    \ |    |  \\__  \< | || | | |/ ___\| | \ __\ / | \ |_> >  ___/|   |  \|    `   \/ __ \\___  ||  |_|  / /_/  >   Y  \  |
    \_______  /   __/ \___  >___|  /_______  (____  / ____||____/__\___  /|___|  /__|
            \/|__|        \/     \/        \/     \/\/            /_____/      \/


Hit '' for a list of available commands
and '[cmd] --help' for help on a specific command.
Hit '' or type 'system:shutdown' or 'logout' to shutdown OpenDaylight.

opendaylight-user@root>
And then we’ll have to install the following features:
opendaylight-user@root>feature:install odl-restconf odl-l2switch-switch odl-mdsal-apidocs odl-dlux-allWe can now try to access the controller from a browser. Enter the following URL:
http://172.100.100.10:8181/index.html#/loginYou will see the following login screen:
The default username and password are “admin”. Click on login, and you will see the topology screen:
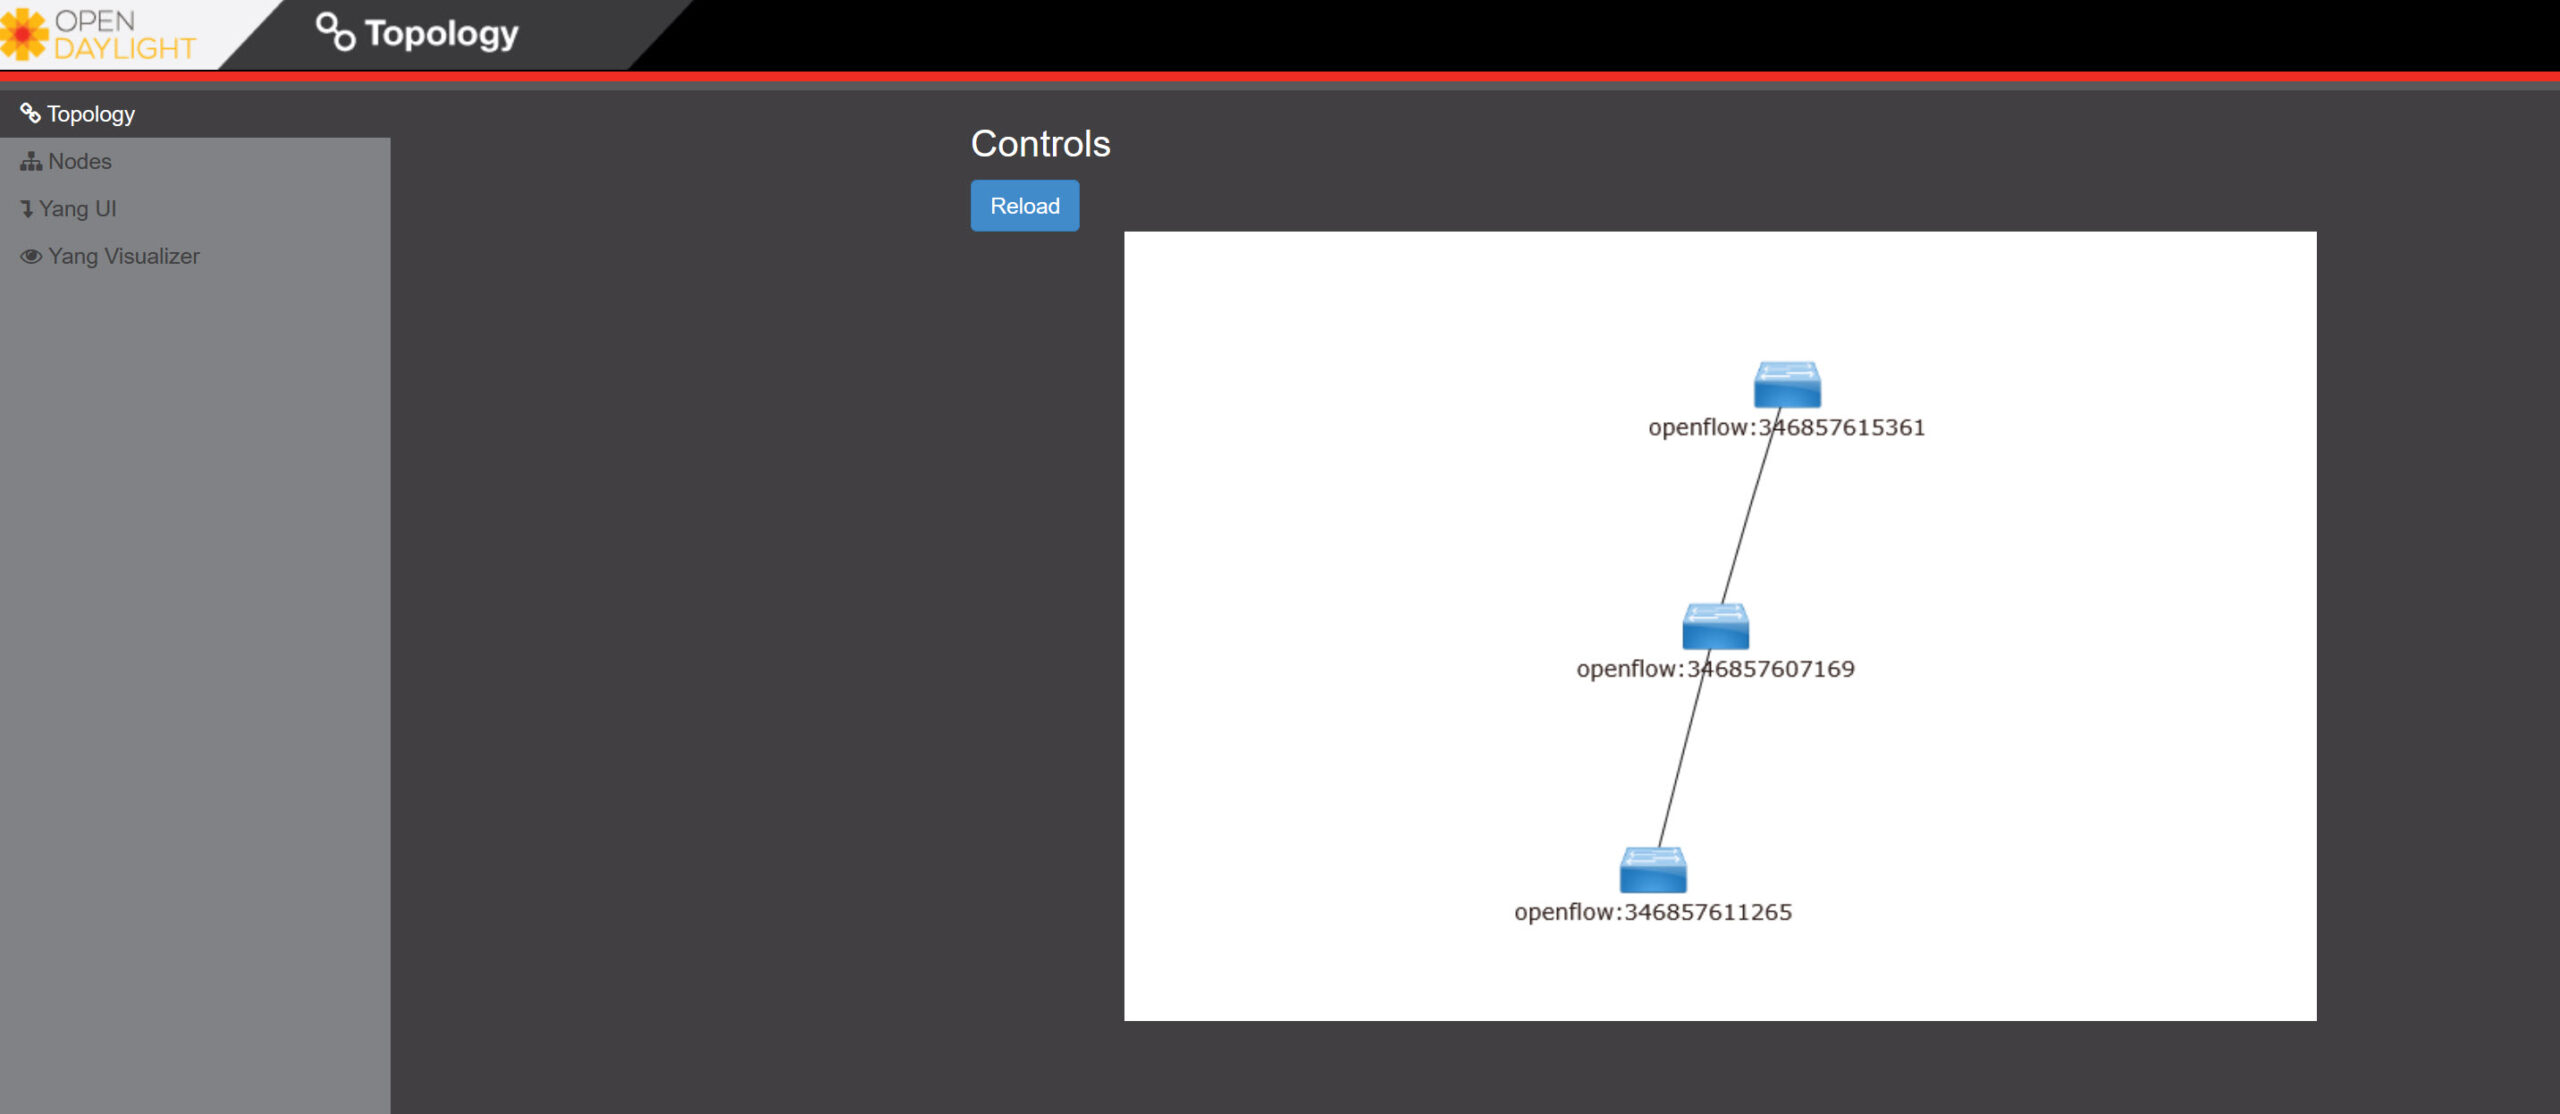
We can see our three switches, which tells us that they are connected to the SDN controller.
Verification
Let’s verify our work. We have three switches in OpenDaylight but we don’t know yet if we can actual forward any packets. In the containerlab topology I added two hosts. You can access these with SSH:
$ ssh lab@172.100.100.51Let’s see if we can ping the other host:
$ ping 172.16.12.2
PING 172.16.12.2 (172.16.12.2) 56(84) bytes of data.
64 bytes from 172.16.12.2: icmp_seq=1 ttl=64 time=2.80 ms
64 bytes from 172.16.12.2: icmp_seq=2 ttl=64 time=0.066 ms
64 bytes from 172.16.12.2: icmp_seq=3 ttl=64 time=0.066 ms
^C
--- 172.16.12.2 ping statistics ---
3 packets transmitted, 3 received, 0% packet loss, time 2022ms
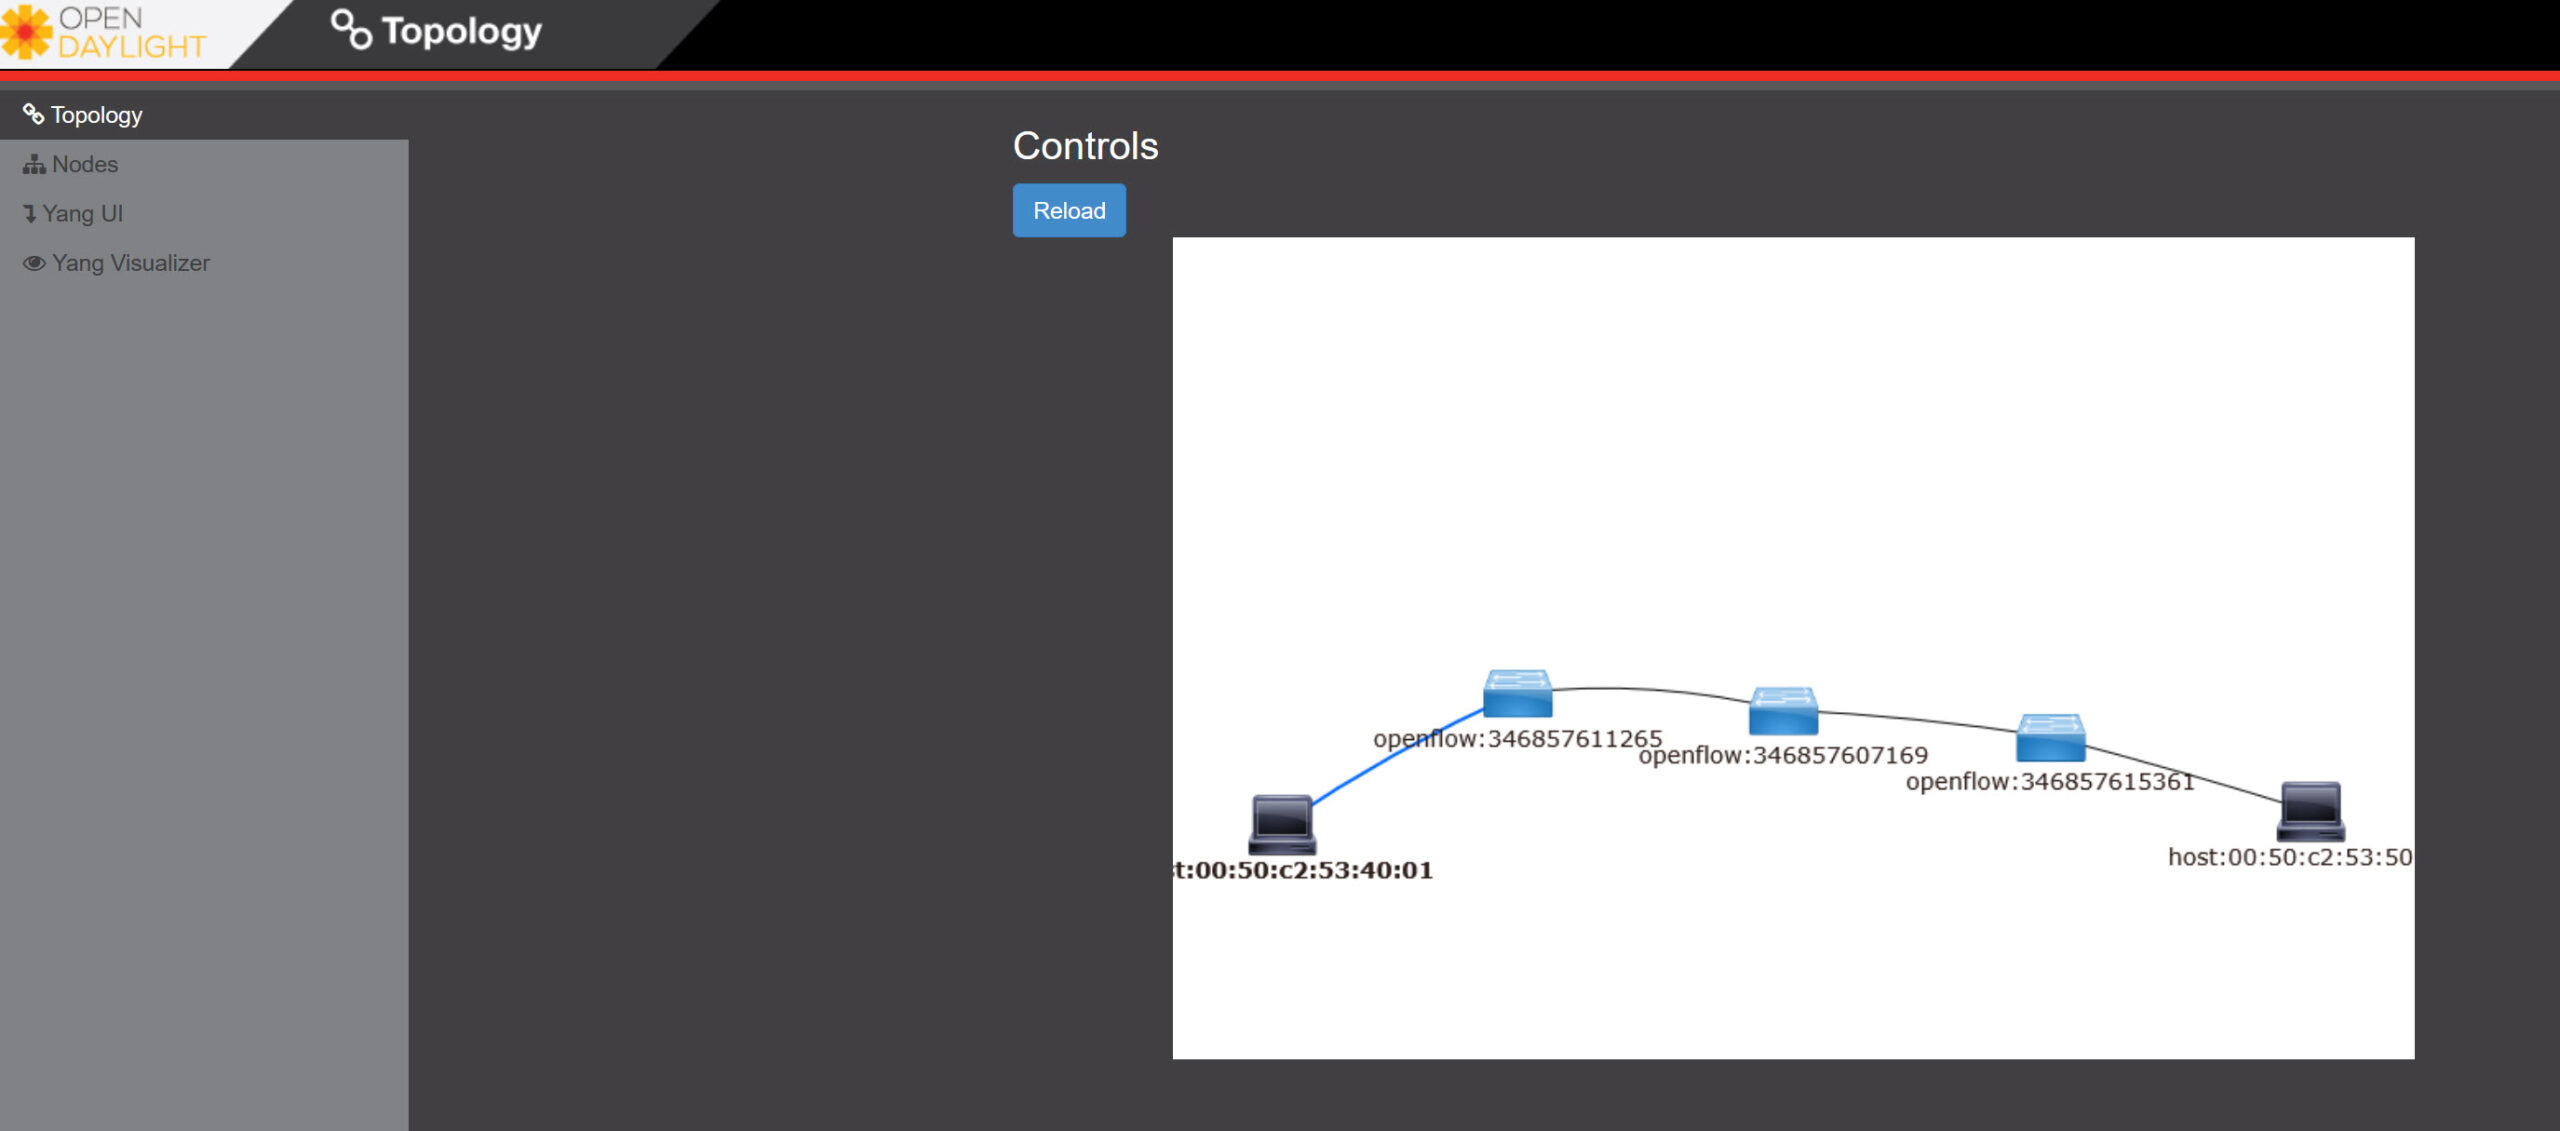
rtt min/avg/max/mdev = 0.066/0.977/2.801/1.289 msThat’s working! If you check the topology in OpenDaylight, you now see these hosts as well:
Open vSwitch
Let’s see. We can see the connection log:
# Check the connection log for the controller
grep "tcp:172.100.100.10:6653" /var/log/openvswitch/ovs-vswitchd.log | tail -n 20
2026-01-29T13:04:27.099Z|01320|rconn|WARN|sdn-leaf1<->tcp:172.100.100.10:6653: connection failed (Connection refused)
2026-01-29T13:04:27.099Z|01321|rconn|WARN|sdn-leaf2<->tcp:172.100.100.10:6653: connection failed (Connection refused)
2026-01-29T13:04:32.615Z|01322|rconn|WARN|sdn-spine1<->tcp:172.100.100.10:6653: connection failed (Connection refused)
2026-01-29T13:04:35.120Z|01323|rconn|WARN|sdn-leaf1<->tcp:172.100.100.10:6653: connection failed (Connection refused)
2026-01-29T13:04:35.120Z|01324|rconn|WARN|sdn-leaf2<->tcp:172.100.100.10:6653: connection failed (Connection refused)
2026-01-29T13:04:40.630Z|01325|rconn|WARN|sdn-spine1<->tcp:172.100.100.10:6653: connection failed (Connection refused)
2026-01-29T13:04:43.135Z|01326|rconn|WARN|sdn-leaf1<->tcp:172.100.100.10:6653: connection failed (Connection refused)
2026-01-29T13:04:43.135Z|01327|rconn|WARN|sdn-leaf2<->tcp:172.100.100.10:6653: connection failed (Connection refused)
2026-01-29T13:04:48.640Z|01328|rconn|WARN|sdn-spine1<->tcp:172.100.100.10:6653: connection failed (Connection refused)
2026-01-29T13:04:51.145Z|01329|rconn|WARN|sdn-leaf1<->tcp:172.100.100.10:6653: connection failed (Connection refused)
2026-01-29T13:04:51.145Z|01330|rconn|WARN|sdn-leaf2<->tcp:172.100.100.10:6653: connection failed (Connection refused)
2026-01-29T13:04:56.663Z|01331|rconn|WARN|sdn-spine1<->tcp:172.100.100.10:6653: connection failed (Connection refused)
2026-01-29T13:04:59.167Z|01332|rconn|WARN|sdn-leaf1<->tcp:172.100.100.10:6653: connection failed (Connection refused)
2026-01-29T13:04:59.167Z|01333|rconn|WARN|sdn-leaf2<->tcp:172.100.100.10:6653: connection failed (Connection refused)
2026-01-29T13:05:04.890Z|01334|rconn|INFO|sdn-spine1<->tcp:172.100.100.10:6653: connected
2026-01-29T13:05:07.826Z|01335|rconn|INFO|sdn-leaf1<->tcp:172.100.100.10:6653: connected
2026-01-29T13:05:07.826Z|01336|rconn|INFO|sdn-leaf2<->tcp:172.100.100.10:6653: connected
2026-01-29T13:05:15.323Z|01337|connmgr|INFO|sdn-spine1<->tcp:172.100.100.10:6653: 4 flow_mods in the 5 s starting 10 s ago (4 adds)
2026-01-29T13:05:17.897Z|01338|connmgr|INFO|sdn-leaf1<->tcp:172.100.100.10:6653: 4 flow_mods in the 3 s starting 10 s ago (4 adds)
2026-01-29T13:05:17.912Z|01339|connmgr|INFO|sdn-leaf2<->tcp:172.100.100.10:6653: 4 flow_mods in the 3 s starting 10 s ago (4 adds)
Couple of connections failed because we started the switches before we started the SDN controller. Some general info:
# ovs-vsctl show
c6e77fd6-e20a-4676-8feb-44eb21944926
    Bridge sdn-leaf1
        Controller "tcp:172.100.100.10:6653"
            is_connected: true
        fail_mode: secure
        Port odl-l1h1
            Interface odl-l1h1
        Port odl-l1s1
            Interface odl-l1s1
        Port sdn-leaf1
            Interface sdn-leaf1
                type: internal
    Bridge sdn-spine1
        Controller "tcp:172.100.100.10:6653"
            is_connected: true
        fail_mode: secure
        Port odl-s1l1
            Interface odl-s1l1
        Port sdn-spine1
            Interface sdn-spine1
                type: internal
        Port odl-s1l2
            Interface odl-s1l2
    Bridge sdn-leaf2
        Controller "tcp:172.100.100.10:6653"
            is_connected: true
        fail_mode: secure
        Port sdn-leaf2
            Interface sdn-leaf2
                type: internal
        Port odl-l2h1
            Interface odl-l2h1
        Port odl-l2s1
            Interface odl-l2s1
    ovs_version: "3.3.4"
You can see the ports here:
# ip link show | grep odl
1570: odl-l2h1@if1571: <BROADCAST,MULTICAST,UP,LOWER_UP> mtu 9500 qdisc noqueue master ovs-system state UP mode DEFAULT group default
1572: odl-l1h1@if1573: <BROADCAST,MULTICAST,UP,LOWER_UP> mtu 9500 qdisc noqueue master ovs-system state UP mode DEFAULT group default
1574: odl-l1s1@odl-s1l1: <BROADCAST,MULTICAST,UP,LOWER_UP> mtu 9500 qdisc noqueue master ovs-system state UP mode DEFAULT group default
1575: odl-s1l1@odl-l1s1: <BROADCAST,MULTICAST,UP,LOWER_UP> mtu 9500 qdisc noqueue master ovs-system state UP mode DEFAULT group default
1576: odl-s1l2@odl-l2s1: <BROADCAST,MULTICAST,UP,LOWER_UP> mtu 9500 qdisc noqueue master ovs-system state UP mode DEFAULT group default
1577: odl-l2s1@odl-s1l2: <BROADCAST,MULTICAST,UP,LOWER_UP> mtu 9500 qdisc noqueue master ovs-system state UP mode DEFAULT group default
We can check the active OpenFlow rules for one of the switches:
# ovs-ofctl -O OpenFlow13 dump-flows sdn-spine1
 cookie=0x2b00000000000000, duration=921.793s, table=0, n_packets=370, n_bytes=39590, priority=100,dl_type=0x88cc actions=CONTROLLER:65535
 cookie=0x2b00000000000002, duration=916.101s, table=0, n_packets=7, n_bytes=518, priority=2,in_port="odl-s1l1" actions=output:"odl-s1l2"
 cookie=0x2b00000000000003, duration=916.101s, table=0, n_packets=7, n_bytes=518, priority=2,in_port="odl-s1l2" actions=output:"odl-s1l1"
 cookie=0x2b00000000000000, duration=921.793s, table=0, n_packets=0, n_bytes=0, priority=0 actions=drop
You can see traffic statistics:
# ovs-ofctl -O OpenFlow13 dump-ports sdn-spine1
OFPST_PORT reply (OF1.3) (xid=0x2): 3 ports
  port LOCAL: rx pkts=0, bytes=0, drop=0, errs=0, frame=0, over=0, crc=0
           tx pkts=0, bytes=0, drop=0, errs=0, coll=0
           duration=1702.580s
  port  "odl-s1l1": rx pkts=222, bytes=23335, drop=0, errs=0, frame=0, over=0, crc=0
           tx pkts=222, bytes=23335, drop=0, errs=0, coll=0
           duration=1187.447s
  port  "odl-s1l2": rx pkts=222, bytes=23335, drop=0, errs=0, frame=0, over=0, crc=0
           tx pkts=222, bytes=23335, drop=0, errs=0, coll=0
           duration=1187.412s
RESTCONF API
The GUI of OpenDaylight is nice, but also very limited. If we want to monitor and/or configure our SDN controller, we have to use the RESTCONF API.
There are a number of different methods to use the API, I’ll show you some different options. First, let me explain what RESTCONF is in a nutshell.
For the last couple of decades, we have been using the CLI to configure our network equipment. A lot of network automation tools also use CLI scripting.
The CLI however, has been created for humans. We use configuration commands to configure everything and show/debug commands to verify our work. For us, this works very well but for software, not so much.It can be a pain to write scripts that enter commands and wait for a result or check the output of show commands. The syntax and output of commands can also change in different software versions which means you have to update your scripts.
An alternative to the CLI is SNMP. SNMP can be used for configuration but in reality, it’s mostly only used for monitoring of the network. One of the issues with SNMP is that it can be hard to figure out what MIBs to use.
To make network automation easier, the IETF developed NETCONF.
NETCONF is a management protocol that allows us to install, manipulate, and delete configurations of network devices. It uses XML for data encoding and RPC for transport. It can be used as an alternative to the CLI to configure your devices. NETCONF can also be used to fetch statistics from your network devices.
Besides NETCONF, we use a data modeling language for NETCONF called YANG.
YANG uses a hierarchical structure and makes things easy to read for humans.
Last but not least, we have something called RESTCONF. This is an API interface over HTTP that allows us to access data from YANG.
Yang UI
We can access Yang from the OpenDaylight GUI so let’s take a look:
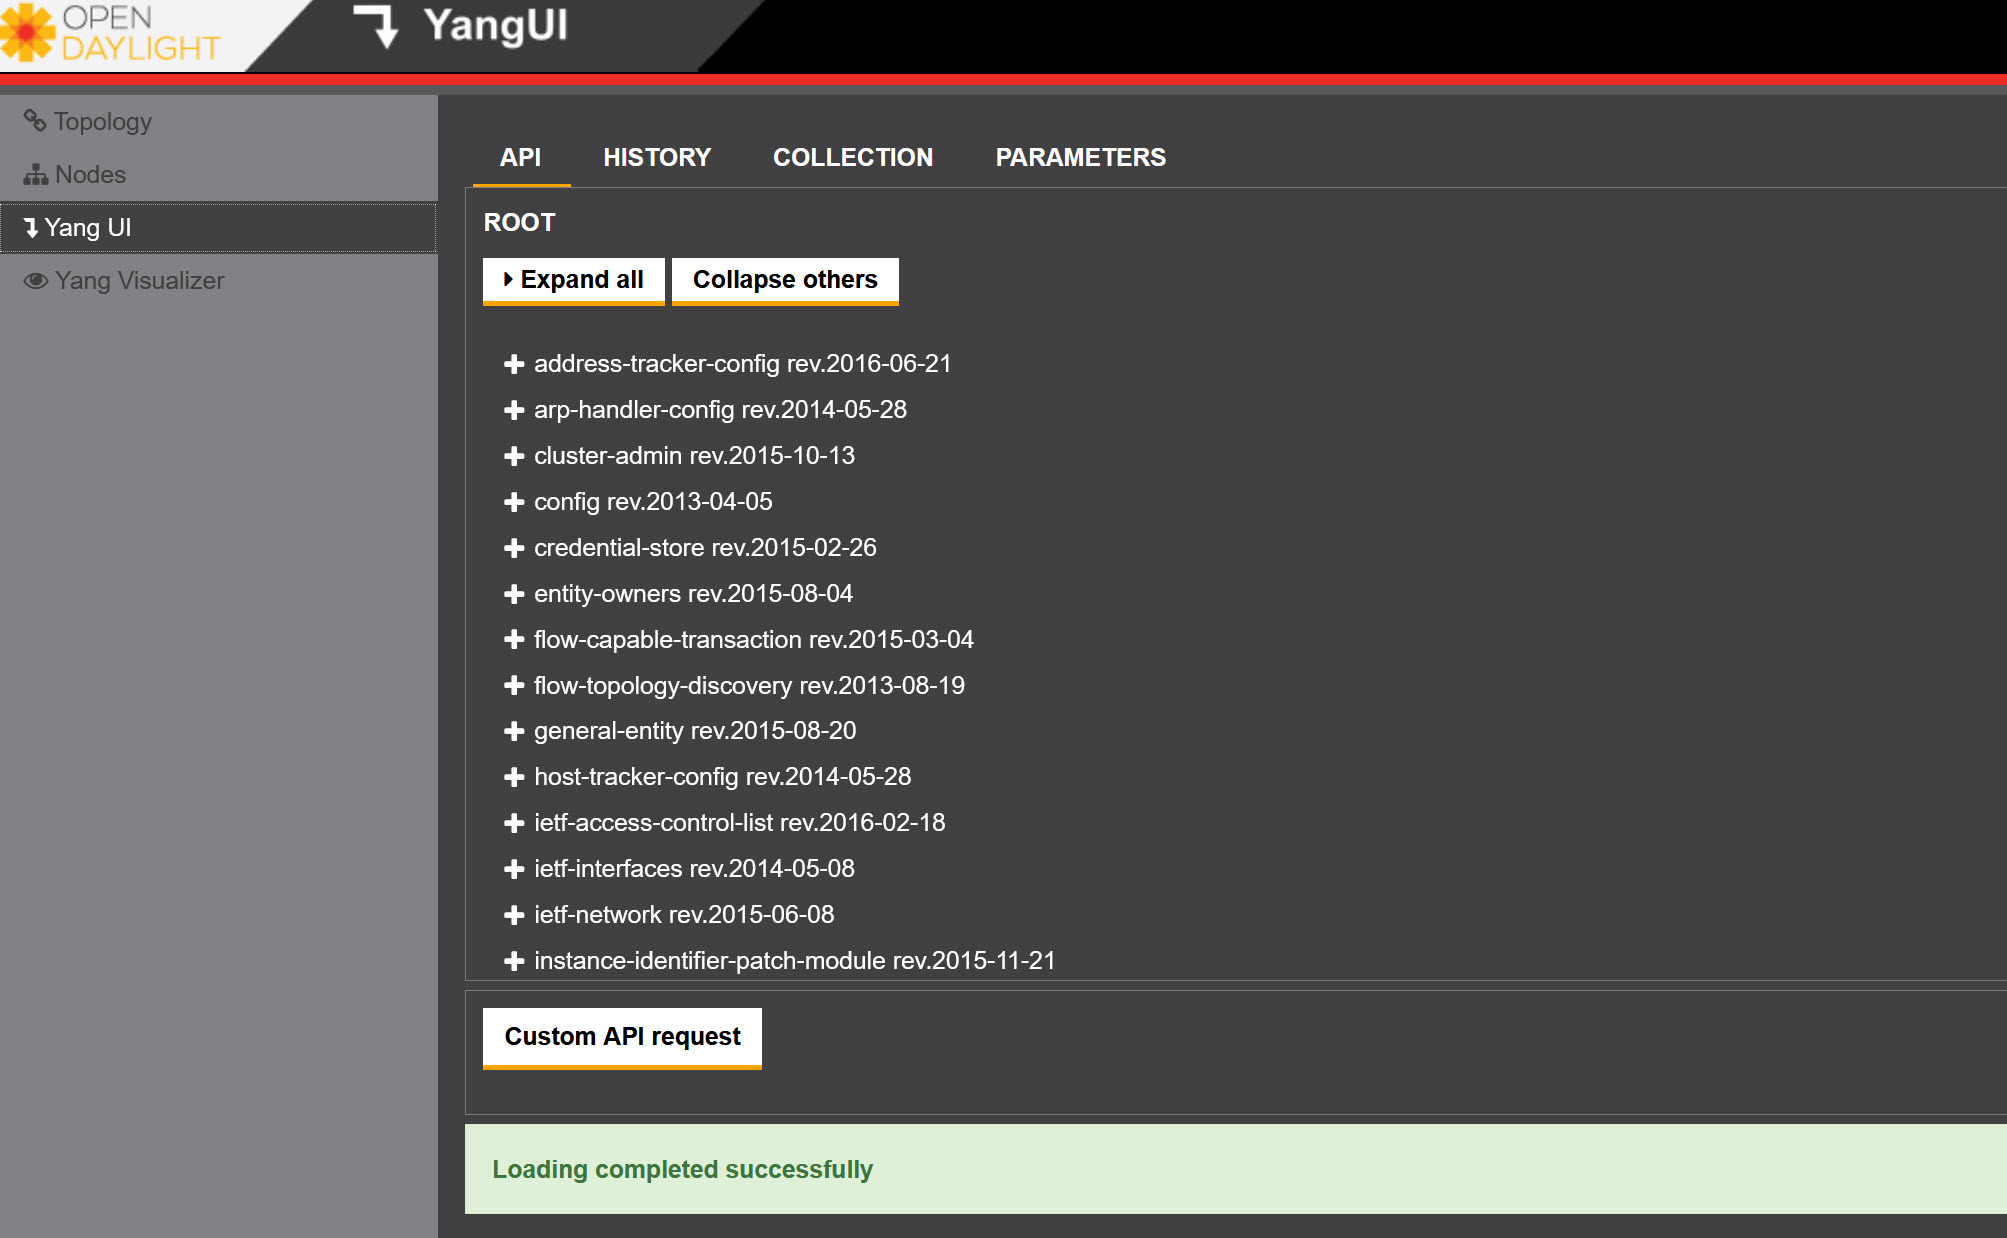
Above you see a lot of different objects. Let’s see if we can fetch the current (operational) network topology through Yang:

Once you click on the network topology, Yang will automatically show you the CONFREST API URL that it uses to retrieve this information:

You can copy this URL and paste it in notepad so we can use it later:

Here’s the URL that I got:
http://172.100.100.10:8181/restconf/operational/network-topology:network-topology
Click on the Send button:

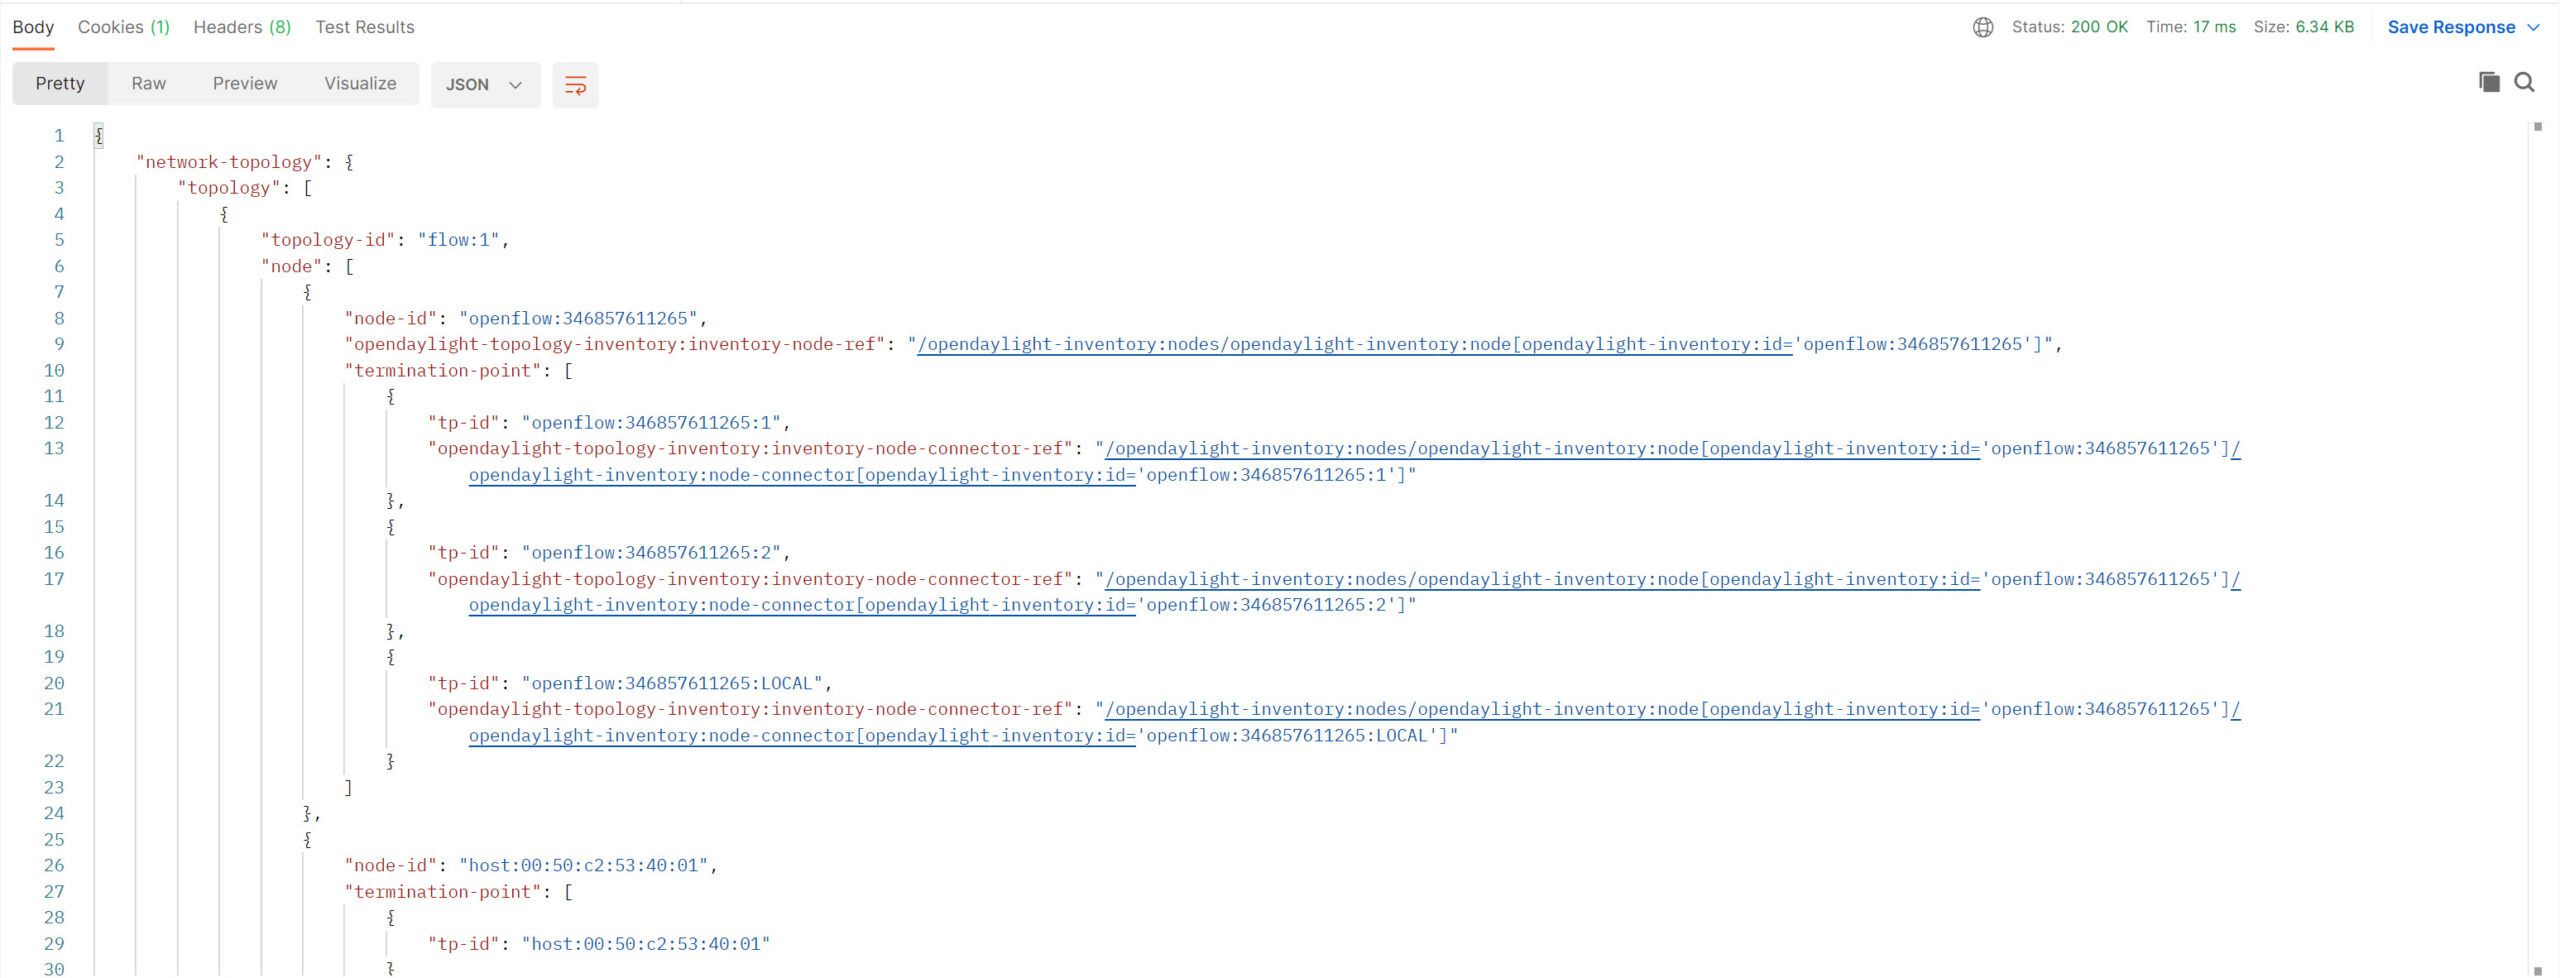
And you will see the operational network topology:
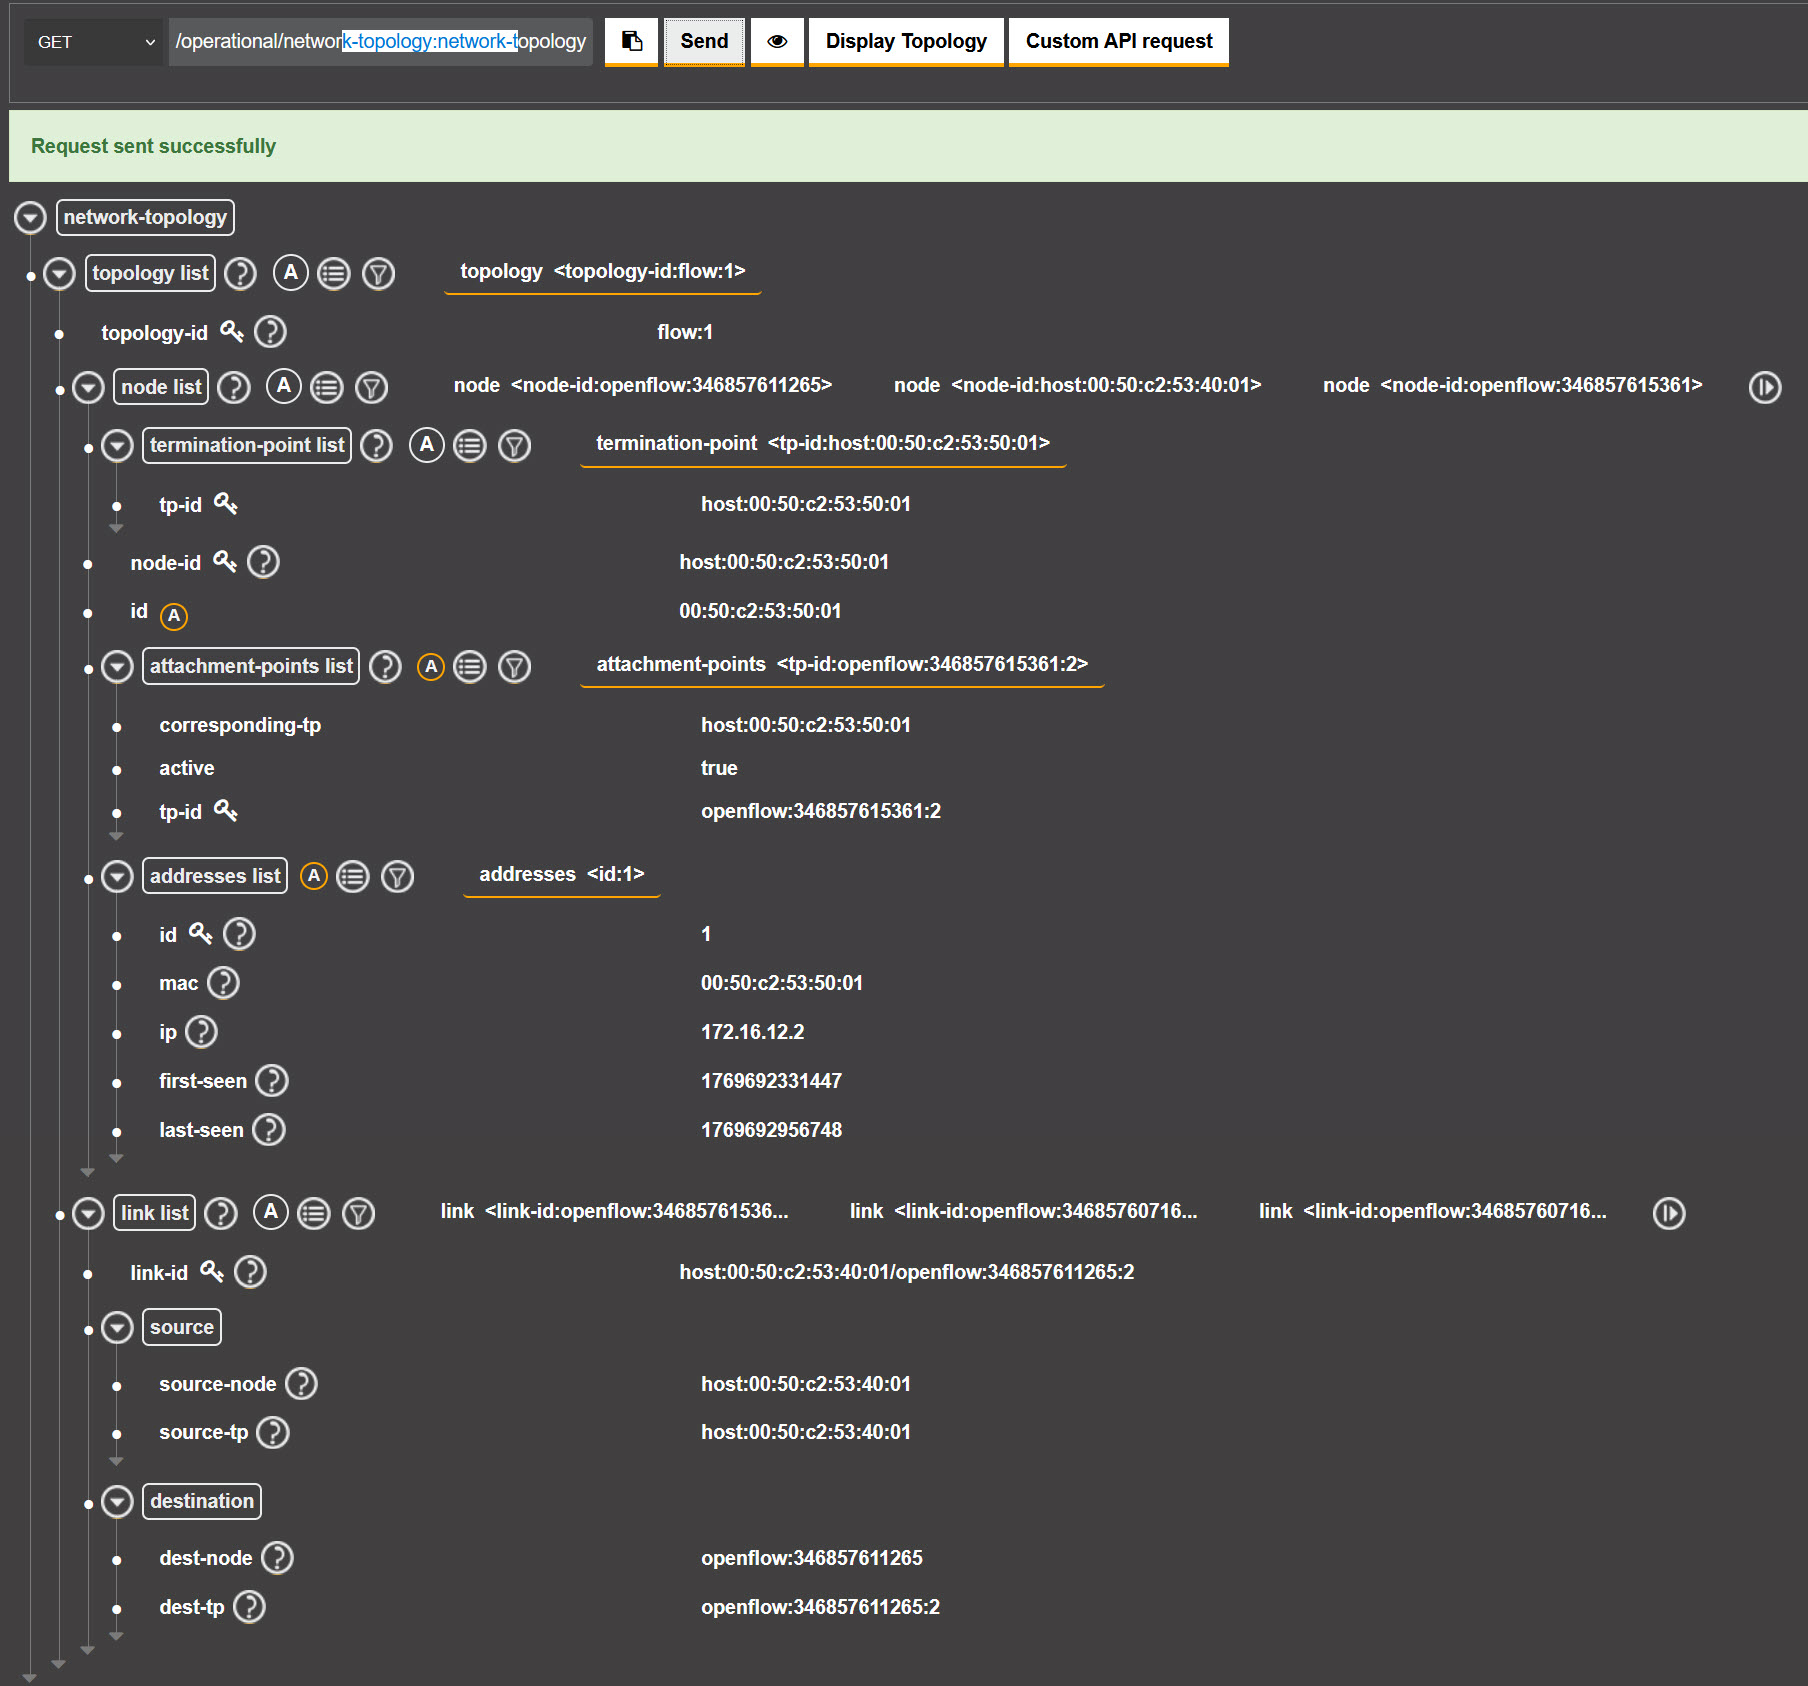
Above you can see the information about our current topology, including the MAC and IP addresses of our hosts.
Postman
The Yang UI is nice to browse around a bit but it’s not very useful if you really want to work with the RESTCONF API.
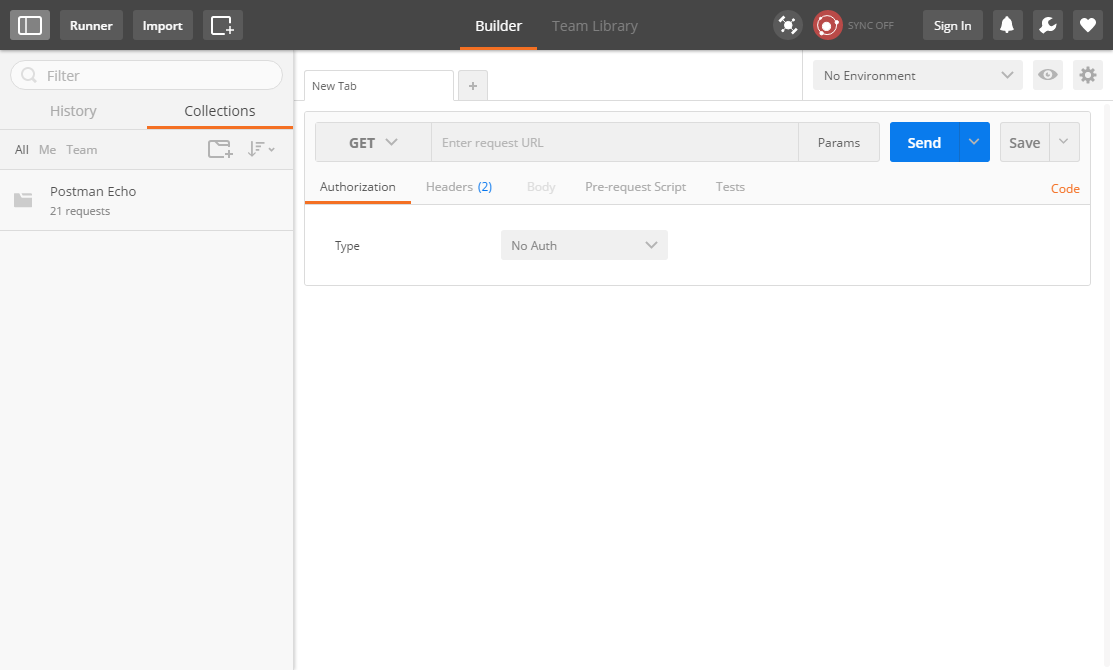
There’s a great app called Postman that you can download here.
It allows you to communicate with APIs, save requests, etc. Here’s a screenshot of the main screen:
We found the URL that showed us the topology in the Yang UI, let’s try the same URL in Postman.
Before you click on the send button, make sure you enter your credentials. We need to be authorized by the API to do anything. Click on the Authorization button and enter the credentials of OpenDaylight (admin / admin):
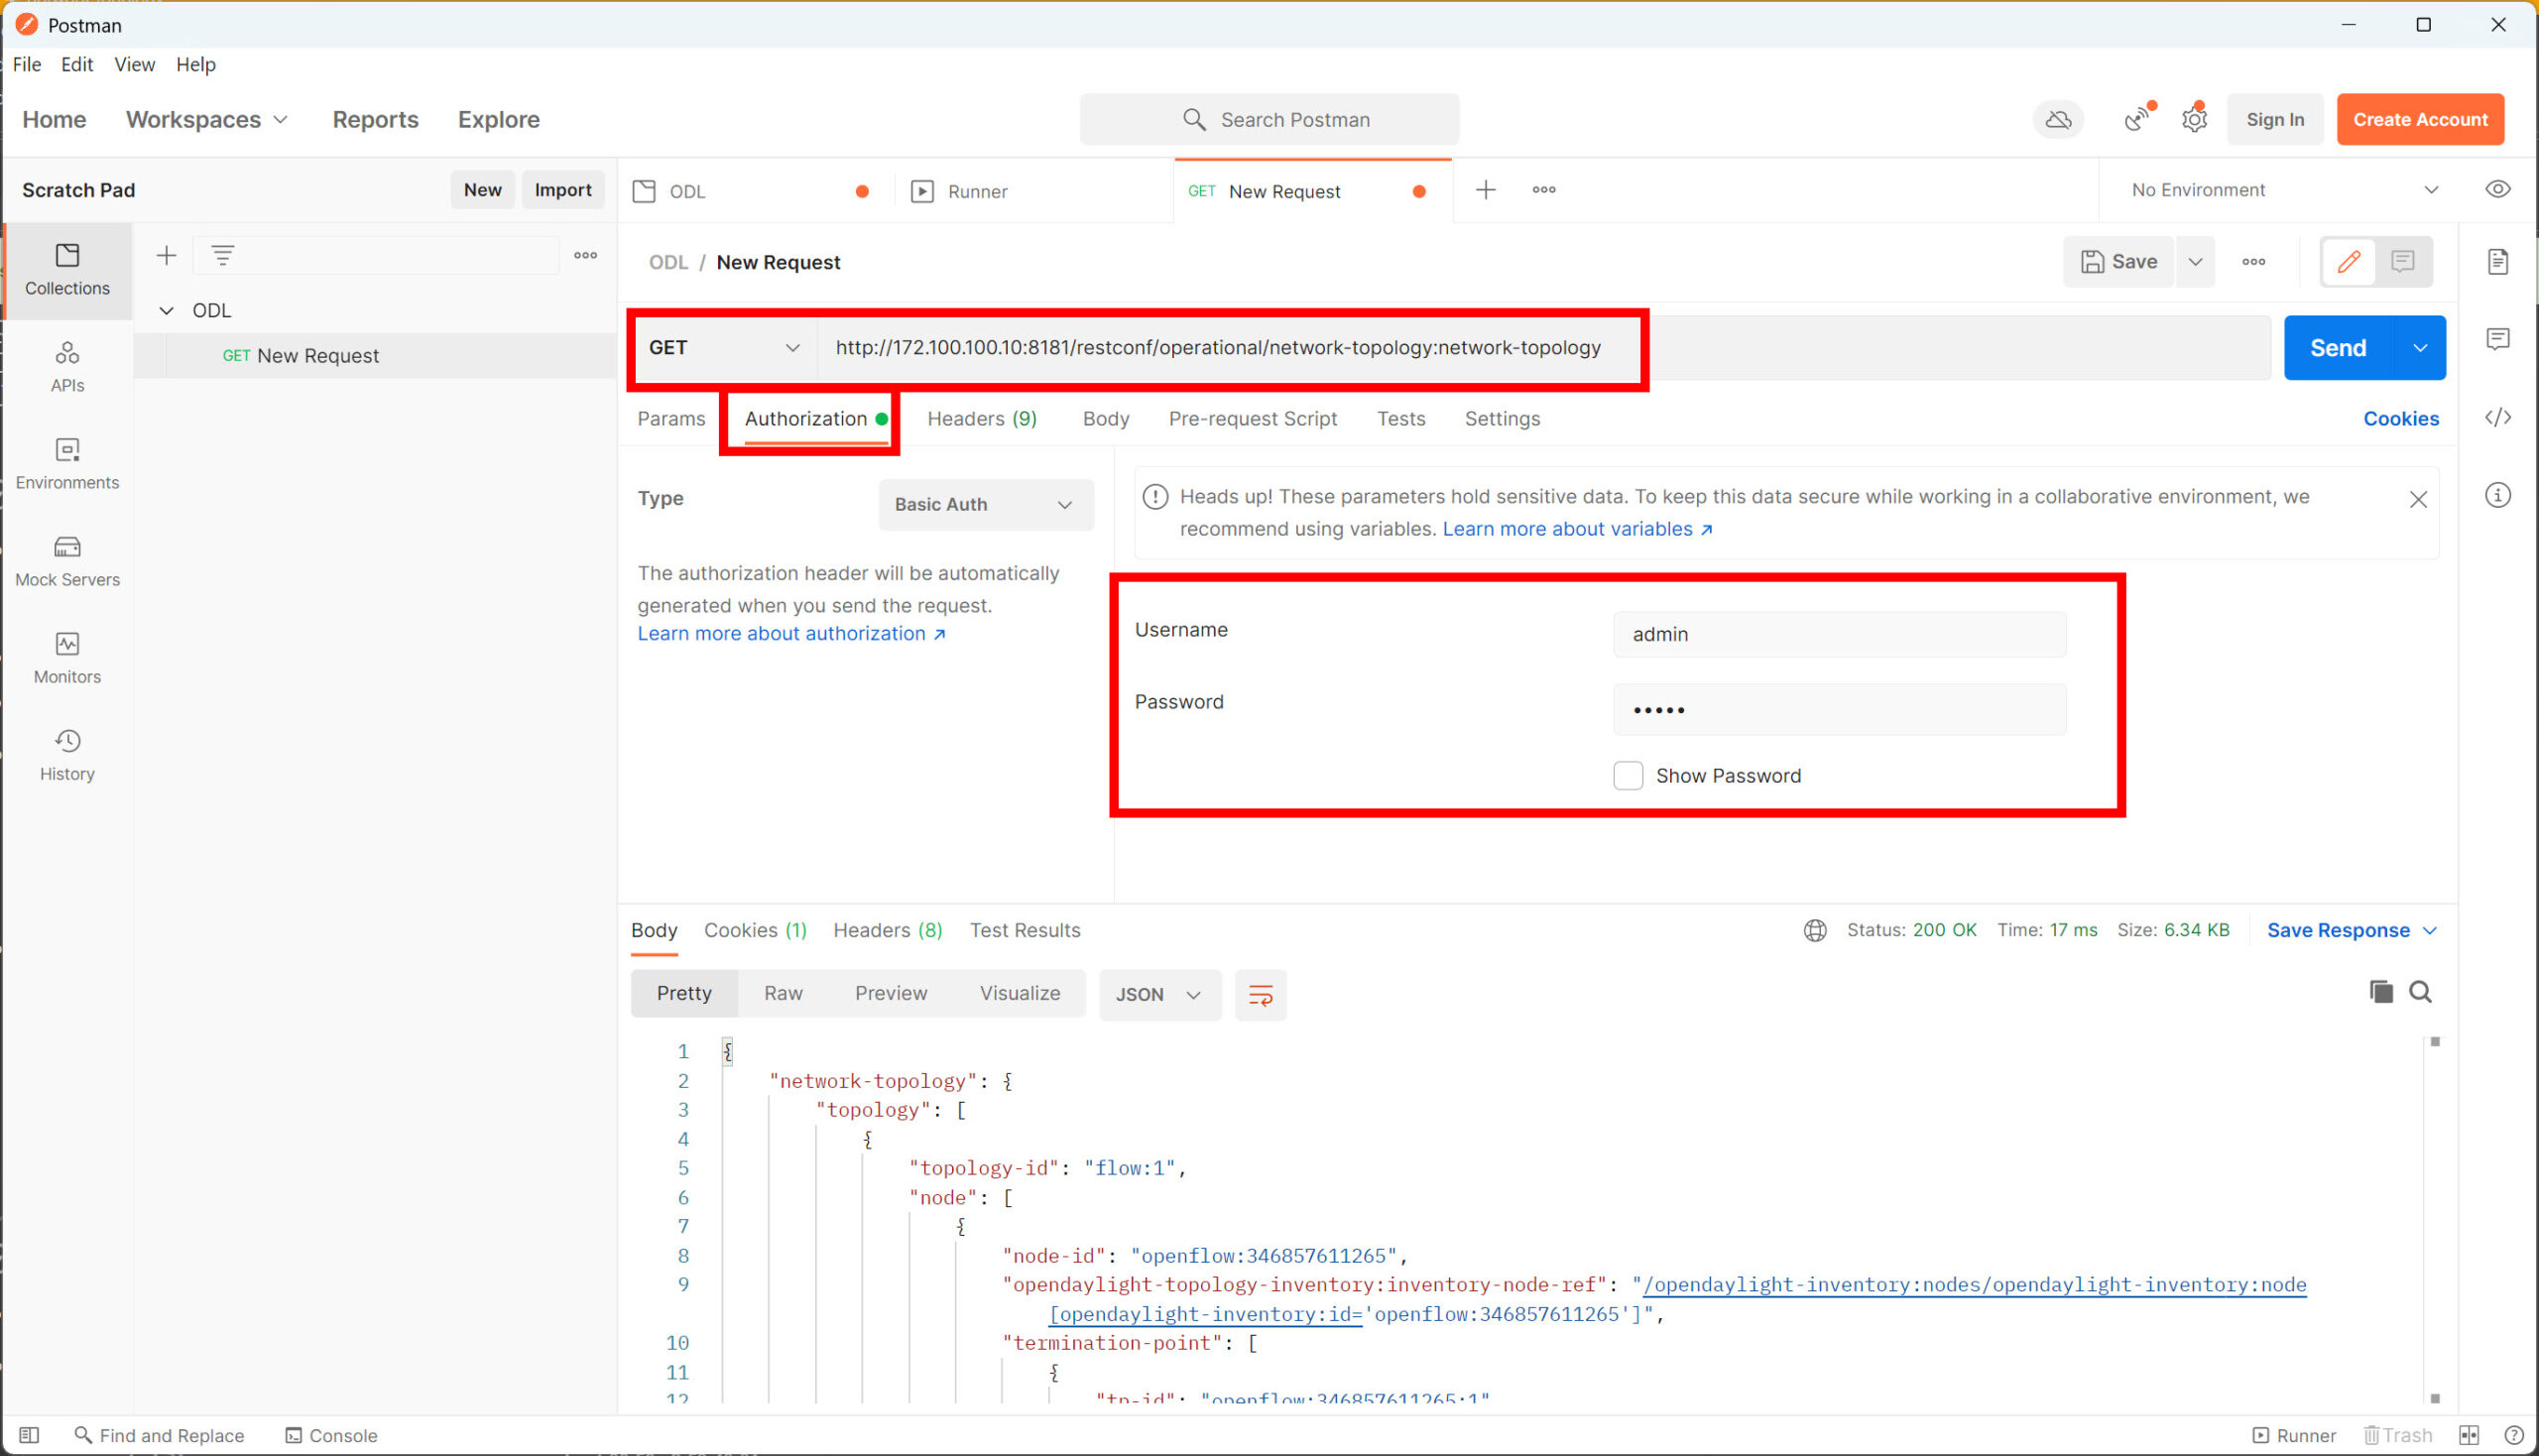
Once you hit the Send button, you will get a response in JSON:
Above, you can see the same output as what we saw in Yang UI, but this time, it’s in JSON format. One of the advantages of Postman is that you can save your requests or download collections of requests from others. For example, here’s a collection of OpenDaylight requests provided by CiscoDevNet.
Python
Postman works great to work with the API but one of the goals of SDN is network automation. Let me show you an example of where we use Python to request the same URL that we used in Yang UI and Postman to fetch the topology information.
Once the script has retrieved the topology information, it will print the MAC and IP addresses of all hosts in the network:
import requests

#OpenDayLight RESTCONF API settings.
odl_url = 'http://172.100.100.10:8181/restconf/operational/network-topology:network-topology'
odl_username = 'admin'
odl_password = 'admin'

# Fetch information from API.
response = requests.get(odl_url, auth=(odl_username, odl_password))

# Find information about nodes in retrieved JSON file.
for nodes in response.json()['network-topology']['topology']:

    # Walk through all node information.
    node_info = nodes['node']

    # Look for MAC and IP addresses in node information.
    for node in node_info:
        try:
            ip_address = node['host-tracker-service:addresses'][0]['ip']
            mac_address = node['host-tracker-service:addresses'][0]['mac']
            print('Found host with MAC address %s and IP address %s' % (mac_address, ip_address))
        except:
            pass
Let’s run the script above:
WOW Rene!!!
Nice and clear explanation.
God Bless you!
Hello Rene,
can you please explain to us more about RESTCONF and NETCONF and what is the difference? also can we integrate ODL controller with regular Cisco devices in GNS3 ?
thanks
Hi @ammar.eng100
There’s not really a quick answer to this but to get an idea what NETCONF and RESTCONF are about, let me show you an example. This is done on an CSR1000V router running IOS XE.
## RESTCONF
Here’s an example of NETCONF on a Cisco IOS router. It’s an alternative to the CLI where you can use XML to retrieve information or to configure the device. It uses RPC for transport and can be used through SSH:
R1(config)#netconf sshLet’s log in:
$ ssh admin@192.168.1.1 -s netconfThe router will respond with a hello like this:
... Continue reading in our forumForgot to mention, APIC-EM does have support for most Cisco routers/switches.
Hi @veera.krn
Both options are possible, whatever you prefer. It’s possible to create a single virtual machine that includes mininet and multiple SDN controllers.
Personally, I like to use the VM images that are offered. Mininet also has a pre-installed image:
http://mininet.org/download/
OpenDayLight has a VM image that includes their SDN controller and mininet:
https://wiki.opendaylight.org/view/CrossProject:Integration_Group:Test_VMs
Using these images usually saves you a lot of time compared to installing everything from source yourself.