Lesson Contents
There are two common protocols for remote management to your Cisco IOS router or switch: telnet and SSH.
Telnet is easy to configure but not used often anymore since it is insecure, everything you do is sent in plaintext while SSH uses encryption. However, some older devices might only support telnet, so it’s good to know how to configure it. Besides remote management, the telnet client is also very useful to test access-lists, routing and if certain ports are listening or not.
In this lesson, I’ll show you everything there is to know about telnet.
Configuration
For this example we will use the following topology:
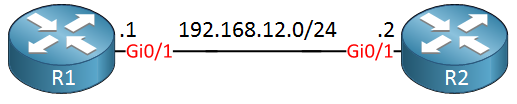
R1 will be our telnet server, R2 will be used as a telnet client.
Telnet Server
Your router or switch will have a certain amount of VTY lines. These are virtual terminal lines that define how many concurrent connections it supports. Let’s take a look:
R1(config)#line vty 0 ?
  <1-924>  Last Line number
  <cr>
This router supports more than 900 VTY lines which is a lot. Some smaller boxes will typically have 4 or 16 VTY lines. Let’s configure only the first five VTY lines:
R1(config)#line vty 0 4
R1(config-line)#transport input ?
  all      All protocols
  lapb-ta  LAPB Terminal Adapter
  lat      DEC LAT protocol
  mop      DEC MOP Remote Console Protocol
  none     No protocols
  pad      X.3 PAD
  rlogin   Unix rlogin protocol
  ssh      TCP/IP SSH protocol
  telnet   TCP/IP Telnet protocol
  udptn    UDPTN async via UDP protocol
  v120     Async over ISDN
This router supports multiple protocols. Above you can see that telnet and SSH are two supported protocols. It is possible to support multiple protocols but let’s configure the router so that it will only support telnet:
R1(config-line)#transport input telnetThe router will now accept telnet connections but without authentication, it’s not going to work. Let’s configure a password:
R1(config-line)#password my_password
R1(config-line)#login
The password will be “my_password”. The login command tells the router to check for this password.
Let’s see if it works:
R2#telnet 192.168.12.1
Trying 192.168.12.1 ... Open

User Access Verification

Password:
R1>
Above you can see that I was able to telnet from R2 to R1. Once you see “open” you know that it has successfully established a TCP connection.
Local Database
Instead of using a single password, it’s also possible to use usernames and passwords that are stored in a local database on the router or switch. Multiple users are able to log in with the same password but it’s easier to see who has accessed your device if you use multiple usernames. Here’s how to do this:
R1(config)#line vty 0 4
R1(config-line)#no password
R1(config-line)#login local
We need to use the login local command to tell the router/switch to use the local database for authentication. Let’s create a user account:
R1(config)#username admin password my_passwordWe now have an admin user with a password. Let’s test this:
R2#telnet 192.168.12.1
Trying 192.168.12.1 ... Open

User Access Verification

Username: admin
Password:
R1>
The router now prompts for the username and password.
Security
As I explained before, telnet sends everything in plain text so it is not secure. Let’s take a look at some Wireshark captures of telnet traffic so that you can see this in action. Here is a single telnet packet:
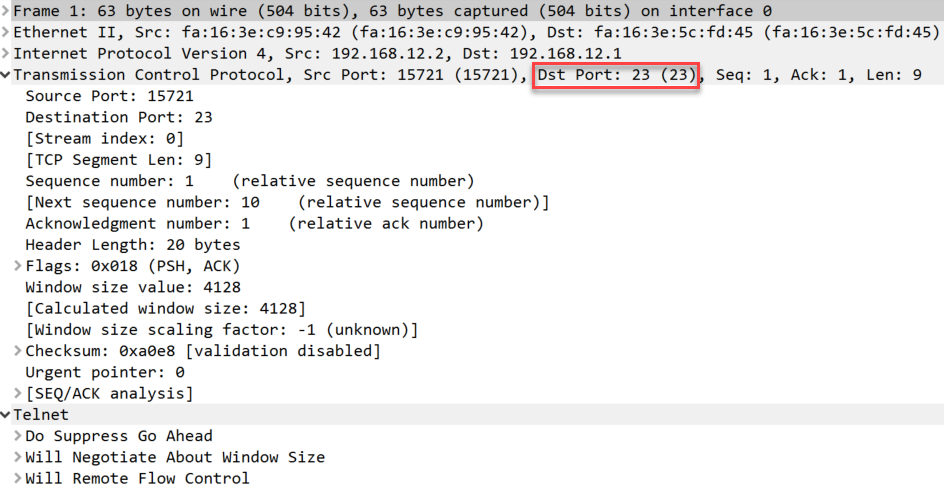
Above you can see a telnet packet from the client to our server. You can see telnet uses TCP destination port 23.
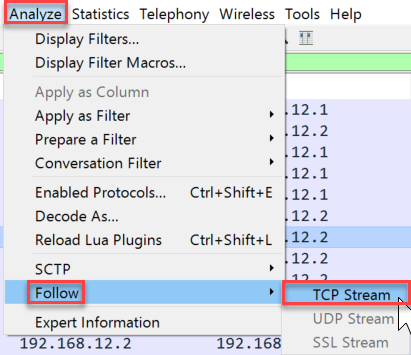
If we want to see the username and password in clear text then we have to look at the entire TCP conversation.
In Wireshark, you can do this by going to Analyze > Follow > TCP Stream:
Now you can see everything that has been transmitted between the client and server:
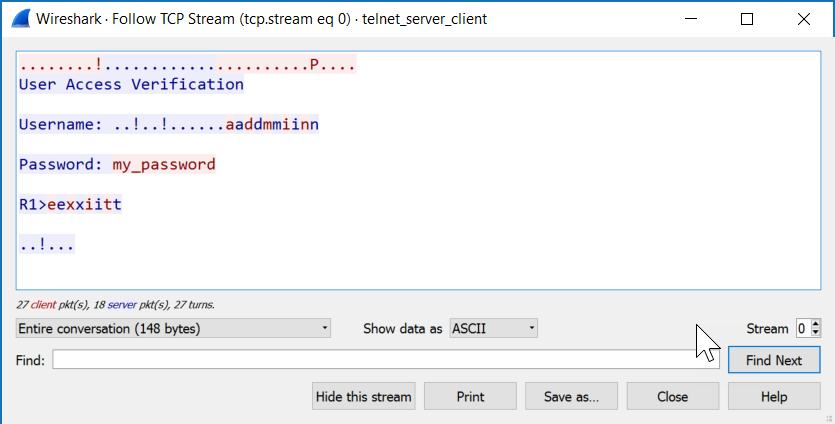
All client packets are in red, server packets are in blue. Want to try this yourself? You can find the capture files below:
Packet Capture: Telnet Server Client
Now you have seen that telnet is insecure but if you still want to use it, it’s probably best to use it with an access-list so that you can at least restrict which devices are allowed to connect to your router or switch. Here’s how to do this:
R1(config)#access-list 1 permit host 192.168.12.2

R1(config)#line vty 0 4
R1(config-line)#access-class 1 in
First we create an access-list that only permits 192.168.12.2 (R2) and then apply it to the VTY lines with the access-class command. Let’s test it:
R2#telnet 192.168.12.1
Trying 192.168.12.1 ... Open
We are still able to connect. Our access-list will show that some packets have matched:
R1#show access-lists
Standard IP access list 1
    10 permit 192.168.12.2 (2 matches)
That’s all there is to it.
Telnet Client
In the previous example I showed you how you can use the telnet client to connect from R2 to R1 but there’s so much more you can use this client for. Take a look at all its options:
R2#telnet 192.168.12.1 ?
  /debug             Enable telnet debugging mode
  /ipv4              Force use of IP version 4
  /ipv6              Force use of IP version 6
  /line              Enable telnet line mode
  /noecho            Disable local echo
  /quiet             Suppress login/logout messages
  /route:            Enable telnet source route mode
  /source-interface  Specify source interface
  /stream            Enable stream processing
  /terminal-type     Set terminal type
  <0-65535>          Port number
  bgp                Border Gateway Protocol (179)
  chargen            Character generator (19)
  cmd                Remote commands (rcmd, 514)
  daytime            Daytime (13)
  discard            Discard (9)
  domain             Domain Name Service (53)
  drip               Dynamic Routing Information Protocol (3949)
  echo               Echo (7)
  exec               Exec (rsh, 512)
  finger             Finger (79)
  ftp                File Transfer Protocol (21)
  ftp-data           FTP data connections (20)
  gopher             Gopher (70)
  hostname           NIC hostname server (101)
  ident              Ident Protocol (113)
  irc                Internet Relay Chat (194)
  klogin             Kerberos login (543)
  kshell             Kerberos shell (544)
  login              Login (rlogin, 513)
  lpd                Printer service (515)
  nntp               Network News Transport Protocol (119)
  onep-plain         ONEP Cleartext (15001)
  onep-tls           ONEP TLS (15002)
  pim-auto-rp        PIM Auto-RP (496)
  pop2               Post Office Protocol v2 (109)
  pop3               Post Office Protocol v3 (110)
  smtp               Simple Mail Transport Protocol (25)
  sunrpc             Sun Remote Procedure Call (111)
  tacacs             TAC Access Control System (49)
  talk               Talk (517)
  telnet             Telnet (23)
  time               Time (37)
  uucp               Unix-to-Unix Copy Program (540)
  whois              Nicname (43)
  www                World Wide Web (HTTP, 80)
  <cr>
The two most important options are choosing a source interface and selecting a different port number. Using different port numbers is very useful, you can use this to test if certain services are up and running, test if an access-list is working and even if your routing is configured correctly.
Port numbers
Let’s try a simple example. I will have to enable HTTP server on R1:
R1(config)#ip http serverNow we will use telnet to check if the HTTP server is active:
R2#telnet 192.168.12.1 80
Trying 192.168.12.1, 80 ... Open
We are now connected. If you know HTML, you can even try to request some pages:
GET / HTTP/1.0

HTTP/1.1 401 Unauthorized
Date: Tue, 12 Jul 2016 10:31:55 GMT
Server: cisco-IOS
Accept-Ranges: none
WWW-Authenticate: Basic realm="level_15_access"

401 Unauthorized
[Connection to 192.168.12.1 closed by foreign host]
R1 disconnects me since I am not authorized by the HTTP server but that’s ok, this example proves that the HTTP server is up and running.
Source Interface
We can also use a different source interface for the telnet client. To test this, I’ll have to add another interface and IP address on R2. I’ll create a loopback for this:
R2(config)#int loopback 0
R2(config-if)#ip address 2.2.2.2 255.255.255.255
Let’s make sure R1 knows how to reach this loopback interface:
R1(config)#ip route 2.2.2.2 255.255.255.255 192.168.12.2And a quick ping to verify our work:
R1#ping 2.2.2.2
Type escape sequence to abort.
Sending 5, 100-byte ICMP Echos to 2.2.2.2, timeout is 2 seconds:
!!!!!
Success rate is 100 percent (5/5), round-trip min/avg/max = 3/4/5 ms
Great, R1 knows how to reach 2.2.2.2.
Remember that we configured an access-list that only permits 192.168.12.2 to connect to R2? We can verify this by specifying another source interface:
R2#telnet 192.168.12.1 /source-interface loopback 0
Trying 192.168.12.1 ...
% Connection refused by remote host
We are not allowed to connect because of the access-list on the VTY lines. You can also combine port numbers and a source interface:
R2#telnet 192.168.12.1 80 /source-interface loopback 0
Trying 192.168.12.1, 80 ... Open
As you can see, we are allowed to connect to TCP port 80 and using the loopback interface as our source.
Configurations
Want to take a look for yourself? Here you will find the final configuration of each device.
Please translate the following sentence:
“Telnet is niet secure dus liever niet gebruiken…”
Hi Valli,
Just removed this, this was a bit of my draft (in Dutch
Rene
I think it is better to create the credentials “user and password” before typing the command
login local, because in case of problems (if you lose control), the equipment will ask you an account that you have not created yet.Am I wright ?
Hello Hugues
Yes, if you type the command
login localand log out without creating any credentials, then you will not be able to log back in.Laz
Hi Laz, first I would like to thankyou for your quick response. Just to be specific, I was working on CCNA routing & switching ICND1 100-105, Unit 7 Network Management, subtitle Telnet Server and Client. Here is what I found on packet tracer 7.1:
as you see here I do not have the option to add a source address as explained on the lecture note after the command telnet 192.168.12.1 /source interface…