Lesson Contents
In this lesson, I will explain how HSRP (Hot Standby Routing Protocol) works and how to configure it. If you have no idea what virtual gateways are about then make sure to read my introduction lesson first.
Here’s the topology I will use:
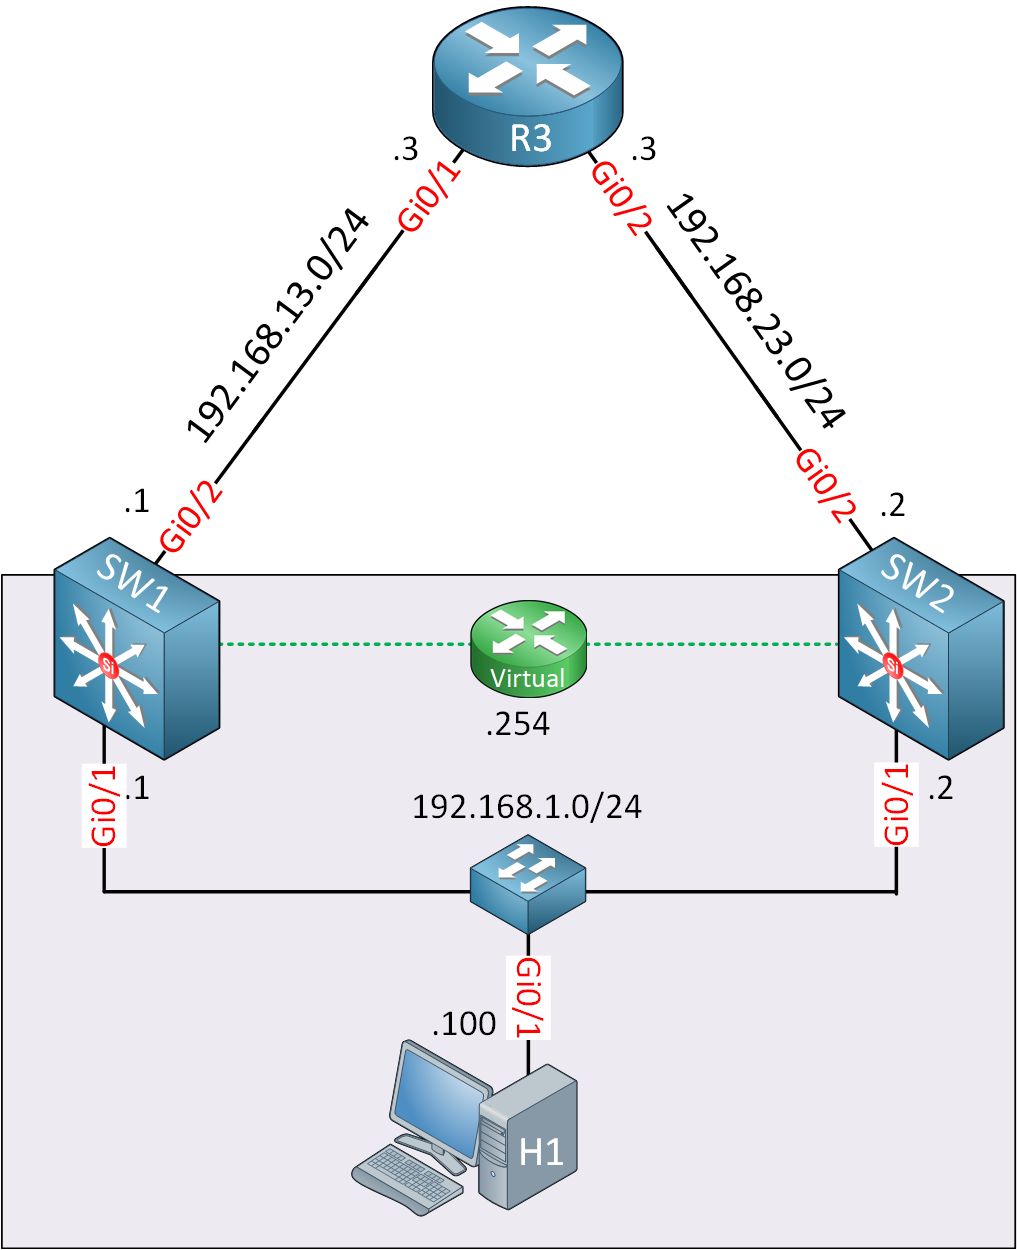
Here’s what we have:
- SW1 and SW2 are multilayer switches. The 192.168.1.0/24 subnet belongs to VLAN 1 and there is one host device.
- There is a layer two switch between SW1, SW2, and H1 to connect the 192.168.1.0/24 segment.
- IP address 192.168.1.254 will be used for the virtual gateway address.
- The multilayer switches are connected with layer three interfaces to an upstream router called R3.
Let’s look at the configuration.
Configurations
Configurations
Want to try this example yourself? Here, you will find the startup configuration of each device.
H1
hostname H1
!
no ip routing
!
interface GigabitEthernet0/1
 ip address 192.168.1.100 255.255.255.0
 no ip route-cache
 duplex auto
 speed auto
 media-type rj45
!
ip default-gateway 192.168.1.254
!
end
R3
hostname R3
!
interface GigabitEthernet0/1
 ip address 192.168.13.3 255.255.255.0
 duplex auto
 speed auto
 media-type rj45
!
interface GigabitEthernet0/2
 ip address 192.168.23.3 255.255.255.0
 duplex auto
 speed auto
 media-type rj45
!
end
SW1
hostname SW1
!
interface GigabitEthernet0/1
 media-type rj45
 negotiation auto
!
interface GigabitEthernet0/2
 no switchport
 ip address 192.168.13.1 255.255.255.0
 negotiation auto
!
interface Vlan1
 ip address 192.168.1.1 255.255.255.0
!
end
SW2
hostname SW2
!
interface GigabitEthernet0/1
 media-type rj45
 negotiation auto
!
interface GigabitEthernet0/2
 no switchport
 ip address 192.168.23.2 255.255.255.0
 negotiation auto
!
interface Vlan1
 ip address 192.168.1.2 255.255.255.0
!
end
The first thing we’ll do is enable HSRP. We will do this on the VLAN 1 interfaces of SW1 and SW2:
SW1 & SW2
(config)#interface Vlan 1
(config-if)#standby 1 ip 192.168.1.254
Use the standby command to configure HSRP. 192.168.1.254 will be the virtual gateway IP address. The “1” is the group number for HSRP. It doesn’t matter what you pick just make sure it’s the same on both devices. On your console, you’ll see something like this:
SW1#
%HSRP-5-STATECHANGE: Vlan1 Grp 1 state Standby -> Listen
%HSRP-5-STATECHANGE: Vlan1 Grp 1 state Speak -> Standby
SW2#
%HSRP-5-STATECHANGE: Vlan1 Grp 1 state Standby -> ActiveDepending on which switch you configured first, you’ll see these messages. One of the switches will be the active gateway, and the other one will go into standby mode. Let’s see if we can reach this virtual gateway from our host:
H1#ping 192.168.1.254
Type escape sequence to abort.
Sending 5, 100-byte ICMP Echos to 192.168.1.254, timeout is 2 seconds:
!!!!!
Success rate is 100 percent (5/5), round-trip min/avg/max = 6/206/1007 ms
As you can see, we can successfully reach the virtual gateway IP address.
That wasn’t too bad, right? Only one command and HSRP works! There are a couple of other things we have to look at, though. We use 192.168.1.254 as the virtual IP address, but what MAC address will it use?
SW1#show ip arp | include 1.254
Internet  192.168.1.254           1   0000.0c07.ac01  ARPA   GigabitEthernet0/1
You can see the MAC address of 192.168.1.254 in the ARP table. Where did this MAC address come from?
0000.0c07.ac01 is the MAC address that we have. HSRP uses the 0000.0c07.acXX MAC address where XX is the HSRP group number. In my example, I configured HSRP group number 1. There are a couple of other interesting things to check. Take a look below:
SW1#show standby
Vlan1 - Group 1
  State is Standby
    3 state changes, last state change 00:03:33
  Virtual IP address is 192.168.1.254
  Active virtual MAC address is 0000.0c07.ac01 (MAC Not In Use)
    Local virtual MAC address is 0000.0c07.ac01 (v1 default)
  Hello time 3 sec, hold time 10 sec
    Next hello sent in 0.144 secs
  Preemption disabled
  Active router is 192.168.1.2, priority 100 (expires in 7.776 sec)
  Standby router is local
  Priority 100 (default 100)
Group name is "hsrp-Vl1-1" (default)SW2#show standby
Vlan1 - Group 1
State is Active
2 state changes, last state change 00:04:25
Virtual IP address is 192.168.1.254
Active virtual MAC address is 0000.0c07.ac01 (MAC In Use)
Local virtual MAC address is 0000.0c07.ac01 (v1 default)
Hello time 3 sec, hold time 10 sec
Next hello sent in 0.992 secs
Preemption disabled
Active router is local
Standby router is 192.168.1.1, priority 100 (expires in 10.640 sec)
Priority 100 (default 100)
Group name is "hsrp-Vl1-1" (default)Use the show standby command to verify your configuration. There are a couple of interesting things here:
- We can see the virtual IP address here (192.168.1.254).
- It also shows the virtual MAC address (0000.0c07.ac01).
- You can see which router is active or in standby mode.
- The hello time is 3 seconds, and the hold time is 10 seconds.
- Preemption is disabled.
The active router will respond to ARP requests from computers, and it will be actively forwarding packets from them. It will send hello messages to the routers that are in standby mode. Routers in standby mode will listen to the hello messages, if they don’t receive anything from the active router, they will wait for the hold time to expire before taking over. The hold time is 10 seconds by default which is pretty slow; we’ll see how to speed this up in a bit.
Each HSRP router will go through several states before it ends up as an active or standby router. This is what will happen:
| State | Explanation |
| Initial | This is the first state when HSRP starts. You’ll see this just after you configured HSRP or when the interface just got enabled. |
| Listen | The router knows the virtual IP address and will listen for hello messages from other HSRP routers. |
| Speak | The router will send hello messages and join the election to see which router will become active or standby. |
| Standby | The router didn’t become the active router but will keep sending hello messages. If the active router fails, it will take over. |
| Active | The router will actively forward packets from clients and send hello messages. |
We can see all these steps with a debug command. Let’s shut the VLAN 1 interfaces first so that we can restart HSRP:
SW1 & SW2
(config)#interface Vlan 1
(config-if)#shutdown
Now use the debug standby events command:
SW1 & SW2
#debug standby events
HSRP Events debugging is on
Now, we will enable the VLAN 1 interface on SW1 first:
SW1
(config)#interface Vlan 1
(config-if)#no shutdown
Here’s what you will see on SW1:
SW1#
HSRP: Vl1 Interface UP
HSRP: Vl1 Starting minimum intf delay (1 secs) - uptime 997
HSRP: Vl1 Intf min delay expired - uptime 998
HSRP: Vl1 Grp 1 Init: a/HSRP enabled
HSRP: Vl1 Grp 1 Init -> Listen
HSRP: Vl1 Grp 1 Redundancy "hsrp-Vl1-1" state Init -> Backup
HSRP: Vl1 IP Redundancy "hsrp-Vl1-1" update, Init -> Backup
HSRP: Vl1 Grp 1 Listen: d/Standby timer expired (unknown)
HSRP: Vl1 Grp 1 Listen -> Speak
HSRP: Vl1 Grp 1 Redundancy "hsrp-Vl1-1" state Backup -> Speak
HSRP: Vl1 IP Redundancy "hsrp-Vl1-1" update, Backup -> Speak
HSRP: Vl1 Grp 1 Speak: d/Standby timer expired (unknown)
HSRP: Vl1 Grp 1 Standby router is local
HSRP: Vl1 Grp 1 Speak -> Standby
HSRP: Vl1 Grp 1 Redundancy "hsrp-Vl1-1" state Speak -> Standby
HSRP: Vl1 IP Redundancy "hsrp-Vl1-1" standby, unknown -> local
HSRP: Vl1 IP Redundancy "hsrp-Vl1-1" update, Speak -> Standby
HSRP: Vl1 Grp 1 Standby: c/Active timer expired (unknown)
HSRP: Vl1 Grp 1 Active router is local
HSRP: Vl1 Grp 1 Standby router is unknown, was local
HSRP: Vl1 Grp 1 Standby -> Active
HSRP: Vl1 Grp 1 Redundancy "hsrp-Vl1-1" state Standby -> Active
HSRP: Vl1 Grp 1 Added 192.168.1.254 to ARP (0000.0c07.ac01)
HSRP: Vl1 Grp 1 Activating MAC 0000.0c07.ac01
HSRP: Vl1 Grp 1 Adding 0000.0c07.ac01 to MAC address filter - resetting the interface
HSRP: Vl1 IP Redundancy "hsrp-Vl1-1" standby, local -> unknown
HSRP: Vl1 IP Redundancy "hsrp-Vl1-1" update, Standby -> Active
HSRP: Vl1 IP Redundancy "hsrp-Vl1-1" update, Active -> Active
Above, you can clearly see the different states we go through before we end up in the active state. Right now, SW1 is the only switch that is running HSRP, so let’s enable the VLAN 1 interface of SW2 as well:
SW2(config)#interface Vlan 1
SW2(config-if)#no shutdown
Here’s the debug output:
SW2#
HSRP: Vl1 Grp 1 Active router is 192.168.1.1
HSRP: Vl1 Nbr 192.168.1.1 created
HSRP: Vl1 Nbr 192.168.1.1 active for group 1
HSRP: Vl1 Interface UP
HSRP: Vl1 Starting minimum intf delay (1 secs) - uptime 1089
HSRP: Vl1 Intf min delay expired - uptime 1090
HSRP: Vl1 Grp 1 Init: a/HSRP enabled
HSRP: Vl1 Grp 1 Init -> Listen
HSRP: Vl1 Grp 1 Redundancy "hsrp-Vl1-1" state Init -> Backup
HSRP: Vl1 IP Redundancy "hsrp-Vl1-1" update, Init -> Backup
HSRP: Vl1 Grp 1 Listen: d/Standby timer expired (unknown)
HSRP: Vl1 Grp 1 Listen -> Speak
HSRP: Vl1 Grp 1 Redundancy "hsrp-Vl1-1" state Backup -> Speak
HSRP: Vl1 IP Redundancy "hsrp-Vl1-1" update, Backup -> Speak
HSRP: Vl1 Grp 1 Speak: d/Standby timer expired (unknown)
HSRP: Vl1 Grp 1 Standby router is local
HSRP: Vl1 Grp 1 Speak -> Standby
HSRP: Vl1 Grp 1 Redundancy "hsrp-Vl1-1" state Speak -> Standby
HSRP: Vl1 IP Redundancy "hsrp-Vl1-1" standby, unknown -> local
HSRP: Vl1 IP Redundancy "hsrp-Vl1-1" update, Speak -> Standby
Above, we can see that SW2 is seeing 192.168.1.1 (SW1) as the active router. Eventually, it ends up in the standby state.
Active Gateway Election
Why did SW2 go into standby mode instead of SW1?
By default, the switch with the highest priority will become the active HSRP device. If the priority is the same, then the highest IP address will be the tie-breaker. Let’s take a look at the priorities:
SW1#show standby | include Priority
Priority 100 (default 100)SW2#show standby | include Priority
Priority 100 (default 100)The priority is the same on both switches. SW2 has a higher IP address, so it should become the active router, but it’s not. Let’s try increasing its priority:
SW2(config)#interface Vlan 1
SW2(config-if)#standby 1 priority 150
Here’s how we can verify the new priority:
SW2#show standby | include Priority
Priority 150 (configured 150)SW2#show standby | include Active
Active virtual MAC address is 0000.0c07.ac01 (MAC Not In Use)
Active router is 192.168.1.1, priority 100 (expires in 9.232 sec)Even though SW2 has a higher priority, SW1 remains the active router. Another useful command to verify which router is active or standby is the show standby brief command:
SW1#show standby brief
                     P indicates configured to preempt.
                     |
Interface   Grp  Pri P State   Active          Standby         Virtual IP
Vl1 1 100 Active local 192.168.1.2 192.168.1.254SW2#show standby brief
P indicates configured to preempt.
|
Interface Grp Pri P State Active Standby Virtual IP
Vl1 1 150 Standby 192.168.1.1 local 192.168.1.254We can confirm that SW2 has a higher priority, but SW1 is still active. Once HSRP has decided which device should be active, it will stay active until it goes down. We can overrule this if we want, though…
Preemption
When we enable preemption, the switch with the highest priority (or IP address in case the priority is the same) will always become the new active device. Here’s how to enable this:
SW1 & SW2
(config)#interface Vlan 1
(config-if)#standby 1 preempt
Let’s see if it makes any difference:
SW1#show standby brief
                     P indicates configured to preempt.
                     |
Interface   Grp  Pri P State   Active          Standby         Virtual IP
Vl1 1 100 P Standby 192.168.1.2 local 192.168.1.254SW2#show standby brief
P indicates configured to preempt.
|
Interface Grp Pri P State Active Standby Virtual IP
Vl1 1 150 P Active local 192.168.1.1 192.168.1.254There goes…SW2 is now active, and SW1 goes to standby!
By default, preemption will take effect immediately, but it might be a good idea to use a delay. If a router reboots it might need some time to “converge”. Maybe OSPF or EIGRP need to form neighbor adjacencies or spanning tree isn’t ready yet unblocking ports. If you want to add a delay, then you can do it like this:
SW1 & SW2
(config)#interface Vlan 1
(config-if)#standby 1 preempt delay minimum 60
This will delay the preemption by 60 seconds.
Authentication
HSRP also supports authentication. You can choose between plaintext or MD5 authentication. Here’s how to configure MD5:
SW1 & SW2
(config)#interface Vlan 1
(config-if)#standby 1 authentication md5 key-string MY_SECRET_KEY
This ensures that all packets sent between the two switches are authenticated. This prevents someone on the 192.168.1.0/24 subnet from joining our HSRP setup.
HSRP Timers
By default, HSRP is pretty slow. SW1 is my standby router, and it will wait for 10 seconds (hold time) before it will become active once SW2 fails. That means we’ll have 10 seconds of downtime…let’s see if we can speed that up:
SW1(config-if)#standby 1 timers ?
  <1-254>  Hello interval in seconds
  msec     Specify hello interval in milliseconds
We can speed things up by changing the standby timers command. We can even use millisecond values. Let’s try this:
SW1 & SW2
(config)#interface Vlan 1
(config-if)#standby 1 timers msec 100 msec 300
I’ve set the hello time to 100 milliseconds and the hold timer to 300 milliseconds. Make sure your hold time is at least three times the hello timer. Let’s verify our work:
SW1#show standby | include time
Hello time 100 msec, hold time 300 msecSW2#show standby | include time
Hello time 100 msec, hold time 300 msecHSRP Version 1 and 2
There are two versions of HSRP, and depending on the router or switch model, you might have the option to use HSRP version 2. You can change the version by using the standby version command.
| HSRPv1 | HSRPv2 | |
| Group Numbers | 0 – 255 | 0 – 4095 |
| Virtual MAC address | 0000.0c07.acXX (XX = group number) | 0000.0c9f.fxxx (XXX = group number) |
| Multicast Address | 224.0.0.2 | 224.0.0.102 |
Let’s try switching our devices to HSRP version 2:
SW1 & SW2
(config)#interface Vlan 1
(config-if)#standby version 2SW1#show standby | include version
Vlan1 - Group 1 (version 2)That’s all there is to it.
Object (Interface) Tracking
There is one more thing we need to look at, and it’s called object (interface) tracking. Take a look at the following picture:
![]()
In the picture above, SW2 is the active router because we changed the priority to 150. That’s great, but what if the interface on SW2 to R3 fails? It will be the active router, but it doesn’t have a direct path to R3 anymore.
When this happens, it will send an ICMP redirect to the computer. It would be better if SW1 becomes the active HSRP router in case this happens.
HSRP offers a feature called interface tracking. We can select an interface to track, and if it fails, we will give it a penalty. This way, your priority will decrease, and another device can become the active router.
Make sure you have enabled preemption if you want to use interface tracking. Here’s an example:
SW2(config)track 1 interface GigabitEthernet 0/2 line-protocolFirst, we configure object tracking for the GigabitEthernet 0/2 interface. When the line-protocol changes (goes down), then the object state will change.
We can now use this object with HSRP:
SW2(config)#interface Vlan 1
SW2(config-if)#standby 1 track 1 ?
  decrement  Priority decrement
  shutdown   Shutdown group
We can decrease the priority, or you can decide to shut down the entire HSRP group in case the interface is down. Let’s try decrementing the priority:
SW2(config-if)#standby 1 track 1 decrement 60Let’s try this out:
SW2(config)#interface GigabitEthernet 0/2
SW2(config-if)#shutdown
Here’s what we will see on SW2:
SW2#
%TRACK-6-STATE: 1 interface Gi0/2 line-protocol Up -> Down
The interface goes down, so the state of our object changes. Let’s see if the priority has decreased:
SW2#show standby | include Priority
Priority 90 (configured 150)SW2#show standby | include Active
Active virtual MAC address is 0000.0c9f.f001 (MAC Not In Use)
Active router is 192.168.1.1, priority 100 (expires in 0.352 sec)You can see the priority is now 90 instead of the 150 that we configured.
The priority is now 90, which is lower than SW1 (100). As a result, SW2 will go to the standby state, and SW1 will move to the active state. Interface tracking is useful but it will only check the state of the interface. It’s possible that the interface remains in the up state but that we cannot reach R3. It might be a better idea to use IP SLA instead since it can check end-to-end connectivity.
Let’s remove the current object tracking configuration:
SW2(config)#interface GigabitEthernet 0/2
SW2(config-if)#no shutdown
SW2(config-if)#no standby 1 track 1 decrement 60
And configure IP SLA to ping the IP address of R3:
SW2(config)#ip sla 1
SW2(config-ip-sla)#icmp-echo 192.168.23.3
SW2(config-ip-sla-echo)#frequency 10

SW2(config)#ip sla schedule 1 start-time now life forever
We can now combine IP SLA with object tracking:
SW2(config)#no track 1
SW2(config)#track 1 ip sla 1
We’ll configure SW2 once again so that the priority will decrease by 60 when the object is down:
SW2(config)#interface Vlan 1
SW2(config-if)#standby 1 track 1 decrement 60
Let’s test our configuration. First, we want to make sure that IP SLA is working:
SW2#show ip sla statistics
IPSLAs Latest Operation Statistics

IPSLA operation id: 1
        Latest RTT: 3 milliseconds
Latest operation start time: 13:31:57 UTC Thu Feb 18 2016
Latest operation return code: OK
Number of successes: 7
Number of failures: 0
Operation time to live: Forever
IP SLA is up and running. Let’s shut the GigabitEthernet 0/2 interface on SW2 again so that IP SLA will fail:
SW2(config)#interface GigabitEthernet 0/2
SW2(config-if)#shutdown
Let’s check the current priority:
SW2#show standby | include Priority
  Priority 90 (configured 150)
The priority has decreased, which will cause SW1 to become the active router:
SW2#show standby | include Active
  Active virtual MAC address is 0000.0c9f.f001 (MAC Not In Use)
  Active router is 192.168.1.1, priority 100 (expires in 0.288 sec)
That’s all there is to it.
Configurations
Want to take a look for yourself? Here, you will find the final configuration of each device.
H1
hostname H1
!
no ip routing
!
interface GigabitEthernet0/1
 ip address 192.168.1.100 255.255.255.0
 no ip route-cache
 duplex auto
 speed auto
 media-type rj45
!
ip default-gateway 192.168.1.254
!
end
R3
hostname R3
!
interface GigabitEthernet0/1
 ip address 192.168.13.3 255.255.255.0
 duplex auto
 speed auto
 media-type rj45
!
interface GigabitEthernet0/2
 ip address 192.168.23.3 255.255.255.0
 duplex auto
 speed auto
 media-type rj45
!
end
SW1
hostname SW1
!
interface GigabitEthernet0/1
 media-type rj45
 negotiation auto
!
interface GigabitEthernet0/2
 no switchport
 ip address 192.168.13.1 255.255.255.0
 negotiation auto
!
interface Vlan1
 ip address 192.168.1.1 255.255.255.0
 standby version 2
 standby 1 ip 192.168.1.254
 standby 1 timers msec 100 msec 300
 standby 1 preempt delay minimum 60
 standby 1 authentication md5 key-string MY_SECRET_KEY
!
end
SW2
hostname SW2
!
track 1 ip sla 1
!
interface GigabitEthernet0/1
 media-type rj45
 negotiation auto
!
interface GigabitEthernet0/2
 no switchport
 ip address 192.168.23.2 255.255.255.0
 negotiation auto
!
interface Vlan1
 ip address 192.168.1.2 255.255.255.0
 standby version 2
 standby 1 ip 192.168.1.254
 standby 1 timers msec 100 msec 300
 standby 1 priority 150
 standby 1 preempt delay minimum 60
 standby 1 authentication md5 key-string MY_SECRET_KEY
 standby 1 track 1 decrement 60
!
ip sla 1
 icmp-echo 192.168.23.3
 frequency 10
ip sla schedule 1 life forever start-time now
!
end
Conclusion
You have now seen how to configure HSRP, how to enable authentication, and how to “tune” some of its parameters. I hope this has been useful. Share it with your friends and/or colleagues. If you have any questions, feel free to leave a comment in our forum.
hi Rene
at the beginning of the lab, i wasn’t able to issue the following commands
the thing is SwitchA does not have the option standby under interface, not unless i convert this interface as a layer 3 int with command “no switchport”, then it has the option, but when i try to type the following command
standby 1 ip 192.168.1.3then it give me the error that overlaps with vlan 1, and this is because the layer 3 interface does not belong to any vlan, can you please advice.
or should i
... Continue reading in our forumHi Ramon,
You can only use configure HSRP / VRRP / GLBP on “routed” (L3) interfaces, not on switchports (L2 interfaces).
You have two options:
or
The reason you get the overlapping error is beca
... Continue reading in our forumHi Rene i lab this on a real cisco equipments and the lab was awesome thank you very much. Please can you make a video training on how to setup a complete ACS server and snmp configuration for a newly cisco switch/router. Moreover, we will like to see more of a recommended way of designing and implementing cisco configuration a network thank you.
Hi Princek,
I’ll probably do some ACS tutorials/videos. I’m currently adding some ASA tutorials and ACS will be a nice addon. I already have a lesson for SNMPv3 on Cisco IOS router:
https://networklessons.com/network-management/how-to-configure-snmpv3-on-cisco-ios-router/
About the designing part, anything in particular you are looking for? There’s a lot to cover when it comes to network design.
Hey,
In above example, why choose layer 3 switches instead of routers? Also, IP SLA pings forever but at what time interval ping occurs?
Thanks,
AD