Lesson Contents
Routing protocols select the “best path” using different metrics:
- RIP uses a hop count
- OSPF uses cost (based on interface bandwidth)
- EIGRP uses a composite metric which looks at the bandwidth, delay, load, and reliability on an interface.
Dynamic values in routing protocols like EIGRP’s load and reliability never took off. We want our networks to be safe and predictable so the general recommendation with EIGRP is to stick to static values like bandwidth and delay.
Still, the idea behind routing based on dynamic values is interesting so Cisco created Optimized Edge Routing (OER). OER is not a routing protocol, it requires existing routing but is able to influence your routing by injecting routes. It’s able to select different paths in the network and does this on a per-prefix level. OER looks at different criteria like packet loss, response times, path availability, and traffic load.
OER is a good step forward but it’s not enough, it does “prefix based route optimization” but optimization per prefix is not good enough in today’s world. Nowadays, it’s all about “application based optimization”. Performance Routing (PfR) is very similar to OER but is able to optimize our routing based on application requirements. Technically, OER and PfR are 95% the same but Cisco rebranded OER to PfR.
PfR uses different “phases”, these are the same as the OER phases so I will just explain them in a nutshell here:
- Profile/Learning: in a typical network, there are a lot of flows and we can’t optimize everything. PfR learns about flows with high throughput and/or delay. A flow that PfR wants to optimize is called a traffic-class. The list with all traffic classes is called the monitored traffic-classes (MTC) list.
- Measure: collect and calculate performance metrics for the traffic-classes we learned in the profile/learning phase.
- Apply policy: compare the performance metrics for a traffic-class against certain thresholds to see if a traffic class is in-policy or out-of-policy.
- Control/Enforce: influence our traffic by injecting routes or by using policy-based routing (PBR).
- Verify: after making our changes, we keep monitoring the traffic-class to verify performance and make adjustments if needed.
There are two device roles in PfR:
- Master controller (MC): this is where the magic happens. The MC communicates with all border routers, monitors everything, and does the calculations.
- Border router (BR): a border router is a router that has one or more interfaces connected to external networks. The BR reports performance metrics to the MC and on this router we implement policies.
The MC doesn’t have to be in the forwarding path, it can be any router in your network. You can also configure the MC and BR on a single router.
PfR uses three interface types:
- Internal: we use these interfaces to connect to the internal network.
- External: we use these interfaces to connect to external networks. You need at least two external interfaces to make PfR work.
- Local: this is the source interface we use to communicate between the MC and BRs. We often use loopback interfaces for this.
In the remaining of this lesson, I’ll show you how to configure PfR on Cisco IOS routers.
Configuration
We’ll use the following topology:
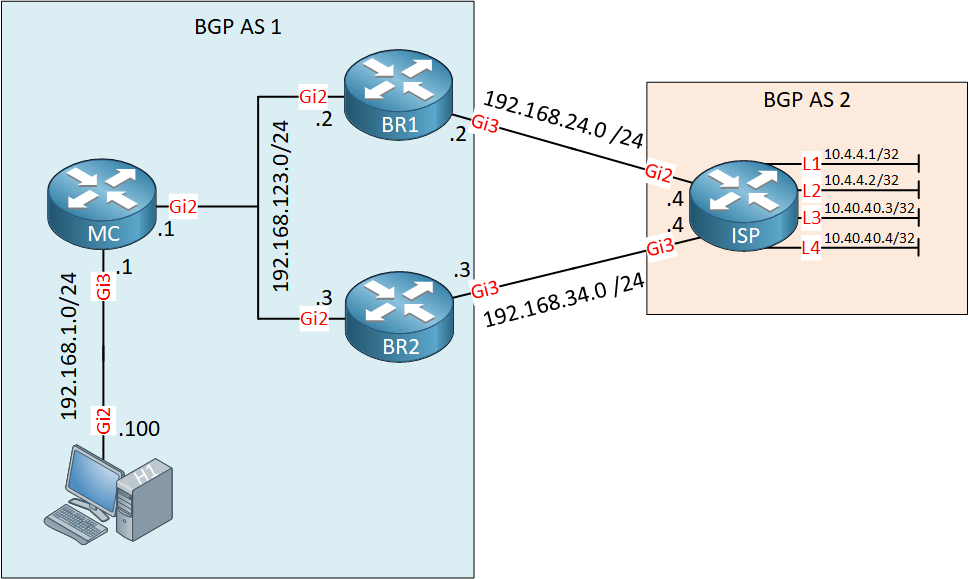
Let me explain what we have:
- H1 is a traffic generator that sends traffic to the ISP router loopback interfaces.
- MC, BR1, and BR2 run iBGP.
- MC is our master controller.
- BR1 and BR2 are border routers.
- Between AS 1 and AS 2 we run eBGP.
We’ll configure PfR so that it automatically learns about the traffic from H1 to ISP1 and optimize it. It will do this by influencing our BGP routing.
Configurations
Want to take a look for yourself? Here you will find the startup configuration of each device.
BR1
hostname BR1
!
key chain PFR
 key 1
  key-string NETWORKLESSONS
!
interface Loopback0
 ip address 2.2.2.2 255.255.255.255
!
interface GigabitEthernet2
 ip address 192.168.123.2 255.255.255.0
 no mop enabled
 no mop sysid
!
interface GigabitEthernet3
 ip address 192.168.24.2 255.255.255.0
 load-interval 30
!
router ospf 1
 network 2.2.2.2 0.0.0.0 area 0
 network 192.168.123.0 0.0.0.255 area 0
!
router bgp 1
 network 192.168.1.0
 network 192.168.123.0
 neighbor 1.1.1.1 remote-as 1
 neighbor 1.1.1.1 update-source Loopback0
 neighbor 1.1.1.1 next-hop-self
 neighbor 3.3.3.3 remote-as 1
 neighbor 3.3.3.3 update-source Loopback0
 neighbor 192.168.24.4 remote-as 2
!
end
BR2
hostname BR2
!
key chain PFR
 key 1
  key-string NETWORKLESSONS
!
interface Loopback0
 ip address 3.3.3.3 255.255.255.255
!
interface GigabitEthernet2
 ip address 192.168.123.3 255.255.255.0
!
interface GigabitEthernet3
 ip address 192.168.34.3 255.255.255.0
!
router ospf 1
 network 3.3.3.3 0.0.0.0 area 0
 network 192.168.123.0 0.0.0.255 area 0
!
router bgp 1
 network 192.168.1.0
 network 192.168.123.0
 neighbor 1.1.1.1 remote-as 1
 neighbor 1.1.1.1 update-source Loopback0
 neighbor 1.1.1.1 next-hop-self
 neighbor 2.2.2.2 remote-as 1
 neighbor 2.2.2.2 update-source Loopback0
 neighbor 192.168.34.4 remote-as 2
!
end
H1
hostname H1
!
interface GigabitEthernet2
 ip address 192.168.1.100 255.255.255.0
!
ip route 0.0.0.0 0.0.0.0 192.168.1.1
!
end
ISP1
hostname ISP1
!
interface Loopback1
 ip address 10.4.4.1 255.255.255.255
!
interface Loopback2
 ip address 10.4.4.2 255.255.255.255
!
interface Loopback3
 ip address 10.40.40.3 255.255.255.255
!
interface Loopback4
 ip address 10.40.40.4 255.255.255.255
!
interface GigabitEthernet2
 ip address 192.168.24.4 255.255.255.0
!
interface GigabitEthernet3
 ip address 192.168.34.4 255.255.255.0
!
router bgp 2
 network 10.0.0.0
 neighbor 192.168.24.2 remote-as 1
 neighbor 192.168.34.3 remote-as 1
!
ip route 10.0.0.0 255.0.0.0 Null0
!
end
MC
hostname MC
!
key chain PFR
 key 1
  key-string NETWORKLESSONS
!
interface Loopback0
 ip address 1.1.1.1 255.255.255.255
!
interface GigabitEthernet2
 ip address 192.168.123.1 255.255.255.0
!
interface GigabitEthernet3
 ip address 192.168.1.1 255.255.255.0
!
router ospf 1
 network 1.1.1.1 0.0.0.0 area 0
 network 192.168.1.0 0.0.0.255 area 0
 network 192.168.123.0 0.0.0.255 area 0
!
router bgp 1
 network 192.168.1.0
 neighbor 2.2.2.2 remote-as 1
 neighbor 2.2.2.2 update-source Loopback0
 neighbor 3.3.3.3 remote-as 1
 neighbor 3.3.3.3 update-source Loopback0
!
end
Default BGP Routing
Let’s take a look at our current routing. Here’s the BGP table of our MC:
MC#show ip bgp
BGP table version is 4, local router ID is 1.1.1.1
Status codes: s suppressed, d damped, h history, * valid, > best, i - internal,
              r RIB-failure, S Stale, m multipath, b backup-path, f RT-Filter,
              x best-external, a additional-path, c RIB-compressed,
              t secondary path,
Origin codes: i - IGP, e - EGP, ? - incomplete
RPKI validation codes: V valid, I invalid, N Not found

     Network          Next Hop            Metric LocPrf Weight Path
 * i  10.0.0.0         3.3.3.3                  0    100      0 2 i
 *>i                   2.2.2.2                  0    100      0 2 i
 * i  192.168.1.0      3.3.3.3                  2    100      0 i
 * i                   2.2.2.2                  2    100      0 i
 *>                    0.0.0.0                  0         32768 i
 r i  192.168.123.0    3.3.3.3                  0    100      0 i
 r>i                   2.2.2.2                  0    100      0 i
We see two entries for the 10.0.0.0/8 network and iBGP uses BR1 as the exit point. We can also check this in the routing table:
MC#show ip route  bgp

      10.0.0.0/8 is variably subnetted, 3 subnets, 3 masks
B        10.0.0.0/8 [200/0] via 2.2.2.2, 16:35:51
Let’s also check our border routers:
BR1#show ip bgp

     Network          Next Hop            Metric LocPrf Weight Path
 * i  10.0.0.0         192.168.34.4             0    100      0 2 i
 *>                    192.168.24.4             0             0 2 i
 * i  192.168.1.0      1.1.1.1                  0    100      0 i
 * i                   192.168.123.1            2    100      0 i
 *>                    192.168.123.1            2         32768 i
 * i  192.168.123.0    3.3.3.3                  0    100      0 i
*> 0.0.0.0 0 32768 iBR1#show ip route bgp
10.0.0.0/8 is variably subnetted, 3 subnets, 3 masks
B 10.0.0.0/8 [20/0] via 192.168.24.4, 16:36:52Above, we see that BR1 uses its eBGP entry. Here’s BR2:
BR2#show ip bgp

     Network          Next Hop            Metric LocPrf Weight Path
 * i  10.0.0.0         192.168.24.4             0    100      0 2 i
 *>                    192.168.34.4             0             0 2 i
 * i  192.168.1.0      1.1.1.1                  0    100      0 i
 * i                   192.168.123.1            2    100      0 i
 *>                    192.168.123.1            2         32768 i
 * i  192.168.123.0    2.2.2.2                  0    100      0 i
*> 0.0.0.0 0 32768 iBR2#show ip route bgp
10.0.0.0/8 is variably subnetted, 3 subnets, 3 masks
B 10.0.0.0/8 [20/0] via 192.168.34.4, 16:37:16BR2 has also installed its eBGP route. Right now, we only have a 10.0.0.0/8 route and iBGP uses BR1 as the exit point to reach AS 2. Wouldn’t it be nice if we can also use BR2 for some traffic?
Performance Routing
Let’s configure Performance Routing. On our interfaces, we need to set the correct bandwidth since this is something PfR takes into account when selecting an exit path. I also change the load-interval to thirty seconds (default value is five minutes) so we calculate the interface statistics more often:
BR1(config)#interface GigabitEthernet3
BR1(config-if)#bandwidth 128
BR1(config-if)#load-interval 30BR2(config)#interface GigabitEthernet3
BR2(config-if)#bandwidth 256
BR1(config-if)#load-interval 30PfR requires a keychain for authentication so let’s add one on the MC and BCs:
MC, BR1 & BR2
(config)#key chain PFR
(config-keychain)#key 1
(config-keychain-key)#key-string NETWORKLESSONS
Let’s configure the master controller. This is where I add my border routers and set the correct interfaces:
MC(config)#pfr master
MC(config-pfr-mc)#border 2.2.2.2 key-chain PFR
MC(config-pfr-mc-br)#interface GigabitEthernet2 internal
MC(config-pfr-mc-br)#interface GigabitEthernet3 external

MC(config-pfr-mc)#border 3.3.3.3 key-chain PFR
MC(config-pfr-mc-br)#interface GigabitEthernet2 internal
MC(config-pfr-mc-br)#interface GigabitEthernet3 external
PfR can be pretty slow, especially in a lab. To speed things up, I tune some of the default timers:
MC(config)#pfr master
MC(config-oer-mc)#holddown 90
MC(config-oer-mc)#backoff 90 180 90
MC(config-pfr-mc)#learn
MC(config-pfr-mc-learn)#periodic-interval 1
MC(config-pfr-mc-learn)#monitor-period 1
Pfr can produce some useful logging messages on the console so I like to enable it:
MC(config)#pfr master
MC(config-pfr-mc)#logging
This completes the configuration of the master controller. The configuration of the border routers is pretty straight-forward:

Hello,
it was a great lesson very interesting!!!, when I lab ( had to use OER instead) it up, it worked but I came up with a couple of question.
using command show oer master border detail, only shows utilization, however in the policy it uses delay also, in fact is priority 11 more than 12 utilization, as in this lab the delay its the same is deciding with utilization, but delay has the highes
... Continue reading in our forumHi Ignacio,
If you lab this up, I highly recommend to use PfR. OER is pretty buggy and I had lots of issues with it.
One command I can think of is
... Continue reading in our forumshow pfr master traffic-class detail:Thanks very much for the explanation.
Hello,
Is it possible to use PFR when you are receiving default routes from a service provider or this can only be effective when the full routing table is being received?
Hello Tariq
PfR will function regardless of whether or not the ISP simply sends you a default route or more routing information. The policy that is used to determine the routing is based on the traffic itself and not on whether or not it is a default route. In the lesson, the PfR is actually used to balance the use of traffic between the multiple exit points from the local AS. This is why at least two external interfaces are required to make PfR work.
I hope this has been helpful!
Laz