Lesson Contents
In the first DMVPN lesson I explained the basics, the second one covers a basic DMVPN phase 1 configuration which we will use in this lesson where we configure OSPF.
OSPF is not the best solution when it comes to DMVPN. Because it’s a link-state protocol, each spoke router has to have the complete LSDB of the DMVPN area. Since we use a single subnet on the multipoint GRE interfaces, all spoke routers have to be in the same area.
With a few routers this is no problem but when you have dozens or hundreds of routers, this doesn’t scale very well. Most spoke routers are probably low end devices at branch offices that don’t like all the LSA flooding that OSPF might do within the area. One way to reduce the number of prefixes in the DMVPN network is to use a stub or totally stub area.
OSPF also has a lot of different network types:
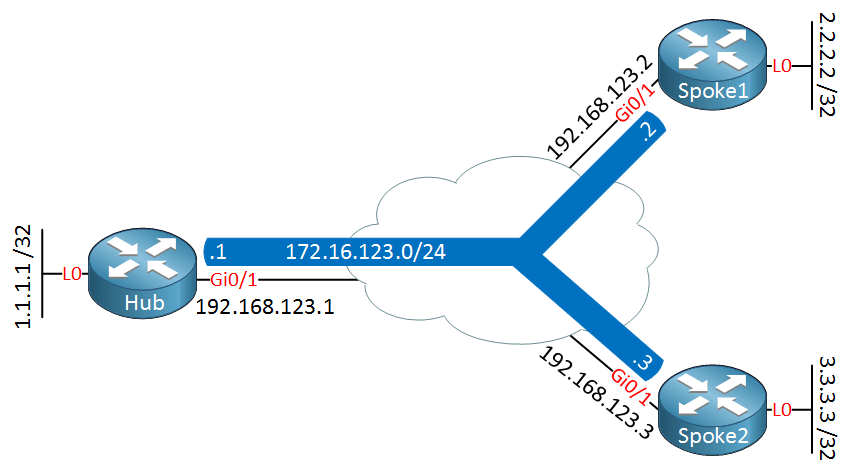
In this lesson I’ll show you how to configure OSPF on a DMVPN phase 1 network. Here’s the topology we will use:
Let’s take a look at the configuration…
Configuration
Tunnel interfaces
Here is the basic DMVPN phase 1 configuration that we will use:
Hub(config)#interface Tunnel0
Hub(config-if)#ip address 172.16.123.1 255.255.255.0
Hub(config-if)#ip nhrp authentication DMVPN
Hub(config-if)#ip nhrp map multicast dynamic
Hub(config-if)#ip nhrp network-id 1
Hub(config-if)#tunnel source GigabitEthernet0/1
Hub(config-if)#tunnel mode gre multipointSpoke1(config)#interface Tunnel0
Spoke1(config-if)#ip address 172.16.123.2 255.255.255.0
Spoke1(config-if)#ip nhrp authentication DMVPN
Spoke1(config-if)#ip nhrp map 172.16.123.1 192.168.123.1
Spoke1(config-if)#ip nhrp map multicast 192.168.123.1
Spoke1(config-if)#ip nhrp network-id 1
Spoke1(config-if)#ip nhrp nhs 172.16.123.1
Spoke1(config-if)#tunnel source GigabitEthernet0/1
Spoke1(config-if)#tunnel destination 192.168.123.1Spoke2(config)#interface Tunnel0
Spoke2(config-if)#ip address 172.16.123.3 255.255.255.0
Spoke2(config-if)#ip nhrp authentication DMVPN
Spoke2(config-if)#ip nhrp map 172.16.123.1 192.168.123.1
Spoke2(config-if)#ip nhrp map multicast 192.168.123.1
Spoke2(config-if)#ip nhrp network-id 1
Spoke2(config-if)#ip nhrp nhs 172.16.123.1
Spoke2(config-if)#tunnel source GigabitEthernet0/1
Spoke2(config-if)#tunnel destination 192.168.123.1Let’s make sure it works:
Hub#show dmvpn | begin 192.168.123.
     1 192.168.123.2      172.16.123.2    UP 00:22:37     D
     1 192.168.123.3      172.16.123.3    UP 00:00:32     D
This is looking good, two registrations. Let’s try a quick ping:
Hub#ping 172.16.123.2
Type escape sequence to abort.
Sending 5, 100-byte ICMP Echos to 172.16.123.2, timeout is 2 seconds:
!!!!!
Success rate is 100 percent (5/5), round-trip min/avg/max = 6/6/8 msHub#ping 172.16.123.3
Type escape sequence to abort.
Sending 5, 100-byte ICMP Echos to 172.16.123.3, timeout is 2 seconds:
!!!!!
Success rate is 100 percent (5/5), round-trip min/avg/max = 5/6/9 msOur tunnels are up and running. Let’s play with OSPF!
OSPF
We will try each of the OSPF network types, the default is point-to-point so that’s what we will start with:
Point-to-point
Let’s configure OSPF, I will advertise all networks in the same area for now:
Hub(config)#router ospf 1
Hub(config-router)#network 172.16.123.0 0.0.0.255 area 0
Hub(config-router)#network 1.1.1.1 0.0.0.0 area 0Spoke1(config)#router ospf 1
Spoke1(config-router)#network 172.16.123.0 0.0.0.255 area 0
Spoke1(config-router)#network 2.2.2.2 0.0.0.0 area 0Spoke2(config)#router ospf 1
Spoke2(config-router)#network 172.16.123.0 0.0.0.255 area 0
Spoke2(config-router)#network 3.3.3.3 0.0.0.0 area 0As soon as you configure the network commands, the hub router will spam the following message:
Hub#
%OSPF-5-ADJCHG: Process 1, Nbr 2.2.2.2 on Tunnel0 from EXCHANGE to DOWN, Neighbor Down: Adjacency forced to reset
%OSPF-5-ADJCHG: Process 1, Nbr 2.2.2.2 on Tunnel0 from EXCHANGE to DOWN, Neighbor Down: Adjacency forced to reset
Why do we see this? Take a look at the OSPF default network type:
Hub#show ip ospf interface Tunnel 0 | include Network Type
  Process ID 1, Router ID 1.1.1.1, Network Type POINT_TO_POINT, Cost: 1000
Spoke1#show ip ospf interface Tunnel 0 | include Network Type
Process ID 1, Router ID 2.2.2.2, Network Type POINT_TO_POINT, Cost: 1000The default is point-to-point and we are using multipoint interfaces. Our hub router expects one neighbor, not two. It will keep establishing and tearing neighbor adjacencies with the default network type.
This is never going to work, not for any of the phases so the OSPF point-to-point network type is something you can forget about with DMVPN. Let’s move on to the next one!
Broadcast
The broadcast OSPF network type works very well since it automatically establishes neighbor adjacencies. Let’s change the network type on all routers:
Hub, Spoke1 & Spoke2
(config)#interface Tunnel 0
(config-if)#ip ospf network broadcast
There is no direct communication between spoke routers so we need to make sure that the spoke router can never be elected as DR or BDR. To enforce this we’ll set their priority to 0:
Spoke1 & Spoke2
(config)#interface Tunnel 0
(config-if)#ip ospf priority 0
Let’s reset OSPF:
Hub#clear ip ospf process
Reset ALL OSPF processes? [no]: yes
And verify if we have neighbors:
Hub#show ip ospf neighbor

Neighbor ID     Pri   State           Dead Time   Address         Interface
2.2.2.2           0   FULL/DROTHER    00:00:37    172.16.123.2    Tunnel0
3.3.3.3           0   FULL/DROTHER    00:00:32    172.16.123.3    Tunnel0
Excellent, we see two neighbors. Using an OSPF network type that automatically establishes neighbor adjacencies works well on a hub that allows dynamic spoke routers. Let’s check the routing tables:
Hub#show ip route ospf

      2.0.0.0/32 is subnetted, 1 subnets
O        2.2.2.2 [110/1001] via 172.16.123.2, 00:02:16, Tunnel0
      3.0.0.0/32 is subnetted, 1 subnets
O 3.3.3.3 [110/1001] via 172.16.123.3, 00:02:06, Tunnel0Spoke1#show ip route ospf
1.0.0.0/32 is subnetted, 1 subnets
O 1.1.1.1 [110/1001] via 172.16.123.1, 00:02:24, Tunnel0
3.0.0.0/32 is subnetted, 1 subnets
O 3.3.3.3 [110/1001] via 172.16.123.3, 00:02:14, Tunnel0Spoke2#show ip route ospf
1.0.0.0/32 is subnetted, 1 subnets
O 1.1.1.1 [110/1001] via 172.16.123.1, 00:03:53, Tunnel0
2.0.0.0/32 is subnetted, 1 subnets
O 2.2.2.2 [110/1001] via 172.16.123.2, 00:03:53, Tunnel0Each router has learned the networks on the different loopback interfaces. When we use the broadcast network type, the next hop value is preserved. Do we have connectivity? Let’s find out:
Spoke1#ping 3.3.3.3 source loopback 0
Type escape sequence to abort.
Sending 5, 100-byte ICMP Echos to 3.3.3.3, timeout is 2 seconds:
Packet sent with a source address of 2.2.2.2
!!!!!
Success rate is 100 percent (5/5), round-trip min/avg/max = 7/8/9 msSpoke1#traceroute 3.3.3.3 source loopback 0
Type escape sequence to abort.
Tracing the route to 3.3.3.3
VRF info: (vrf in name/id, vrf out name/id)
1 172.16.123.1 7 msec 8 msec 6 msec
2 172.16.123.3 8 msec 9 msec *Since we use DMVPN phase 1, all traffic will go through the hub. Let’s move on to the next network type!
Non-Broadcast
The non-broadcast network type works exactly the same as broadcast with the exception that we have to configure static neighbors. It works but it kinda defeats the purpose of having dynamic spokes if we have to configure static neighbors.
Let’s change the network type on all routers:
Hub, Spoke1 & Spoke2
(config)#interface Tunnel 0
(config-if)#ip ospf network non-broadcast
Let’s manually configure the neighbors:
Hi Rene,
If we configure the stub area and the spoke receive the default route, the default route will not take any effect as we still have a static default route at the SPOKE router which pointing to the internet gateway. We still not able to reach to the IA route from the spoke router in this case right?
Davis
Hi Davis,
Good question and yes, this is an issue. In my example I could use default routes since the routers are directly connected. In a real network however you are probably using a default route towards the ISP.
In that case you shouldn’t use a default route but a summary route instead.
Rene
In the “Non Broadcast” configuration section ; I’m a little bit confused about the neighbor command.
With my GNS3 IOS :
The neighbor command expects that the interface be configured as point-to-multipoint. And, finally ; it does not turn the interface to NBMA.
The command ip ospf network non-broadcast does perfectly the job.
What exactly is the difference between the two commands ?
Hello Maodo
In order to configure the network as an NBMA, it is necessary to enter the
ip ospf network non-broadcastcommand. If that is done, then in order to get the OSPF functioning correctly, theneighborcommand must be issued. This is because when you configure the interface as an NBMA, neighbor relationships will not form automatically.Now in @ReneMolenaar’s lesson, the command
ip ospf network non-broadcastwas not actually included in the lesson. It was assumed. It might be worth clarifying that in the lesson. I will let @ReneMolenaar know…I hope this has been helpful!
Laz
For last ospf example, it seems the configuration below is missing ?
network 1.1.1.1 0.0.0.0 area 0