EIGRP Authentication can only be enabled on the interface level, and it’s impossible to configure this per neighbor on a multi-access network. What can we do if we face the following requirements in a CCIE lab exam?
- Enable EIGRP authentication between R1 and R2 using key “R1-R2”.
- Enable EIGRP authentication between R1 and R3 using key “R1-R3”.
- You are not allowed to use sub-interfaces or configure additional subnets.
- Don’t change the EIGRP AS Number.
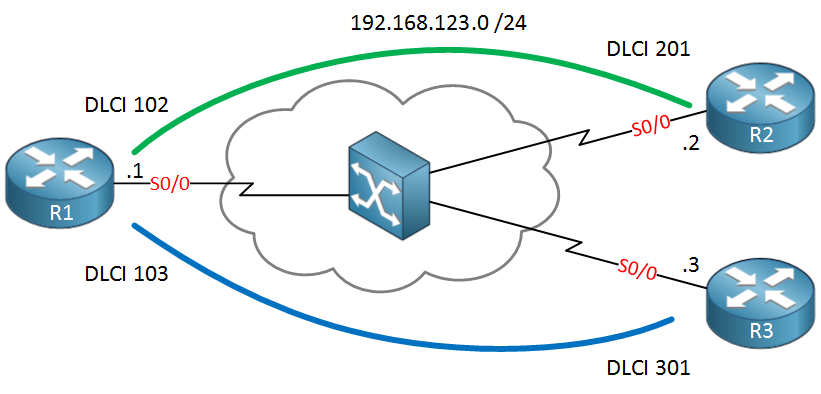
This is a tricky solution, but fortunately, there is a nice workaround for this. In this lesson, I’ll show you the problem and how to fix it. The network that we will use is a simple hub and spoke frame-relay topology. R1 is our hub router and R2 / R3 are spoke routers:
 We’ll start by configuring frame-relay, adding some IP addresses, and enable EIGRP:
R1(config)#interface serial0/0
R1(config-if)#encapsulation frame-relay
R1(config-if)#no shutdown
R1(config-if)#ip address 192.168.123.1 255.255.255.0R2(config)#interface serial0/0
R2(config-if)#encapsulation frame-relay
R2(config-if)#no shutdown
R2(config-if)#ip address 192.168.123.2 255.255.255.0R3(config)#interface serial0/0
R3(config-if)#encapsulation frame-relay
R3(config-if)#no shutdown
R3(config-if)#ip address 192.168.123.3 255.255.255.0This allows reachability between the Hub and spoke routers. Let’s enable EIGRP:
R1, R2 & R3:
router eigrp 123
no auto-summary
network 192.168.123.0
Nothing special so far. I just want to make sure the routers become neighbors. Let’s make sure R1 has two neighbors:
R1#show ip eigrp neighbors
IP-EIGRP neighbors for process 123
H   Address                 Interface       Hold Uptime   SRTT   RTO  Q  Seq
                                            (sec)         (ms)       Cnt Num
1   192.168.123.2           Se0/0            143 00:00:38 1604  5000  0  3
0   192.168.123.3           Se0/0            143 00:00:38   23   200  0  3
Perfect, we have some neighbors. Our next move is to configure some key chains. One for R1-R2 and another one for R1-R3:
R1(config)#key chain R1-R2
R1(config-keychain)#key 1
R1(config-keychain-key)#key-string R1-R2R1(config)#key chain R1-R3
R1(config-keychain)#key 1
R1(config-keychain-key)#key-string R1-R3Creating key chains is no problem. Now we need to activate it on the interface:
R1(config-if)#ip authentication key-chain eigrp 123 R1-R2 ?
  <cr>
Here’s our problem…we can only configure a single key chain on an interface, and there’s no way to specify the neighbor or something. There’s no way to get around this…maybe you are thinking about playing with the key IDs, perhaps using key 1 for R2 and key 2 for R3 or something. This sounds plausible, but there’s no way to tell EIGRP which key to use for a certain neighbor.
There is a trick, however, to make this work without breaking our requirements. We can use virtual templates to get the job done.
For each PVC, we will create a virtual template, and we will attach the key chain to the corresponding virtual template. This allows us to use different keys between neighbors.
Let’s start with R1 and create the virtual templates:
R1(config)#interface virtual-template 12
R1(config-if)#ip address 192.168.123.1 255.255.255.0
R1(config-if)#ip authentication mode eigrp 123 md5
R1(config-if)#ip authentication key-chain eigrp 123 R1-R2

R1(config)#interface virtual-template 13
R1(config-if)#ip address 192.168.123.1 255.255.255.0
R1(config-if)#ip authentication mode eigrp 123 md5
R1(config-if)#ip authentication key-chain eigrp 123 R1-R3
Virtual-template 12 is for the PVC between R1-R2, and virtual-template 13 is for the PVC between R1-R3. As you can see, I attached the different key chains to the virtual templates. Also, note that I used the same IP address on both virtual templates.
Let’s enable those virtual templates on the interface now:
Gr8 tutorial…Never read about this virtual-template before… will practice today… thnx Rene .
nice work indeed.. but doesn’t this break the ccie lab requirements of not creating new interfaces unless explicitly requested? or am i missing something here?
thanks Mr.René Molenaar but what if we use sub-interface in R1 ? do we still need virtual-template commands ??
thanks a lot for ur effort
Hi Mohammed,
If you use sub-interface then this doesn’t apply because you can activate EIGRP authentication per (sub)interface. This “trick” is only a fun method to use when you are not allowed to use sub-interfaces…something you could see in a CCIE lab exam.
Rene
Hi Rene,
I have tow question :-
1 - You configure the same IP address on both virtual-template interfaces and you do not have any overlaps with the tow virtual-template interfaces, so how did this happen ?
2 - Does OSPF support the authentication per Neighbor ?
Thanks,