Lesson Contents
In this lesson we’ll take a look how to configure RIP on a DMVPN phase 3 network. If you are unsure what the differences between the different DMVPN phases are then you might want to start with my introduction to DMVPN first.
We will use the DMVPN phase 3 basic configuration for this example. Here’s the topology we will use:
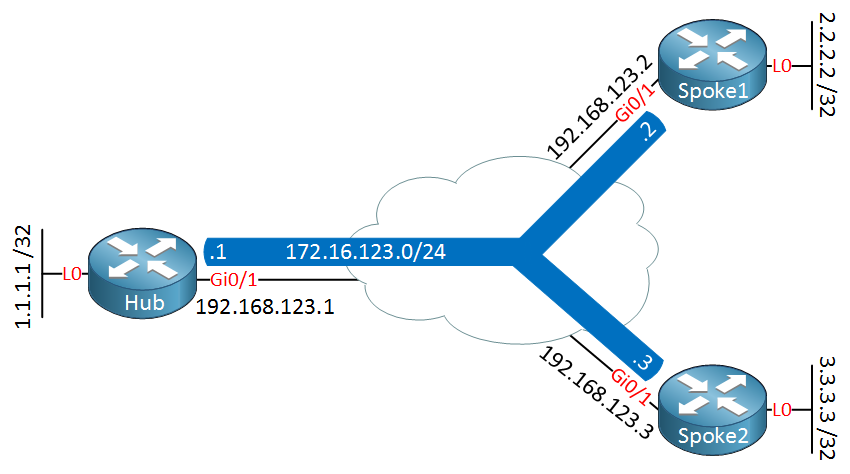
We have a hub router and two spoke routers. Here’s the DMVPN phase 3 configuration:
Hub(config)#interface Tunnel0
Hub(config-if)#ip address 172.16.123.1 255.255.255.0
Hub(config-if)#ip nhrp authentication DMVPN
Hub(config-if)#ip nhrp map multicast dynamic
Hub(config-if)#ip nhrp network-id 1
Hub(config-if)#tunnel source GigabitEthernet0/1
Hub(config-if)#tunnel mode gre multipoint
Hub(config-if)#ip nhrp redirect
Spoke1(config)#interface Tunnel0
Spoke1(config-if)#ip address 172.16.123.2 255.255.255.0
Spoke1(config-if)#ip nhrp authentication DMVPN
Spoke1(config-if)#ip nhrp map 172.16.123.1 192.168.123.1
Spoke1(config-if)#ip nhrp map multicast 192.168.123.1
Spoke1(config-if)#ip nhrp network-id 1
Spoke1(config-if)#ip nhrp nhs 172.16.123.1
Spoke1(config-if)#tunnel source GigabitEthernet0/1
Spoke1(config-if)#tunnel mode gre multipoint
Spoke2(config-if)#ip nhrp shortcutSpoke2(config)#interface Tunnel0
Spoke2(config-if)#ip address 172.16.123.3 255.255.255.0
Spoke2(config-if)#ip nhrp authentication DMVPN
Spoke2(config-if)#ip nhrp map 172.16.123.1 192.168.123.1
Spoke2(config-if)#ip nhrp map multicast 192.168.123.1
Spoke2(config-if)#ip nhrp network-id 1
Spoke2(config-if)#ip nhrp nhs 172.16.123.1
Spoke2(config-if)#tunnel source GigabitEthernet0/1
Spoke2(config-if)#tunnel mode gre multipoint
Spoke2(config-if)#ip nhrp shortcutLet’s make sure the hub has two NHRP registrations:
Hub#show dmvpn
Legend: Attrb --> S - Static, D - Dynamic, I - Incomplete
        N - NATed, L - Local, X - No Socket
        T1 - Route Installed, T2 - Nexthop-override
        C - CTS Capable
        # Ent --> Number of NHRP entries with same NBMA peer
        NHS Status: E --> Expecting Replies, R --> Responding, W --> Waiting
        UpDn Time --> Up or Down Time for a Tunnel
==========================================================================

Interface: Tunnel0, IPv4 NHRP Details
Type:Hub, NHRP Peers:2,

 # Ent  Peer NBMA Addr Peer Tunnel Add State  UpDn Tm Attrb
 ----- --------------- --------------- ----- -------- -----
     1 192.168.123.2      172.16.123.2    UP 00:00:04     D
     1 192.168.123.3      172.16.123.3    UP 00:00:03     D
So far so good, can we ping the spoke routers?
Hub#ping 172.16.123.2
Type escape sequence to abort.
Sending 5, 100-byte ICMP Echos to 172.16.123.2, timeout is 2 seconds:
!!!!!
Success rate is 100 percent (5/5), round-trip min/avg/max = 7/8/10 msHub#ping 172.16.123.3
Type escape sequence to abort.
Sending 5, 100-byte ICMP Echos to 172.16.123.3, timeout is 2 seconds:
!!!!!
Success rate is 100 percent (5/5), round-trip min/avg/max = 7/7/8 msOur pings are working, time to configure RIP…
RIP
Unlike DMVPN phase 2, our spoke routers don’t need specific entries in their routing tables. The only thing they’ll need is a summary that covers the networks behind all spoke routers or a default route. I’ll configure the hub router so that it will only advertise a default route to the spoke routers:
Hub(config)#ip prefix-list DEFAULT_ROUTE permit 0.0.0.0/0

Hub(config)#router rip
Hub(config-router)#version 2
Hub(config-router)#no auto-summary
Hub(config-router)#network 172.16.0.0
Hub(config-router)#default-information originate
Hub(config-router)#distribute-list prefix DEFAULT_ROUTE out Tunnel 0
We will configure the spoke routers so that they advertise everything to the hub:
Spoke1(config)#router rip
Spoke1(config-router)#version 2
Spoke1(config-router)#no auto-summary
Spoke1(config-router)#network 172.16.0.0
Spoke1(config-router)#network 2.0.0.0Spoke2(config)#router rip
Spoke2(config-router)#version 2
Spoke2(config-router)#no auto-summary
Spoke2(config-router)#network 172.16.0.0
Spoke2(config-router)#network 3.0.0.0That should do it, let’s check the routing tables:
Hub#show ip route

      2.0.0.0/32 is subnetted, 1 subnets
R        2.2.2.2 [120/1] via 172.16.123.2, 00:00:16, Tunnel0
      3.0.0.0/32 is subnetted, 1 subnets
R 3.3.3.3 [120/1] via 172.16.123.3, 00:00:24, Tunnel0Spoke1#show ip route rip
R* 0.0.0.0/0 [120/1] via 172.16.123.1, 00:00:28, Tunnel0Spoke2#show ip route rip
R* 0.0.0.0/0 [120/1] via 172.16.123.1, 00:00:02, Tunnel0Our hub has learned the two networks on the loopback interfaces of our spoke routers. The spokes only have a default route.
Before we test spoke-to-spoke connectivity, let me show you the NHRP cache on the two spoke routers:
Spoke1#show dmvpn | begin Peer
Type:Spoke, NHRP Peers:1,

 # Ent  Peer NBMA Addr Peer Tunnel Add State  UpDn Tm Attrb
 ----- --------------- --------------- ----- -------- -----
1 192.168.123.1 172.16.123.1 UP 00:22:10 SSpoke2#show dmvpn | begin Peer
Type:Spoke, NHRP Peers:1,
# Ent Peer NBMA Addr Peer Tunnel Add State UpDn Tm Attrb
----- --------------- --------------- ----- -------- -----
1 192.168.123.1 172.16.123.1 UP 00:22:32 SRight now the two spoke routers only have an entry for the hub router, this will change in a minute. Before I test connectivity between spoke1 and spoke2, let’s enable a debug:
Hub, Spoke1 & Spoke2#debug nhrp
NHRP protocol debugging is on
Now let’s send a ping:
Spoke1#ping 3.3.3.3 source loopback0
Type escape sequence to abort.
Sending 5, 100-byte ICMP Echos to 3.3.3.3, timeout is 2 seconds:
!!!!!
Success rate is 100 percent (5/5), round-trip min/avg/max = 7/8/10 ms
When both spoke routers don’t know about each others NBMA addresses then this will produce a lot of debug information. In the debug below I filtered some of the lines so that you only see how spoke1 learns the NBMA address of spoke2:
Hub#
NHRP: NHRP successfully resolved 172.16.123.2 to NBMA 192.168.123.2
NHRP: Attempting to Redirect, remote_nbma: 192.168.123.2
NHRP: inserting (192.168.123.2/3.3.3.3) in redirect table
NHRP: Pre-setting NBMA address in NHRP Traffic Indication to: 192.168.123.2
NHRP: Attempting to send packet via DEST 2.2.2.2
NHRP: Switching NHRP Packet using pre-set NBMA: 192.168.123.2
NHRP: Encapsulation succeeded.  Tunnel IP addr 192.168.123.2
NHRP: Send Traffic Indication via Tunnel0 vrf 0, packet size: 97
      src: 172.16.123.1, dst: 2.2.2.2
NHRP: 121 bytes out Tunnel0
NHRP: Receive Resolution Request via Tunnel0 vrf 0, packet size: 85
NHRP: netid_in = 1, to_us = 0
NHRP: nhrp_rtlookup yielded interface Tunnel0, prefixlen 32
NHRP: netid_out 1, netid_in 1
NHRP: nhrp_cache_lookup_comp returned 0x0
NHRP: Attempting to forward to destination: 3.3.3.3
NHRP: Forwarding: NHRP SAS picked source: 172.16.123.1 for destination: 3.3.3.3
NHRP: Attempting to send packet via DEST 3.3.3.3
NHRP: NHRP successfully resolved 172.16.123.3 to NBMA 192.168.123.3
NHRP: Encapsulation succeeded.  Tunnel IP addr 192.168.123.3
NHRP: Forwarding Resolution Request via Tunnel0 vrf 0, packet size: 105
      src: 172.16.123.1, dst: 3.3.3.3
NHRP: 129 bytes out Tunnel0
Above you can see that the receives the packet with destination 2.2.2.2 from spoke1. The hub will then send a NHRP traffic indication to the spoke1 router. This will trigger a NHRP resolution request on spoke1 which is received by the hub.
The resolution request is then forwarded by the hub to spoke2.
Here’s what it looks like on spoke1:

It would have been nice if you had used loopback address of 1.1.1.1 for spoke 1 and loop address of 2.2.2.2 for spoke 2 and then loop address of 3.3.3.3 for hub in your examples. Would have been a lot easier to understand the debugs and illustrations that way.
Can I ask why did you use default information originate and the distribute list with a default route in? What was the purpose of the DL?
Hello Chris,
With DMVPN phase 3, the spoke routers don’t need a specific route…only a default route.
I used the distribute-list to ensure the spoke routers only receive that default route, nothing else.
Rene
Hi Laz,
*Again confusion with new term NHRP indication and in what against hub will send nhrp indication as well as we haven’t use nhrp redirect concept anywhere?
Could you explore what spoke 1 will send and to whom talk to with so hub will send nhrp indication and what is this nhrp indication, how it will processed?
Hello Pradyumna
This is explained in the Phase 3 section of the following lesson:
https://networklessons.com/cisco/ccie-routing-switching/introduction-to-dmvpn#Phase_3
A an NHRP traffic indication is simply an NHRP redirect. The full te
... Continue reading in our forum