IP uses Packets called IP packets to carry information. Every IP packet is a single unit of information and besides data, it carries information to determine where to send the packet. IP determines where to send packets by looking at the destination IP address.
Let’s take a look at some of its characteristics:
- Operates at the network layer of the OSI model.
- Connectionless protocol: IP itself does not set up a connection, in order to transport data you need the “transport” layer and use TCP or UDP.
- Every packet is treated independently; there is no order in which the packets are arriving at their destination.
- Hierarchical: IP addresses have a hierarchy; we‟ll discuss this a bit more in-depth when we talk about subnetting and subnet masks.
We need an IP address to identify each network device on the network uniquely. An IP address is just like a phone number (I’m talking about regular phone numbers, no cell phones). Everyone in a city who has a phone at home has a unique phone number where you can reach them.
An IP address is 32-bit and consists of 2 parts, the network part, and the host part:

The IP address is 32-bit but we write it down in 4 blocks of 8 bits. 8 bits is what we call a “byte”. So, the IP address will look like this:

The network part will tell us to which “network” the IP address will belong, you can compare this to the city or area code of a phone number. The “host” part uniquely identifies the network device; these are like the last digits of your phone number.
You probably have seen the IP address 192.168.1.1 before. It’s a very commonly used IP address on local networks. For this IP address, the first 3 bytes are the “network” address, and the last byte is the “host” address:

Okay awesome…but why are the first 3 bytes the “network” part, and why is the last byte the “host” part? Good question! I only gave you the IP address, but you might remember that if you configure an IP address, you also have to specify the subnet mask. Our IP address 192.168.1.1 would come along with the subnet mask 255.255.255.0.
The subnet mask tells your computer which part is the “network” part and which part is the “host” part. Despite the name, it does not “hide” or “mask” anything. We’ll talk about binary and subnetting calculations later on, for now hold the thought that your subnet mask tells us which part of the IP address is the “network” part and which part is for “hosts”.
Let’s take a look at an actual IP packet:
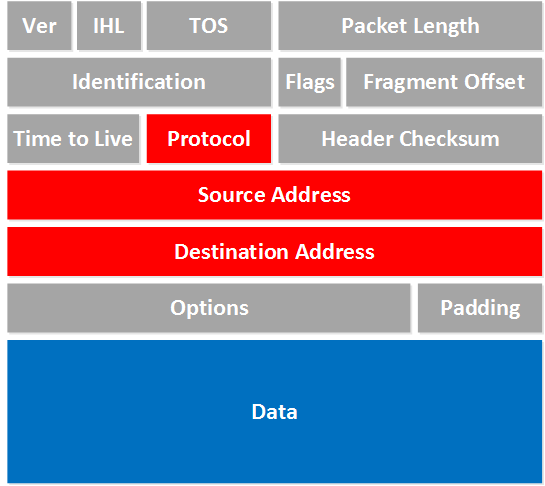
There are a lot of fields there! Now don’t go look over them and feel puzzled that you have no idea what they are about. For now, there are only a few fields that are interesting to us. The fields we don’t care about are in gray, I want to focus on the red and blue fields.
- Protocol: Here, you will find which protocol we use on top of IP. This is how we specify which transport layer protocol we are using. So you’ll find TCP, UDP, or perhaps something else in here.
- Source Address: Here you will find the IP address of the device that created this IP packet.
- Destination Address: This is the IP address of the device that should receive the IP packet.
- Data: This is the actual data that we are trying to get to the other side.
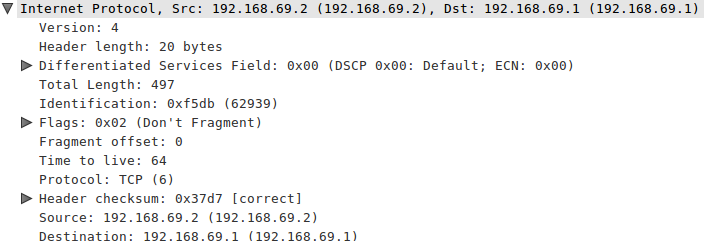
That wasn’t so bad, right? If you ever played with Wireshark, you might recognize these fields. Here’s a screenshot of an IP packet in Wireshark:
Let’s take another look at an IP address:
192.168.1.1
What do we know about this IP address? First of all, we know it’s a 32-bit value, so in binary, it will look like this:

Now, this is a number that is not very human-friendly, so to make our life easier, we can at least put this number into “blocks” of 8 bits. 8 bits is also called a byte or an octet:

Now we can convert each byte into decimal, let’s take the first block and convert it from binary to decimal using the following table:
| Bits | 128 | 64 | 32 | 16 | 8 | 4 | 2 | 1 |
| 0 | 0 | 0 | 0 | 0 | 0 | 0 | 0 |
First Byte:
| Bits | 128 | 64 | 32 | 16 | 8 | 4 | 2 | 1 |
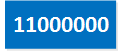
| 1 | 1 | 0 | 0 | 0 | 0 | 0 | 0 |
128 + 64 = 192
Second Byte:
| Bits | 128 | 64 | 32 | 16 | 8 | 4 | 2 | 1 |
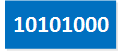
| 1 | 0 | 1 | 0 | 1 | 0 | 0 | 0 |
128 + 32 + 8 = 168
Third Byte:
| Bits | 128 | 64 | 32 | 16 | 8 | 4 | 2 | 1 |
| 0 | 0 | 0 | 0 | 0 | 0 | 0 | 1 |
Only the last bit so that’s 1.
Fourth byte:
| Bits | 128 | 64 | 32 | 16 | 8 | 4 | 2 | 1 |
| 0 | 0 | 0 | 0 | 0 | 0 | 0 | 1 |
Same as the third byte, decimal number 1.
This gives us the IP address:

Excellent so now you know why IP addresses look like this and why we write them down like this, we even did some basic binary-to-decimal calculations.
One last thing to look at is the different classes we have for networks. Maybe you have heard of class A, B, or C networks before. Our IP address that we just used (192.168.1.1) is an example of a class C network.
We have 3 different classes to work with:
- Class A
- Class B
- Class C
So what’s the difference between them? The difference between them is how many hosts you can fit in each network, let me show you an example:

The first three octets which are in blue are the “network” part of this IP address. The red part is for “hosts”. So we can use the last octet (octet or byte is the same thing) for our hosts to give them a unique IP address.
The following computers will be in the same network:
- 192.168.1.1
- 192.168.1.2
- 192.168.1.3
As you can see their “network” part is the same.
A computer with 192.168.2.1 is not in the same network since its “network” part is different, it’s 192.168.2.X compared to 192.168.1.X.
What do you think your computer will do when it wants to send an IP packet to another network? You can find the answer on your own computer:
If you are using Windows just hit the start button, type CMD and press enter. Use the ipconfig command to look at the IP information:
C:Documents and Settings\Computer>ipconfig

Windows IP Configuration

Ethernet adapter Local Area Connection:

        Connection-specific DNS Suffix  . :
        IP Address. . . . . . . . . . . . : 192.168.1.1
        Subnet Mask . . . . . . . . . . . : 255.255.255.0
        Default Gateway . . . . . . . . . : 192.168.1.254
The computer above is in network 192.168.1.X. When it wants to send something to another network it will use its default gateway. This will be your router; in the example above the router has IP address 192.168.1.254.
Back to our classes; let me start by showing you the difference between the classes:
 If you use a class A network, you can have a LOT of hosts in each network that you create.
 If you use a class B, you can build more networks, but fewer hosts per network.

And with class C you can build a LOT of networks but only with a few hosts in each network.
I just explained to you that 192.168.1.1 is a class C IP address. How do I know this? It’s because the first bits are “fixed” for the different classes. Let me show you this:
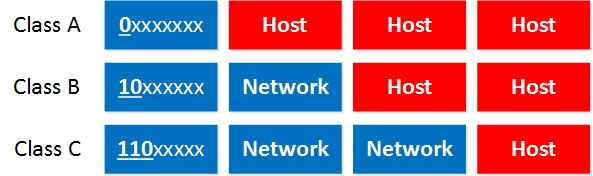
- Class A: The first bit always has to be 0.
- Class B: The first 2 bits always have to be 10.
- Class C: The first 3 bits always have to be 110.
So, if you calculate this from binary to decimal, you’ll get the following ranges:
- Class A starts at 0.0.0.0
- Class B starts at 128.0.0.0
- Class C starts at 192.0.0.0
So, what are the exact ranges that we have?
- Class A: 0.0.0.0 – 126.255.255.255
- Class B: 128.0.0.0 – 191.255.255.255
- Class C: 192.0.0.0 – 223.255.255.255
Hmm, now this raises two questions:
- If you look closely, do you see a 127.0.0.0 subnet? It’s not in the class A range, so what happened to it?
- Why does Class C stop at 223.255.255.255?
To answer the first question: Go to the command prompt of your computer and type in “ping 127.0.0.1” and you’ll get a response. This network range is being used as a “loopback”. Your loopback interface is something to check if your IP stack is OK.
To answer the second question, I have to tell you that there’s a class D range, We don’t use those IP addresses to assign to computers, but it’s being used for “multicast”. It starts with the 224.0.0.0 range.
The last thing I need to tell you about classes is the difference between “private” and “public” IP addresses.
- Public IP addresses are used on the Internet.
- Private IP addresses are used on your local area network and should not be used on the Internet.
These are the Private IP address ranges:
- Class A: 10.0.0.0 – 10.255.255.255
- Class B: 172.16.0.0 – 172.31.255.255
- Class C: 192.168.0.0 – 192.168.255.255
Do you see our 192.168.1.1 example IP address falls within class C and is a private IP address? I like to use this IP address since it’s most common to people, it’s used a lot on home networks and SOHO (small office home office) routers.
Is there anything else we need to know about IP addresses? Well, yes, one last thing! There are 2 IP addresses we cannot use on our network.
- Network address.
- Broadcast address.
The network address cannot be used on a computer as an IP address because it’s being used to “define” the network.
The broadcast address cannot be used on a computer as an IP address because it’s used by broadcast applications. A broadcast is an IP packet that will be received by all devices in your network.
So, how do we recognize these two IP addresses we cannot use? Let me give you an example of this:
Let’s use the Class C range and our IP address 192.168.1.1.

We need to look at the last octet, which is being used for hosts. If we set all the bits to 0 in our “host” part, then we have the network address:

So 192.168.1.0 is the network address in this case, and we cannot use this IP address for computers. If we set all the bits to 1, we’ll have a broadcast IP address, and we also cannot use this for computers:
Great insight on IPs, still struggling with the subject but this is well helpfull moving forward. Thank you, great we’ll.
Hi i am Ali. I read this article . it is very helpful for beginners in Cisco IP Routing.
Thanks Again
Hi Vusi,
Any particular topic you have trouble with? I can always create a blogpost for it.
Rene
Hi Rene,
I want to know that if we use subnetting for an IP address. Then also we have to leave a network and broadcast IP for our network?
Hi Vicky,
Each subnet always has a network + broadcast address so you need to keep that in mind when you are assigning IP addresses to hosts. The first IP address in the subnet is always the network address, the last one the broadcast address.
Rene