Lesson Contents
Terraform is an infrastructure as code (IaC) or provisioning tool from HashiCorp.
IaC tools such as Terraform are an alternative to manually deploying resources. For example, when creating an EC2 instance (virtual machine) on Amazon Web Services (AWS), you can use the GUI to click around and start one. Besides the EC2 instance, you might have to create a security group, add some permissions, etc.
Manually creating resources has many disadvantages. You might know what you did today, but three months later, you might have no idea what settings you used. It’s also difficult with a team where you want to ensure everyone uses the same settings. Creating everything manually is time-consuming, and it’s easy to make errors.
IaC has many advantages. By having everything in code, we have consistency, and it’s easy to reproduce resources. You can also put it under version control with git to share it with others, see who made changes, and roll back when there are issues with your code. It also opens the door to automation. You can use CI/CD to automatically create resources when someone commits code to the git repository.
With Terraform, you can define the resources you want to create and the destination where you want to create them.
Resources can be compute, storage, and networking. They can also be databases, appliances such as network devices, and more high-level items like DNS entries.
Destinations can be cloud providers such as Amazon AWS, Google Cloud, or Azure Cloud. There are many options, though, such as OpenStack, Proxmox servers, and even Cisco devices.
Terraform can create resources on these destinations using their APIs. Terraform is also declarative. This means that you only have to focus on the end state, and Terraform will figure out what steps to take to achieve that. It will also figure out the underlying logic of what it has to create first and in what order.
Many IaC tools use a common file format such as YAML or JSON, but Terraform uses a JSON-like language called Hashicorp Config Language (HCL). HCL supports additional things you can’t do with JSON, such as blocks and arguments, variables, and data types.
Terraform can be very useful even in networking. For example, you can use it to manage Cisco ACI, ASA, IOS XE, Meraki, and more.
Terminology
Let’s look at some of the core terminology of Terraform. We’ll focus only on the primary items you need to understand to start with Terraform.
Providers
Providers are plugins that allow the connection to the destination where you want to create your resources. For example, Amazon AWS, Microsoft Azure, Google Cloud, etc. There is a provider for each destination.
There are thousands of providers, and if you want to see some examples, check out the Terraform registry.
Resources
Resources are the physical or logical infrastructure items that you want to create, such as a virtual machine, database server, virtual network device, etc.
State
When you create a resource with Terraform, it saves the current state of your infrastructure. Later, when you modify the code that describes the resource and try to deploy it again, Terraform checks the differences and only modifies what is needed. State can be stored locally or remotely, such as in an Amazon AWS S3 bucket.
Alternatives
There are similar tools to Terraform, both open source and from vendors. When Hashicorp announced they changed the license of their products (including Terraform) from open source to Business Source License (BSL), some people and companies weren’t too happy about it and created a fork of Terraform called OpenTofu.
Another open-source IaC tool is Pulumi. It uses general-purpose programming languages (TypeScript/JavaScript, Python, Go, C#, Java) instead of YAML/JSON/HCL. Programming languages have some advantages because they allow you to use loops, conditionals, functions, and classes. Also, developers can use a programming language they already know instead of learning Terraform’s proprietary HCL.
There are also IaC tools from vendors, such as Amazon’s AWS Cloudformation. The advantage of using an IaC tool from a vendor is that it usually supports the latest features. However, the disadvantage is that you are also stuck with the cloud provider, creating vendor lock-in. When you use multiple cloud providers, you’ll have to learn multiple IaC tools.
There are other similar tools that can do some of the things Terraform can do, such as Ansible, Puppet, or Chef. These are however configuration management tools. Their main focus is on the configuration, such as installing packages on a server or uploading a configuration to a network device.
There is a grey area, though. While IaC tools such as Terraform focus on the “provisioning” of resources, you can also use them for some configuration management. I’ll show you an example later of configuring a Cisco IOS XE router using Terraform. With configuration management tools such as Ansible, you can also provision and create resources on different destinations. There is some overlap between these tools and you’ll have to decide which tool you are going to use for what job.
Configuration
Let’s see if we can create some resources with Terraform. You can run Terraform on Windows, MacOS, and Linux.
The workflow looks like this:
- Write: Define the resources you want and their destination, such as an EC2 instance in Amazon AWS’s us-east-1 region.
- Initialize: Run
terraform initto initialize the project and download the required provider plugins. - Plan: Run
terraform planto create an execution plan that explains what will be created, modified, or destroyed. - Apply: Run
terraform applyto perform the execution plan.
We’ll look at two examples to demonstrate this.
Amazon AWS EC2
Let’s see if we can create an Amazon AWS EC2 instance using Terraform.
In an empty folder, I’ll create a main.tf file:
provider "aws" {
  region = "us-west-2"  # Set your desired AWS region
}

resource "aws_instance" "example" {
  ami           = "ami-0819177b8e6d4947a"  # Ubuntu 24.04 LTS
  instance_type = "t2.nano"

  tags = {
    Name = "my-aws-terraform-ec2-instance"
  }
}
We’ll keep it simple. This file defines:
- The region I want to use: us-west-2.
- The AMI (machine image) I want to use: (Ubuntu 24.04 LTS).
- The instance type: t2.nano.
- The name: my-aws-terraform-ec2-instance.
Let’s make sure Terraform has the required provider plugin for this:
$ terraform init
Initializing the backend...
Initializing provider plugins...
- Finding latest version of hashicorp/aws...
- Installing hashicorp/aws v5.68.0...
- Installed hashicorp/aws v5.68.0 (signed by HashiCorp)
Terraform has created a lock file .terraform.lock.hcl to record the provider
selections it made above. Include this file in your version control repository
so that Terraform can guarantee to make the same selections by default when
you run "terraform init" in the future.

Terraform has been successfully initialized!

You may now begin working with Terraform. Try running "terraform plan" to see
any changes that are required for your infrastructure. All Terraform commands
should now work.

If you ever set or change modules or backend configuration for Terraform,
rerun this command to reinitialize your working directory. If you forget, other
commands will detect it and remind you to do so if necessary.
Terraform downloads the required provider plugin for Amazon AWS. These are stored in the project folder under .terraform/providers. Let’s look at the execution plan:
$ terraform plan

Terraform used the selected providers to generate the following execution plan. Resource actions are indicated with the following symbols:
  + create

Terraform will perform the following actions:

  # aws_instance.example will be created
  + resource "aws_instance" "example" {
      + ami                                  = "ami-0819177b8e6d4947a"
      + arn                                  = (known after apply)
      + associate_public_ip_address          = (known after apply)
      + availability_zone                    = (known after apply)
      + cpu_core_count                       = (known after apply)
      + cpu_threads_per_core                 = (known after apply)
      + disable_api_stop                     = (known after apply)
      + disable_api_termination              = (known after apply)
      + ebs_optimized                        = (known after apply)
      + get_password_data                    = false
      + host_id                              = (known after apply)
      + host_resource_group_arn              = (known after apply)
      + iam_instance_profile                 = (known after apply)
      + id                                   = (known after apply)
      + instance_initiated_shutdown_behavior = (known after apply)
      + instance_lifecycle                   = (known after apply)
      + instance_state                       = (known after apply)
      + instance_type                        = "t2.nano"
      + ipv6_address_count                   = (known after apply)
      + ipv6_addresses                       = (known after apply)
      + key_name                             = (known after apply)
      + monitoring                           = (known after apply)
      + outpost_arn                          = (known after apply)
      + password_data                        = (known after apply)
      + placement_group                      = (known after apply)
      + placement_partition_number           = (known after apply)
      + primary_network_interface_id         = (known after apply)
      + private_dns                          = (known after apply)
      + private_ip                           = (known after apply)
      + public_dns                           = (known after apply)
      + public_ip                            = (known after apply)
      + secondary_private_ips                = (known after apply)
      + security_groups                      = (known after apply)
      + source_dest_check                    = true
      + spot_instance_request_id             = (known after apply)
      + subnet_id                            = (known after apply)
      + tags                                 = {
          + "Name" = "my-aws-terraform-ec2-instance"
        }
      + tags_all                             = {
          + "Name" = "my-aws-terraform-ec2-instance"
        }
      + tenancy                              = (known after apply)
      + user_data                            = (known after apply)
      + user_data_base64                     = (known after apply)
      + user_data_replace_on_change          = false
      + vpc_security_group_ids               = (known after apply)

      + capacity_reservation_specification (known after apply)

      + cpu_options (known after apply)

      + ebs_block_device (known after apply)

      + enclave_options (known after apply)

      + ephemeral_block_device (known after apply)

      + instance_market_options (known after apply)

      + maintenance_options (known after apply)

      + metadata_options (known after apply)

      + network_interface (known after apply)

      + private_dns_name_options (known after apply)

      + root_block_device (known after apply)
    }

Plan: 1 to add, 0 to change, 0 to destroy.

────────────────────────────────────────────────────────────────────────────────────────────────────────────────────────────────────────────────────────────────────────

Note: You didn't use the -out option to save this plan, so Terraform can't guarantee to take exactly these actions if you run "terraform apply" now.
This gives us an overview of what Terraform will create. Many items are unknown because they will be available once the EC2 instance has been created. Let’s execute our plan:
$ terraform apply
Terraform used the selected providers to generate the following execution plan. Resource actions are indicated with the following symbols:
+ create
Terraform will perform the following actions:
# aws_instance.example will be created
+ resource "aws_instance" "example" {
+ ami = "ami-0819177b8e6d4947a"
+ arn = (known after apply)
+ associate_public_ip_address = (known after apply)
+ availability_zone = (known after apply)
+ cpu_core_count = (known after apply)
+ cpu_threads_per_core = (known after apply)
+ disable_api_stop = (known after apply)
+ disable_api_termination = (known after apply)
+ ebs_optimized = (known after apply)
+ get_password_data = false
+ host_id = (known after apply)
+ host_resource_group_arn = (known after apply)
+ iam_instance_profile = (known after apply)
+ id = (known after apply)
+ instance_initiated_shutdown_behavior = (known after apply)
+ instance_lifecycle = (known after apply)
+ instance_state = (known after apply)
+ instance_type = "t2.nano"
+ ipv6_address_count = (known after apply)
+ ipv6_addresses = (known after apply)
+ key_name = (known after apply)
+ monitoring = (known after apply)
+ outpost_arn = (known after apply)
+ password_data = (known after apply)
+ placement_group = (known after apply)
+ placement_partition_number = (known after apply)
+ primary_network_interface_id = (known after apply)
+ private_dns = (known after apply)
+ private_ip = (known after apply)
+ public_dns = (known after apply)
+ public_ip = (known after apply)
+ secondary_private_ips = (known after apply)
+ security_groups = (known after apply)
+ source_dest_check = true
+ spot_instance_request_id = (known after apply)
+ subnet_id = (known after apply)
+ tags = {
+ "Name" = "my-aws-terraform-ec2-instance"
}
+ tags_all = {
+ "Name" = "my-aws-terraform-ec2-instance"
}
+ tenancy = (known after apply)
+ user_data = (known after apply)
+ user_data_base64 = (known after apply)
+ user_data_replace_on_change = false
+ vpc_security_group_ids = (known after apply)
+ capacity_reservation_specification (known after apply)
+ cpu_options (known after apply)
+ ebs_block_device (known after apply)
+ enclave_options (known after apply)
+ ephemeral_block_device (known after apply)
+ instance_market_options (known after apply)
+ maintenance_options (known after apply)
+ metadata_options (known after apply)
+ network_interface (known after apply)
+ private_dns_name_options (known after apply)
+ root_block_device (known after apply)
}
Plan: 1 to add, 0 to change, 0 to destroy.
Do you want to perform these actions?
Terraform will perform the actions described above.
Only 'yes' will be accepted to approve.
Enter a value: yes
aws_instance.example: Creating...
aws_instance.example: Still creating... [10s elapsed]
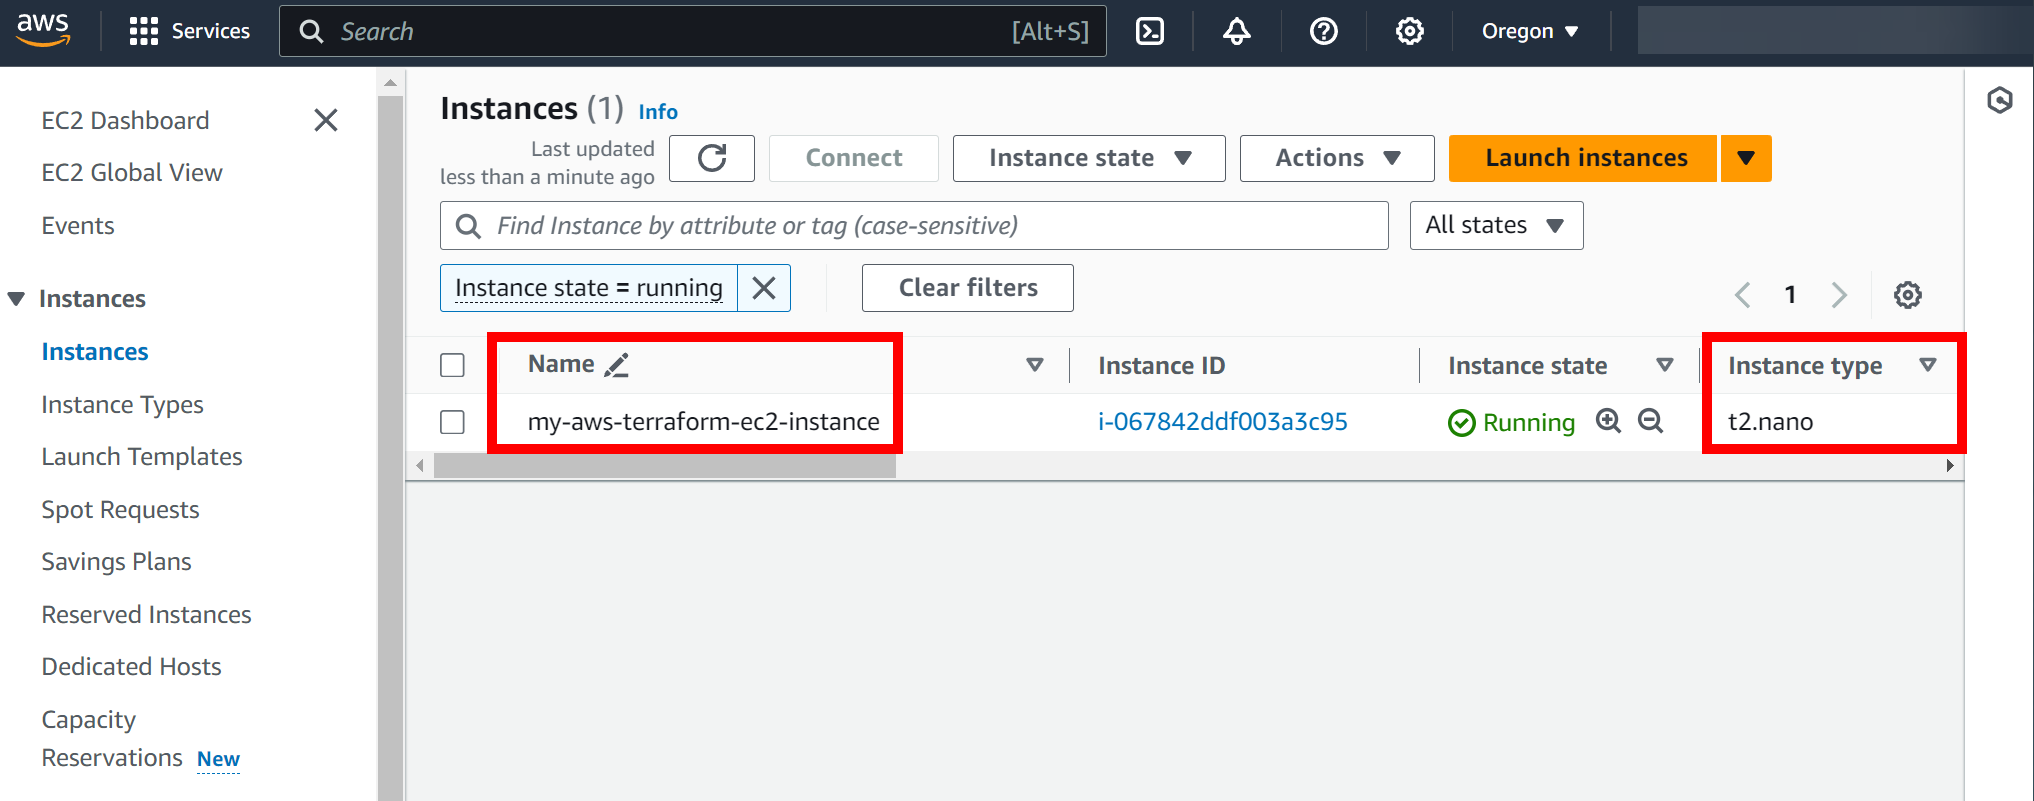
aws_instance.example: Creation complete after 16s [id=i-067842ddf003a3c95]
Apply complete! Resources: 1 added, 0 changed, 0 destroyed.This took less than a minute. As you can see, we now have an EC2 instance:
What if I want to modify my EC2 instance? Let’s edit our configuration file:
provider "aws" {
  region = "us-west-2"  # Set your desired AWS region
}

resource "aws_instance" "example" {
  ami           = "ami-0819177b8e6d4947a"  # Ubuntu 24.04 LTS
  instance_type = "t2.micro"

  tags = {
    Name = "my-aws-terraform-ec2-micro-instance"
  }
}
I changed the instance type and name. Let’s look at the execution plan:
$ terraform plan
aws_instance.example: Refreshing state... [id=i-067842ddf003a3c95]

Terraform used the selected providers to generate the following execution plan. Resource actions are indicated with the following symbols:
  ~ update in-place

Terraform will perform the following actions:

  # aws_instance.example will be updated in-place
  ~ resource "aws_instance" "example" {
        id                                   = "i-067842ddf003a3c95"
      ~ instance_type                        = "t2.nano" -> "t2.micro"
      ~ tags                                 = {
          ~ "Name" = "my-aws-terraform-ec2-instance" -> "my-aws-terraform-ec2-micro-instance"
        }
      ~ tags_all                             = {
          ~ "Name" = "my-aws-terraform-ec2-instance" -> "my-aws-terraform-ec2-micro-instance"
        }
        # (37 unchanged attributes hidden)

        # (8 unchanged blocks hidden)
    }

Plan: 0 to add, 1 to change, 0 to destroy.

────────────────────────────────────────────────────────────────────────────────────────────────────────────────────────────────────────────────────────────────────────

Note: You didn't use the -out option to save this plan, so Terraform can't guarantee to take exactly these actions if you run "terraform apply" now.
In the output above, you can see it will change the instance type and name. Terraform is able to make these changes without having to destroy the EC2 instance. Let’s apply these changes:
$ terraform apply
aws_instance.example: Refreshing state... [id=i-067842ddf003a3c95]
Terraform used the selected providers to generate the following execution plan. Resource actions are indicated with the following symbols:
~ update in-place
Terraform will perform the following actions:
# aws_instance.example will be updated in-place
~ resource "aws_instance" "example" {
id = "i-067842ddf003a3c95"
~ instance_type = "t2.nano" -> "t2.micro"
~ tags = {
~ "Name" = "my-aws-terraform-ec2-instance" -> "my-aws-terraform-ec2-micro-instance"
}
~ tags_all = {
~ "Name" = "my-aws-terraform-ec2-instance" -> "my-aws-terraform-ec2-micro-instance"
}
# (37 unchanged attributes hidden)
# (8 unchanged blocks hidden)
}
Plan: 0 to add, 1 to change, 0 to destroy.
Do you want to perform these actions?
Terraform will perform the actions described above.
Only 'yes' will be accepted to approve.
Enter a value: yes
aws_instance.example: Modifying... [id=i-067842ddf003a3c95]
aws_instance.example: Still modifying... [id=i-067842ddf003a3c95, 10s elapsed]
aws_instance.example: Still modifying... [id=i-067842ddf003a3c95, 20s elapsed]
aws_instance.example: Still modifying... [id=i-067842ddf003a3c95, 30s elapsed]
aws_instance.example: Still modifying... [id=i-067842ddf003a3c95, 40s elapsed]
aws_instance.example: Still modifying... [id=i-067842ddf003a3c95, 50s elapsed]
aws_instance.example: Modifications complete after 57s [id=i-067842ddf003a3c95]
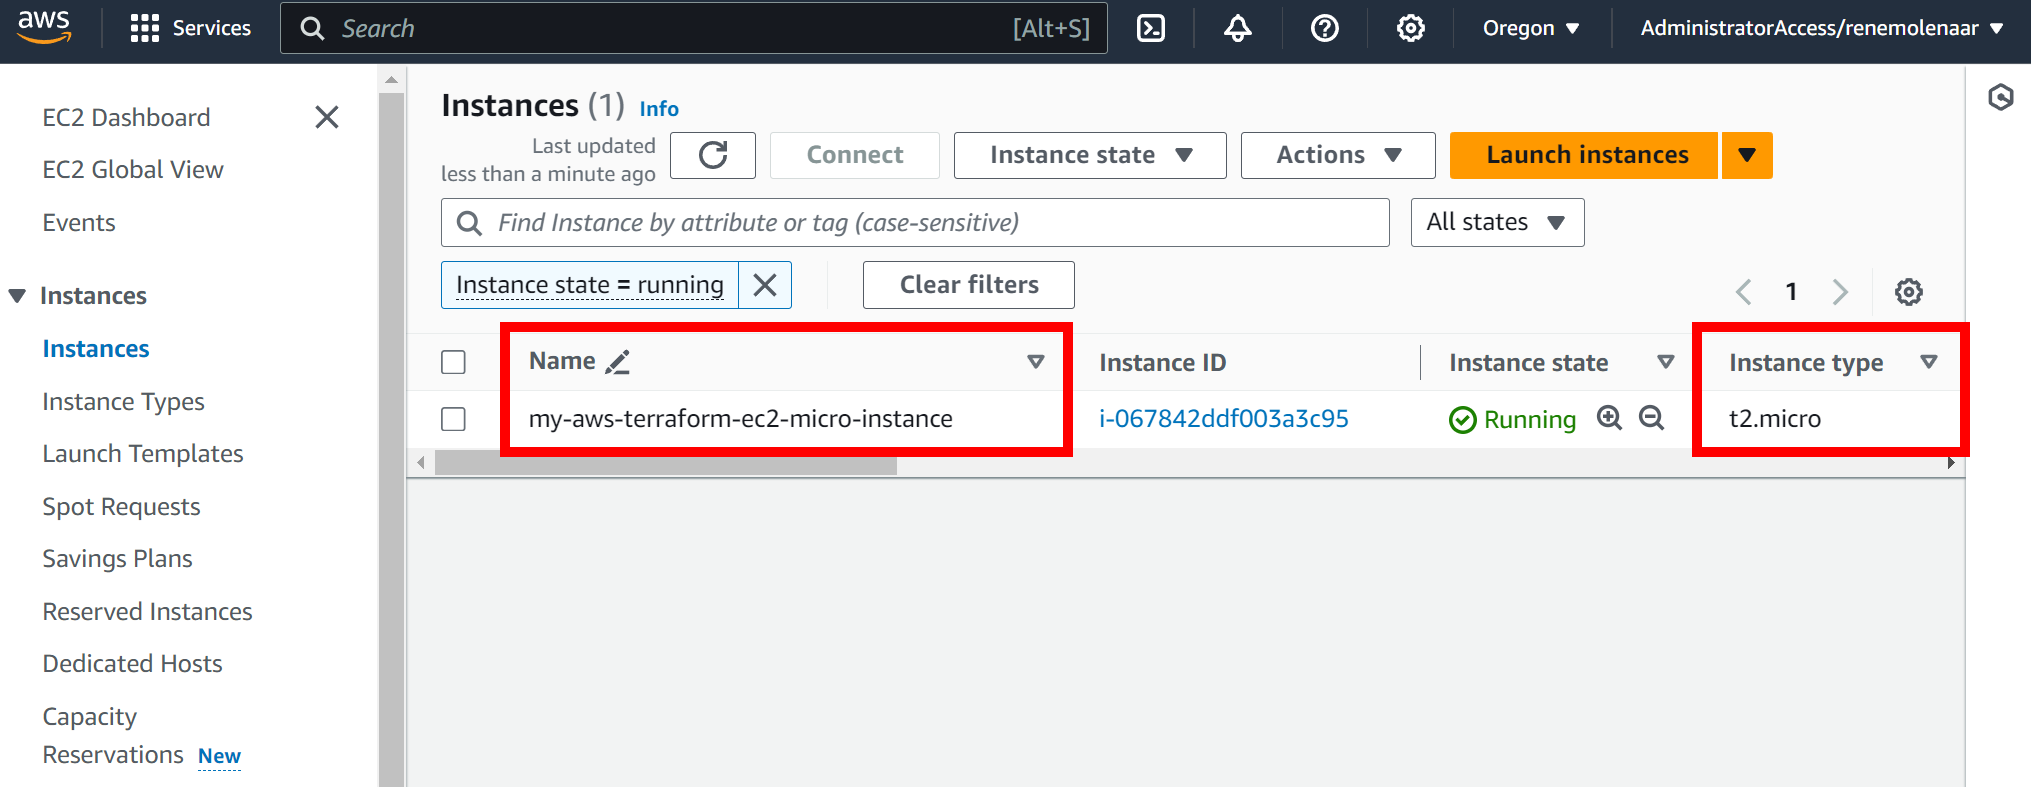
Apply complete! Resources: 0 added, 1 changed, 0 destroyed.It took almost a minute to modify these changes. Changing the name only takes a second but modifying the instance type requires shutting and restarting the EC2 instance. You don’t have to worry about that though, Terraform took care of that for us. We can see the changes in the Amazon AWS GUI:
If you want to get rid of your EC2 instance, you can run this command:
$ terraform destroy
aws_instance.example: Refreshing state... [id=i-067842ddf003a3c95]

Terraform used the selected providers to generate the following execution plan. Resource actions are indicated with the following symbols:
  - destroy

Terraform will perform the following actions:

  # aws_instance.example will be destroyed
  - resource "aws_instance" "example" {
      - ami                                  = "ami-0819177b8e6d4947a" -> null
      - arn                                  = "arn:aws:ec2:us-west-2:151709868703:instance/i-067842ddf003a3c95" -> null
      - associate_public_ip_address          = true -> null
      - availability_zone                    = "us-west-2a" -> null
      - cpu_core_count                       = 1 -> null
      - cpu_threads_per_core                 = 1 -> null
      - disable_api_stop                     = false -> null
      - disable_api_termination              = false -> null
      - ebs_optimized                        = false -> null
      - get_password_data                    = false -> null
      - hibernation                          = false -> null
      - id                                   = "i-067842ddf003a3c95" -> null
      - instance_initiated_shutdown_behavior = "stop" -> null
      - instance_state                       = "running" -> null
      - instance_type                        = "t2.micro" -> null
      - ipv6_address_count                   = 0 -> null
      - ipv6_addresses                       = [] -> null
      - monitoring                           = false -> null
      - placement_partition_number           = 0 -> null
      - primary_network_interface_id         = "eni-0a2624ed45efbb829" -> null
      - private_dns                          = "ip-172-31-18-99.us-west-2.compute.internal" -> null
      - private_ip                           = "172.31.18.99" -> null
      - public_dns                           = "ec2-52-13-15-177.us-west-2.compute.amazonaws.com" -> null
      - public_ip                            = "52.13.15.177" -> null
      - secondary_private_ips                = [] -> null
      - security_groups                      = [
          - "default",
        ] -> null
      - source_dest_check                    = true -> null
      - subnet_id                            = "subnet-c0b9c5a4" -> null
      - tags                                 = {
          - "Name" = "my-aws-terraform-ec2-micro-instance"
        } -> null
      - tags_all                             = {
          - "Name" = "my-aws-terraform-ec2-micro-instance"
        } -> null
      - tenancy                              = "default" -> null
      - user_data_replace_on_change          = false -> null
      - vpc_security_group_ids               = [
          - "sg-9b1652fd",
        ] -> null
        # (8 unchanged attributes hidden)

      - capacity_reservation_specification {
          - capacity_reservation_preference = "open" -> null
        }

      - cpu_options {
          - core_count       = 1 -> null
          - threads_per_core = 1 -> null
            # (1 unchanged attribute hidden)
        }

      - credit_specification {
          - cpu_credits = "standard" -> null
        }

      - enclave_options {
          - enabled = false -> null
        }

      - maintenance_options {
          - auto_recovery = "default" -> null
        }

      - metadata_options {
          - http_endpoint               = "enabled" -> null
          - http_protocol_ipv6          = "disabled" -> null
          - http_put_response_hop_limit = 2 -> null
          - http_tokens                 = "required" -> null
          - instance_metadata_tags      = "disabled" -> null
        }

      - private_dns_name_options {
          - enable_resource_name_dns_a_record    = false -> null
          - enable_resource_name_dns_aaaa_record = false -> null
          - hostname_type                        = "ip-name" -> null
        }

      - root_block_device {
          - delete_on_termination = true -> null
          - device_name           = "/dev/sda1" -> null
          - encrypted             = false -> null
          - iops                  = 3000 -> null
          - tags                  = {} -> null
          - tags_all              = {} -> null
          - throughput            = 125 -> null
          - volume_id             = "vol-08ed3f215247bc854" -> null
          - volume_size           = 8 -> null
          - volume_type           = "gp3" -> null
            # (1 unchanged attribute hidden)
        }
    }

Plan: 0 to add, 0 to change, 1 to destroy.

Do you really want to destroy all resources?
  Terraform will destroy all your managed infrastructure, as shown above.
  There is no undo. Only 'yes' will be accepted to confirm.

  Enter a value: yes

aws_instance.example: Destroying... [id=i-067842ddf003a3c95]
aws_instance.example: Still destroying... [id=i-067842ddf003a3c95, 10s elapsed]
aws_instance.example: Still destroying... [id=i-067842ddf003a3c95, 20s elapsed]
aws_instance.example: Still destroying... [id=i-067842ddf003a3c95, 30s elapsed]
aws_instance.example: Still destroying... [id=i-067842ddf003a3c95, 40s elapsed]
aws_instance.example: Still destroying... [id=i-067842ddf003a3c95, 50s elapsed]
aws_instance.example: Destruction complete after 53s

Destroy complete! Resources: 1 destroyed.
This will get rid of everything we created.
Cisco IOS XE
Let’s try something else. We can use Terraform to configure a Cisco IOS XE router, which is a good example of how Terraform can also be used for configuration management.
I have a single router running Cisco IOS Software [Amsterdam], Virtual XE Software (X86_64_LINUX_IOSD-UNIVERSALK9-M), Version 17.3.6, RELEASE SOFTWARE (fc2). The only thing I need to do is enable RESTCONF:
R1(config)#restconf
R1(config)#ip http secure-server
R1(config)#username cisco privilege 15 secret cisco
Terraform can now communicate with this router through the RESTCONF API.
I’ll create a new main.tf file with the following contents:
terraform {
  required_providers {
    iosxe = {
      source = "CiscoDevNet/iosxe"
    }
  }
}

provider "iosxe" {
  username = "cisco"
  password = "cisco"
  url      = "https://10.65.90.202"
}

resource "iosxe_interface_loopback" "example" {
  name                       = 100
  description                = "My Terraform Created Loopback"
  shutdown                   = false
  ipv4_address               = "1.1.1.1"
  ipv4_address_mask          = "255.255.255.255"
}
This should create a loopback 100 with IP address 1.1.1.1/32. Let’s make sure Terraform has the required provider plugin for IOS XE:
$ terraform init
Initializing the backend...
Initializing provider plugins...
- Finding latest version of ciscodevnet/iosxe...
- Installing ciscodevnet/iosxe v0.5.6...
- Installed ciscodevnet/iosxe v0.5.6 (signed by a HashiCorp partner, key ID 974C06066198C482)
Partner and community providers are signed by their developers.
If you'd like to know more about provider signing, you can read about it here:
https://www.terraform.io/docs/cli/plugins/signing.html
Terraform has created a lock file .terraform.lock.hcl to record the provider
selections it made above. Include this file in your version control repository
so that Terraform can guarantee to make the same selections by default when
you run "terraform init" in the future.

Terraform has been successfully initialized!

You may now begin working with Terraform. Try running "terraform plan" to see
any changes that are required for your infrastructure. All Terraform commands
should now work.

If you ever set or change modules or backend configuration for Terraform,
rerun this command to reinitialize your working directory. If you forget, other
commands will detect it and remind you to do so if necessary.
I’ll skip terraform plan just to show that it’s not a requirement to run. We can apply this configuration right away:
$ terraform apply

Terraform used the selected providers to generate the following execution plan. Resource actions are indicated with the following symbols:
  + create

Terraform will perform the following actions:

  # iosxe_interface_loopback.example will be created
  + resource "iosxe_interface_loopback" "example" {
      + description       = "My Terraform Created Loopback"
      + id                = (known after apply)
      + ipv4_address      = "1.1.1.1"
      + ipv4_address_mask = "255.255.255.255"
      + name              = 100
      + shutdown          = false
    }

Plan: 1 to add, 0 to change, 0 to destroy.

Do you want to perform these actions?
  Terraform will perform the actions described above.
  Only 'yes' will be accepted to approve.

  Enter a value: yes

iosxe_interface_loopback.example: Creating...
iosxe_interface_loopback.example: Creation complete after 1s [id=Cisco-IOS-XE-native:native/interface/Loopback=100]

Apply complete! Resources: 1 added, 0 changed, 0 destroyed.
This is looking good. Let’s check our configuration:
R1#show run interface Loopback 100
Building configuration...

Current configuration : 108 bytes
!
interface Loopback100
 description My Terraform Created Loopback
 ip address 1.1.1.1 255.255.255.255
end
The loopback interface has been created. Let’s see what happens when I modify my configuration file:
terraform {
  required_providers {
    iosxe = {
      source = "CiscoDevNet/iosxe"
    }
  }
}

provider "iosxe" {
  username = "cisco"
  password = "cisco"
  url      = "https://10.65.90.202"
}

resource "iosxe_interface_loopback" "example" {
  name                       = 200
  description                = "My Terraform Created Loopback"
  shutdown                   = false
  ipv4_address               = "1.1.1.1"
  ipv4_address_mask          = "255.255.255.255"
}
I’ll change the loopback interface number from 100 to 200. Let’s check the execution plan:
$ terraform plan
iosxe_interface_loopback.example: Refreshing state... [id=Cisco-IOS-XE-native:native/interface/Loopback=100]

Terraform used the selected providers to generate the following execution plan. Resource actions are indicated with the following symbols:
-/+ destroy and then create replacement

Terraform will perform the following actions:

  # iosxe_interface_loopback.example must be replaced
-/+ resource "iosxe_interface_loopback" "example" {
      ~ id                = "Cisco-IOS-XE-native:native/interface/Loopback=100" -> (known after apply)
      ~ name              = 100 -> 200 # forces replacement
        # (4 unchanged attributes hidden)
    }

Plan: 1 to add, 0 to change, 1 to destroy.

────────────────────────────────────────────────────────────────────────────────────────────────────────────────────────────────────────────────────────────────────────

Note: You didn't use the -out option to save this plan, so Terraform can't guarantee to take exactly these actions if you run "terraform apply" now.
Terraform informs us that it will destroy the old loopback interface and create a new one. Let’s do it:
$ terraform apply
iosxe_interface_loopback.example: Refreshing state... [id=Cisco-IOS-XE-native:native/interface/Loopback=100]

Terraform used the selected providers to generate the following execution plan. Resource actions are indicated with the following symbols:
-/+ destroy and then create replacement

Terraform will perform the following actions:

  # iosxe_interface_loopback.example must be replaced
-/+ resource "iosxe_interface_loopback" "example" {
      ~ id                = "Cisco-IOS-XE-native:native/interface/Loopback=100" -> (known after apply)
      ~ name              = 100 -> 200 # forces replacement
        # (4 unchanged attributes hidden)
    }

Plan: 1 to add, 0 to change, 1 to destroy.

Do you want to perform these actions?
  Terraform will perform the actions described above.
  Only 'yes' will be accepted to approve.

  Enter a value: yes

iosxe_interface_loopback.example: Destroying... [id=Cisco-IOS-XE-native:native/interface/Loopback=100]
iosxe_interface_loopback.example: Destruction complete after 1s
iosxe_interface_loopback.example: Creating...
iosxe_interface_loopback.example: Creation complete after 1s [id=Cisco-IOS-XE-native:native/interface/Loopback=200]

Apply complete! Resources: 1 added, 0 changed, 1 destroyed.
Let’s check the loopback interface:
Hi Rene ,
How do I set up the interface between my Cisco ASR920 and the Terraform platform?
BR//ZAMAN
Hello Zaman
In the lesson, by enabling RESTCONF and the HTTPS service on the router, Terraform is able to use the RESTCONF API to communicate with the router. If you want to find out how that connection is made, take a look at the RESTCONF section of this lesson here:
https://networklessons.com/cisco/evolving-technologies/device-programmability#RESTCONF
Once this is complete, Terraform will use HTTPS to communicate with the router, with the use of a URL as shown in the above lesson.
I hope this has been helpful!
Laz
Hello Laz,
Could you please explain what is AWS EC2 is it virtual machine or some component of VM or what exactly ?
Also as the lesson above we showed Rene worked in terraform on left and visual Studio on right my question, Is terraform works just by opening the terminal or do we have to do some setting ups to initialize Terraform, Also how the communication happened between the terminal and the Visual Studio as Rene were running the commands and script in each separately?
Regards.
Hello Ahmedlmad
AWS EC2 refers to Amazon’s Elastic Compute Cloud, which is part of Amazon’s cloud-computing platform, Amazon Web Services (AWS). Specifically, the EC2 is a VM that you can configure and “rent” based on the resources that you specify, and you can run your own applications on. More info about this can be found here:
https://aws.amazon.com/ec2/
... Continue reading in our forumHello Dear,
Thanks for the awesome explanation of tf in this lesson, however for the cisco configuration I have recently used Netmiko tool to automate some configuration in the network, In fact i see it much easier to apply scripts compared to Terraform which needs pre preparations such as mentioned in the lesson as enabling REST and HTTPS, could you please explain me if I’m right in what I did mention, also what would be the main differences/advantages in using Terraform for Cisco over Netmiko way? and why would i use Terraform even if an easier tool is there such as Netmiko.
Best regards.