NAT (Network Address Translation) is most commonly used to let users on our LAN access the Internet using a single public IP address but it can be used for some more interesting scenarios. Recently I encountered an interesting CCIE R&S task that had the following requirement:
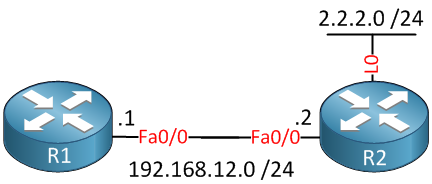
"Make sure that whenever R2 responds to a traceroute it replies with the IP address on the loopback 0 interface"This sounds easy enough but there’s no such thing as a “traceroute source loopback 0” command or anything like that. To make this work, we have to configure the NAT on a stick feature. In this lesson, I’ll show you this is done. First of all, this is the topology that we will use:

There are only two routers that are directly connected to each other. R2 has a loopback 0 interface with IP address 2.2.2.0 /24. Let’s configure these IP addresses first:
R1(config)#interface fa0/0
R1(config-if)#no shutdown
R1(config-if)#ip address 192.168.12.1 255.255.255.0R2(config)#interface fa0/0
R2(config-if)#no shutdown
R2(config-if)#ip address 192.168.12.2 255.255.255.0
R2(config-if)#interface loopback0
R2(config-if)#ip address 2.2.2.2 255.255.255.0Before we dive into the NAT configuration let’s do a trace and look at the output:
R1#traceroute 192.168.12.2

Type escape sequence to abort.
Tracing the route to 192.168.12.2

  1 192.168.12.2 0 msec 4 msec *
As expected, R2 responds with the IP address on its FastEthernet interface. The task requires this output to show the 2.2.2.2 address from the loopback interface. To achieve this, we’ll configure NAT on R2:
R2(config)#access-list 100 permit icmp any any time-exceeded
R2(config)#access-list 100 permit icmp any any port-unreachable

R2(config)#ip nat inside source list 100 interface loopback0 overload

R2(config)#interface fastethernet 0/0
R2(config-if)#ip nat inside

R2(config)#interface loopback 0
R2(config-if)#ip nat outside
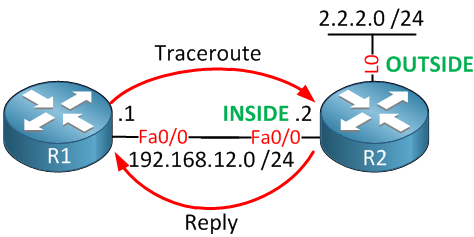
The configuration above defines the FastEthernet interface as NAT inside and the loopback interface as NAT outside. An access-list is used to permit the ICMP time-exceeded and port-unreachable packets that are used as a response to a traceroute. The NAT configuration itself is complete, but we still have a problem with this setup. Take a look at the following picture:
 If you look closely at the image above, you can see that whenever R1 does a trace, R2 will reply with its FastEthernet 0/0 interface. In order for NAT to work, traffic has to flow from the inside interface to the outside interface. To fix this, we can configure policy-based routing on R2 to forward traffic to the loopback 0 interface:
R2(config)#route-map FORWARD_TO_L0
R2(config-route-map)#match ip address 100
R2(config-route-map)#set interface loopback0R2(config)#ip local policy route-map FORWARD_TO_L0This route-map matches on the interface that we created before and forwards the traffic towards the loopback 0 interface. We also require the ip local policy command to apply the route-map to self-generated traffic. Let’s enable a debug on R2 and try that traceroute again from R1:
R2#debug ip policy
Policy routing debugging is on

R2#debug ip nat
IP NAT debugging is on
Time to trace!
R1#traceroute 192.168.12.2

Type escape sequence to abort.
Tracing the route to 192.168.12.2

  1 2.2.2.2 0 msec 4 msec *
Excellent, we now see IP address 2.2.2.2 from R2 in our traceroute. Let’s take a look at the debug on R2:
R2#
IP: s=192.168.12.2 (local), d=192.168.12.1, len 56, policy match
IP: route map FORWARD_TO_L0, item 10, permit
IP: s=192.168.12.2 (local), d=192.168.12.1 (Loopback0), len 56, policy routed
IP: local to Loopback0 192.168.12.1
NAT: s=192.168.12.2->2.2.2.2, d=192.168.12.1 [17]
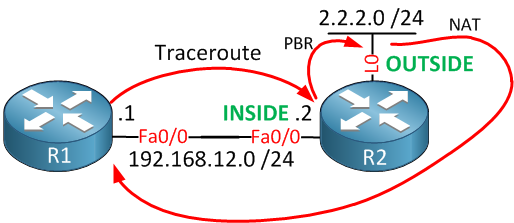
The first line is the ICMP packet from R2 towards R1 that it wants to send as a reply to the traceroute. It matches the route-map, so it is being policy-based routed towards the loopback 0 interface. Since the loopback 0 interface is configured for NAT outside, IP address 192.168.12.2 is translated to 2.2.2.2 and routed towards R1. Basically, it looks like this:

Great! it’s working as it should…what if we make this scenario a little bit more interesting by changing the task as follows:
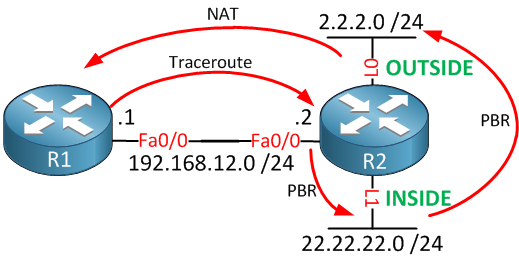
"Make sure that whenever R2 responds to a traceroute it replies with the IP address on the loopback 0 interface, you are not allowed to configure NAT on the FastEthernet interface but you may configure an additional interface and IP address."No problem! We can still make this work, but we’ll have to use another interface configured with the ip nat inside command. Traffic still has to flow from a NAT inside interface to a NAT outside interface in order to be translated. To accomplish this, we will create a new loopback interface that has the “IP NAT inside” command. We will send traffic from the FastEthernet interface to the new loopback and then forward it to the first loopback interface. I know this sounds funky, so let me help you visualize it:

Just follow the arrows starting at R1. This is what we have to configure:
- Configure policy-based routing so that the ICMP replies are forwarded from the FastEthernet interface to the new loopback 1 (NAT inside) interface.
- Configure policy-based routing so that the ICMP replies are forwarded from the loopback 1 interface to the loopback 0 (NAT outside) interface.
First, we’ll remove the NAT configuration from the FastEthernet interface, and I’ll also get rid of the policy-based routing configuration:


Hi,
Excellent article. I especially like this kind of setup because they are rare and enforce us to make our brain work harder.
I think there’s some kind of typo in the beginning, in the basic configuration of R2. The following line seems to be missing:
Hi Steve,
Merci for letting me know, I just fixed it. I also like these kind of scenarios, it really helps to understand the way Cisco IOS processes packets and makes us think a bit more.
Rene
Rene, you are a great person, thank you for all
Thank you as well David
Rene:
Brilliant article. Network Lessons is another great work done by you !!!
Continue this way you are great !!!