Lesson Contents
If you have multiple connections, like an MPLS and a regular Internet connection, then (depending on the OMP best path selection) both will probably be actively used. This might not be the best solution. Your MPLS connection might support QoS while the Internet connection is best effort. You might have a critical business application that requires QoS that should use the MPLS link and web traffic that should only use the Internet connection.
What if the performance of the MPLS connection degrades? Temporarily switching over to the Internet connection could offer a better end-user experience.
Another example is when you have multiple Internet connections. Perhaps through Fiber, Cable, DSL, and 4G. It would be nice if you could always pick the best connection out of these options.
With Application-Aware Routing (AAR), we can decide which applications should use what WAN connection, and we can failover based on criteria like packet loss, jitter, and delay. AAR tracks network statistics from data plane tunnels between Cisco SD-WAN devices and uses this information to calculate optimal traffic paths.
In this lesson, I’ll show you how to configure AAR and verify your traffic flows. This is the topology we’ll use:
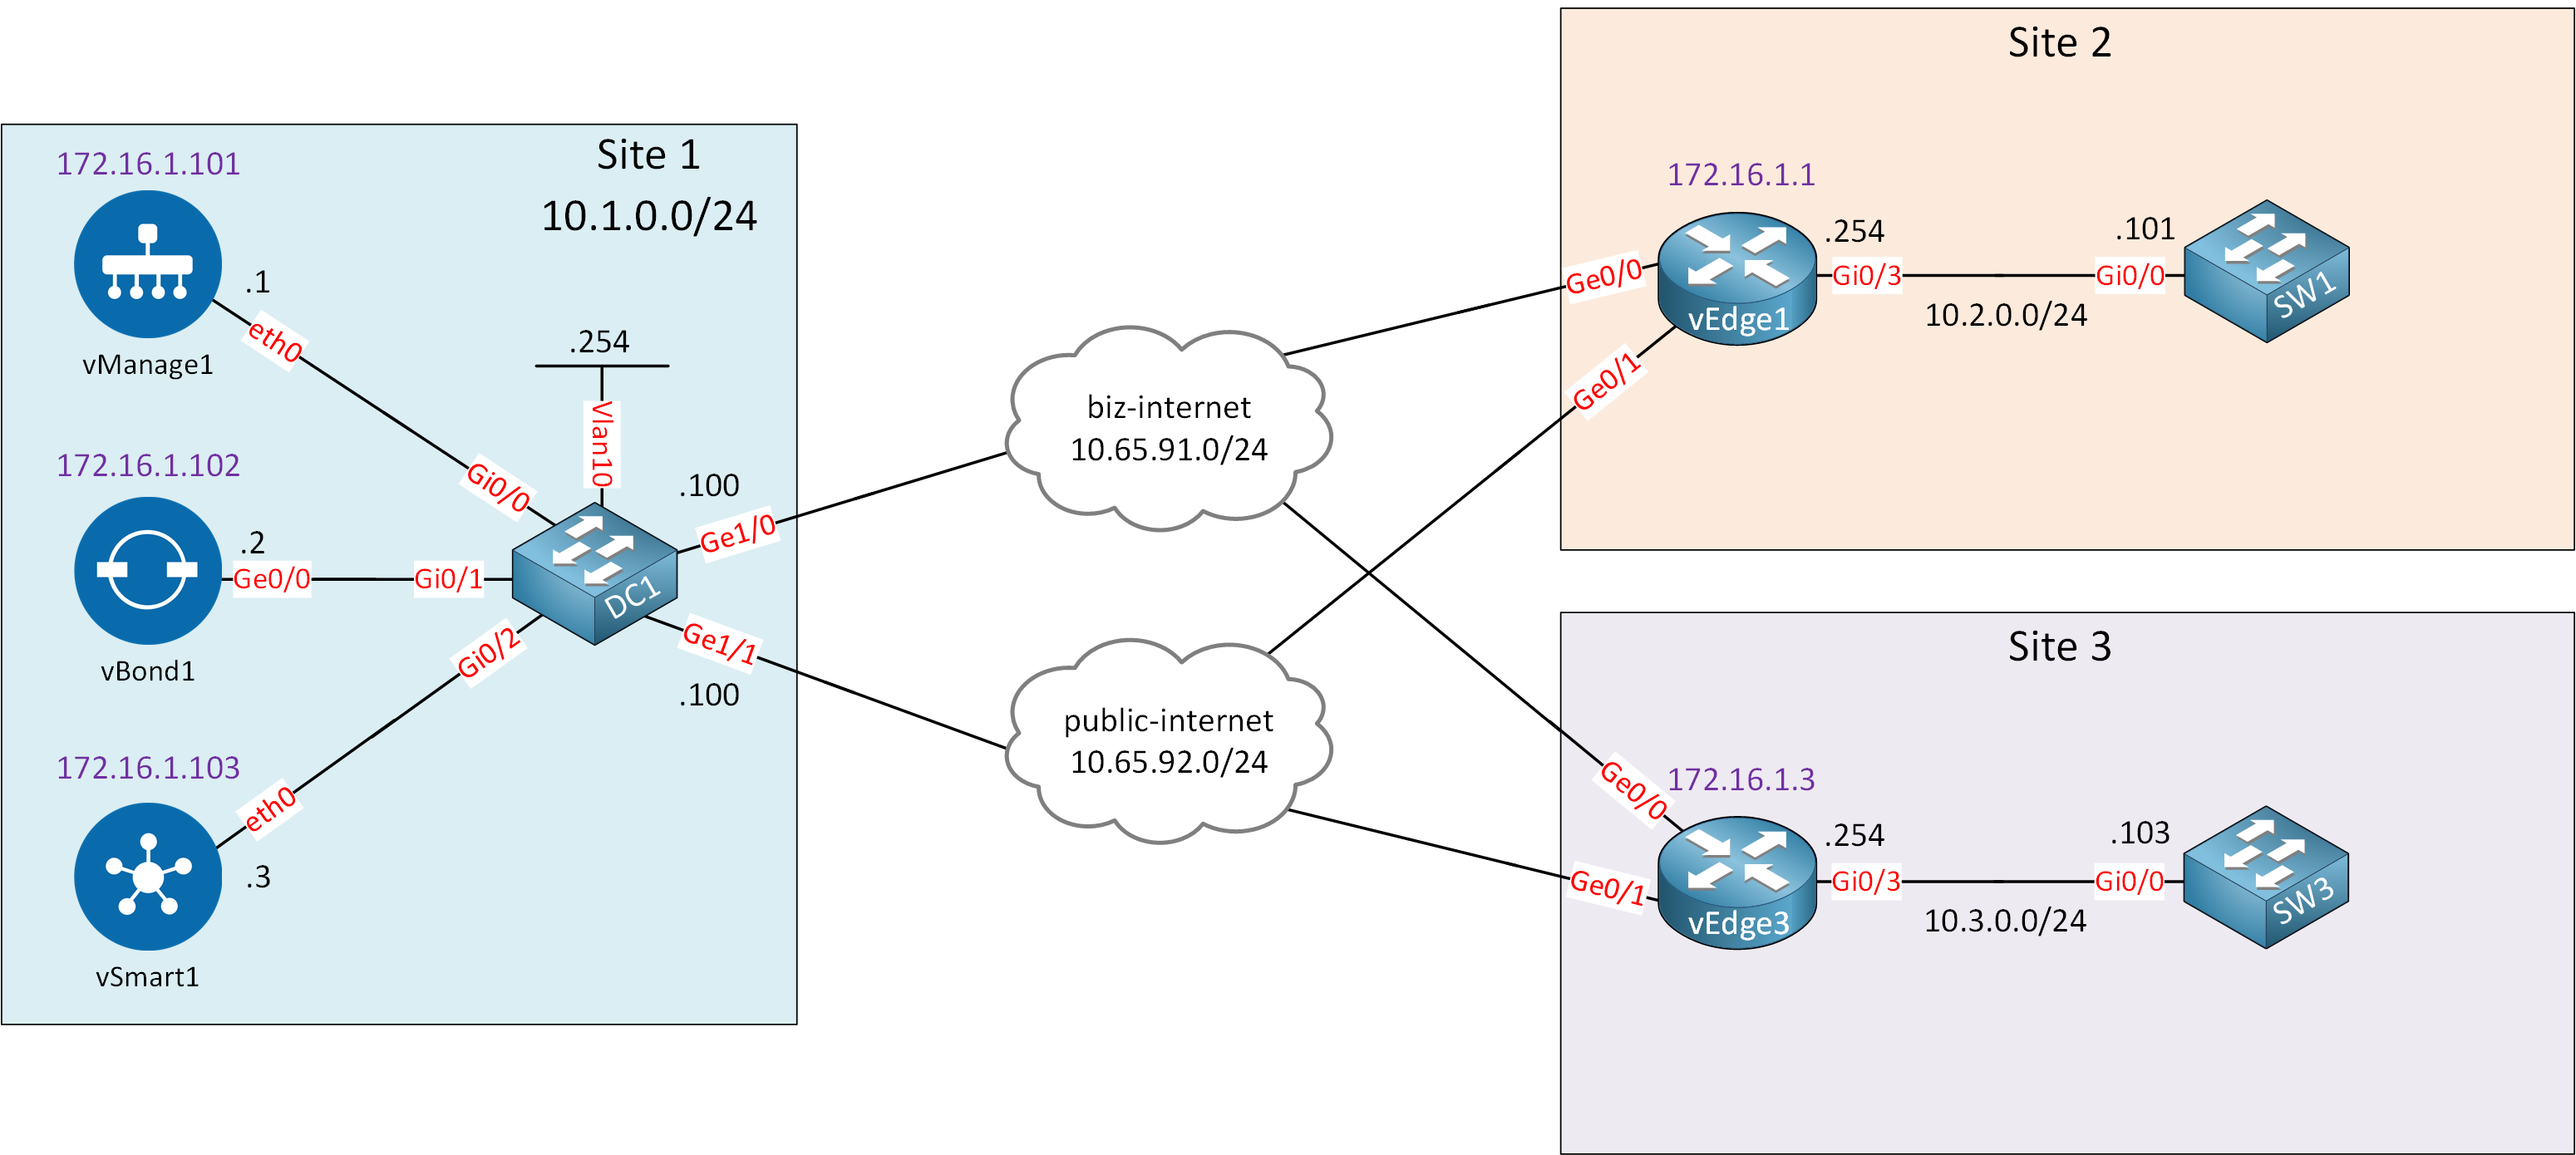
I have two sites with a single service VPN (10). The two sites are connected using two different WAN links:
- biz-internet
- public-internet
We’ll take a look at how Cisco SD-WAN uses these two WAN connections if you don’t have any policies.
Afterward, we’ll configure a centralized policy with Application-Aware Routing and two traffic rules:
- Telnet traffic should use the “biz-internet” connection. When this traffic exceeds a certain loss, latency, or delay, it should switch over to the public-internet link.
- An application list with multiple applications should use the “public-internet” link. When this traffic exceeds a certain loss, latency, or delay, it should switch over to the biz-internet link.
These two examples will help to understand AAR so you can create your own policies in the future. I’m using Cisco SD-WAN version 19.3.0.
Configurations
Want to take a look for yourself? Here you will find the startup configuration of each device.
vEdge1
system
 host-name               vEdge1
 system-ip               172.16.1.1
 site-id                 2
 organization-name       nwl-lab-sdwan
 vbond 10.1.0.2
!
omp
 no shutdown
 graceful-restart
 advertise connected
 advertise static
!
banner
 motd "Welcome to the vEdge router!"
!
vpn 0
 interface ge0/0
  ip address 10.65.91.1/24
  tunnel-interface
   encapsulation ipsec
   color biz-internet
   allow-service all
  !
  no shutdown
 !
 interface ge0/1
  ip address 10.65.92.1/24
  tunnel-interface
   encapsulation ipsec
   color public-internet
   allow-service all
  !
  no shutdown
 !
 ip route 10.1.0.0/24 10.65.91.100
 ip route 10.1.0.0/24 10.65.92.100
!
vpn 10
 interface ge0/3
  ip address 10.2.0.254/24
  no shutdown
 !
 omp
  advertise connected
 !
!
vpn 512
 interface eth0
  shutdown
 !
!
vEdge3
system
 host-name               vEdge3
 system-ip               172.16.1.3
 site-id                 3
 organization-name       nwl-lab-sdwan
 vbond 10.1.0.2
!
omp
 no shutdown
 graceful-restart
 advertise connected
 advertise static
!
banner
 motd "Welcome to the vEdge router!"
!
vpn 0
 interface ge0/0
  ip address 10.65.91.3/24
  tunnel-interface
   encapsulation ipsec
   color biz-internet
   allow-service all
  !
  no shutdown
 !
 interface ge0/1
  ip address 10.65.92.3/24
  tunnel-interface
   encapsulation ipsec
   color public-internet
   allow-service all
  !
  no shutdown
 !
 ip route 10.1.0.0/24 10.65.91.100
 ip route 10.1.0.0/24 10.65.92.100
!
vpn 10
 interface ge0/3
  ip address 10.3.0.254/24
  no shutdown
 !
 omp
  advertise connected
 !
!
vpn 512
 interface eth0
  shutdown
 !
!
SW1
hostname SW1
!
no ip routing
!
interface GigabitEthernet0/0
 no switchport
 ip address 10.2.0.101 255.255.255.0
!
ip default-gateway 10.2.0.254
!
end
SW3
hostname SW3
!
no ip routing
!
interface GigabitEthernet0/0
 no switchport
 ip address 10.3.0.103 255.255.255.0
!
ip default-gateway 10.3.0.254
!
end
Simulate Flows
Before we configure anything, let’s look at the default behavior. Cisco vManage has a useful tool to simulate flows and show traffic behavior.
Go to Monitor > Network > WAN – Edge and click on a vEdge router:
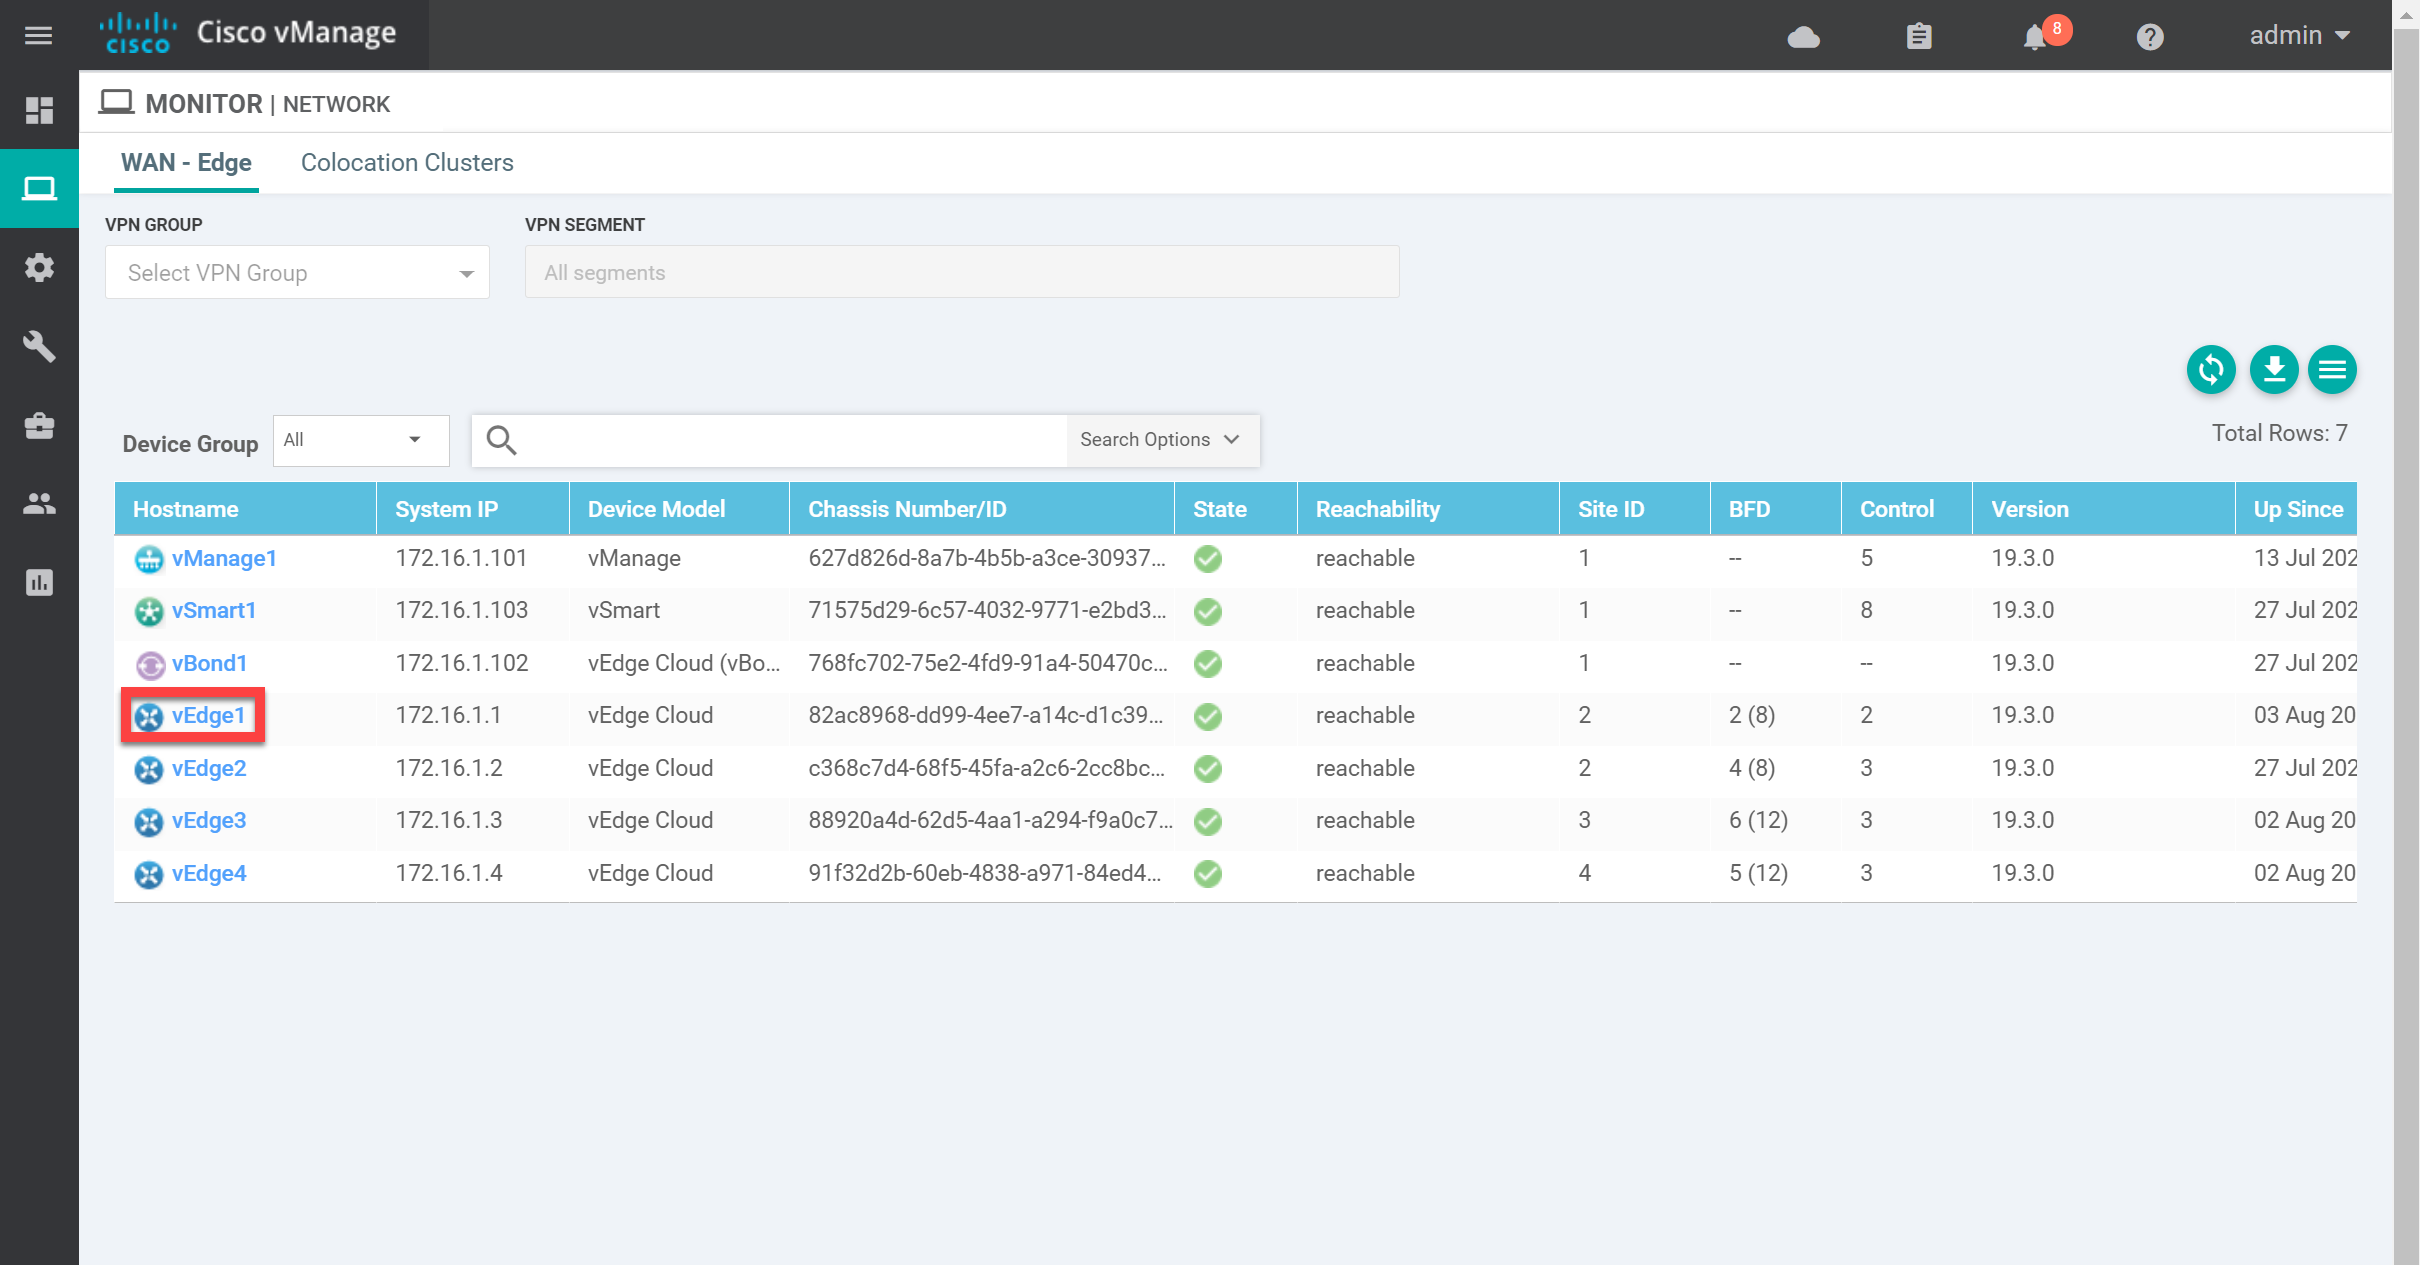
Scroll down to Troubleshooting and click on Simulate Flows on the right side:
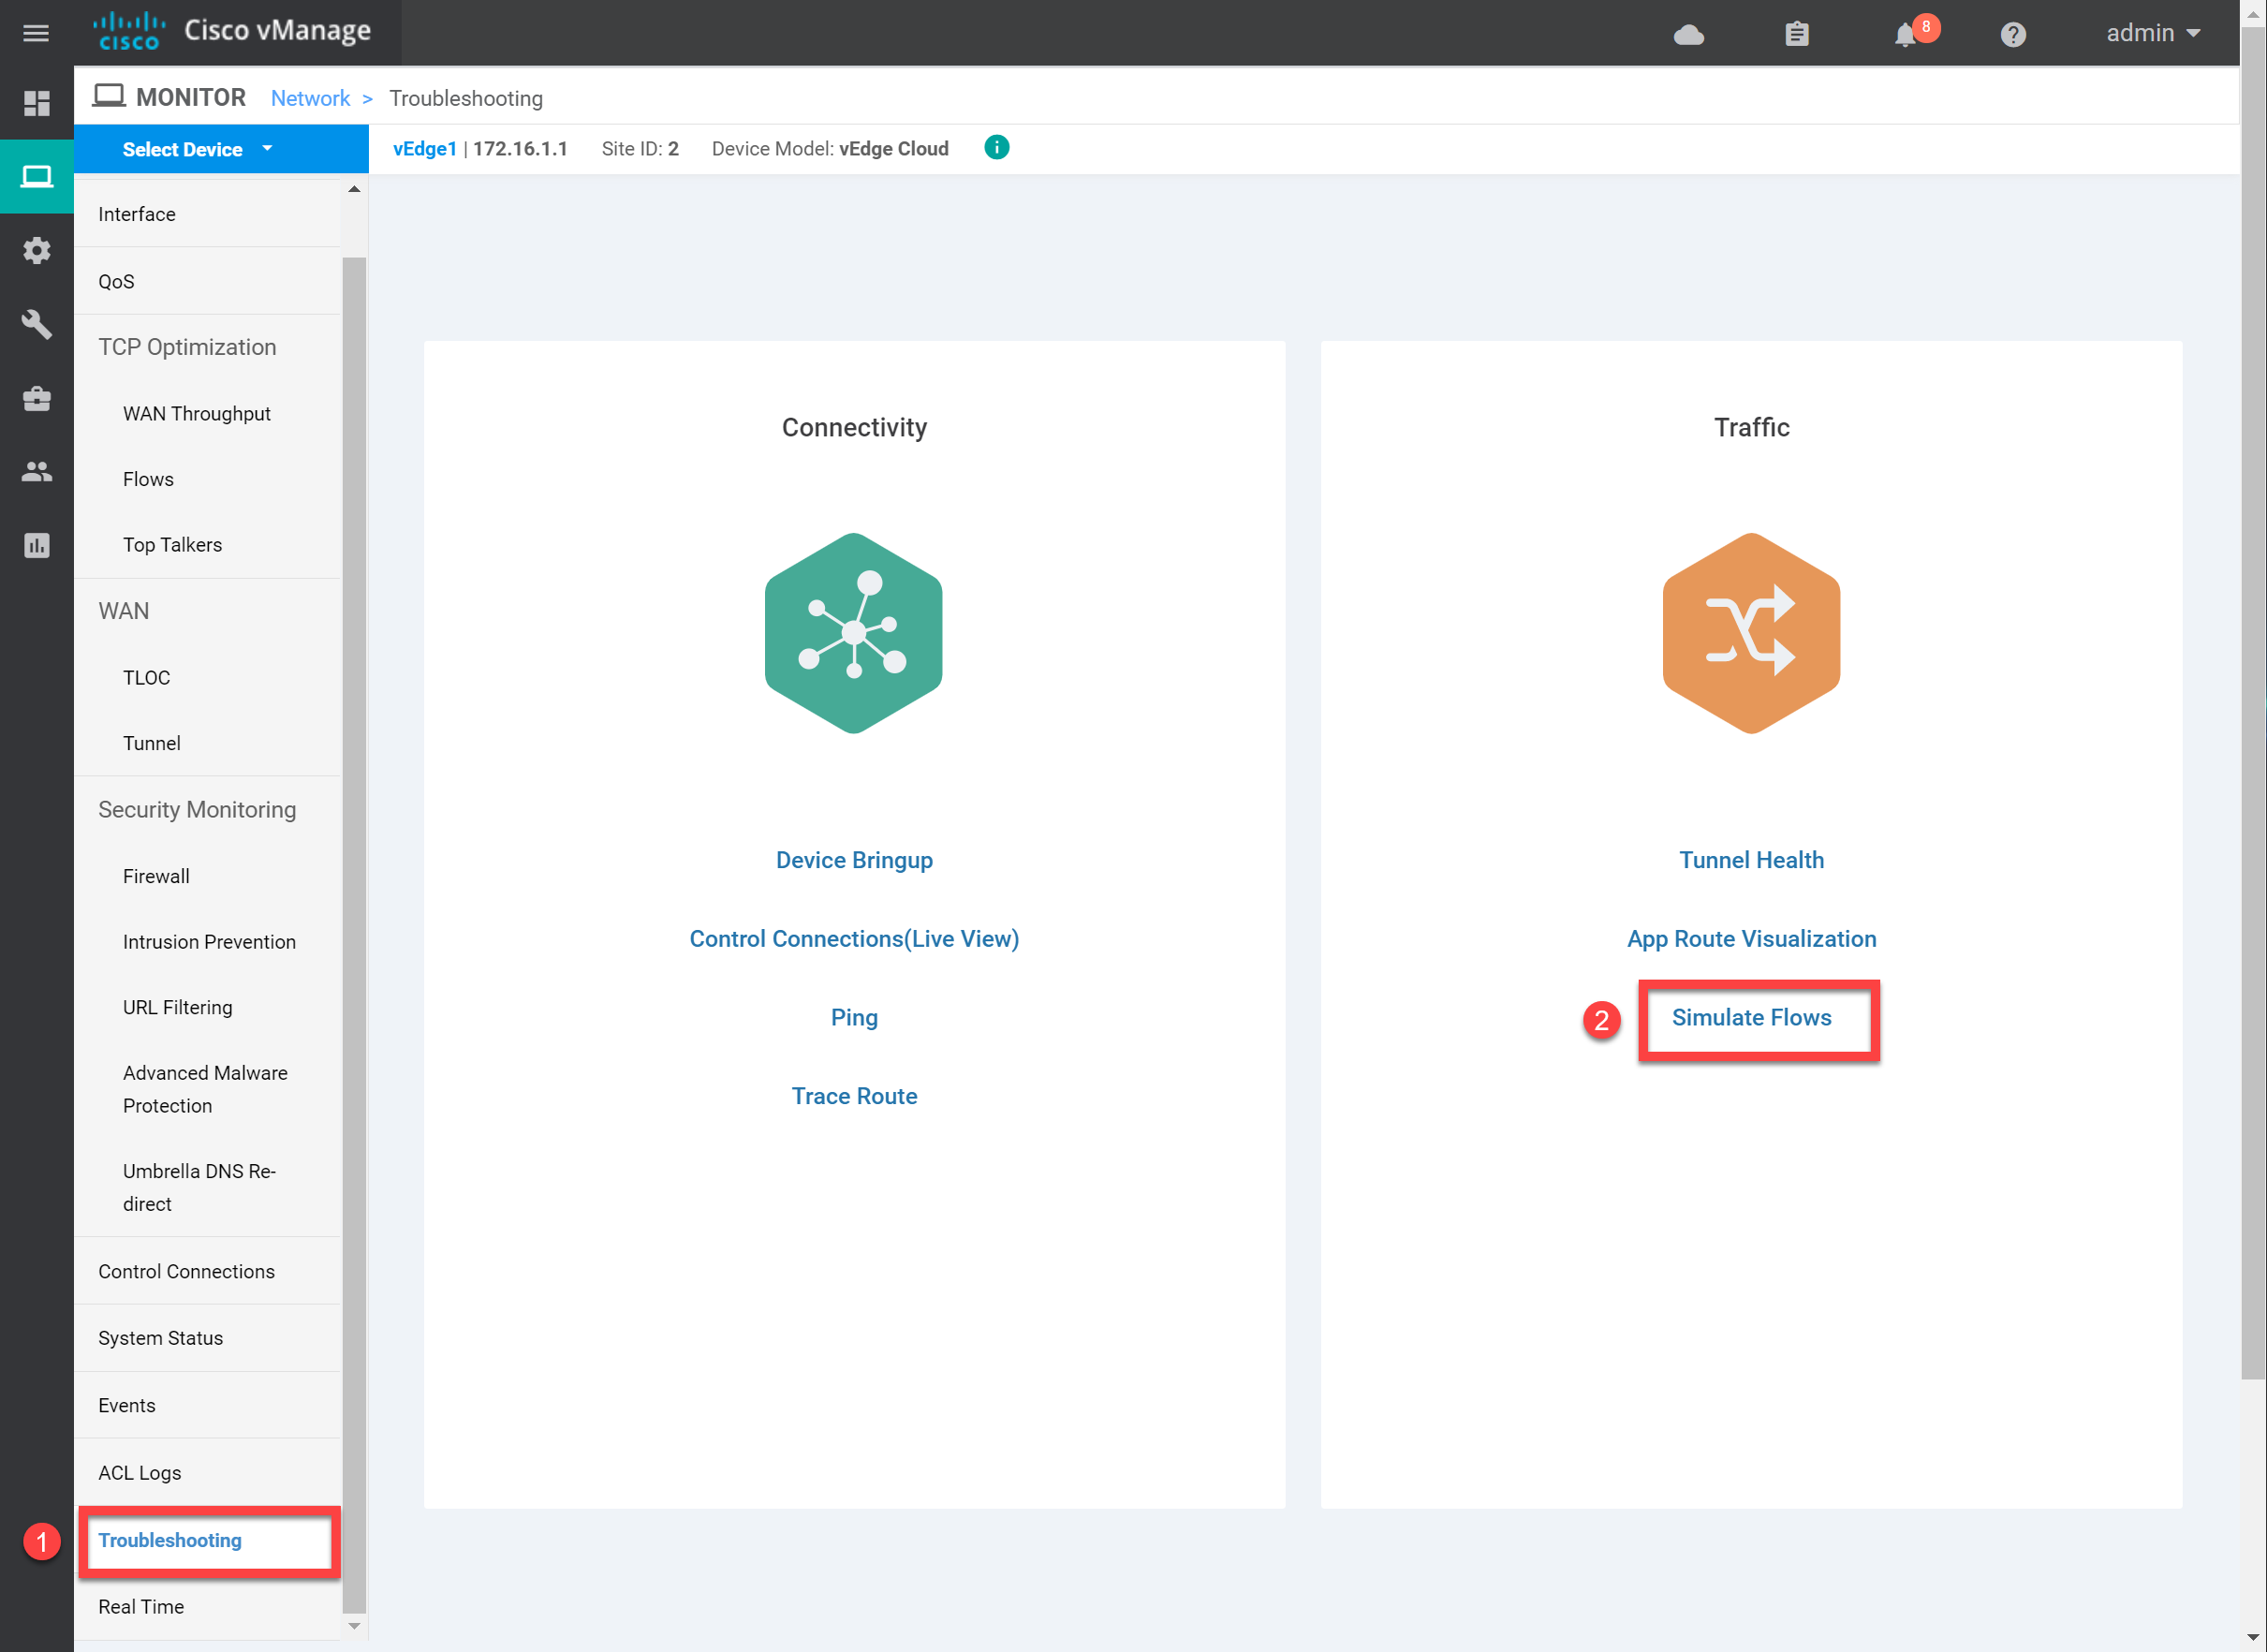
We’ll try something simple to start with. I’ll specify a flow from source 10.2.0.101 with destination 10.3.0.103. This is traffic from site 2 to site 3. The protocol number 6 is TCP, and the destination port is 23 (telnet). Let’s fill in all fields and click on Simulate:

Take a look at the output below:

In the output above, you can see that the default behavior is to use both WAN links to send traffic between the two sites. Once we have configured Application-Aware Routing, we’ll try this again so you can see the difference.
Configuration
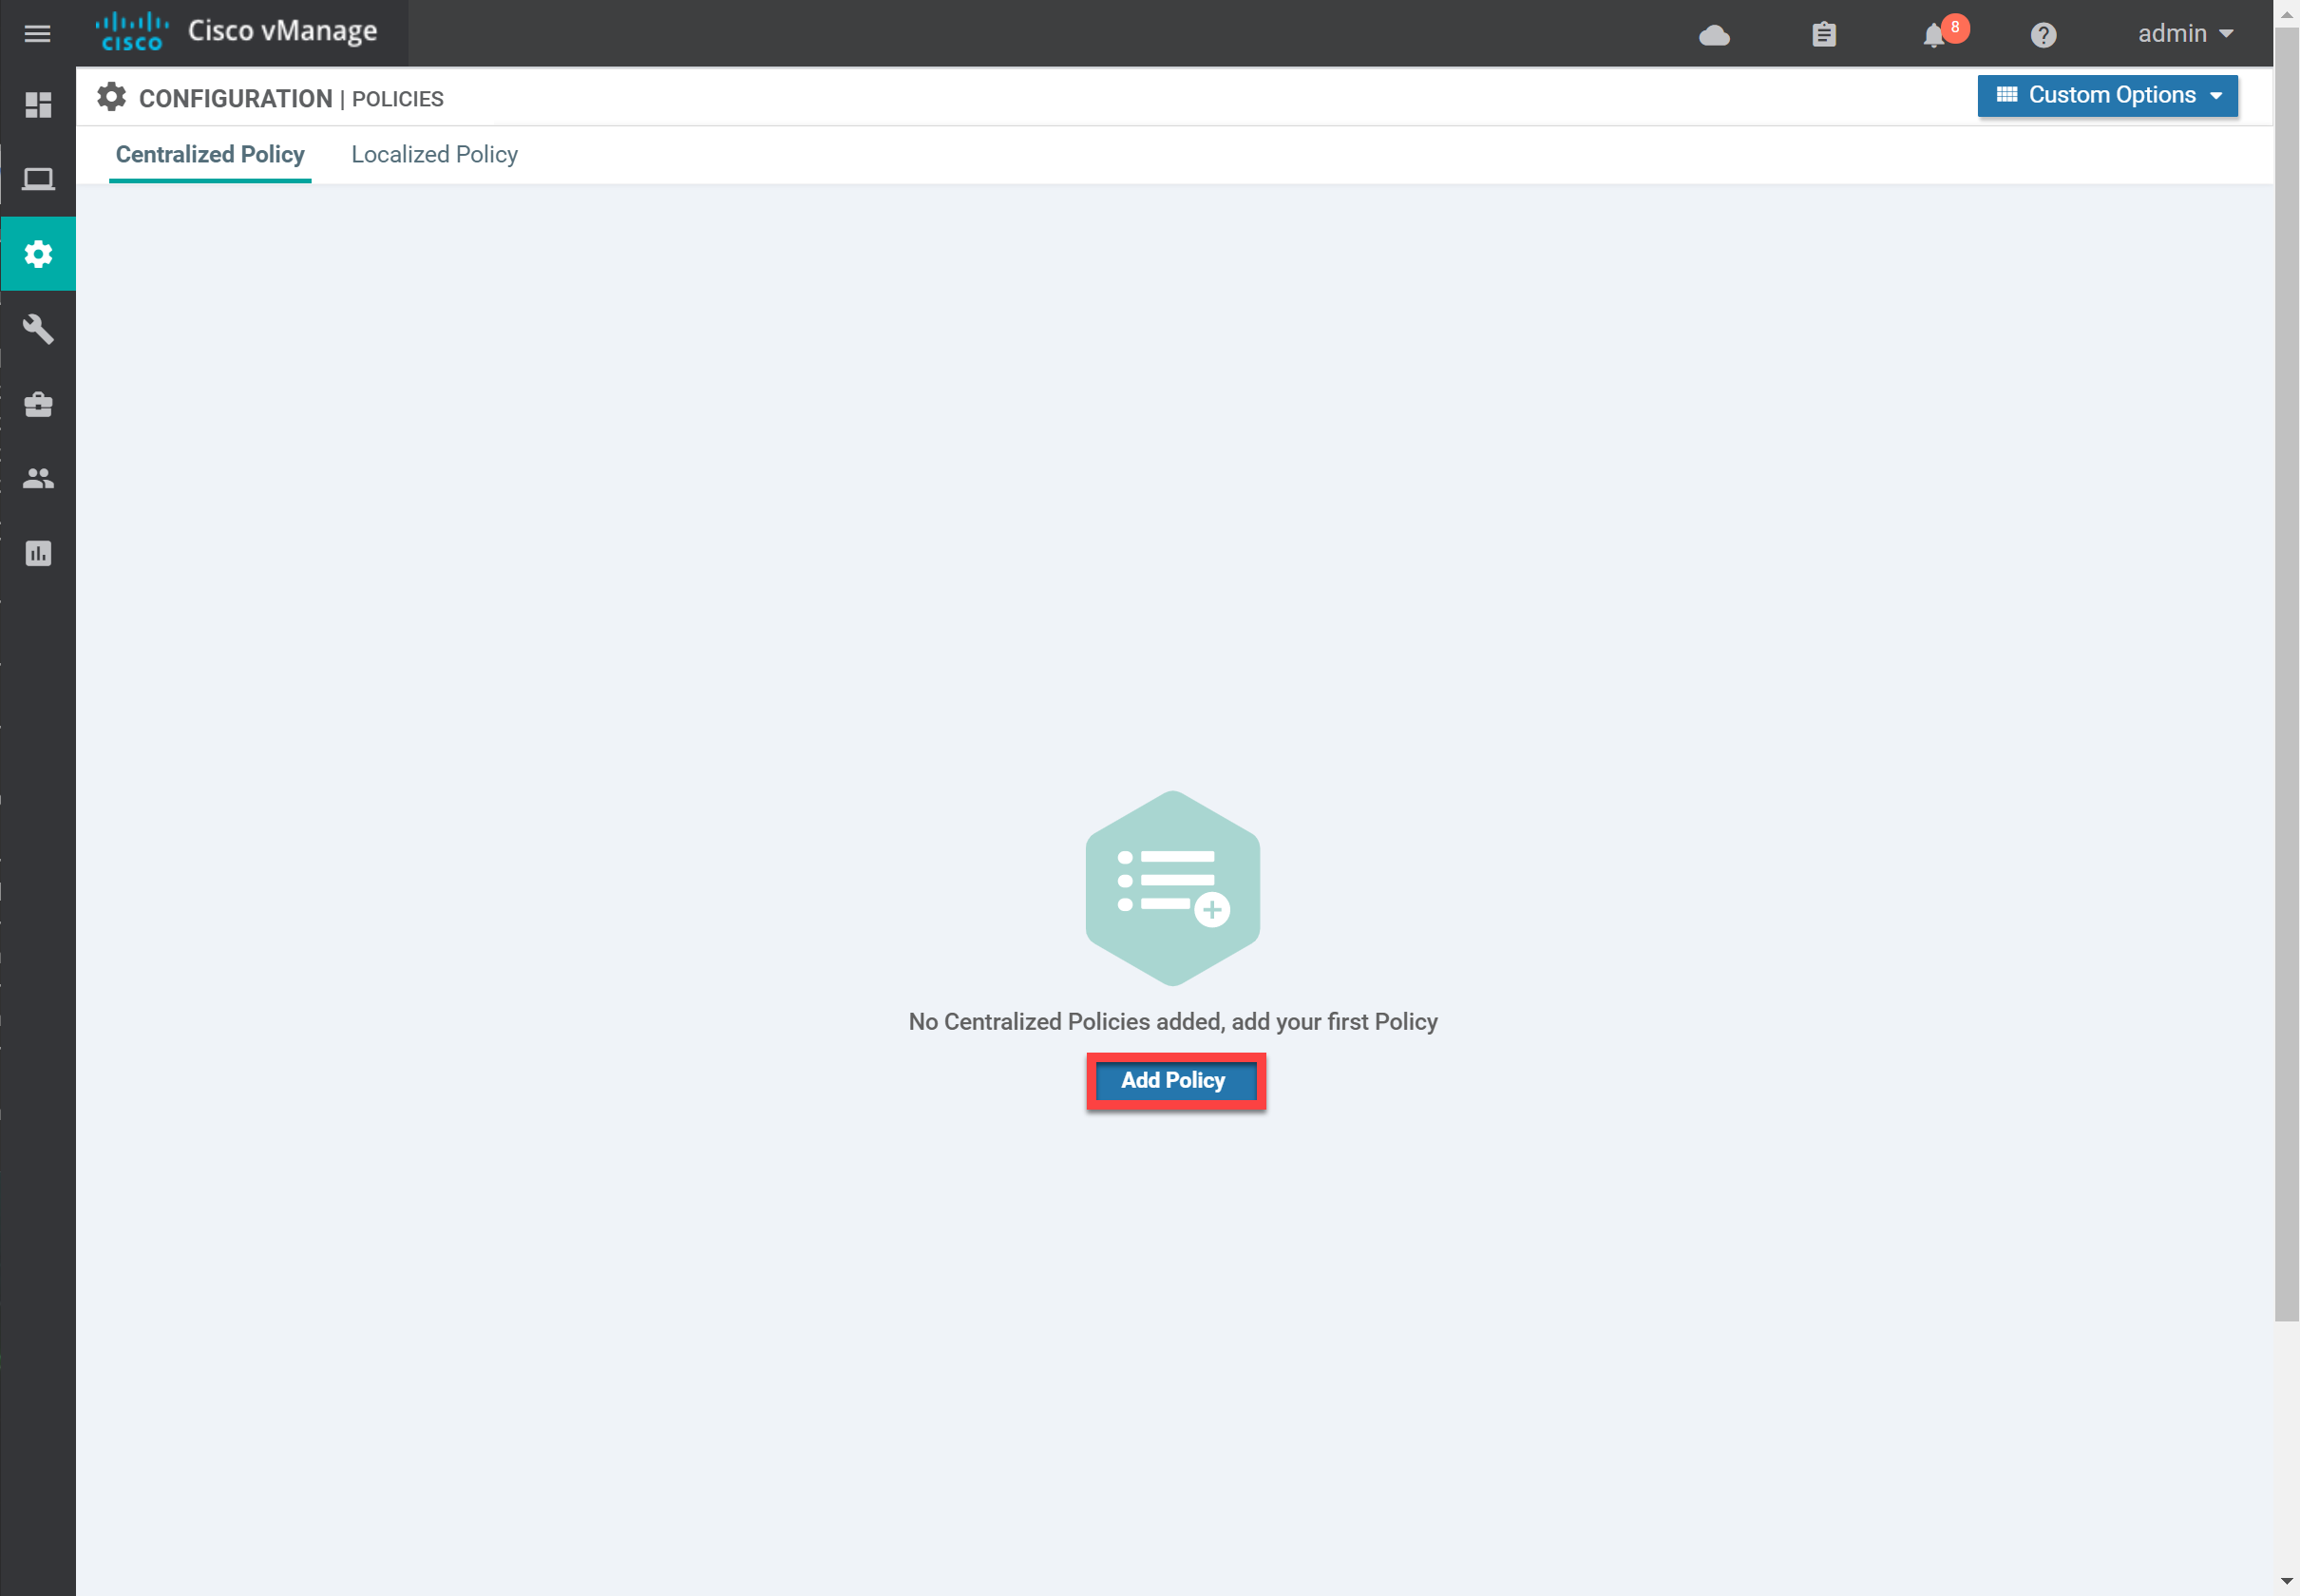
Let’s configure a centralized policy with Application-Aware Routing. Go to Configuration > Policies > Centralized Policy and click on Add Policy:
Groups of Interest
First, we have to create some groups of interest:
- Application List
- Site List
- SLA Class
Application List
The application list contains one or more applications that we want to use in our policy. There are two default application lists:
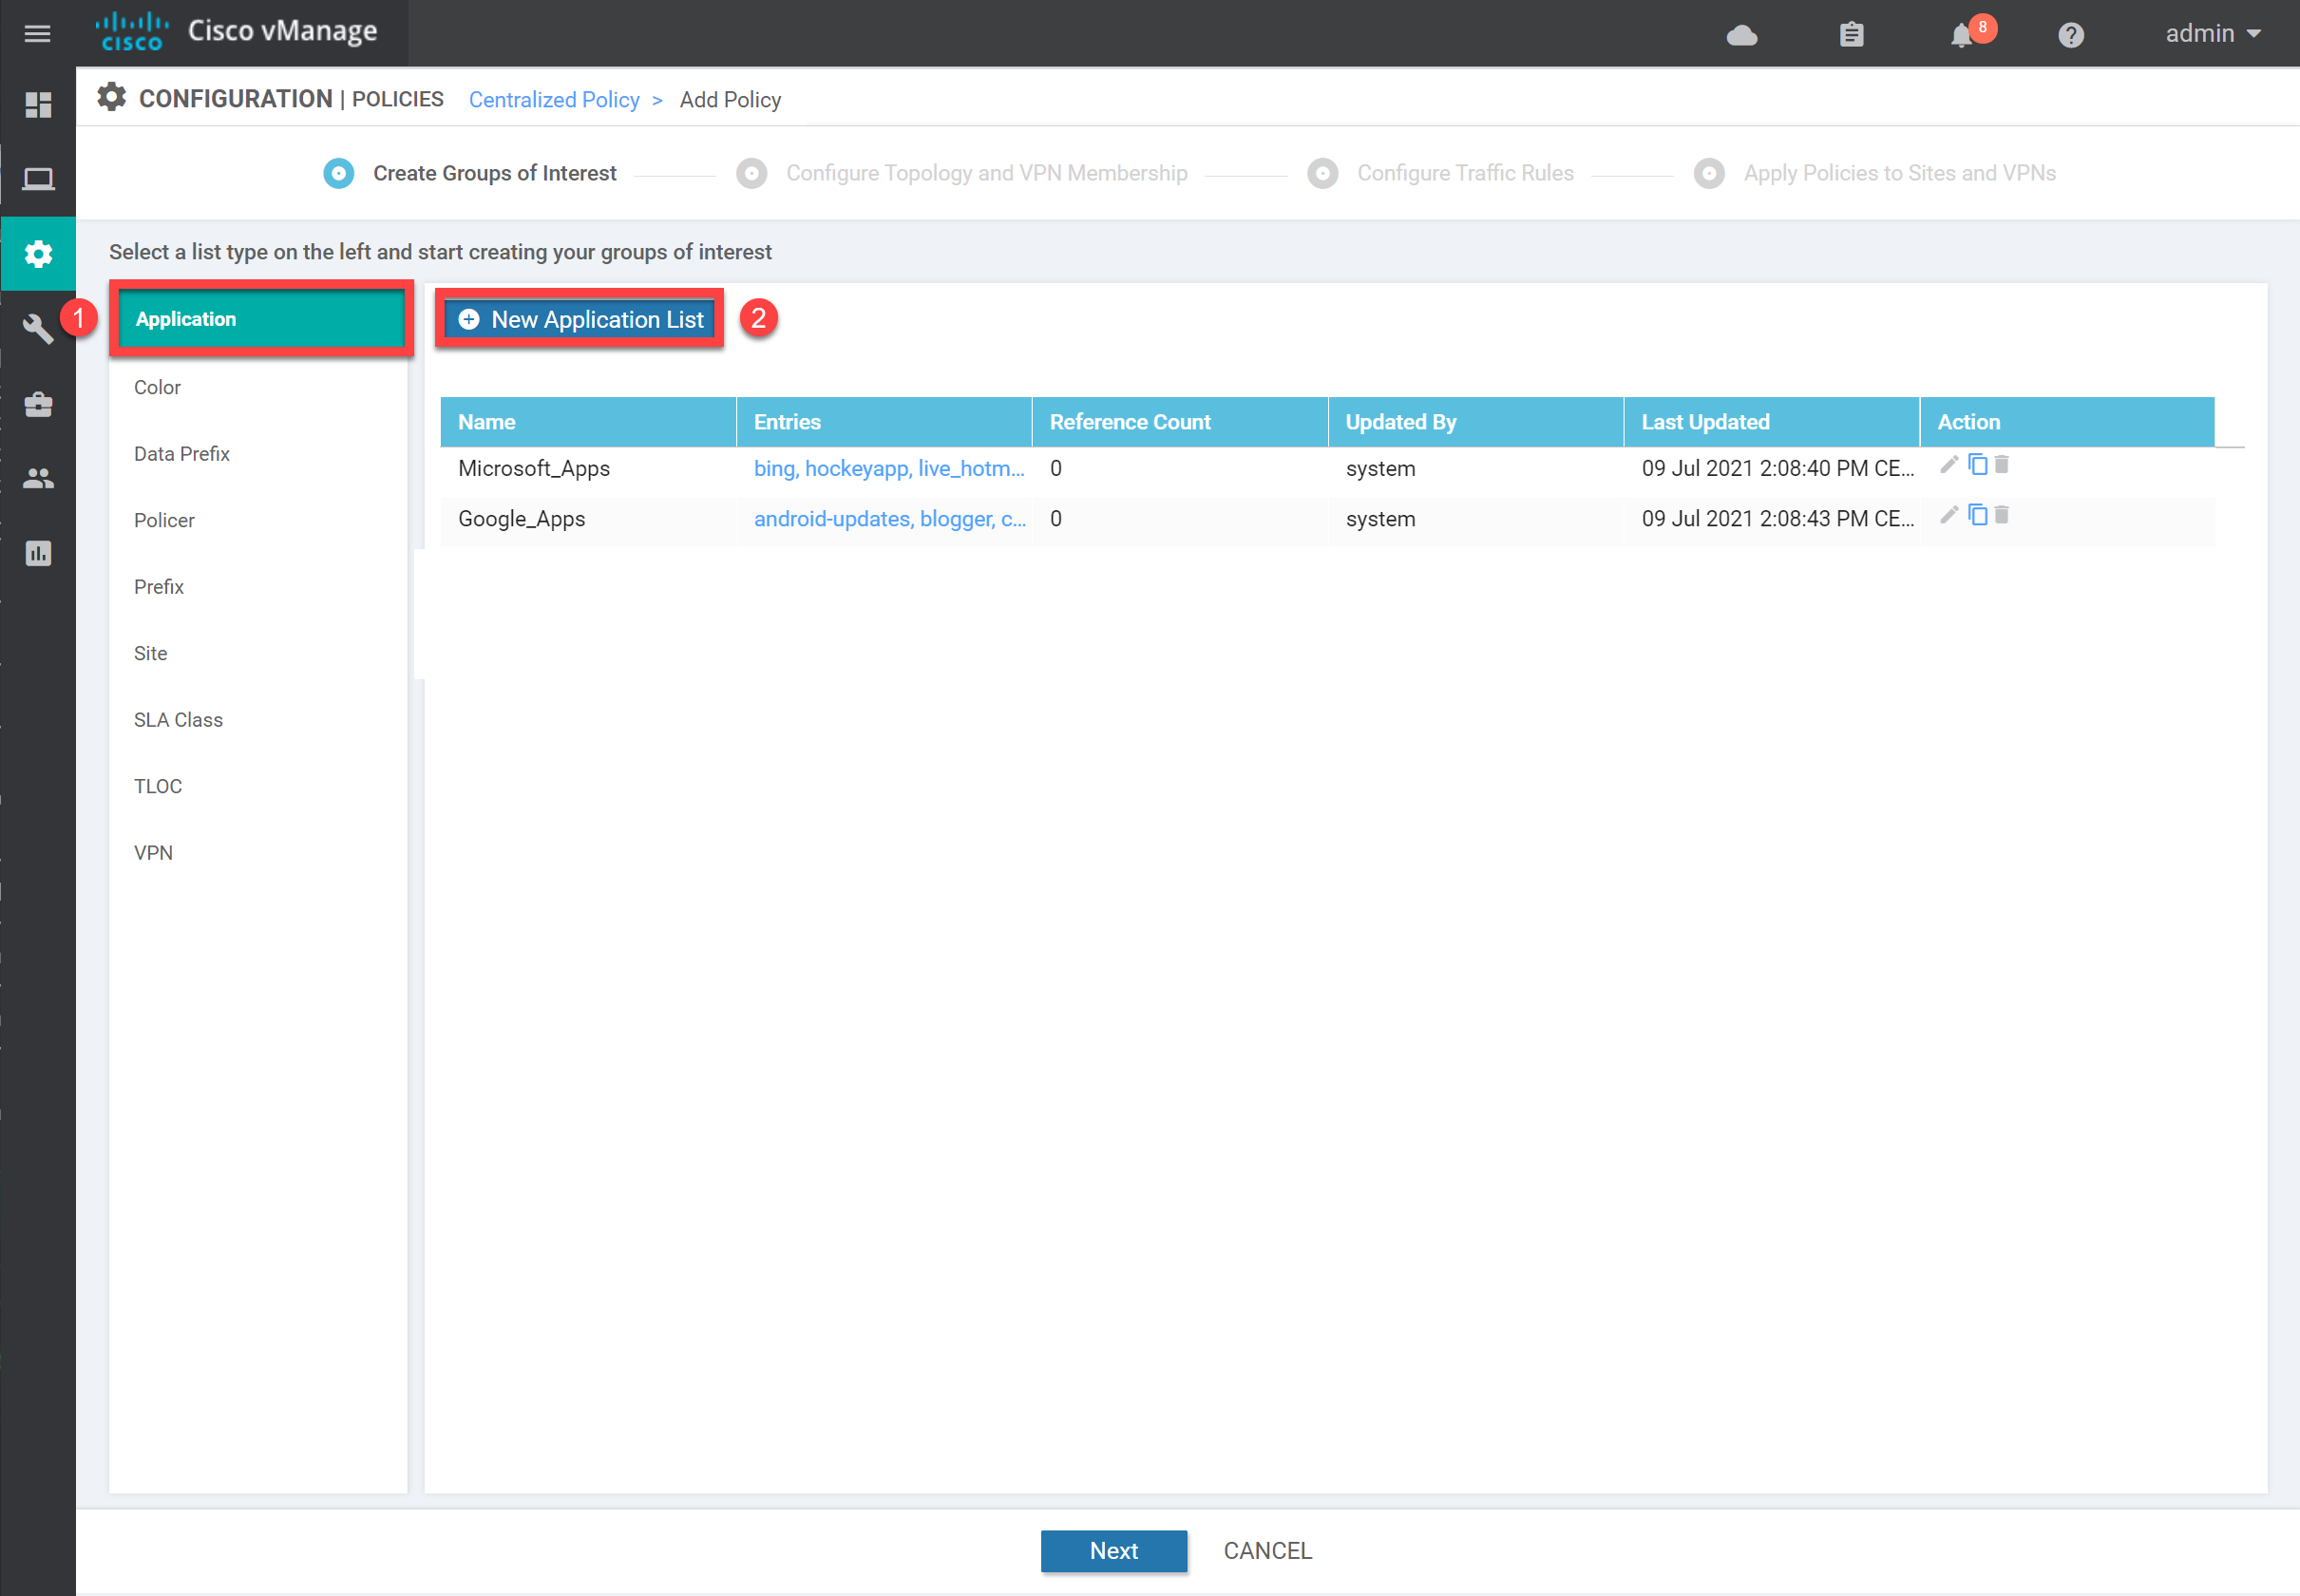
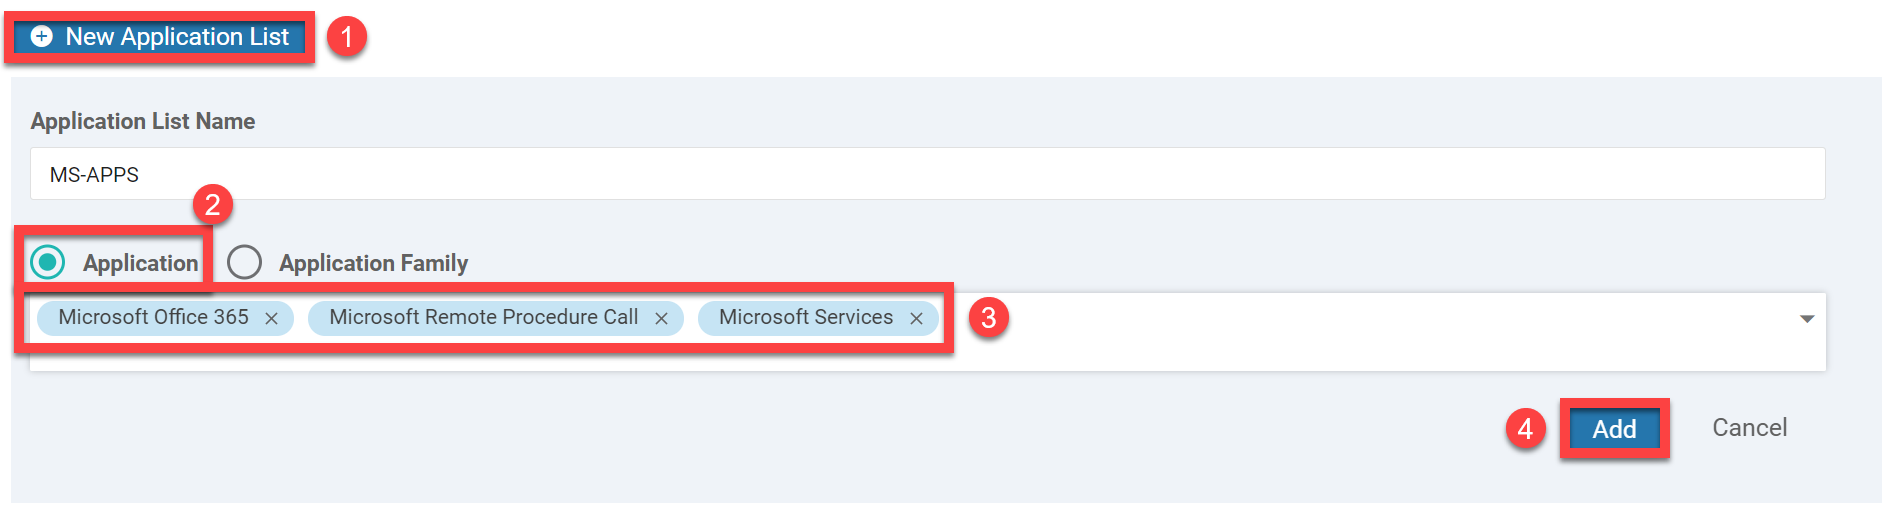
Each application list has a range of applications. We’ll create a new one so you can see what it looks like. You probably have more applications than Microsoft or Google apps. Click on New Application List, give it a name, and select some applications from the dropdown menu. Save the list by clicking on the Add button:
Site List
Next up is the Site List. We’ll create a new list that defines our two sites (2 and 3). Select Site and click on New Site List:
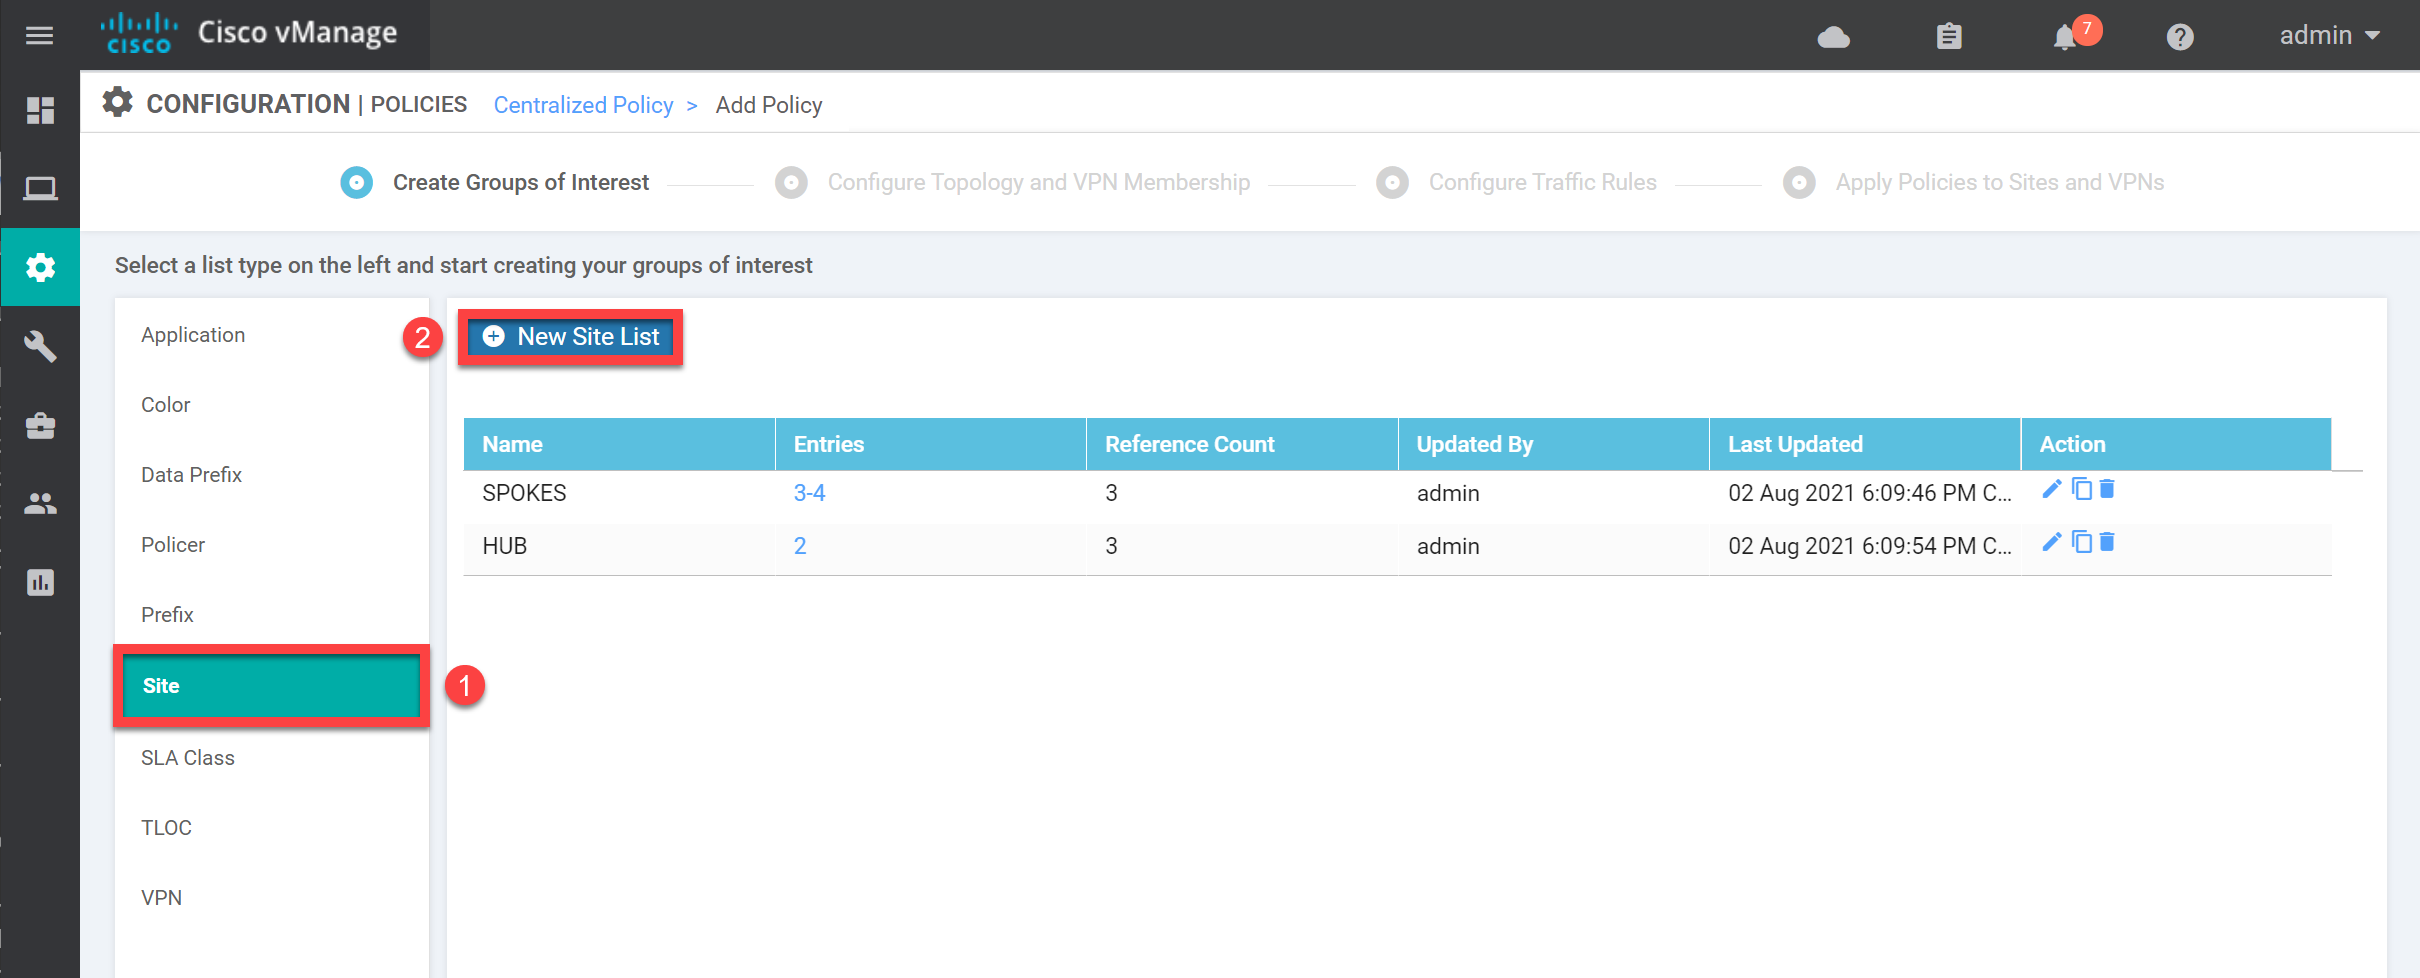
Give the Site List a name and add site numbers two and three:

Click on Add to store the Site List.
SLA Class List
The SLA Class List defines when the traffic has to switch over to another WAN connection. This is where we define a threshold for packet loss, latency, and jitter. There are four default SLA classes. Let’s create an SLA Class List. Click on New SLA Class List:
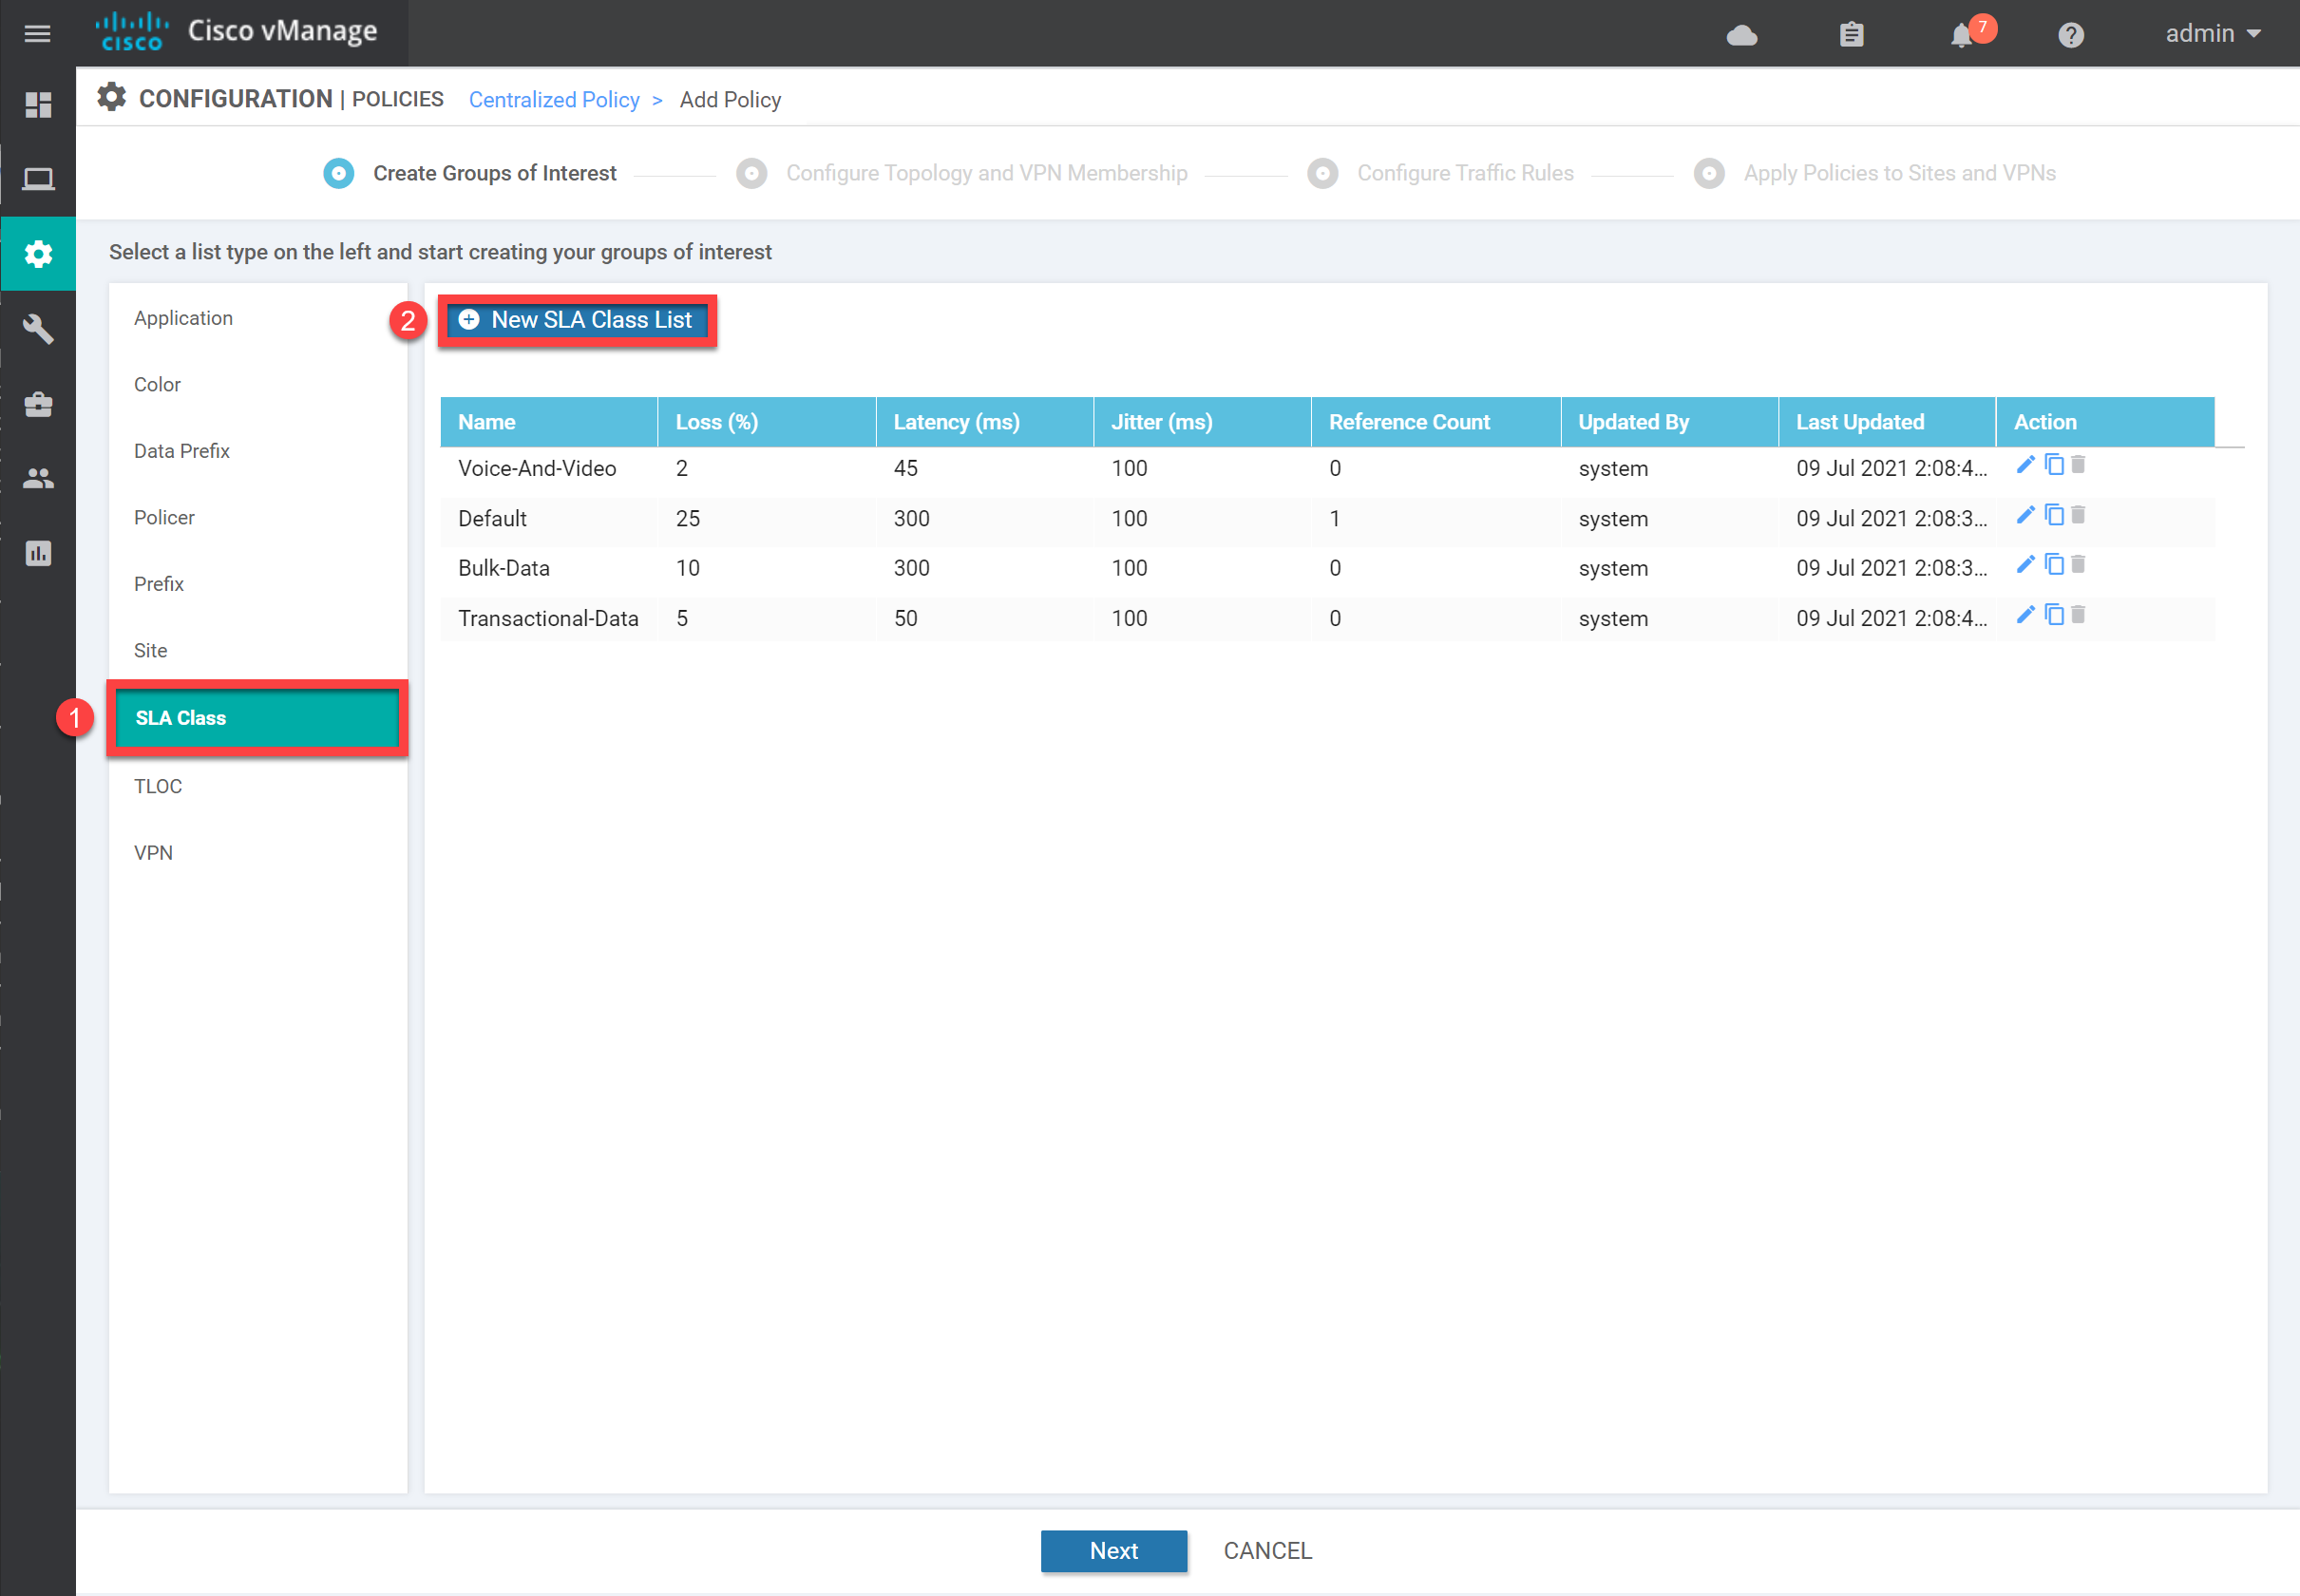
We’ll set some parameters. In a lab, it doesn’t matter what values you select:
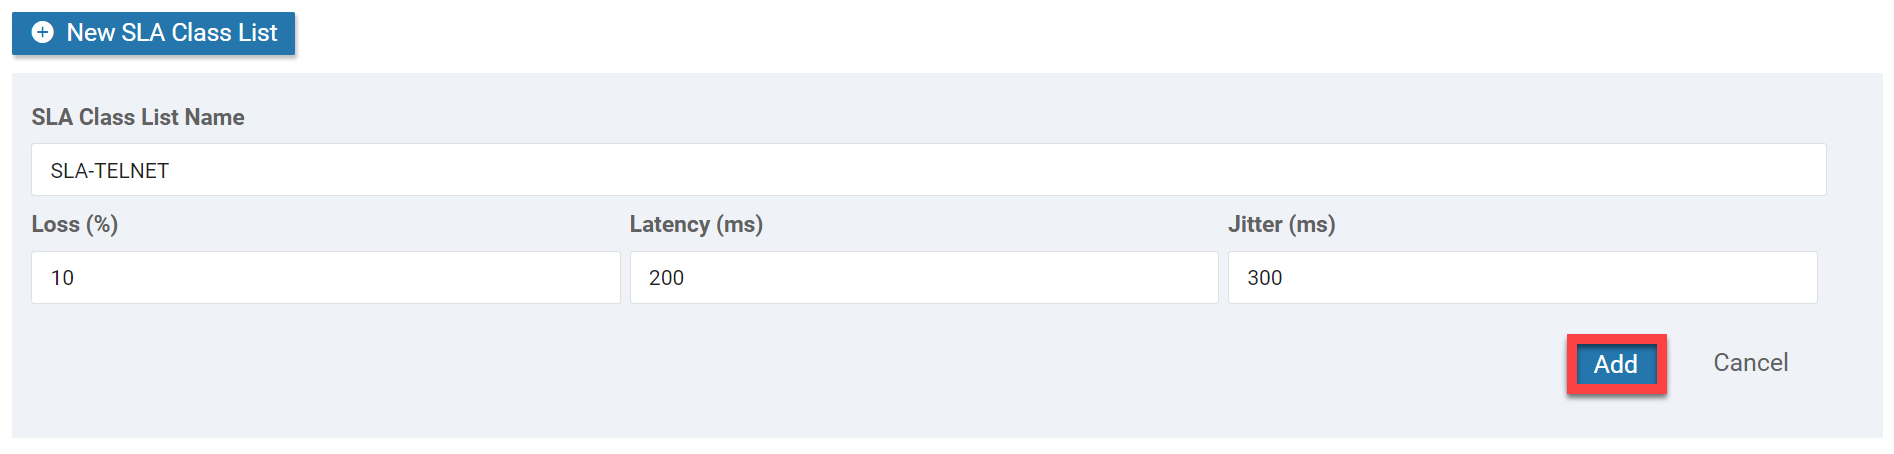
Click on Add to store the SLA Class List.
Traffic Rules
We don’t need a Topology, or VPN Membership, so click on Next. Select Create New under Configure Traffic Rules > Application-Aware Routing > Add Policy:
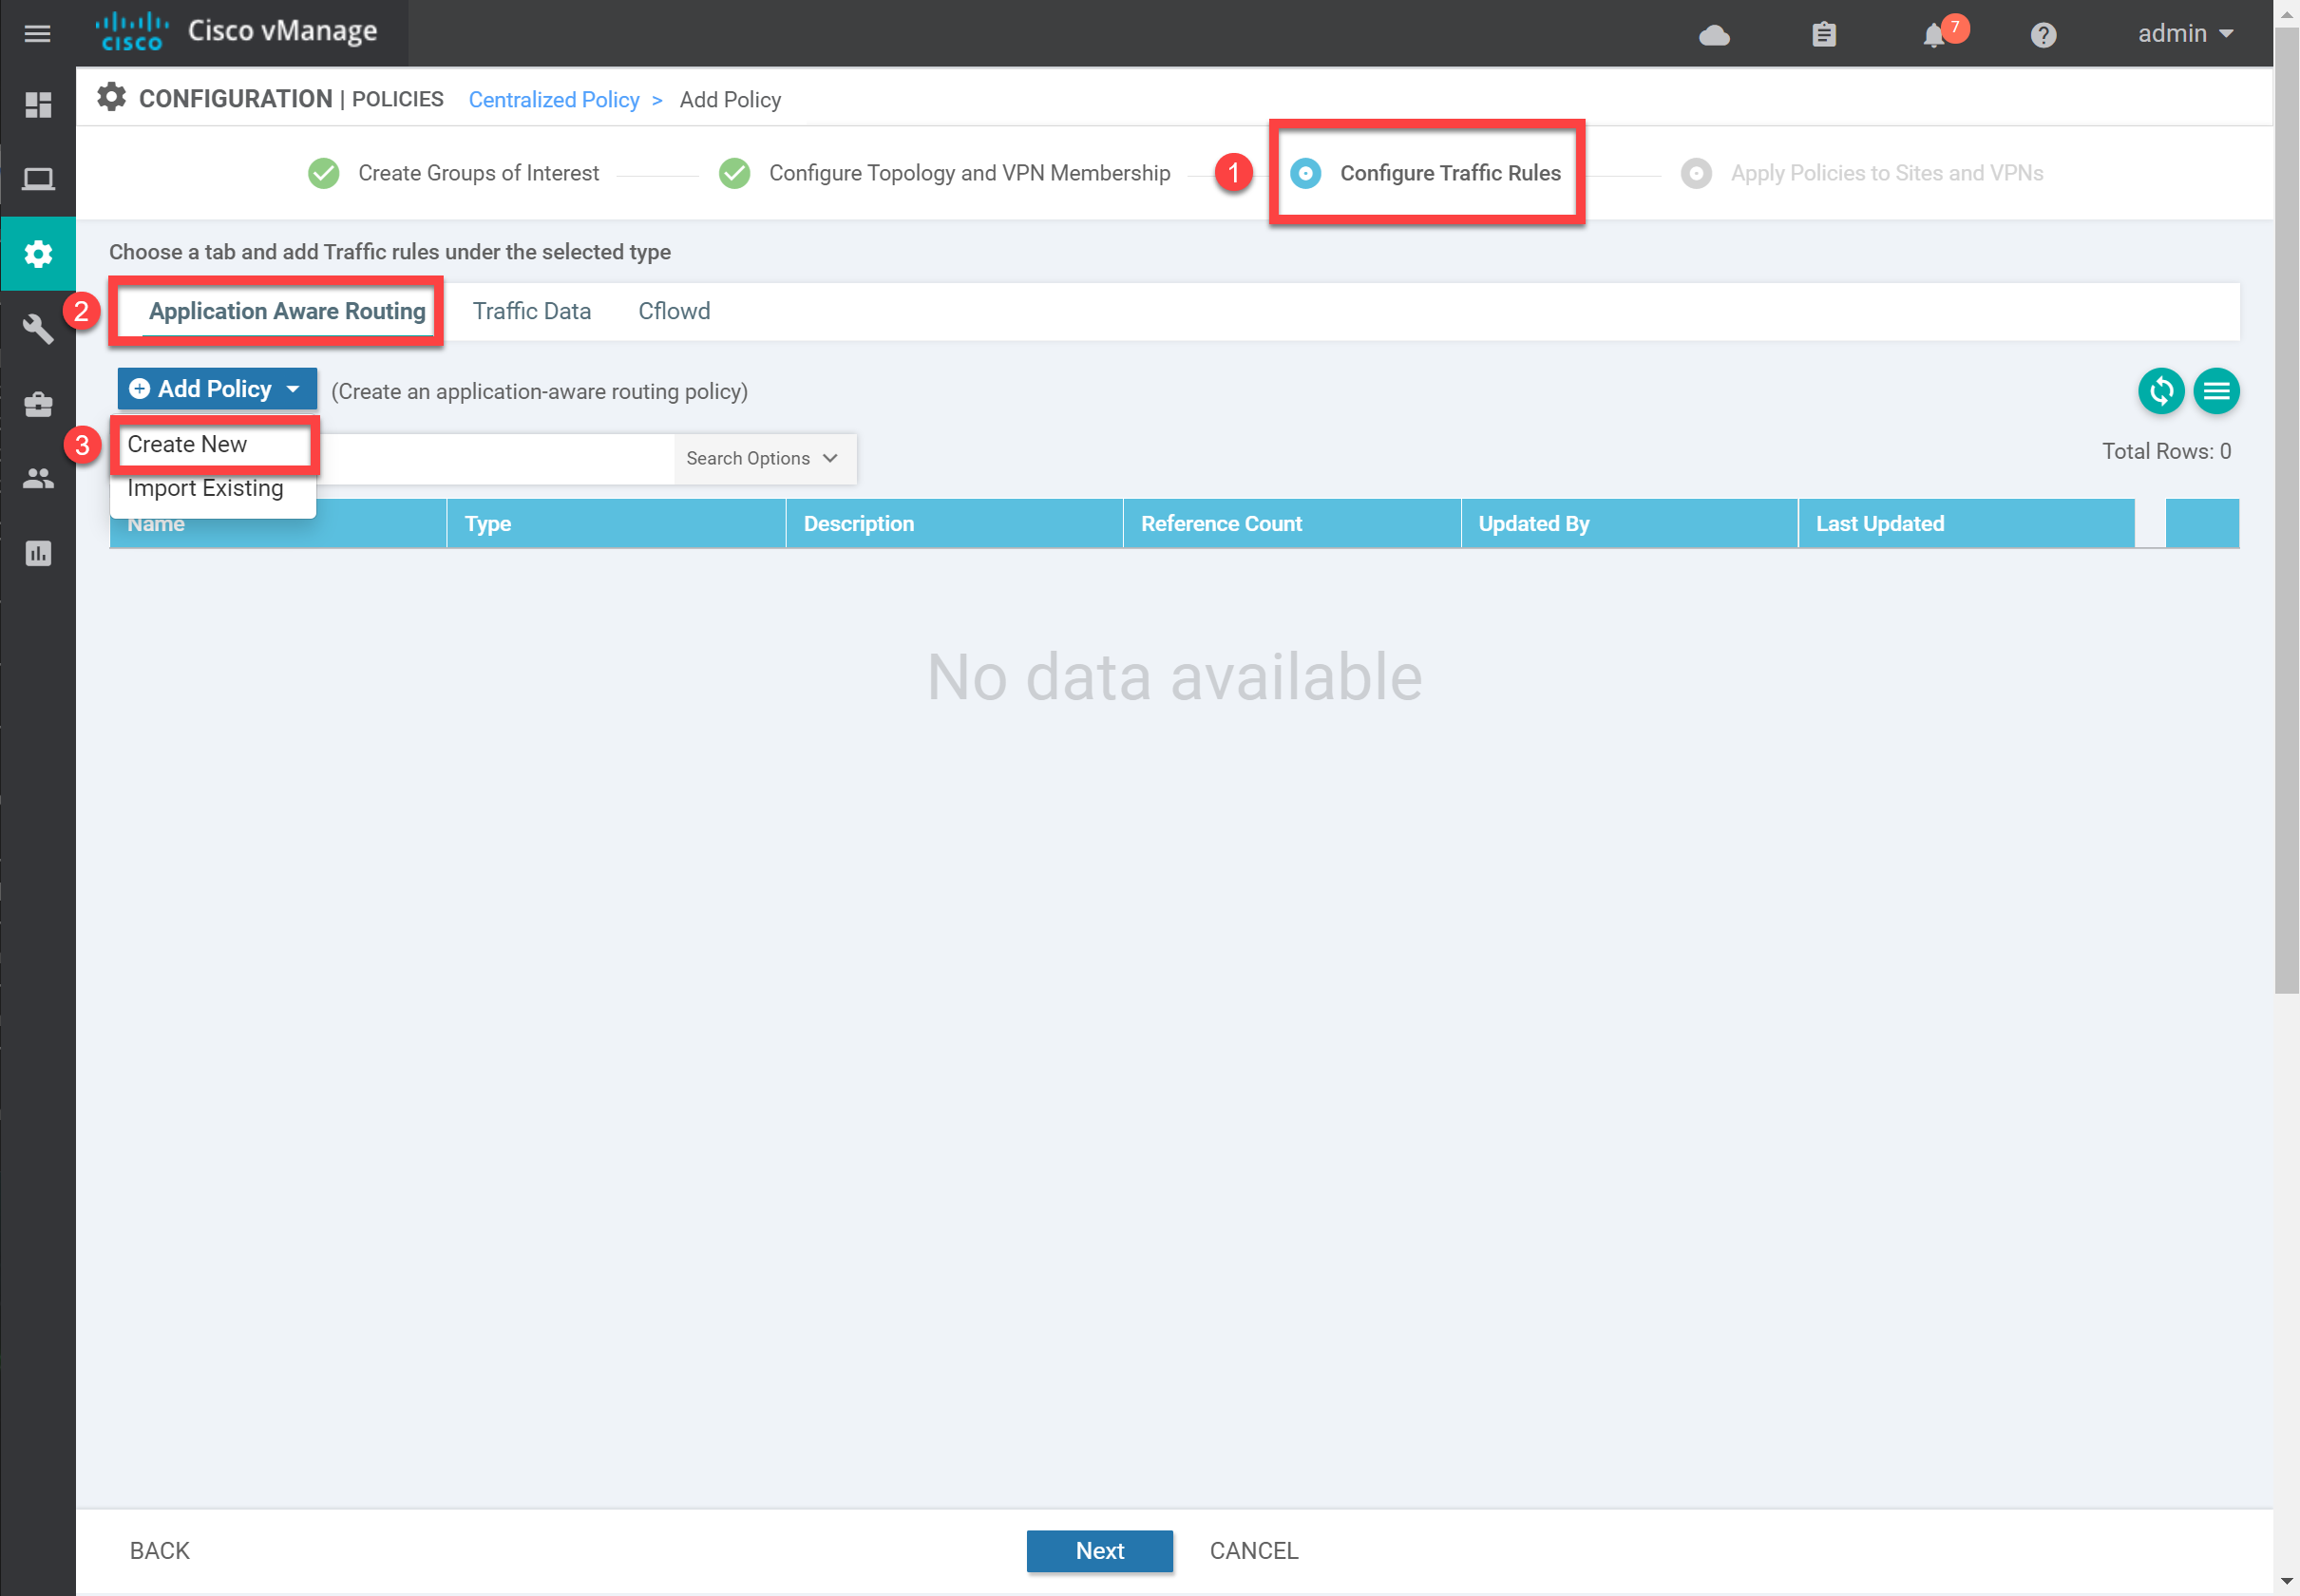
Telnet
Click on + Sequence Type, then select Protocol and Destination Port. Set the Protocol to 6 (TCP) and the destination port number to 23:
Thanks Rene and the Network Lessons crew, for taking time to break down Cisco SD-WAN knowledge. I am now a full Cisco SD-WAN engineer.
Hello Maciej
Thanks so much for your kind words and for the feedback on the lessons! And thanks for pointing out the error. I will let Rene know. Can you point us to the specific lesson and the particular error? That would help out a lot!
Thanks again!
Laz
Hello Maciej
Great, thanks for pointing that out, I’ll let Rene know to make any necessary modifications. And yes, it is typically the errors we find and troubleshoot that help us to learn the most… Keep networking!
Laz
Hi, I have a question regarding COR (Cloud OnRamp).
Question 1 - SaaS
I understand that if we have two service providers, we can send HTTP probes to our SaaS application and determine the quality (QOE) of both connections and then pick the one that is currently performing better.
This example makes great sense but every single resource mentions another example where we have just one internet circuit and then an MPLS circuit.
https://img.youtube.com/vi/AbVa8-EDjmc/maxresdefault.jpg
14:20 on the YouTube video.
My question is, why isn’t SD-WAN running
... Continue reading in our forumHello David
The example in the video as well as the examples you see from other sources, are simply indicating that you can have an SD-WAN deployment with one option completely outside of the SD-WAN fabric. This is your breakout option. The fabric will include at least one, but typically multiple, connections. You can see similar dia
... Continue reading in our forum