All routing protocols can be protected by using authentication and OSPF is no exception. There are two options for authentication:
- Plain text authentication
- MD5 authentication
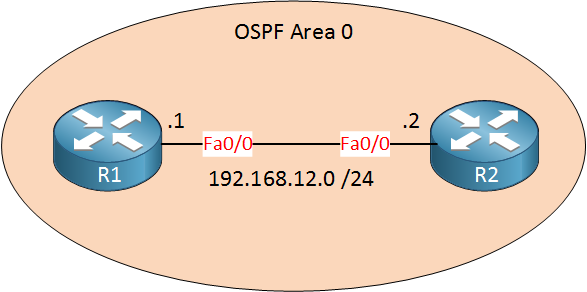
Each OSPF packet will be authenticated if you enable any form of authentication. In this lesson, we’ll take a look at how to configure plain text authentication for OSPF. Here’s the topology that we’ll use:

Above, you see the topology I’m going to use for authentication. Just two routers but we can use them to check all the different methods of authentication. Let’s configure OSPF:
R1(config)#router ospf 1
R1(config-router)#network 192.168.12.0 0.0.0.255 area 0R2(config)#router ospf 1
R2(config-router)#network 192.168.12.0 0.0.0.255 area 0First I’ll enable OSPF, nothing fancy here. Let’s try to enable plain text authentication:
R1(config)#interface fastEthernet 0/0
R1(config-if)#ip ospf authentication
R1(config-if)#ip ospf authentication-key MYPASSR2(config)#interface fastEthernet 0/0
R2(config-if)#ip ospf authentication
R2(config-if)#ip ospf authentication-key MYPASSBy using the ip ospf authentication command we enable plain text authentication on the interface level. I configured the password MYPASS by using the ip ospf authentication-key command. If you have a lot of interfaces you probably don’t want to enable OSPF authentication for each interface. You can also enable area-wide authentication by using the area authentication command:
R1(config)#router ospf 1
R1(config-router)#area 0 authentication
In my example above, I enabled authentication for area 0. Let’s verify our work:
R1#show ip ospf interface fastEthernet 0/0
FastEthernet0/0 is up, line protocol is up
  Internet Address 192.168.12.1/24, Area 0
  Process ID 1, Router ID 192.168.12.1, Network Type BROADCAST, Cost: 1
  Transmit Delay is 1 sec, State BDR, Priority 1
  Designated Router (ID) 192.168.12.2, Interface address 192.168.12.2
  Backup Designated router (ID) 192.168.12.1, Interface address 192.168.12.1
  Flush timer for old DR LSA due in 00:01:49
  Timer intervals configured, Hello 10, Dead 40, Wait 40, Retransmit 5
    oob-resync timeout 40
    Hello due in 00:00:01
  Supports Link-local Signaling (LLS)
  Index 1/1, flood queue length 0
  Next 0x0(0)/0x0(0)
  Last flood scan length is 1, maximum is 1
  Last flood scan time is 0 msec, maximum is 0 msec
  Neighbor Count is 1, Adjacent neighbor count is 1
    Adjacent with neighbor 192.168.12.2  (Designated Router)
  Suppress hello for 0 neighbor(s)
  Simple password authentication enabled
If you use the show ip ospf interface command you can see OSPF information per interface. You can also check if authentication is enabled. You can see the neighbor count is 1 and simple password authentication is enabled.
R1#debug ip ospf packet
OSPF packet debugging is on

OSPF: rcv. v:2 t:1 l:48 rid:192.168.12.2
      aid:0.0.0.0 chk:B9F0 aut:1 auk: from FastEthernet0/0
I love debugs…when it comes to Cisco, not Google but debug is your friend. It gives you so much information. If you use debug ip ospf packetyou can see that authentication is enabled. In my example, I receive a packet, and it says aut:1 which means that plain text authentication is enabled.


If you run a Wireshark cap you can see the plain-text passphrase of MYPASS in one of the OSPF header packets
why you didn’t configure a password under area 0 authentication command?
The password is configured on the interface, not under the OSPF process.
So you have to enter a authentication-key on every interface?
Hi Chris,
That’s right, the key is always per interface.
Rene