Lesson Contents
In the OSPF virtual link lesson, I explained how to configure a virtual link, but I didn’t show how to enable virtual link authentication. That’s what we are going to cover in this lesson.
There are two authentication methods:
- Plain text
- MD5
I’ll show you both options.
Configuration
Here is the topology we will use:
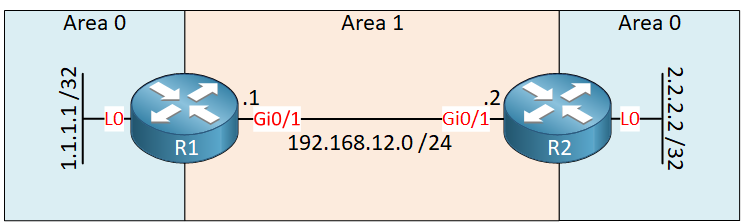
We have two routers running OSPF. Area 0 is discontinuous, so we need a virtual link through area 1 to fix this.
Configurations
Want to take a look for yourself? Here you will find the startup configuration of each device.
R1
hostname R1
!
ip cef
!
interface Loopback0
 ip address 1.1.1.1 255.255.255.255
!
interface GigabitEthernet0/1
 ip address 192.168.12.1 255.255.255.0
!
router ospf 1
 area 1 virtual-link 2.2.2.2
 network 1.1.1.1 0.0.0.0 area 0
 network 192.168.12.0 0.0.0.255 area 1
!
end
R2
hostname R2
!
ip cef
!
interface Loopback0
 ip address 2.2.2.2 255.255.255.255
!
interface GigabitEthernet0/1
 ip address 192.168.12.2 255.255.255.0
!
router ospf 1
 area 1 virtual-link 1.1.1.1
 network 2.2.2.2 0.0.0.0 area 0
 network 192.168.12.0 0.0.0.255 area 1
!
end
Let’s see if we can authenticate this virtual link.
Plain Text Authentication
There are two things we need to do to enable authentication:
- Enable authentication for area 0: the virtual link belongs to area 0, so you need authentication for the backbone area, not the area that the virtual link goes through.
- Set the authentication password for the virtual link.
Only two commands are required to achieve this:
R1(config)#router ospf 1
R1(config-router)#area 0 authentication
R1(config-router)#area 1 virtual-link 2.2.2.2 authentication-key NWLR2(config)#router ospf 1
R2(config-router)#area 0 authentication
R2(config-router)#area 1 virtual-link 1.1.1.1 authentication-key NWLLet’s see if it works. Let’s reset the OSPF process:
R1#clear ip ospf process
Reset ALL OSPF processes? [no]: yes
After a few seconds, our virtual link is back:
R1#
%OSPF-5-ADJCHG: Process 1, Nbr 2.2.2.2 on OSPF_VL0 from LOADING to FULL, Loading Done
Let’s verify that authentication is enabled:
R1#show ip ospf virtual-links
Virtual Link OSPF_VL0 to router 2.2.2.2 is up
  Run as demand circuit
  DoNotAge LSA allowed.
  Transit area 1, via interface GigabitEthernet0/1
 Topology-MTID    Cost    Disabled     Shutdown      Topology Name
        0           1         no          no            Base
  Transmit Delay is 1 sec, State POINT_TO_POINT,
  Timer intervals configured, Hello 10, Dead 40, Wait 40, Retransmit 5
    Hello due in 00:00:01
    Adjacency State FULL (Hello suppressed)
    Index 1/1/2, retransmission queue length 0, number of retransmission 0
    First 0x0(0)/0x0(0)/0x0(0) Next 0x0(0)/0x0(0)/0x0(0)
    Last retransmission scan length is 0, maximum is 0
    Last retransmission scan time is 0 msec, maximum is 0 msec
  Simple password authentication enabled
There we go, above you can see that simple password authentication is enabled.
Configurations
Want to take a look for yourself? Here you will find the final configuration of each device.
R1
hostname R1
!
ip cef
!
interface Loopback0
 ip address 1.1.1.1 255.255.255.255
!
interface GigabitEthernet0/1
 ip address 192.168.12.1 255.255.255.0
!
router ospf 1
 area 0 authentication
 area 1 virtual-link 2.2.2.2 authentication-key NWL
 network 1.1.1.1 0.0.0.0 area 0
 network 192.168.12.0 0.0.0.255 area 1
!
end
R2
hostname R2
!
ip cef
!
interface Loopback0
 ip address 2.2.2.2 255.255.255.255
!
interface GigabitEthernet0/1
 ip address 192.168.12.2 255.255.255.0
!
router ospf 1
 area 0 authentication
 area 1 virtual-link 1.1.1.1 authentication-key NWL
 network 2.2.2.2 0.0.0.0 area 0
 network 192.168.12.0 0.0.0.255 area 1
!
end
MD5 Authentication
Let’s try MD5 authentication. The configuration is similar:
R1(config)#router ospf 1
R1(config-router)#area 0 authentication message-digest
R1(config-router)#area 1 virtual-link 2.2.2.2 message-digest-key 1 md5 NWLR2(config)#router ospf 1
R2(config-router)#area 0 authentication message-digest
R2(config-router)#area 1 virtual-link 1.1.1.1 message-digest-key 1 md5 NWLFirst, we need to configure area 0 to use MD5 authentication and then set the MD5 key for the virtual link.
Let’s see if it works:
Why I can ping 1.1.1.1 source 2.2.2.2 even without virtual link, let alone the authentication? Is it the IOS bug or others?
Hello Rocky
I’ve recreated the topology with the appropriate configuration, but I was unable to reproduce your results. I found that the two routers did indeed become neighbors however, no routes were actually exchanged. The routing tables of both routers were empty.
Check your configuration again and verify that everything is indeed configured as in the topology.
I hope this has been helpful!
Laz
Thanks for your reply.
I will show my config as follows,
https://cdn-forum.networklessons.com/uploads/default/original/2X/d/d38b442b5f8bfc274748c70eef023fb3178e216b.png
r1 config.txt (1.2 KB)r2 config.txt (1.2 KB)
As you can see, I didn’t config virtual link. But I could
https://cdn-forum.networklessons.com/uploads/default/original/2X/2/26430e35842458f7f6d495a1ea72508b5d59a877.jpeg
and its routing table is,
https://cdn-forum.networklessons.com/uploads/default/original/2X/1/1d147ba470a38
... Continue reading in our forumHello Rocky
This is indeed puzzling. This may have to do with the fact that these are Loopback addresses that you are pinging and also because on R1, the router ID is explicitly defined as the same IP as the loopback and as the IP you’re pinging.
Now the fact that the routing table includes the 1.1.1.1 destination in its routing table makes sense, because it sees it in a neighboring area, which is what should happen. What shouldn’t happen however is for there to be L3 connectivity between the loopbacks.
However, notice that the routing table indicates that the
... Continue reading in our forumI believe there is another way of enabling authentication?