Lesson Contents
To allow remote access to a Cisco IOS Catalyst switch with protocols like telnet or SSH, we need to configure an IP address on the switch. You also need this if you want to use any network management tools to monitor your switch.
Most switches have a lot of physical interfaces so where are we going to configure an IP address? Instead of using a physical interface, we often use a virtual interface called a SVI (Switch Virtual Interface). Here’s how to visualize this:
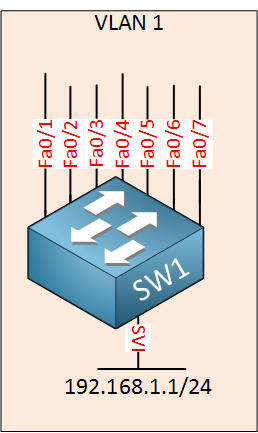
The IP address is configured on the SVI interface. All physical interfaces within the same VLAN will be able to communicate with this SVI interface.
The default VLAN on your Cisco Catalyst switch will be VLAN 1, all interfaces belong to this VLAN by default. This means that if you create a SVI interface for VLAN 1 and put an IP address on it, everyone will be able to reach it. It is possible to use access-lists to restrict which IP addresses are allowed but it’s better to create a separate VLAN for management. Here’s an illustration:

On the left side, we have two hosts in VLAN 10. These will be able to communicate with each other since they are in the same VLAN. On the right side, we see a computer that is only used for management. This computer is connected to interface FastEthernet 0/3 and there is an SVI interface with IP address 192.168.20.1.
This management computer will be able to exchange IP packets with our switch. This is a nice and secure method to access the switch only from computers that are supposed to.
Configuration
Let me show you how to configure the SVI interface. First, you have to make sure you created the VLAN in the VLAN database:
SW1(config)#vlan 20
SW1(config-vlan)#exit
Now we can create a new SVI interface:
SW1(config)#interface vlan 20
SW1(config-if)#no shutdown
SW1(config-if)#ip address 192.168.20.1 255.255.255.0
Make sure you don’t forget the no shutdown command. By default, all SVI interfaces are shut. Make sure you add one of the physical interfaces to VLAN 20:
SW1(config)#interface FastEthernet 0/3
SW1(config-if)#switchport mode access
SW1(config-if)#switchport access vlan 20
That’s all you have to do. Let’s see if it’s working.
Verification
Let’s check if the SVI interface is up and running:
SW1#show ip interface brief | include Vlan
Vlan20                 192.168.20.1    YES manual up                    up
This is looking good. I will connect a computer to the FastEthernet0/3 interface of my switch to see if I can ping the switch. I also configured a static IP address in the same subnet as our switch:
Its been awhile and I just wanted to refresh memory on how initially configure the switch. Particularly L2 switch. Most are L3 these days but nevertheless. This was the only article related I was able to find and I feel a couple of things are missing, particularly those that I had questions about. Thats:
default gateway probably should be included, showing also difference for L3 config as is in the lesson, but also for L2 which is different because its, well, just l2 switch;
so on L2 switch how do we assign management IP address? Can we even create a SVI on pur
... Continue reading in our forumHello again Vadim, nice to see you here!
No need to apologize about asking questions, that’s what we’re here for, to answer them as best we can!
The only way you can access the switch using SSH or Telnet is via an IP address that has been assigned to an SVI. An L2 switch does indeed have SVIs and you can actually configure
... Continue reading in our forum