Lesson Contents
The Cisco ASA Firewall uses so-called “security levels” that indicate how trusted an interface is compared to another interface. The higher the security level, the more trusted the interface is. Each interface on the ASA is a security zone so by using these security levels we have different trust levels for our security zones.
An interface with a high-security level can access an interface with a low-security level, but the other way around is not possible unless we configure an access-list that permits this traffic.
Here are a couple of examples of security levels:
- Security level 0: This is the lowest security level there is on the ASA, and by default, it is assigned to the “outside” interface. Since there is no lower security level, this means that traffic from the outside is unable to reach any of our interfaces unless we permit it within an access-list.
- Security level 100: This is the highest security level on our ASA, and by default, this is assigned to the “inside” interface. We usually use this for our “LAN”. Since this is the highest security level, by default, it can reach all the other interfaces.
- Security level 1 – 99: We can create any other security levels that we want, for example, we can use security level 50 for our DMZ. This means that traffic is allowed from our inside network to the DMZ (security level 100 -> 50) and also from the DMZ to the outside (security level 50 -> 0). Traffic from the DMZ, however, can’t go to the inside (without an access-list) because traffic from security level 50 is not allowed to reach security level 100. You can create as many security levels as you want…
Let’s take a look at a Cisco ASA firewall with three interfaces so you can see this behavior in action. Here’s the topology I will use:
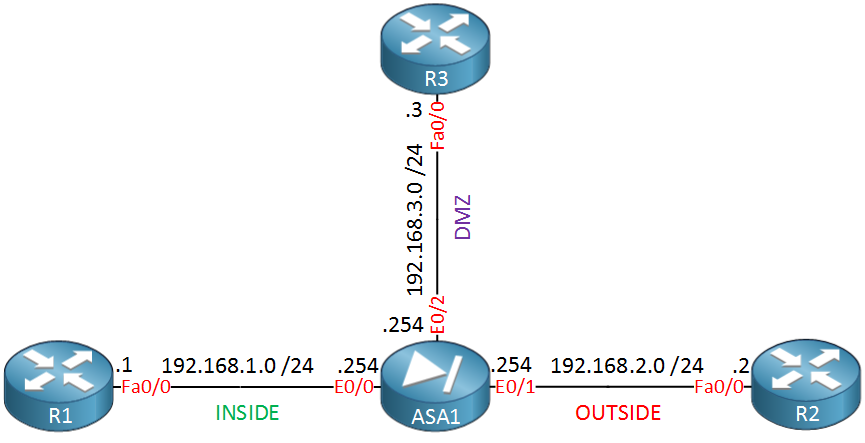 Above, you see the Cisco ASA in the middle with three interfaces:
- Interface E0/0 as the INSIDE.
- Interface E0/1 as the OUTSIDE.
- Interface E0/2 as our DMZ.
I will use the routers to generate traffic between the different security levels. Let’s configure the ASA with these interfaces:
ASA1(config)# interface E0/0
ASA1(config-if)# nameif INSIDE
INFO: Security level for "INSIDE" set to 100 by default.
ASA1(config-if)# ip address 192.168.1.254 255.255.255.0
ASA1(config-if)# no shutdown
ASA1(config)# interface E0/1
ASA1(config-if)# nameif OUTSIDE
INFO: Security level for "OUTSIDE" set to 0 by default.
ASA1(config-if)# ip address 192.168.2.254 255.255.255.0
ASA1(config-if)# no shutdownASA1(config)# interface E0/2
ASA1(config-if)# nameif DMZ
INFO: Security level for "DMZ" set to 0 by default.
ASA1(config-if)# security-level 50
ASA1(config-if)# ip address 192.168.3.254 255.255.255.0
ASA1(config-if)# no shutdownThe nameif command is used to specify a name for the interface. Unlike the description command the name of your interface is actually used in many commands, so pick something useful. As you can see, the ASA recognizes INSIDE, OUTSIDE, and DMZ names. It uses a default security level of 100 for INSIDE and 0 for OUTSIDE/DMZ. I manually changed the security level of the DMZ interface to 50.
Let’s see what traffic patterns are allowed now, shall we? First, we’ll send some pings from the ASA…
Traffic from the ASA
The ASA can reach any device on any interface:
ASA1# ping 192.168.1.1
Type escape sequence to abort.
Sending 5, 100-byte ICMP Echos to 192.168.1.1, timeout is 2 seconds:
!!!!!
Success rate is 100 percent (5/5), round-trip min/avg/max = 1/2/10 ms
ASA1# ping 192.168.2.2
Type escape sequence to abort.
Sending 5, 100-byte ICMP Echos to 192.168.2.2, timeout is 2 seconds:
!!!!!
Success rate is 100 percent (5/5), round-trip min/avg/max = 1/1/1 msASA1# ping 192.168.3.3
Type escape sequence to abort.
Sending 5, 100-byte ICMP Echos to 192.168.3.3, timeout is 2 seconds:
!!!!!
Success rate is 100 percent (5/5), round-trip min/avg/max = 1/1/1 msAs you can see, the ASA can reach any device in each of the different security zones. This makes sense since these devices are also using the ASA as their default gateway. The next step is to test some traffic between devices in different security zones.
ASA1(config)# policy-map global_policy
ASA1(config-pmap)# class inspection_default
ASA1(config-pmap-c)# inspect icmp
Now, ICMP traffic will be allowed between different interfaces.
Traffic from Inside
Let’s send some pings from R1 to R2 (outside) and R3 (DMZ):
R1#ping 192.168.2.2
Type escape sequence to abort.
Sending 5, 100-byte ICMP Echos to 192.168.2.2, timeout is 2 seconds:
!!!!!
Success rate is 100 percent (5/5), round-trip min/avg/max = 1/2/4 msR1#ping 192.168.3.3
Type escape sequence to abort.
Sending 5, 100-byte ICMP Echos to 192.168.3.3, timeout is 2 seconds:
!!!!!
Success rate is 100 percent (5/5), round-trip min/avg/max = 1/2/4 msBoth pings work because we are going from security level 100 (inside) to 0 (outside) and 50 (DMZ).
Traffic from Outside
Now we’ll send some pings from R2, which is on the outside…
R2#ping 192.168.1.1
Type escape sequence to abort.
Sending 5, 100-byte ICMP Echos to 192.168.1.1, timeout is 2 seconds:
.....
Success rate is 0 percent (0/5)R2#ping 192.168.3.3
Type escape sequence to abort.
Sending 5, 100-byte ICMP Echos to 192.168.3.3, timeout is 2 seconds:
.....
Success rate is 0 percent (0/5)This doesn’t work since we are trying to go from a security level of 0 (outside) to 100 (inside) or 50 (DMZ). If you want to allow this traffic, then we would have to use an access-list. Last but not least, let’s try the DMZ:
Traffic from DMZ
R3#ping 192.168.1.1
Type escape sequence to abort.
Sending 5, 100-byte ICMP Echos to 192.168.1.1, timeout is 2 seconds:
.....
Success rate is 0 percent (0/5)R3#ping 192.168.2.2
Type escape sequence to abort.
Sending 5, 100-byte ICMP Echos to 192.168.2.2, timeout is 2 seconds:
!!!!!
Success rate is 100 percent (5/5), round-trip min/avg/max = 1/1/1 msThe first ping doesn’t work since we try to go from security level 50 (DMZ) to 100 (inside). The second one works because we go to a lower security level 0 (outside).
hi renee ;
I was trying to work on your toplogy above but for some reason I cant ping to otherside of ASA .interfaces are up and even applied this default command
still doesnt work on my gns3 .do you have any idea about it ?
Hi Georgi,
What if you try something else that doesn’t require changing the policy-map? For example telnetting from one device in a high security level to something in a low security level?
Rene
telnet is working fine and I actually found 2 ways to allow ping in ASA
first one is ;
and the second one is creating access list like this ;
both do the same job .
Rene,
Working on this Lab using ASA 5505 verison Cisco Adaptive Security Appliance Software Version 8.4(2)
I tried to replicate the lab above, but I can’t add an IP address to the actual interface I need to add them to a VLAN interface. How can I do that and have each zone on a different subnet ?Any advice/example would be greatly appreciated.
Regards,
Juan Iniguez
Hi Juan,
The main difference between the 5505 and the 5510 or higher is that the 5505 has switchports and VLAN interfaces. The 5510 only has L3 interfaces.
Configuration is similar to a L3 switch, here’s an example for an INSIDE and OUTSIDE:
... Continue reading in our forum