Lesson Contents
Site-to-site IPsec VPNs are used to “bridge” two distant LANs together over the Internet. Normally on the LAN we use private addresses so without tunneling, the two LANs would be unable to communicate with each other.
In this lesson you will learn how to configure IKEv1 IPsec between two Cisco ASA firewalls to bridge two LANs together.
Configuration
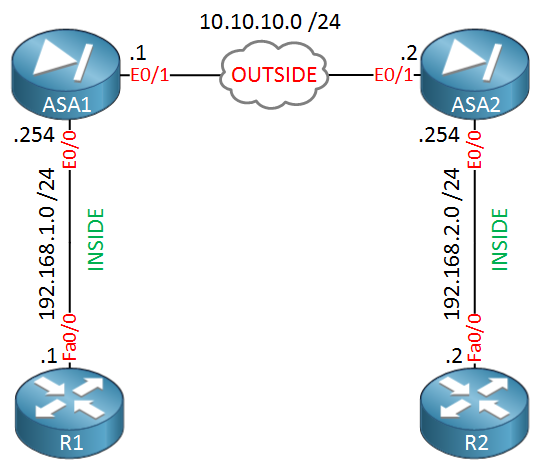
We will use the following topology for this example:

ASA1 and ASA2 are connected with each other using their Ethernet 0/1 interfaces. This is the “OUTSIDE” security zone so imagine that this is their Internet connection. Each ASA has an Ethernet 0/0 interface which is connected to the “INSIDE” security zone. R1 is in network 192.168.1.0 /24 while R2 is in 192.168.2.0 /24. The goal is to ensure that R1 and R2 can communicate with each other through the IPsec tunnel.
Phase 1 Configuration
Phase 1 of IPsec is used to establish a secure channel between the two peers that will be used for further data transmission. The ASAs will exchange secret keys, they authenticate each other and will negotiate about the IKE security policies. This is what happens in phase 1:
- Authenticate and protect the identities of the IPsec peers.
- Negotiate a matching IKE policy between IPsec peers to protect the IKE exchange.
- Perform an authenticated Diffie-Hellman exchange to have matching shared secret keys.
- Setup a secure tunnel for IKE phase 2.
Here’s what the configuration looks like on ASA1:
ASA1(config)# crypto ikev1 policy 10
ASA1(config-ikev1-policy)# authentication pre-share
ASA1(config-ikev1-policy)# encryption aes
ASA1(config-ikev1-policy)# hash sha
ASA1(config-ikev1-policy)# group 2
ASA1(config-ikev1-policy)# lifetime 3600
Let me break down this configuration for you:
- The IKEv1 policy starts with a priority number, I picked number 10. The lower the number, the higher the priority…you can use this if you have multiple peers.
- We use a pre-shared key for authentication.
- Encryption is done with AES.
- SHA is used for hashing.
- We use Diffie-Hellman group 2 for secret key exchange.
- The security association is 3600 seconds, once this expires we will do a renegotiation.
The IKEv1 policy is configured but we still have to enable it:
ASA1(config)# crypto ikev1 enable OUTSIDE
ASA1(config)# crypto isakmp identity address
The first command enables our IKEv1 policy on the OUTSIDE interface and the second command is used so the ASA identifies itself with its IP address, not its FQDN (Fully Qualified Domain Name).
We configured the IKEv1 policy and activated it on the interface but we still have to specify the remote peer and a pre-shared key. This is done with a tunnel-group:
ASA1(config)# tunnel-group 10.10.10.2 type ipsec-l2lThe IP address above is the IP address of the OUTSIDE interface on ASA2. The type “ipsec-l2l” means lan-to-lan. Let’s configure the pre-shared key now:
ASA1(config)# tunnel-group 10.10.10.2 ipsec-attributes
ASA1(config-tunnel-ipsec)# ikev1 pre-shared-key MY_SHARED_KEY
The pre-shared key is configured as an attribute for the remote peer. I’ll use “MY_SHARED_KEY” as the pre-shared key between the two ASA firewalls. This takes care of the phase 1 configuration on ASA1, we’ll configure the same thing on ASA2:
ASA2(config)# crypto ikev1 policy 10
ASA2(config-ikev1-policy)# authentication pre-share
ASA2(config-ikev1-policy)# encryption aes
ASA2(config-ikev1-policy)# hash sha
ASA2(config-ikev1-policy)# group 2
ASA2(config-ikev1-policy)# lifetime 3600
ASA2(config)# crypto ikev1 enable outside
ASA2(config)# crypto isakmp identity address ASA2(config)# tunnel-group 10.10.10.1 type ipsec-l2lASA2(config)# tunnel-group 10.10.10.1 ipsec-attributes
ASA2(config-tunnel-ipsec)# ikev1 pre-shared-key MY_SHARED_KEYPhase 1 is now configured on both ASA firewalls. Let’s continue with phase 2…
Phase 2 configuration
Once the secure tunnel from phase 1 has been established, we will start phase 2. In this phase the two firewalls will negotiate about the IPsec security parameters that will be used to protect the traffic within the tunnel. In short, this is what happens in phase 2:
- Negotiate IPsec security parameters through the secure tunnel from phase 1.
- Establish IPsec security associations.
- Periodically renegotiates IPsec security associations for security.
Here’s what the configuration looks like, we’ll start with ASA1:
ASA1(config)# access-list LAN1_LAN2 extended permit ip 192.168.1.0 255.255.255.0 192.168.2.0 255.255.255.0First we configure an access-list that defines what traffic we are going to encrypt. This will be the traffic between 192.168.1.0 /24 and 192.168.2.0 /24.
The IPsec peers will negotiate about the encryption and authentication algorithms and this is done using a transform-set. Here’s what it looks like:
ASA1(config)# crypto ipsec ikev1 transform-set MY_TRANSFORM_SET esp-aes-256 esp-sha-hmacThe transform set is called “MY_TRANSFORM_SET” and it specifies that we want to use ESP with 256-bit AES encryption and SHA for authentication. Once we configured the transform set we need to configure a crypto map which has all the phase 2 parameters:
ASA1(config)# crypto map MY_CRYPTO_MAP 10 match address LAN1_LAN2
ASA1(config)# crypto map MY_CRYPTO_MAP 10 set peer 10.10.10.2
ASA1(config)# crypto map MY_CRYPTO_MAP 10 set ikev1 transform-set MY_TRANSFORM_SET
ASA1(config)# crypto map MY_CRYPTO_MAP 10 set security-association lifetime seconds 3600
ASA1(config)# crypto map MY_CRYPTO_MAP interface OUTSIDE
Let me explain the configuration step by step:


Rene,
Hello, that was very good! Is there any issue if there are two different versions of the ASA, one before 8.4 and one after with the keyword “ikev1” and “isakmp”, or is that just a local setting?
Thanks
Chris
Hi Chris,
That shouldn’t be an issue, these are just local commands.
Rene
Hi Rene,
Thank you for the explanation.
I’ve a question
As the traffic is coming from the OUTSIDE to INSIDE zones, do we need an inbound ACL in the Outside interface ( applicable for both ASAs) ?
Thank you
Taslim
Hi Taslim,
There’s no need to do this, the ASA will permit the site-to-site traffic by default. One thing to remember when configuring site-to-site VPNs is to configure NAT excemption. By default the ASA will translate all packets from the INSIDE, even when the destination is on the other side of the tunnel.
Rene
Hi Rene, Does the OUTSIDE firewall interfaces has to be on the same subnet as shown in your example? Also, do i need an access-group for the access-list?
Thanks