Lesson Contents
In this lesson we’ll take a look how to configure an IPsec IKEv2 tunnel between a Cisco ASA Firewall and a Linux strongSwan server.
strongSwan is an IPsec VPN implementation on Linux which supports IKEv1 and IKEv2 and some EAP/mobility extensions. It’s well documented, maintained and supports Linux kernels 3.x and later.
For this example I’m using a Ubuntu 14.04 LTS server. Here’s the topology:
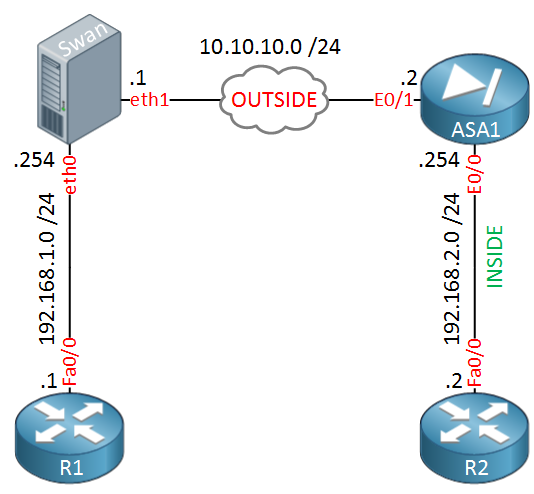 Above we have a small network with 4 devices. On the left side we have our strongSwan server, on the other side a Cisco ASA firewall. I’m using two routers called R1 and R2 as “hosts” so we have something to test the VPN. Let’s start with the strongSwan configuration!
strongSwan Configuration
strongSwan is in the default Ubuntu repositories so installing it is very simple. Just use apt-get to fetch and install it:
# apt-get install strongswanThe main configuration is done in the ipsec.conf file. Open your favorite text editor and edit it:
# vim /etc/ipsec.confThis is what the configuration should look like:
config setup
        # strictcrlpolicy=yes
        # uniqueids = no

conn %default
        ikelifetime=1440m
        keylife=60m
        rekeymargin=3m
        keyingtries=1
        keyexchange=ikev1
        authby=secret

conn ciscoasa
        left=10.10.10.1
        leftsubnet=192.168.1.0/24
        leftid=10.10.10.1
        right=10.10.10.2
        rightsubnet=192.168.2.0/24
        rightid=10.10.10.2
        auto=add
        ike=aes128-sha1-modp1536
        esp=aes128-sha1
        keyexchange=ikev2
Let’s discuss these parameters so you know what we are dealing with. The first two items (strictcrlpolicy and uniqueids) are uncommented by default and we don’t have to worry about these. The first parameters are under the %default connection which means they apply to all connections unless overruled by a specific connection profile.
- ikelifetime=1440m: This is the IKE Phase 1 (ISAKMP) lifetime. In strongSwan this is configured in minutes. The default value equals 86400 seconds (1 day). This is a common value and also the default on our Cisco ASA Firewall.
- keylife=60m: This is the IKE Phase2 (IPsec) lifetime. Default strongSwan value is 60 minutes which is the same as our Cisco ASA Firewall’s 3600 seconds (1 hour).
- rekeymargin=3m: How long before the SA expiry should strongSwan attempt to negiotate the replacements. This is used so when a SA is about to expire, there is already a new SA so that we don’t have any downtime when the current SA expires. This is a local value, it doesn’t have to match with the other side.
- keyingtries=1: How many attempts should strongSwan make to negotiate a connection (or replacement) before giving up. This is a local value, doesn’t have to match with the other side.
- keyexchange=ikev1: The default is to use IKEv1, we will overule this with another connection profile.
- authby=secret: The default authentication method is to use pre-shared keys.
Now for our site-to-site VPN with the Cisco ASA Firewall we have another connection profile called “ciscoasa” with some more specific parameters:
- left=10.10.10.1: strongSwan sees itself as “left” so this is where we configure the IP address of strongSwan that we want to use for the IPsec VPN.
- leftsubnet=192.168.1.0/24: The subnet behind strongSwan that we want to reach through the VPN.
- leftid=10.10.10.1: how strongSwan should identify itself, this can be an IP address or a FQDN. We’ll use the IP address.
- right=10.10.10.2: the IP address of the Cisco ASA Firewall.
- rightsubnet=192.168.2.0/24: The subnet behind the Cisco ASA Firewall.
- rightid=10.10.10.2: the ID of the Cisco ASA Firewall.
- auto=add: This means that this connection is loaded when the IPSEC daemon starts but the tunnel isn’t built right away. The tunnel will be built as soon as there is traffic that should go through the tunnel. if you set this value to “start” then the tunnel will be built as soon as the daemon is started.
- ike=aes128-sha1-modp1536: The security parameters for IKE Phase 1, in this example we use AES 128-bit, SHA-1 and DH Group 5.
- esp=aes128-sha1: We use ESP, AES 128-bit and SHA-1 for Phase 2.
- keyexchange=ikev2: We want to use IKEv2 for this connection profile.
This completes the connection profile but we still have to configure the pre-shared keys. This is done in the ipsec.secrets file. Open your text editor:
# vim /etc/ipsec.secretsIKEv2 allows us to use a different pre-shared key for each peer, to keep it simple we’ll use the same key on both sides. Add this to the ipsec.secrets file:
10.10.10.1 : PSK "networklessons"
10.10.10.2 : PSK "networklessons"
This completes the IPsec configuration. There’s still one thing left to do…by default, Ubuntu (or most Linux distributions) will not act as a router…it won’t forward IP packets from one interface to another. To enable this you have to use the following command:
# sysctl -w net.ipv4.ip_forward=1Forwarding is now activated. If you want to enable this at boot then you should add it to the sysctl.conf file. You can do it like this:
# echo "net.ipv4.ip_forward = 1" | tee -a /etc/sysctl.confEverything is now in place for strongSwan. Let’s start the IPsec daemon:
# ipsec start
Starting strongSwan 5.1.2 IPsec [starter]...
Now we can work on the Cisco ASA…
Cisco ASA Configuration
In a previous lesson I covered the configuration of IKEv2 IPsec VPN between two Cisco ASA firewalls so I won’t explain all commands one by one again. First we’ll configure the interfaces:
ASA1(config)# interface e0/0
ASA1(config-if)# no shutdown
ASA1(config-if)# nameif INSIDE
ASA1(config-if)# ip address 192.168.2.254 255.255.255.0
ASA1(config)# interface e0/1
ASA1(config-if)# no shutdown
ASA1(config-if)# nameif OUTSIDE
ASA1(config-if)# ip address 10.10.10.2 255.255.255.0Now we can configure the VPN settings. Let’s start with the IKEv2 policy:
Thanx Rene,
This a very clear manual. Gonna use it right away…
Andre
Thanks rené,
My present configuration is quite the same but I don’t have (yet) a subnet under the strongswan platform (this may come later).
So I would like to configure the VPN and test it (ping, scp…) directly with the strongwan plateform and not with its subnet.
What should I change in your configuration for it ?
Thanks again.
Hello Luc,
In this case, you might want to test to configure strongSwan as a remote client perhaps.
First I would try to configure a Cisco router as the VPN server and use a Cisco client. Here’s an example:
Cisco Easy VPN
Once this is working, see if you can replace the client with Strongswan:
https://www.strongswan.org/testing/testresults/ikev1/xauth-psk/
Rene
Rene,
How are you using the Ubuntu server with the strongswan on it. Is it in a laptop or do you have a server. Reason for asking is I am wondering how you got the two ports. Maybe you could point me in the right direction on how to set my lab up. thank you
Hi Cristopher,
I use a HP proliant DL360 G7 with a quad NIC running VMware ESXi. Using virtual machines is a great way to test things like this. You can also use a single physical connection from your VMware server to your switch and then configure it as a trunk. Each virtual NIC in your virtual machine can then use a different VLAN.
Rene