Lesson Contents
OSPF uses cost as the metric to choose the shortest path for each destination. However, OSPF first checks the route path type before the cost. The preference of route type can be different depending on your platform and OS version but in general, it works like this:
- Intra-Area (O)
- Inter-Area (O IA)
- External Type 1 (E1)
- NSSA Type 1 (N1)
- External Type 2 (E2)
- NSSA Type 2 (N2)
After the path selection, it will look at the lowest-cost path. Let me give you a quick example. If OSPF learns prefix 1.1.1.1/32 as an intra-area route (O) and as an inter-area router (O IA) then OSPF will always prefer the intra-area router, even if the inter-area- router has a lower cost.
Key Takeaways
- OSPF path selection checks the route path type before looking at the cost.
- An intra-area route is always preferred over inter-area routes, regardless of cost
- When route types are identical, OSPF then compares the lowest-cost metric
- This behavior can cause OSPF to select higher-cost paths when route types differ
Prerequisites
To follow this lesson, you should understand:
- Basic OSPF configuration and operation
- OSPF areas and area types (standard areas, stub areas, NSSA)
- OSPF LSA types and route redistribution
Configuration
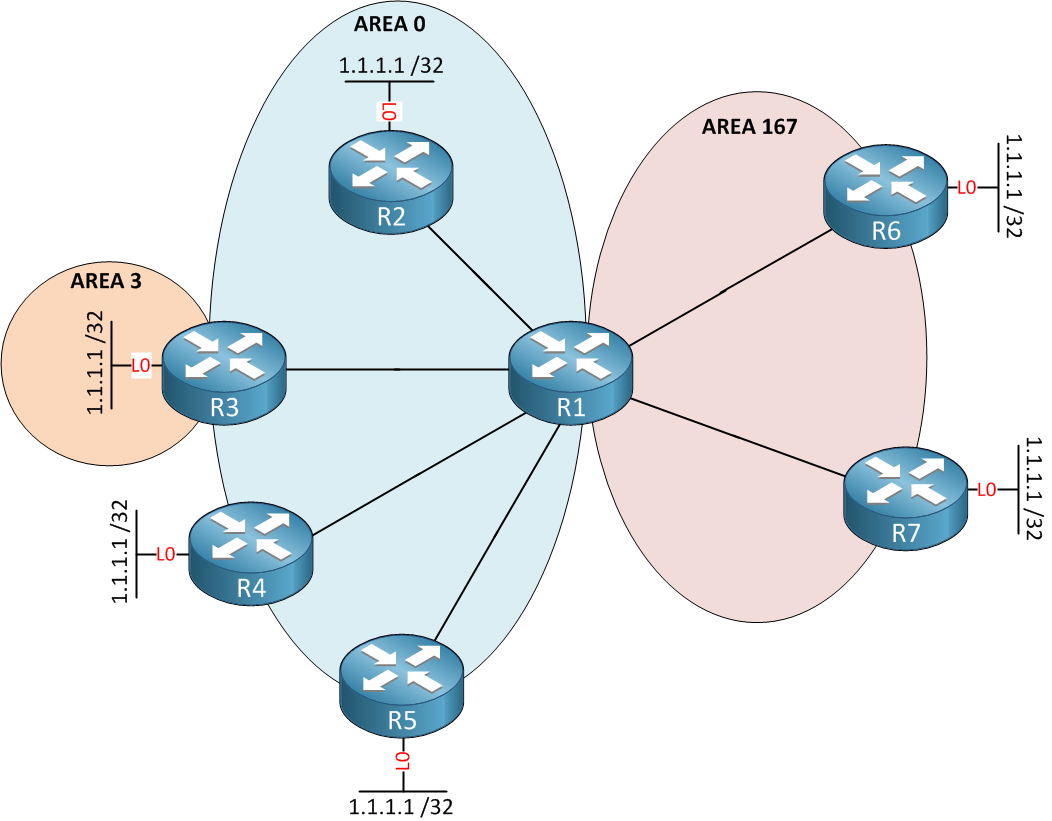
I will demonstrate this behavior to you using the following topology:

We will create a loopback0 interface on R2 – R7 using the same prefix 1.1.1.1/32 and advertise it in OSPF as following:
- R2: Intra-Area (O)
- R3: Inter-Area (O IA)
- R4: External Type 1 (E1)
- R5: External Type 2 (E2)
- R6: NSSA Type 1 (N1)
- R7: NSSA Type 2 (N2)
We will check R1 to see what path it will prefer. Let’s configure OSPF first:
R1(config)#router ospf 1
R1(config-router)#router-id 11.11.11.11
R1(config-router)#network 192.168.12.0 0.0.0.255 area 0
R1(config-router)#network 192.168.13.0 0.0.0.255 area 0
R1(config-router)#network 192.168.14.0 0.0.0.255 area 0
R1(config-router)#network 192.168.15.0 0.0.0.255 area 0
R1(config-router)#network 192.168.16.0 0.0.0.255 area 167
R1(config-router)#network 192.168.17.0 0.0.0.255 area 167
R1(config-router)#area 167 nssa
First, we’ll advertise the correct areas on R1. Don’t forget to make area 167 the NSSA area. Let’s continue with the other routers:
R2(config)#router ospf 1
R2(config-router)#router-id 22.22.22.22
R2(config-router)#network 192.168.12.0 0.0.0.255 area 0
R2(config-router)#network 1.1.1.1 0.0.0.0 area 0
On R2, we will advertise 1.1.1.1/32 as an intra-area route.
R3(config)#router ospf 1
R3(config-router)#router-id 33.33.33.33
R3(config-router)#network 192.168.13.0 0.0.0.255 area 0
R3(config-router)#network 1.1.1.1 0.0.0.0 area 3
R3 will advertise 1.1.1.1/32 in area 3 to make it an inter-area route.
R4(config)#router ospf 1
R4(config-router)#router-id 44.44.44.44
R4(config-router)#network 192.168.14.0 0.0.0.255 area 0
R4(config-router)#redistribute connected subnets metric-type 1
R4 will redistribute prefix 1.1.1.1/32 as an external type 1 route.
R5(config-if)#router ospf 1
R5(config-router)#router-id 55.55.55.55
R5(config-router)#network 192.168.15.0 0.0.0.255 area 0
R5(config-router)#redistribute connected subnets metric-type 2
R5 will redistribute prefix 1.1.1.1/32 as an external type 2 route.
R6(config)#router ospf 1
R6(config-router)#router-id 66.66.66.66
R6(config-router)#network 192.168.16.0 0.0.0.255 area 167
R6(config-router)#redistribute connected subnets metric-type 1
R6(config-router)#area 167 nssa
R6 is an NSSA ABR and will advertise 1.1.1.1/32 as an N1 route.
R7(config)#router ospf 1
R7(config-router)#router-id 77.77.77.77
R7(config-router)#network 192.168.17.0 0.0.0.255 area 167
R7(config-router)#redistribute connected subnets metric-type 2
R7(config-router)#area 167 nssa
Lastly, R7 will redistribute 1.1.1.1/32, so it shows up as an N2 route.
router-id command.Let’s verify our configuration:
R1#show ip ospf neighbor

Neighbor ID     Pri   State           Dead Time   Address         Interface
55.55.55.55       1   FULL/BDR        00:00:38    192.168.15.5    FastEthernet0/3
44.44.44.44       1   FULL/BDR        00:00:38    192.168.14.4    FastEthernet0/2
33.33.33.33       1   FULL/BDR        00:00:38    192.168.13.3    FastEthernet0/1
22.22.22.22       1   FULL/BDR        00:00:37    192.168.12.2    FastEthernet0/0
77.77.77.77       1   FULL/BDR        00:00:30    192.168.17.7    FastEthernet0/5
66.66.66.66       1   FULL/BDR        00:00:39    192.168.16.6    FastEthernet0/4
All OSPF neighbor adjacencies are working. Let’s take a look at the routing table to see what path OSPF has decided to use:


Great post Rene. OSPF is a protocol with lots of details. We can see some interesting things when we do OSPF external type 2 with same cost but different cost to ASBR.
i’ve learn something new, thanks rene
You are welcome Tim.
good site.. for good lessons
keep sharing, m/
I learned inner depth regarding protocol working …keep sharing …