Lesson Contents
In a previous lesson, I explained how you can use telnet for remote access to your Cisco IOS devices. The problem with telnet is that everything is sent in plaintext, for that reason you shouldn’t use it.
SSH (Secure Shell) is a secure method for remote access as is includes authentication and encryption. To do this, it uses a RSA public/private keypair.
There are two versions: version 1 and 2. Version 2 is more secure and commonly used.
Last but not least, to configure SSH you require an IOS image that supports crypto features. Otherwise you won’t be able to configure SSH.
Configuration
To demonstrate SSH, I will use the following topology:
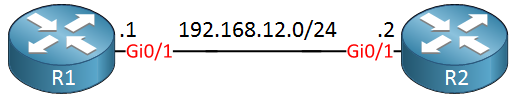
We will configure SSH on R1 so that we can access it from any other device. R2 will be used as a SSH client.
SSH Server
the name of the RSA keypair will be the hostname and domain name of the router. Let’s configure a hostname:
Router(config)#hostname R1And a domain name:
R1(config)#ip domain-name NETWORKLESSONS.LOCALNow we can generate the RSA keypair:
R1(config)#crypto key generate rsa
The name for the keys will be: R1.NETWORKLESSONS.LOCAL
Choose the size of the key modulus in the range of 360 to 4096 for your
  General Purpose Keys. Choosing a key modulus greater than 512 may take
  a few minutes.

How many bits in the modulus [512]: 2048
% Generating 2048 bit RSA keys, keys will be non-exportable...
[OK] (elapsed time was 3 seconds)
When you use the crypto key generate rsa command, it will ask you how many bits you want to use for the key size. How much should you pick?
It’s best to check the next generation encryption article from Cisco for this. At this moment, a key size of 2048 bits is acceptable. Key sizes of 1024 or smaller should be avoided. Larger key sizes also take longer to calculate.
Once the keypair has been generated, the following message will appear:
R1#
%SSH-5-ENABLED: SSH 1.99 has been enabled
As you can see above, SSH version 1 is the default version. Let’s switch to version 2:
R1(config)#ip ssh version 2SSH is enabled but we also have to configure the VTY lines:
R1(config)#line vty 0 4
R1(config-line)#transport input ssh
R1(config-line)#login local
This ensures that we only want to use SSH (not telnet or anything else) and that we want to check the local database for usernames. Let’s create a user:
R1(config)#username admin password my_passwordEverything is now in place. We should be able to connect to R1 through SSH now.
SSH Client
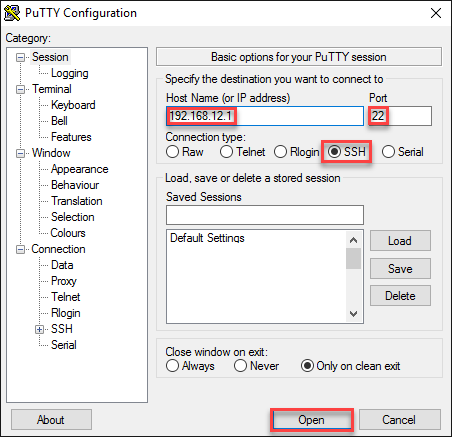
The most common SSH client is probably putty. The only thing you have to do is to select the SSH protocol, enter the IP address and leave the default port at 22:
You will see this on the putty console:
login as: admin
Using keyboard-interactive authentication.
Password:
R1>
You can also use another Cisco IOS device as a SSH client. Here’s how:
R2#ssh ?
  -c    Select encryption algorithm
  -l    Log in using this user name
  -m    Select HMAC algorithm
  -o    Specify options
  -p    Connect to this port
  -v    Specify SSH Protocol Version
  -vrf  Specify vrf name
  WORD  IP address or hostname of a remote system
There are quite some options but as a minimum, we should specify a username and IP address:
R2#ssh -l admin 192.168.12.1
Password:

R1>
We are now connected to R1 through SSH.
Configurations
Want to take a look for yourself? Here you will find the final configuration of each device.
R1
hostname R1
!
ip domain name NETWORKLESSONS.LOCAL
ip cef
!
username admin password 0 my_password
!
interface GigabitEthernet0/1
 ip address 192.168.12.1 255.255.255.0
!
ip ssh version 2
!
line vty 0 4
 login local
 transport input ssh
!
end
R2
hostname R2
!
ip cef
!
interface GigabitEthernet0/1
 ip address 192.168.12.2 255.255.255.0
!
end
If I connect a router R3 to R2 (configured static route) and configure an access list to allow only R3 access to R1 SSH, it just keeps asking for the password again and again. Is this because of the presence of R2 in the middle?
Hello Balagopal!
If you are receiving the prompt for a password, then you have routing configured correctly between the two routers, regardless of what devices may be in between. If it’s asking for the password over and over, it may be that the password being entered is incorrect. Check your config again, and if you still have problems, you can share the relevant portions of your configs so we can take a look.
I hope this has been helpful!
Laz
Hi Rene,
I have always done this using the command:
ip http secure-serverAnd then:
And:
transport input sshI tried it the way you show by generating the crypto key as you have shown above and using the control-plane host lines and it seems to achieve the same results without specifying transport input ssh on the VTY lines. You can only SSH into the router. Is this achieving the same end? The only difference I can see by using your method and issuing a sh run is you don’t
... Continue reading in our forumHello Matt!
The way that you implement your configuration achieves something similar, but not exactly the same as that which Rene has done in his example.
Rene’s example applies SSH on the VTY line. This means that you can connect to the device via SSH from any of its interfaces to the VTY connections. In your configuration, you are binding the ssh configuration only to the management interface. This of course is a legitamite configuration assuming you only apply out of band management, and if it works for you that’s great.
Also, in your configuration the
... Continue reading in our forumipThanks Lazaros, that all makes sense, no need to tie up a port when you can use a virtual interface that can be access from any port. I’ll try this when I gat a chance. Matt.