Lesson Contents
Cisco SD-WAN offers a centralized policy (network-wide scope) and the localized policy (single-device scope). There are two localized policy types:
- Localized control policy
- Localized data policy
The localized control policy affects the control plane. The vEdge routers have an overlay network and use OMP to advertise routes, but you can also use “regular” routing protocols like OSPF or BGP. With the localized control policy, you can affect routing.
The localized data policy controls the flow and data going in and out of interfaces and interface queues. You can set DSCP or CoS values, and do things like policing, shaping, and queueing.
In this lesson, I’ll explain how to configure policing with a localized data policy. We are going to configure this in vManage with templates.
If you are familiar with configuring policing in Cisco IOS and new to Cisco SD-WAN policies, this will be confusing. I’ll make sure to keep it as easy as possible. In Cisco IOS, we configure a simple policer like this:
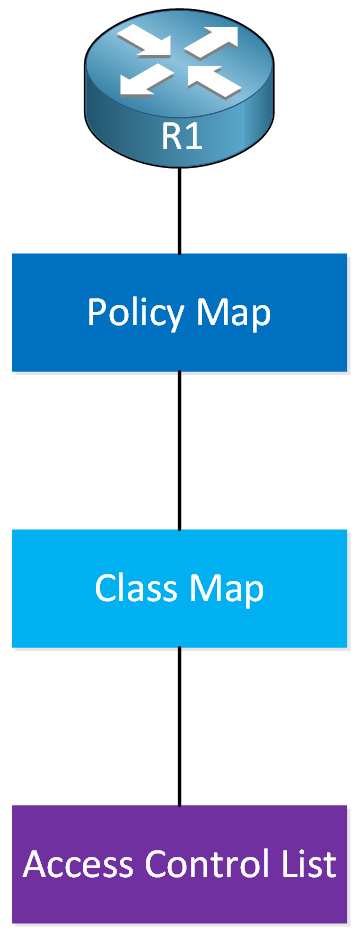
In a nutshell, here’s how it works:
- In the access-list we define the traffic we want to police.
- A class-map includes the access-list. Instead of an access-list, you could also match other items in the class-map.
- A policy-map refers to the class-map and has the policer.
- We attach the policy-map to an interface on the router.
In Cisco SD-WAN, it’s different. The confusing part is that there is new terminology, and some terminology has a different meaning than what you know from Cisco IOS. The configuration is also different. Here is a visualization to help you through this:
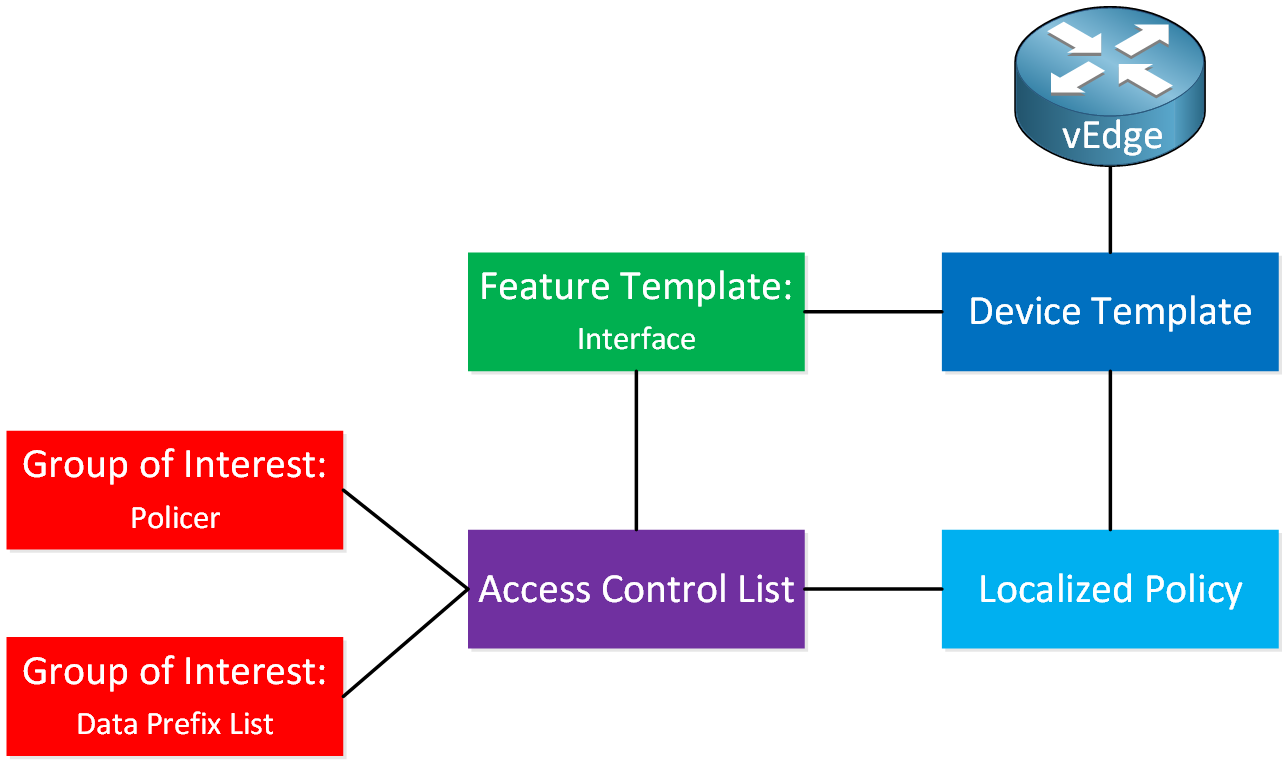
This requires a lot of explanation. I explained the device and feature templates in this lesson, so make sure you are familiar with those.
- Groups of Interest are things we can use in our policy. For example:
- Data Prefix-lists
- Policers
- Port mirrors
- And some other items.
- The access control list is not an access-list, as you know it. This is more like a route-map or policy-map with sequence numbers where you configure:
- Match statements:
- DSCP value
- Packet length
- PLP
- Protocol
- Source or destination Data Prefix
- Source or destination port numbers
- TCP SYN
- Class (this is a queue)
- Action statements:
- Counter
- DSCP (change value)
- Log
- Next Hop (change the next-hop like we do with policy-based routing).
- Mirror List
- Class
- Policer
- Match statements:
- The localized policy is where we configure items like:
- QoS Maps (queues)
- Access Control Lists
- Route Policy
- And some other items.
We have to attach the items we created above to each other. This is what it looks like:
- The groups of interest are attached to the access control list.
- The access control list is configured under the localized control policy and attaches to an interface with a feature template.
- The localized policy is a global configuration item that we attach to a device template.
Don’t worry, I will show you how to configure all of this step by step. The visualization might help to understand the steps when we go through all of this. Let’s do this!
Configuration
Here is the topology we’ll use:
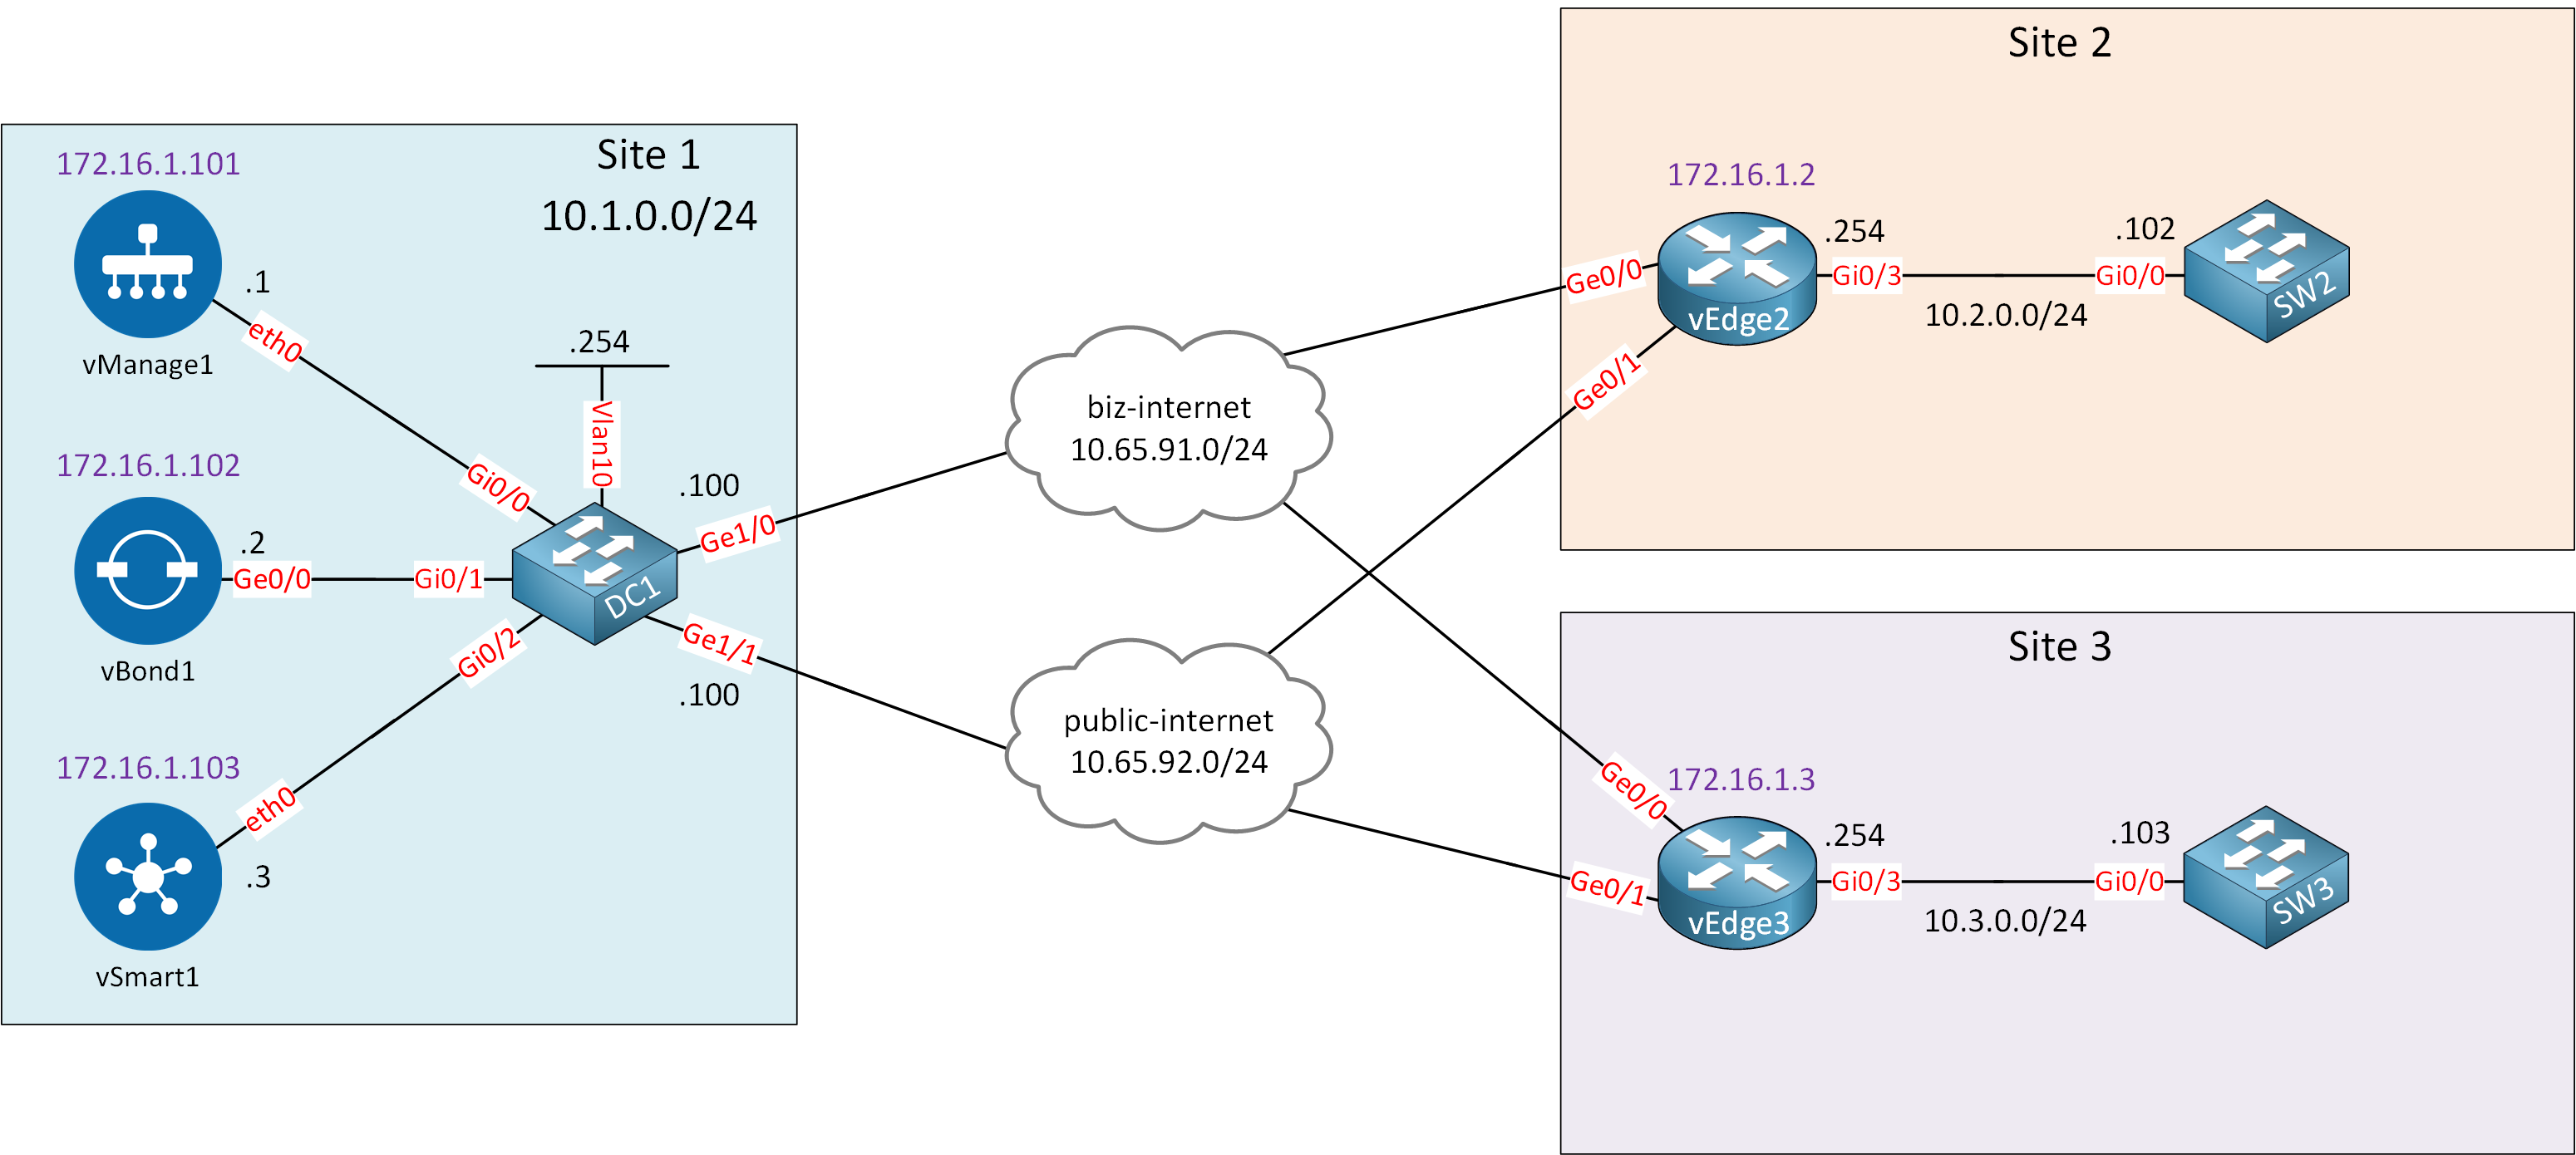
This is the exact same topology I used in the service VPN lesson and the templates lesson. I’m using the same device and feature templates I created before. Service VPN 10 is configured on the Gi0/3 interfaces of vEdge2 and vEdge3 so that I can send traffic between SW2 and SW3.
Our goal is to configure an inbound policer on the ge0/3 interface of vEdge2. Make sure you understand how device and feature templates work before you continue with this lesson. We build upon the knowledge from our previous lessons.
Configurations
Want to take a look for yourself? Here you will find the startup configuration of each device.
vEdge2
system
 host-name               vEdge2
 system-ip               172.16.1.2
 site-id                 2
 organization-name       nwl-lab-sdwan
 vbond 10.1.0.2
!
vpn 0
 interface ge0/0
  ip address 10.65.91.2/24
  ipv6 dhcp-client
  tunnel-interface
   encapsulation ipsec
   color biz-internet
   allow-service all
  !
  no shutdown
 !
 interface ge0/1
  ip address 10.65.92.2/24
  tunnel-interface
   encapsulation ipsec
   color public-internet
   allow-service all
  !
  no shutdown
 !
 ip route 10.1.0.0/24 10.65.91.100
!
vpn 10
 interface ge0/3
  ip address 10.2.0.254/24
  no shutdown
 !
 omp
  advertise connected
!
vpn 512
 interface eth0
  shutdown
vEdge3
system
 host-name               vEdge3
 system-ip               172.16.1.3
 site-id                 3
 organization-name       nwl-lab-sdwan
 vbond 10.1.0.2
!
vpn 0
 interface ge0/0
  ip address 10.65.91.3/24
  ipv6 dhcp-client
  tunnel-interface
   encapsulation ipsec
   color biz-internet
   allow-service all
  !
  no shutdown
 !
 interface ge0/1
  ip address 10.65.92.3/24
  tunnel-interface
   encapsulation ipsec
   color public-internet
   allow-service all
  !
  no shutdown
 !
 ip route 10.1.0.0/24 10.65.91.100
!
vpn 10
 interface ge0/3
  ip address 10.3.0.254/24
  no shutdown
 !
 omp
  advertise connected
!
vpn 512
 interface eth0
  shutdown
SW2
hostname SW2
!
no ip routing
!
interface GigabitEthernet0/0
 no switchport
 ip address 10.2.0.102 255.255.255.0
!
ip default-gateway 10.2.0.254
SW3
hostname SW3
!
no ip routing
!
interface GigabitEthernet0/0
 no switchport
 ip address 10.3.0.103 255.255.255.0
!
ip default-gateway 10.3.0.254
Create Localized Policy
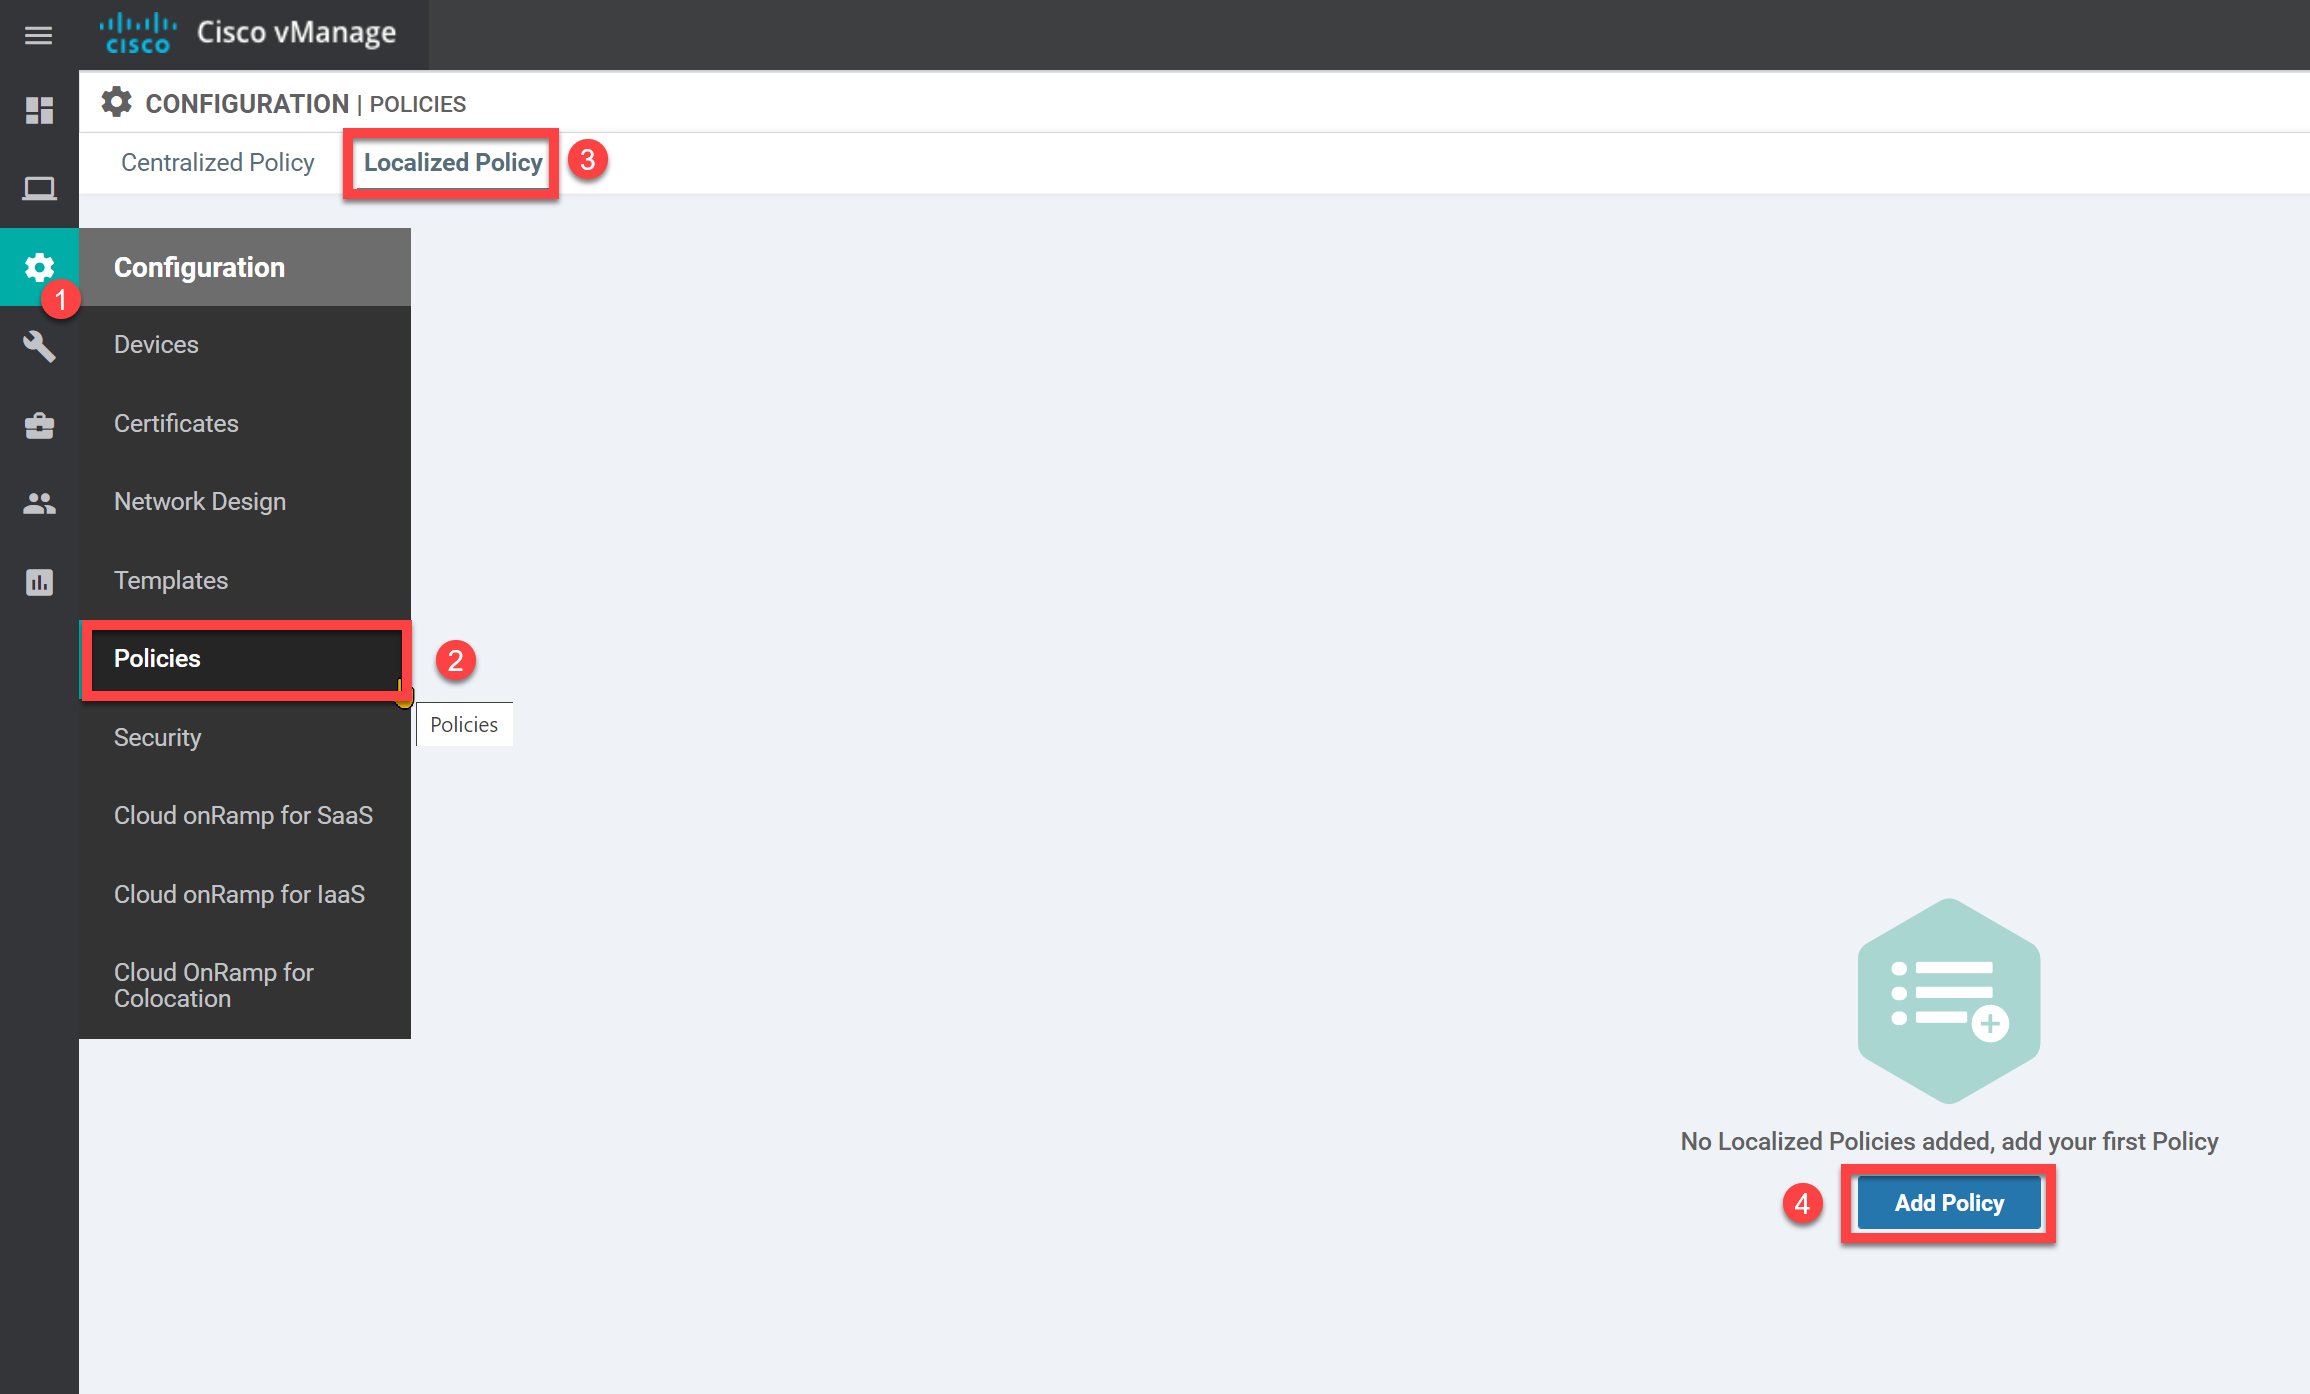
First, we have to create the policy itself.
Go to Configuration > Policies > Localized Policy and click on Add Policy:
Groups of Interest
On the left side, you find the groups of interest. This is where you configure the items that you can call in other items of the policy, like the access control lists.
Policer
Let’s create a policer. Select Policer and click on New Policer List:

We choose a name and configure the settings for our policer. It doesn’t matter too much what you pick for a lab:
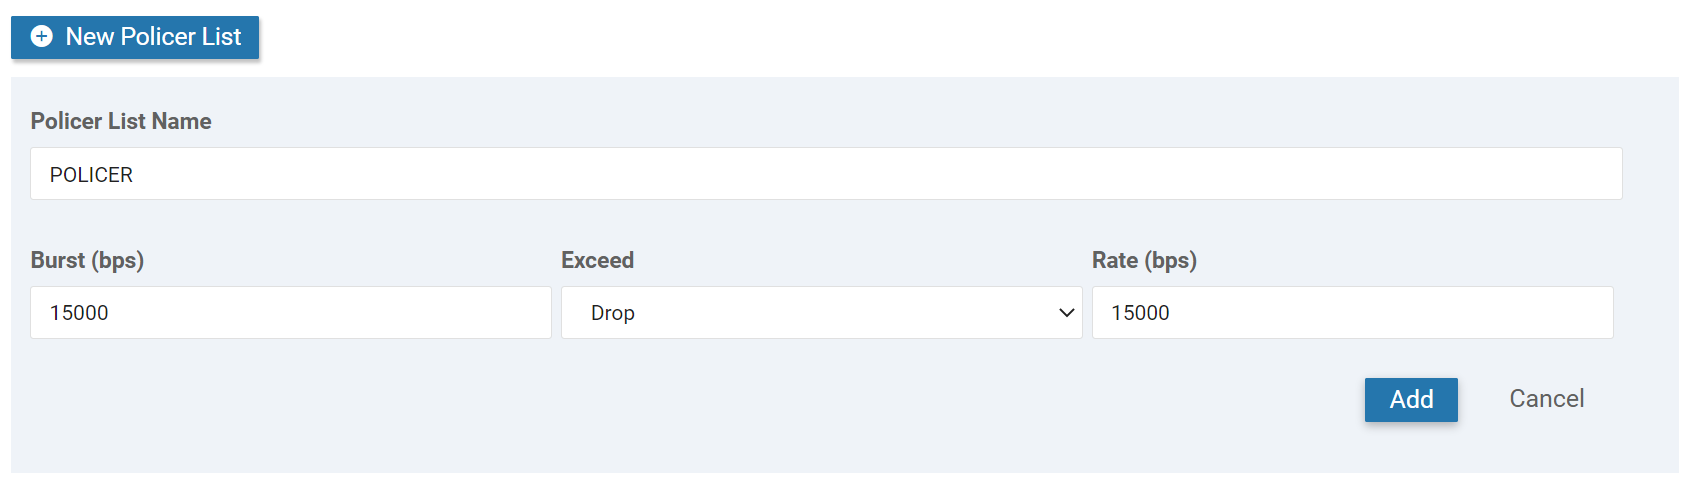
Click on Add, and you will see the new policer in the overview:

Data Prefix List
Let’s make sure that the policer only works for traffic sourced from 10.2.0.0/24 (site 2). We need the Data Prefix group of interest for this:
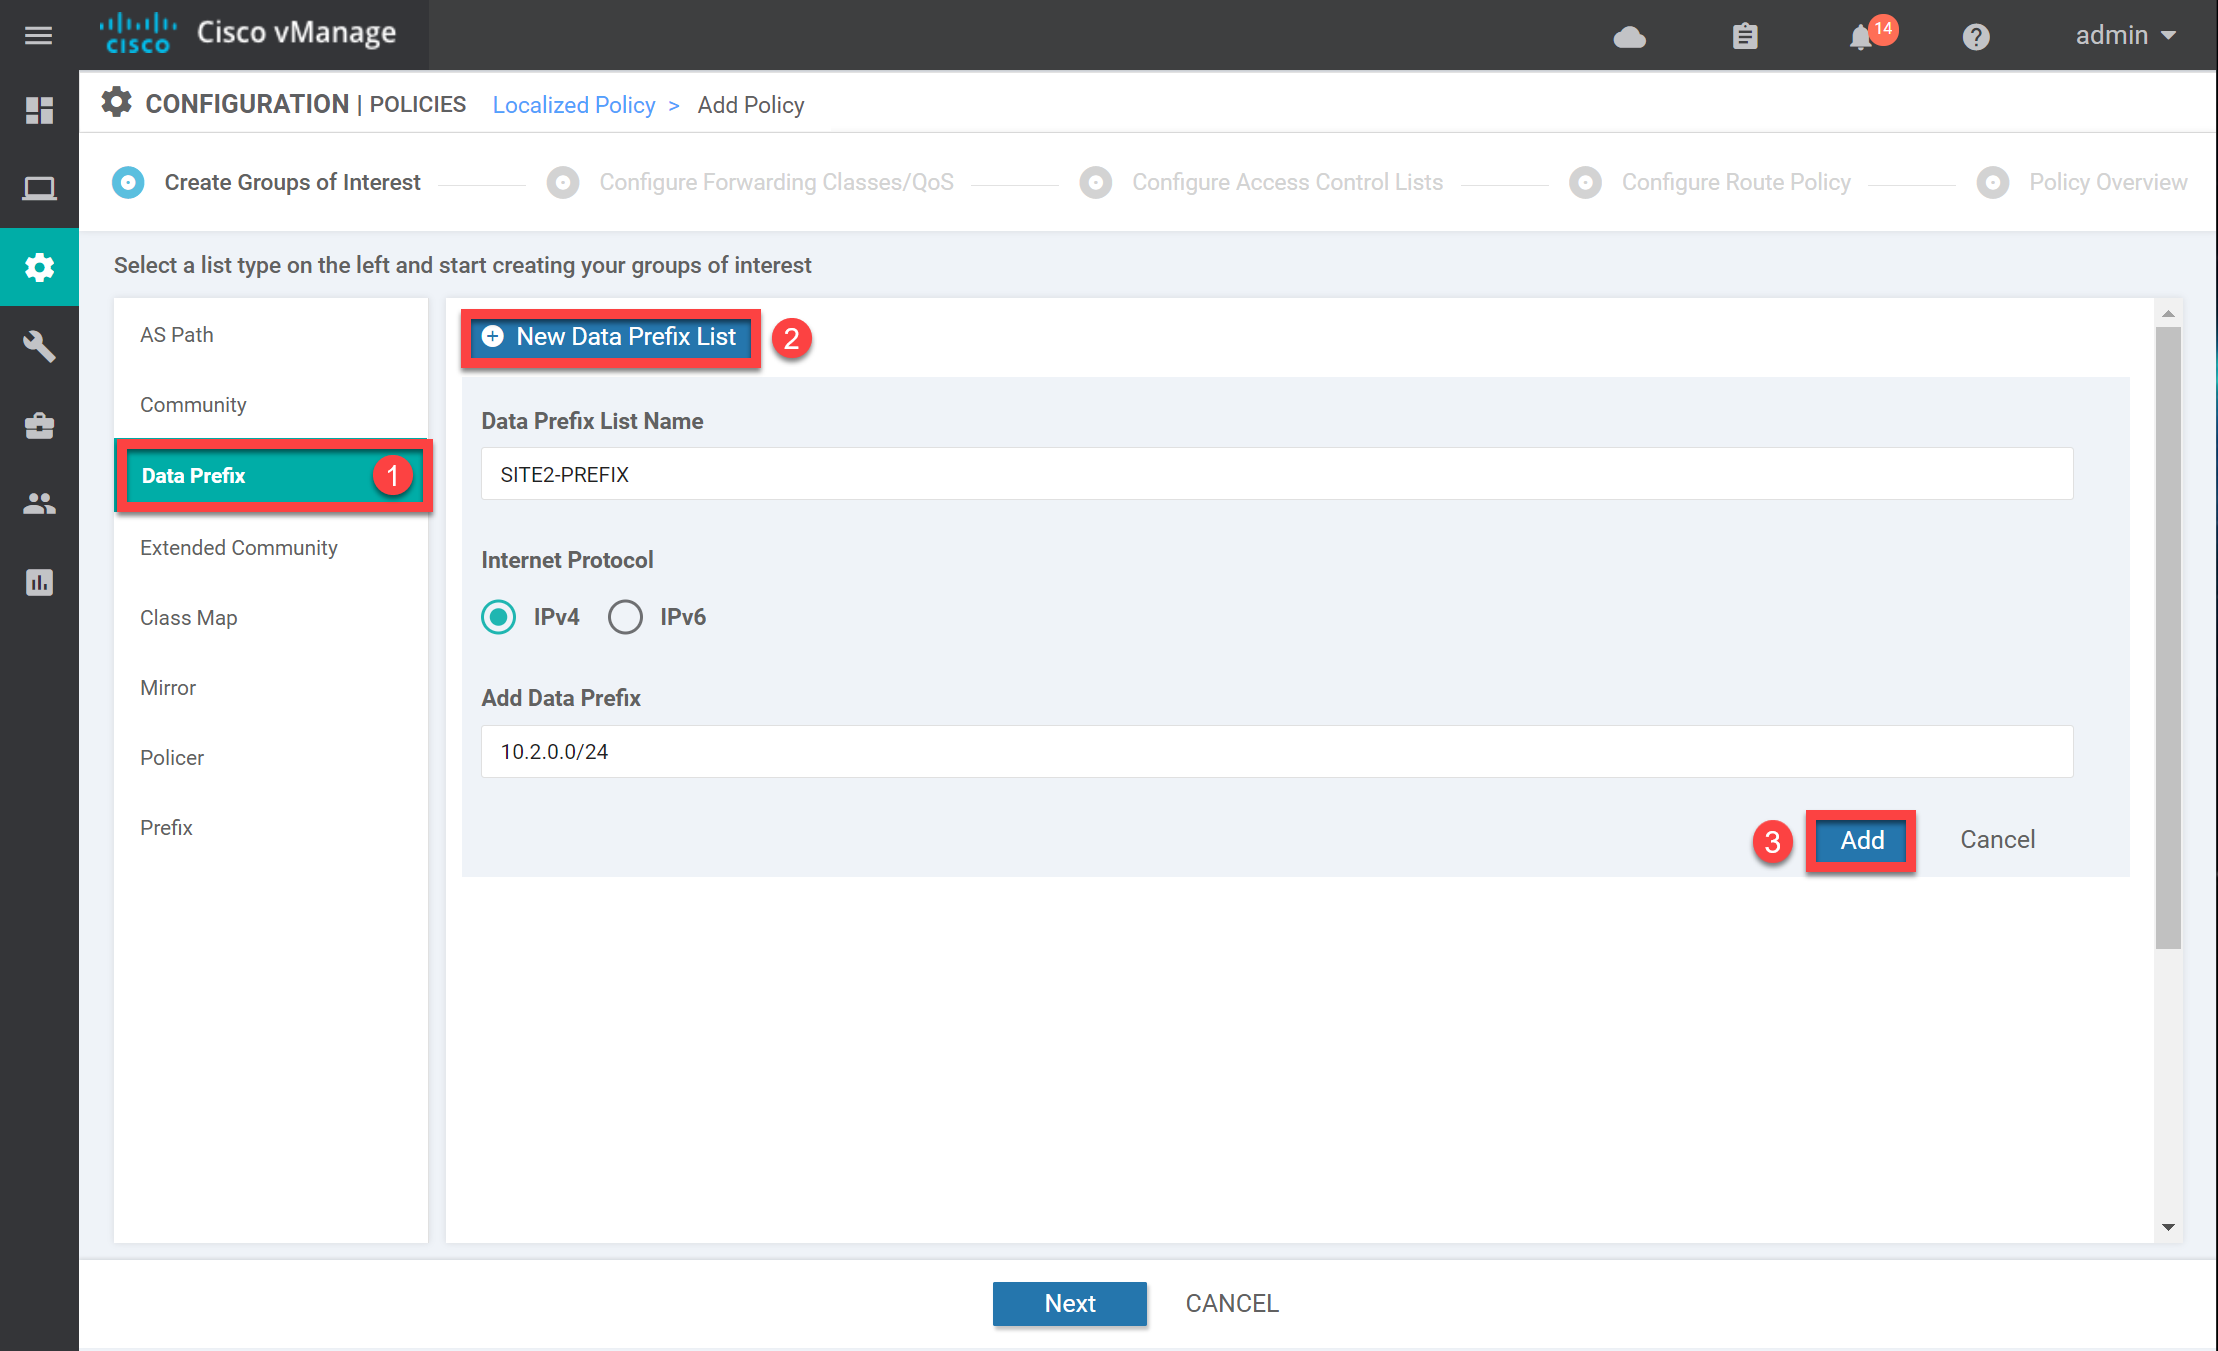
Enter a name and add the correct prefix. Click on Add, and the prefix-list shows up in the overview:
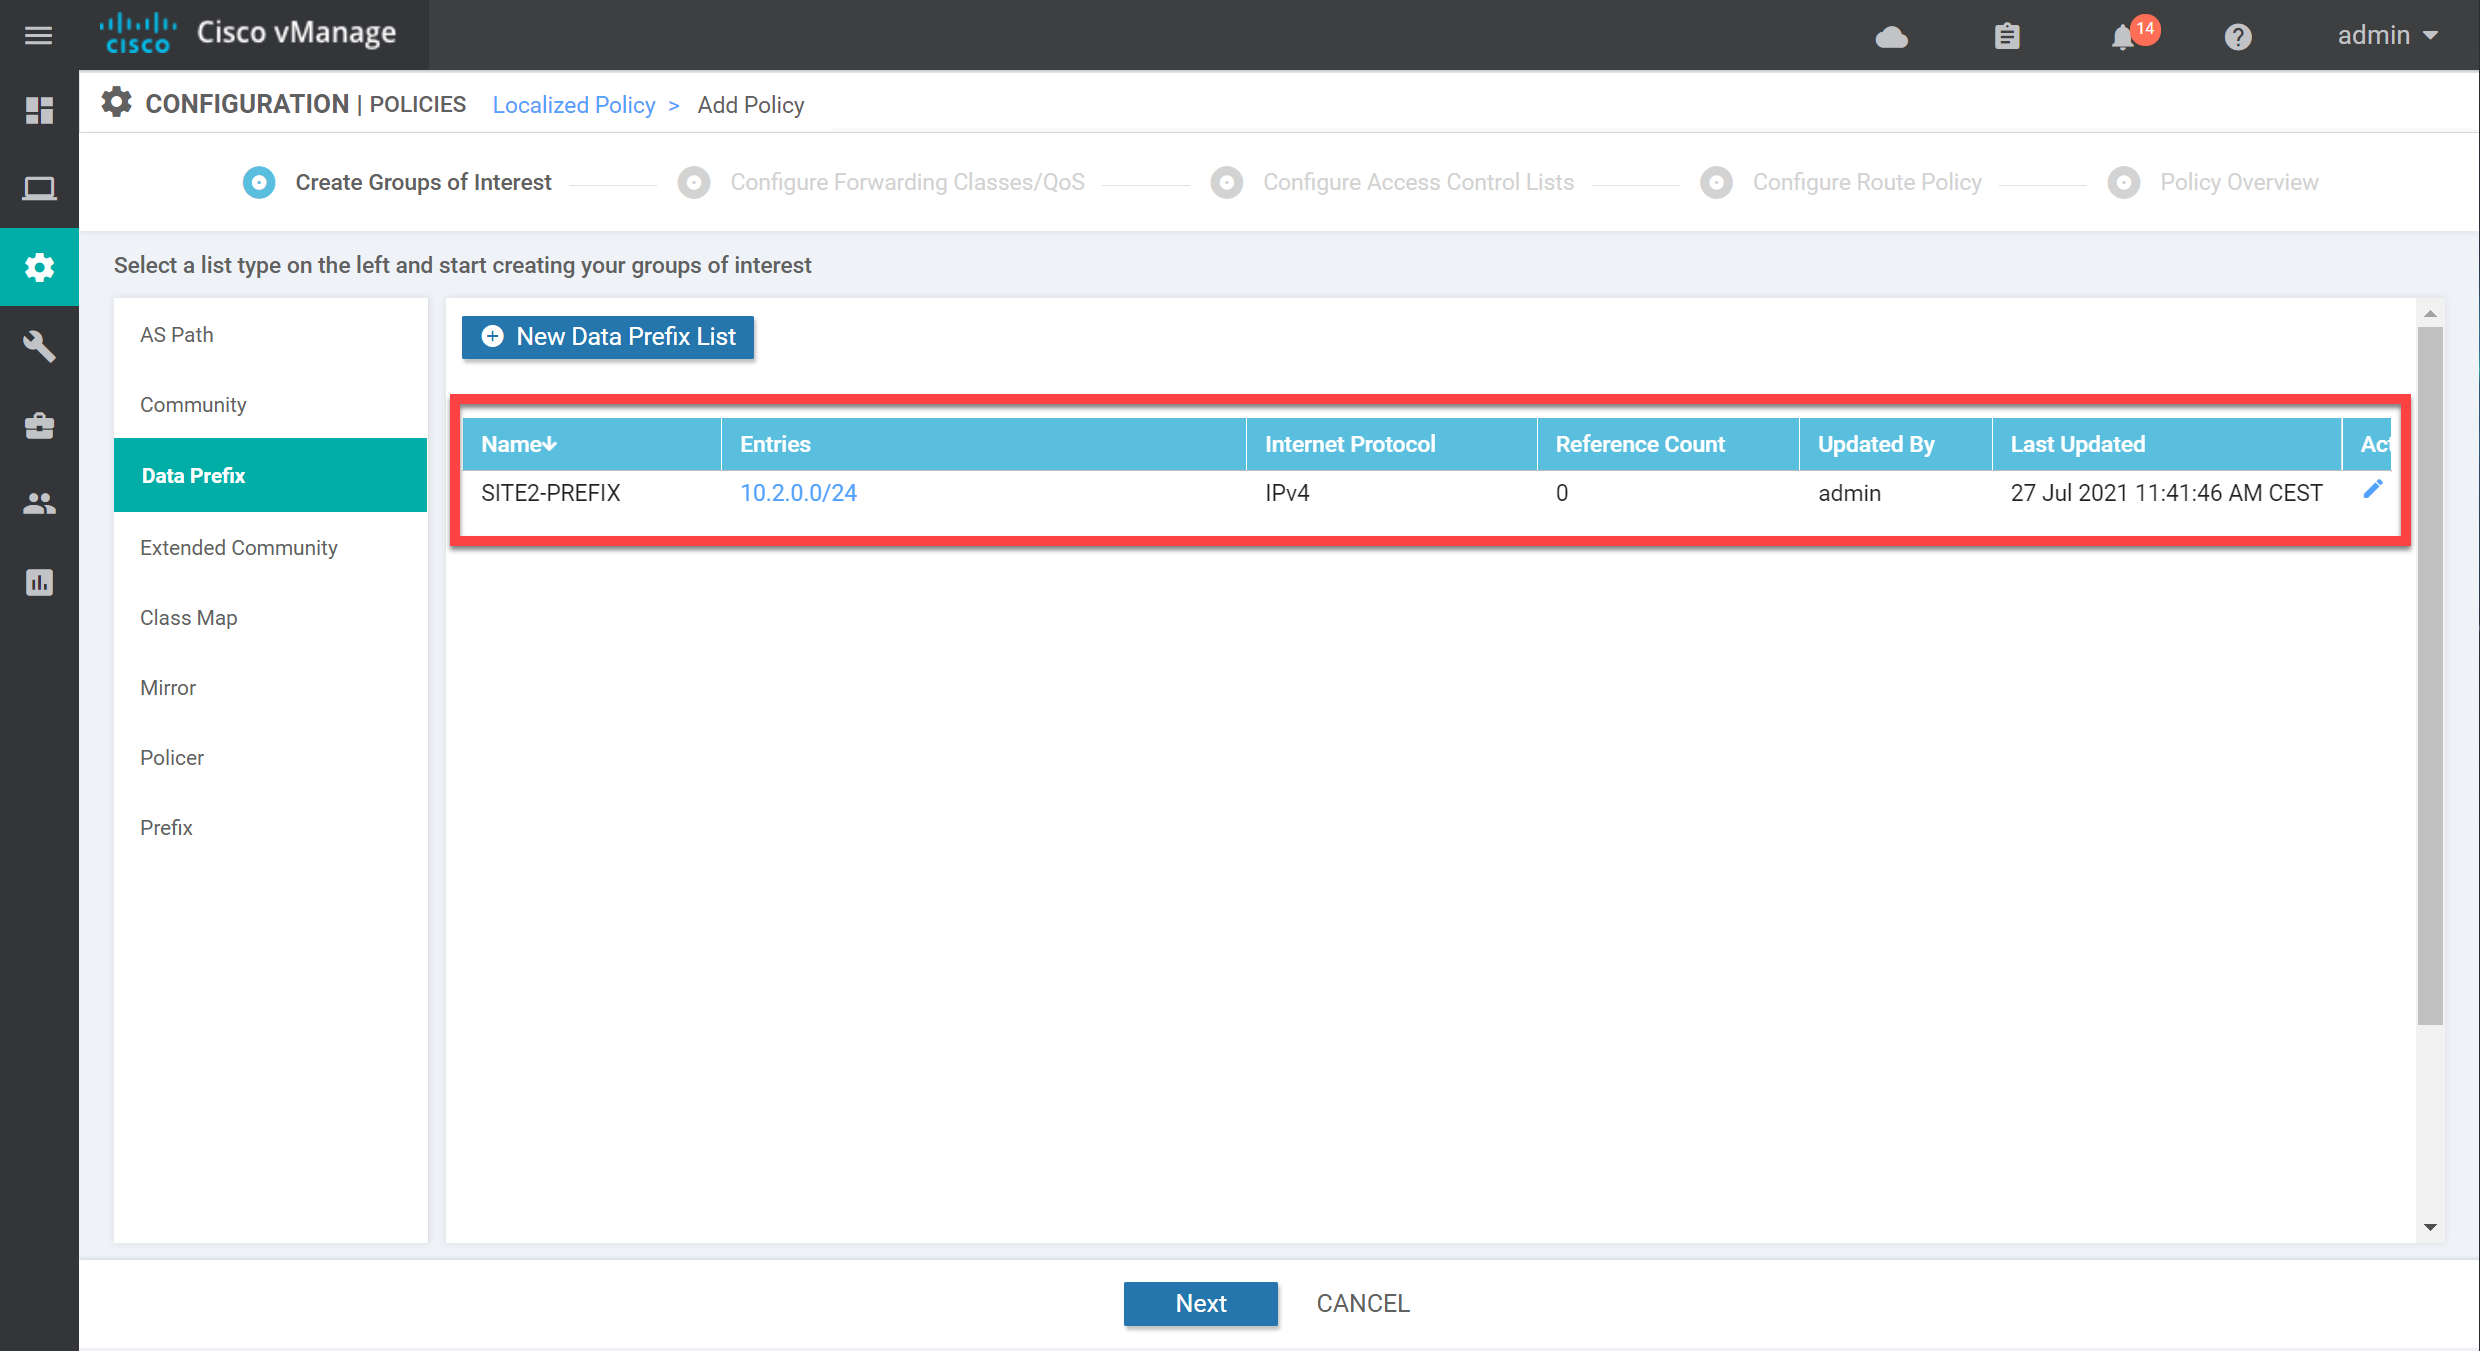
We now have all the required groups of interest. Click on Next to continue so we can create the actual policy.
Access Control List
We don’t need a QoS map, so click on Next:

Click on Add Access Control List Policy and select Add IPv4 ACL Policy:

On the left side, we have two options:
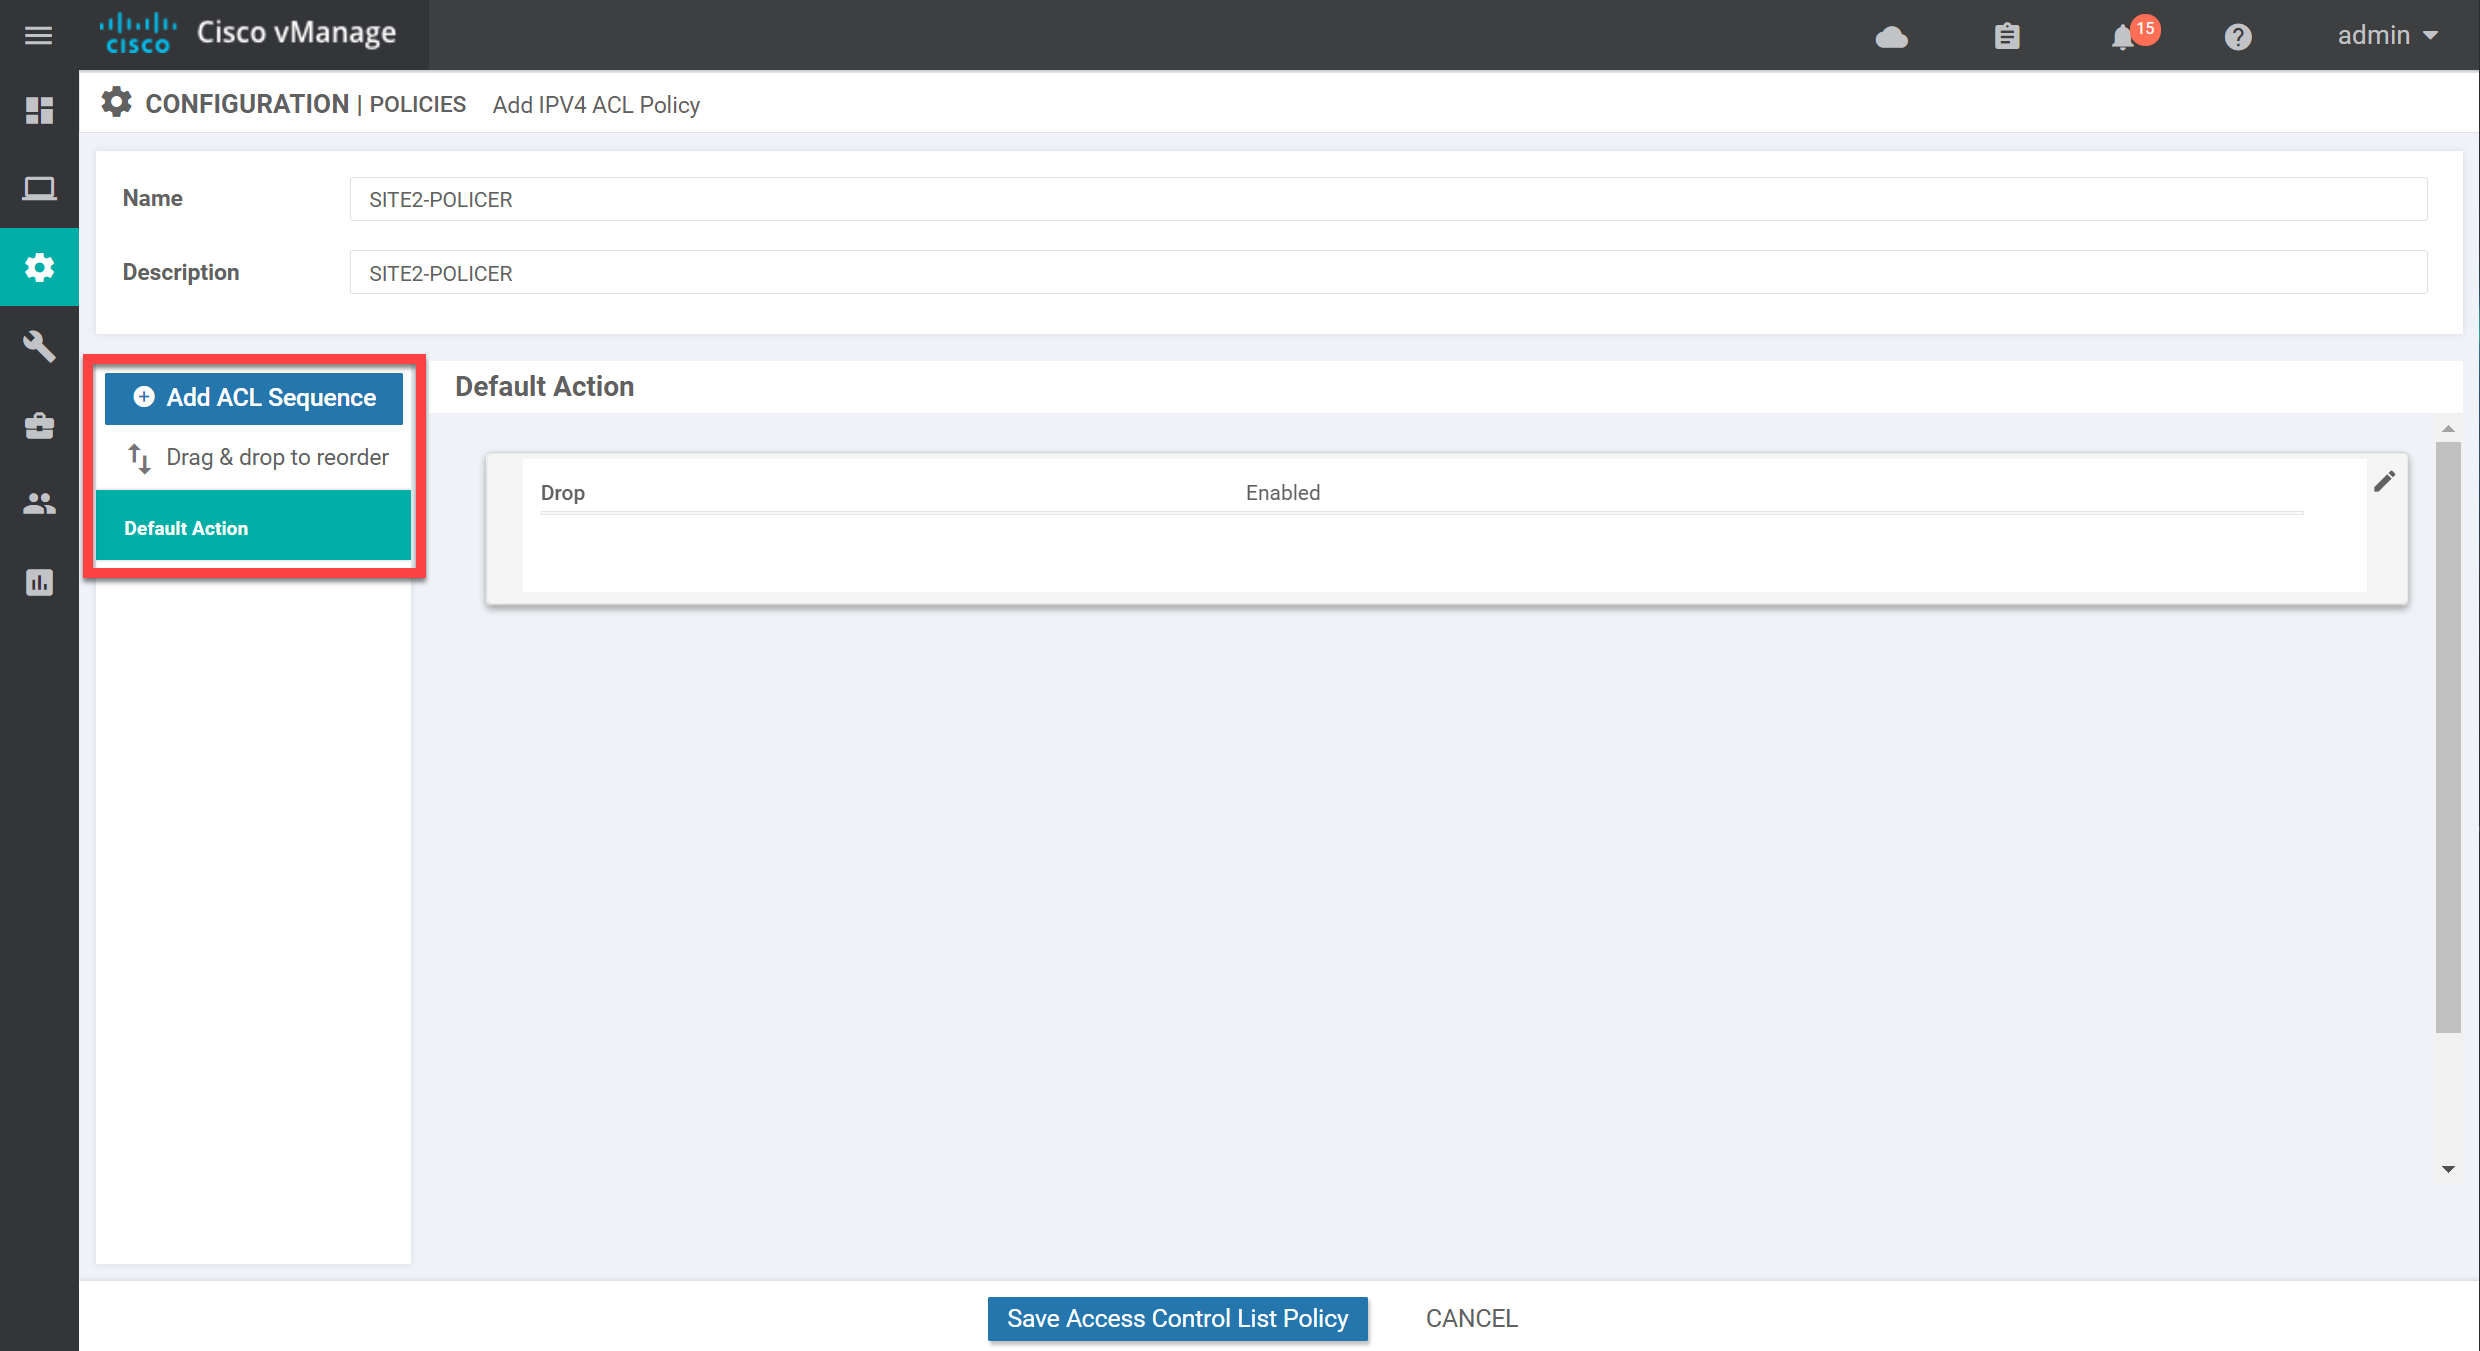
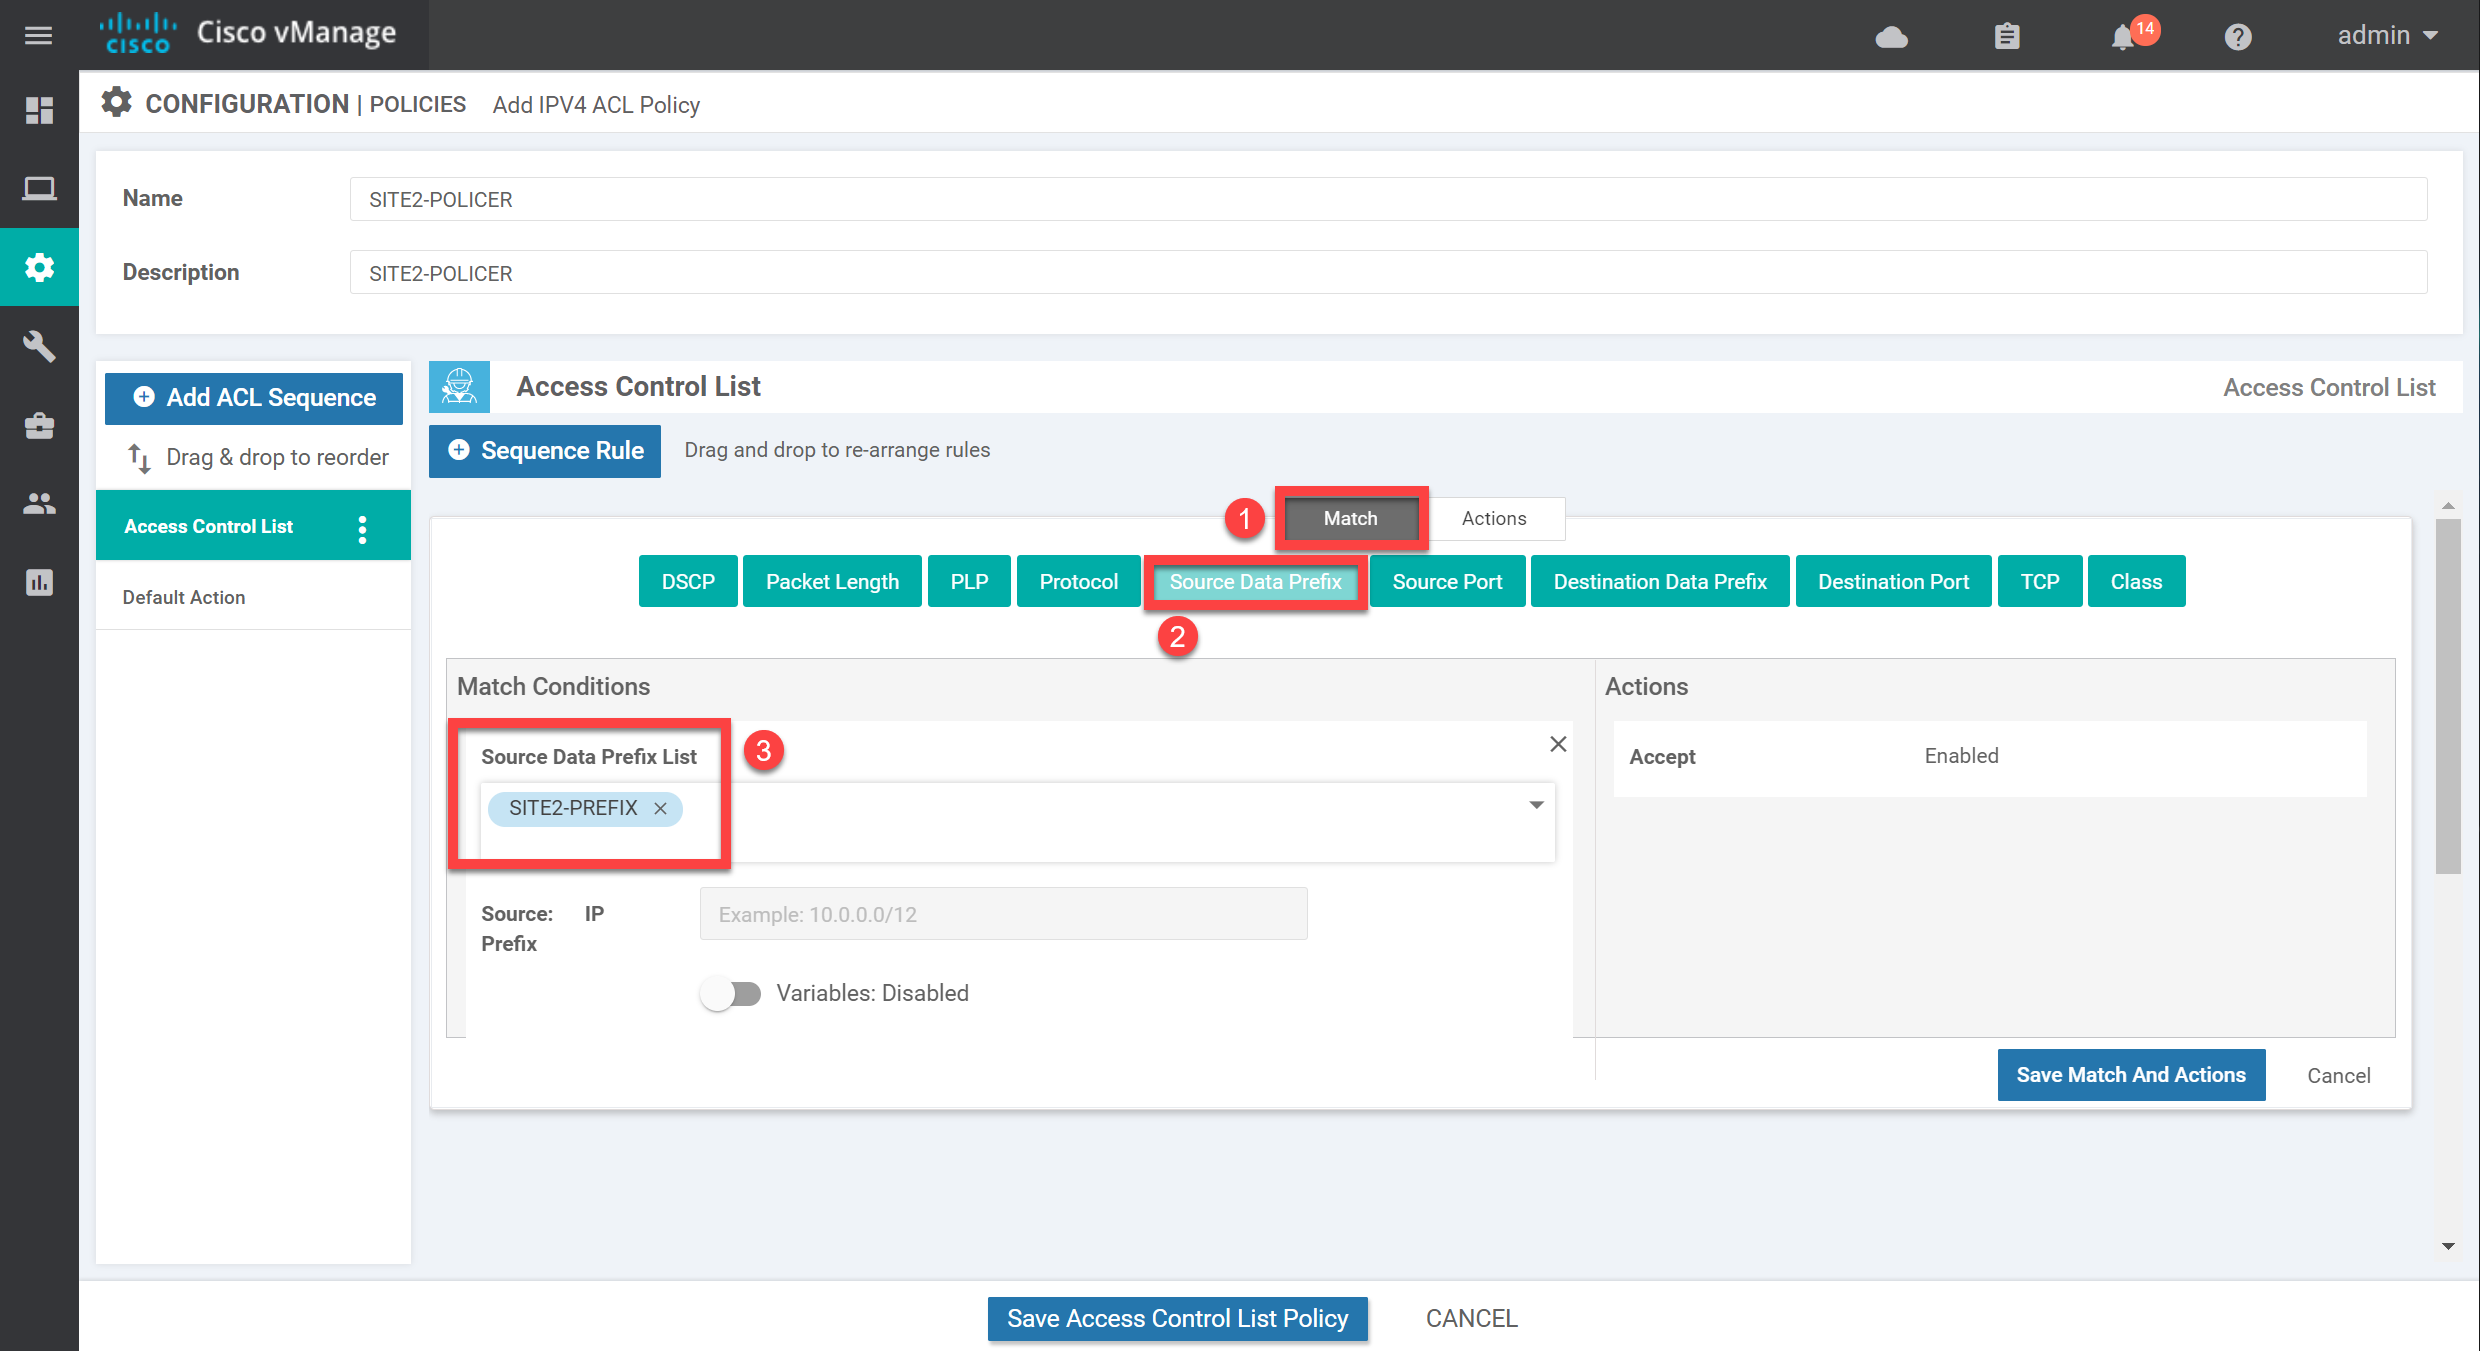
By default, there are no sequences, so all traffic matches the default action. The default action is set to drop. Let’s make some changes here. Click on Add ACL Sequence on the left side, then click on Sequence Rule on the right.
Select Source Data Prefix and select the data prefix-list we just created:
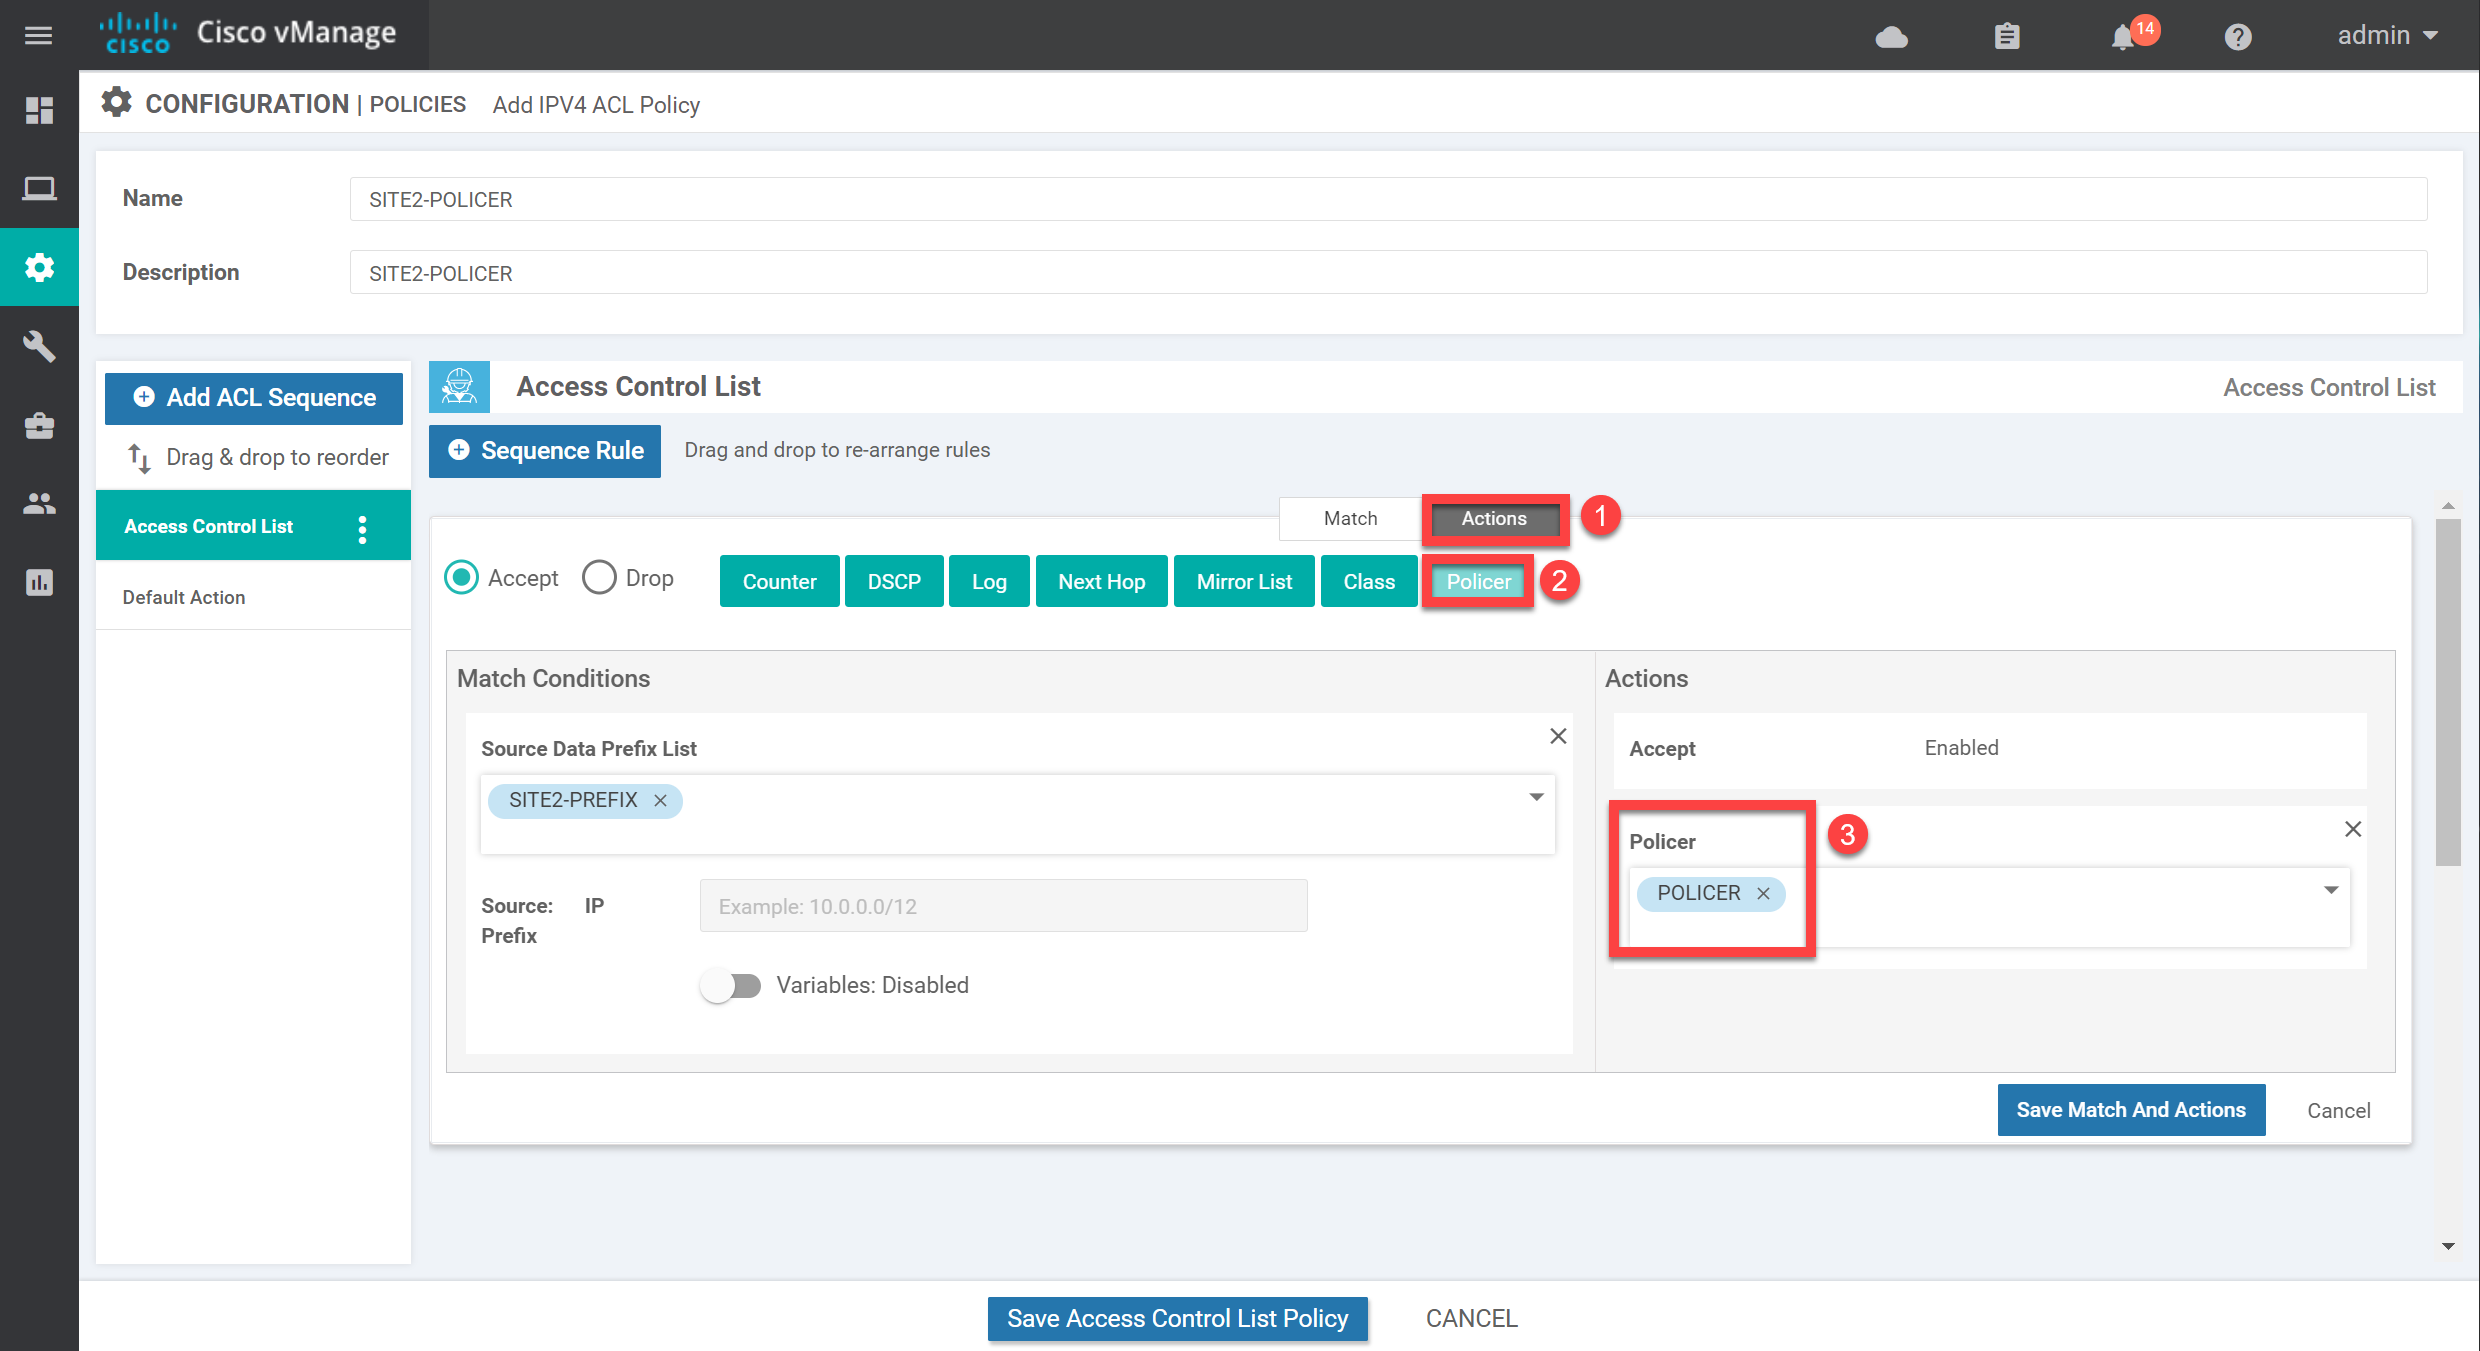
Now click on Action and select our policer:
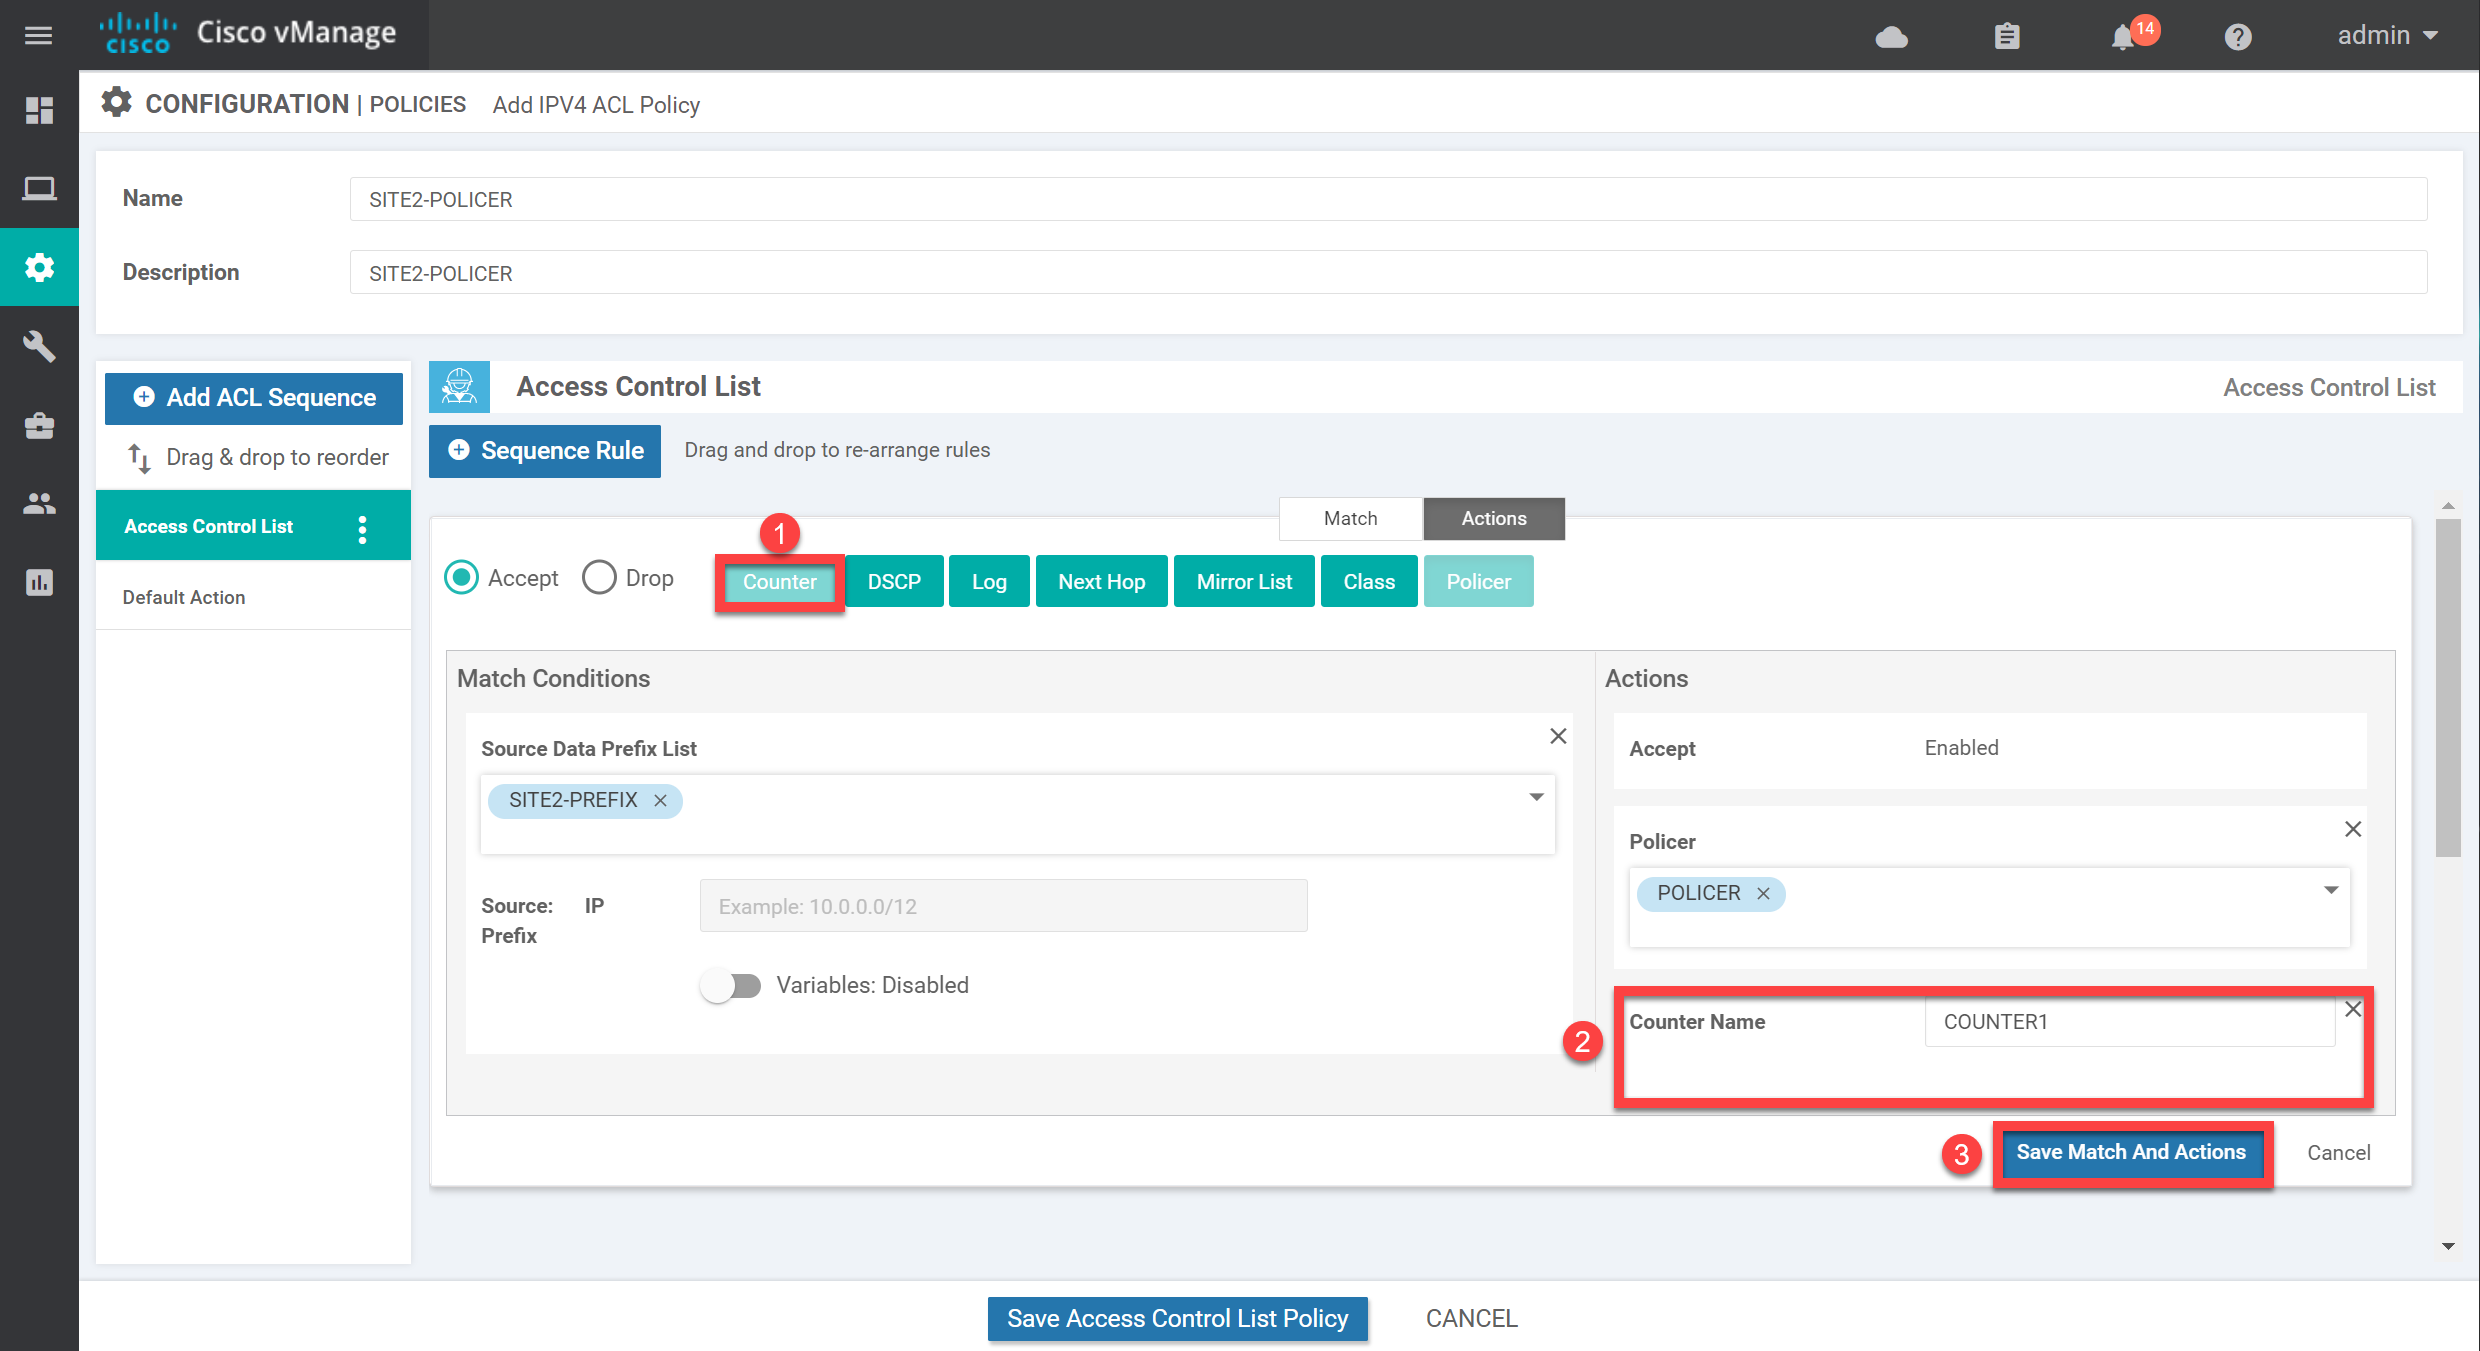
I also like to add a counter which should make it easier to see whether we get matches on this policy. Add the counter, give it a name, and click on Save Match and Actions:
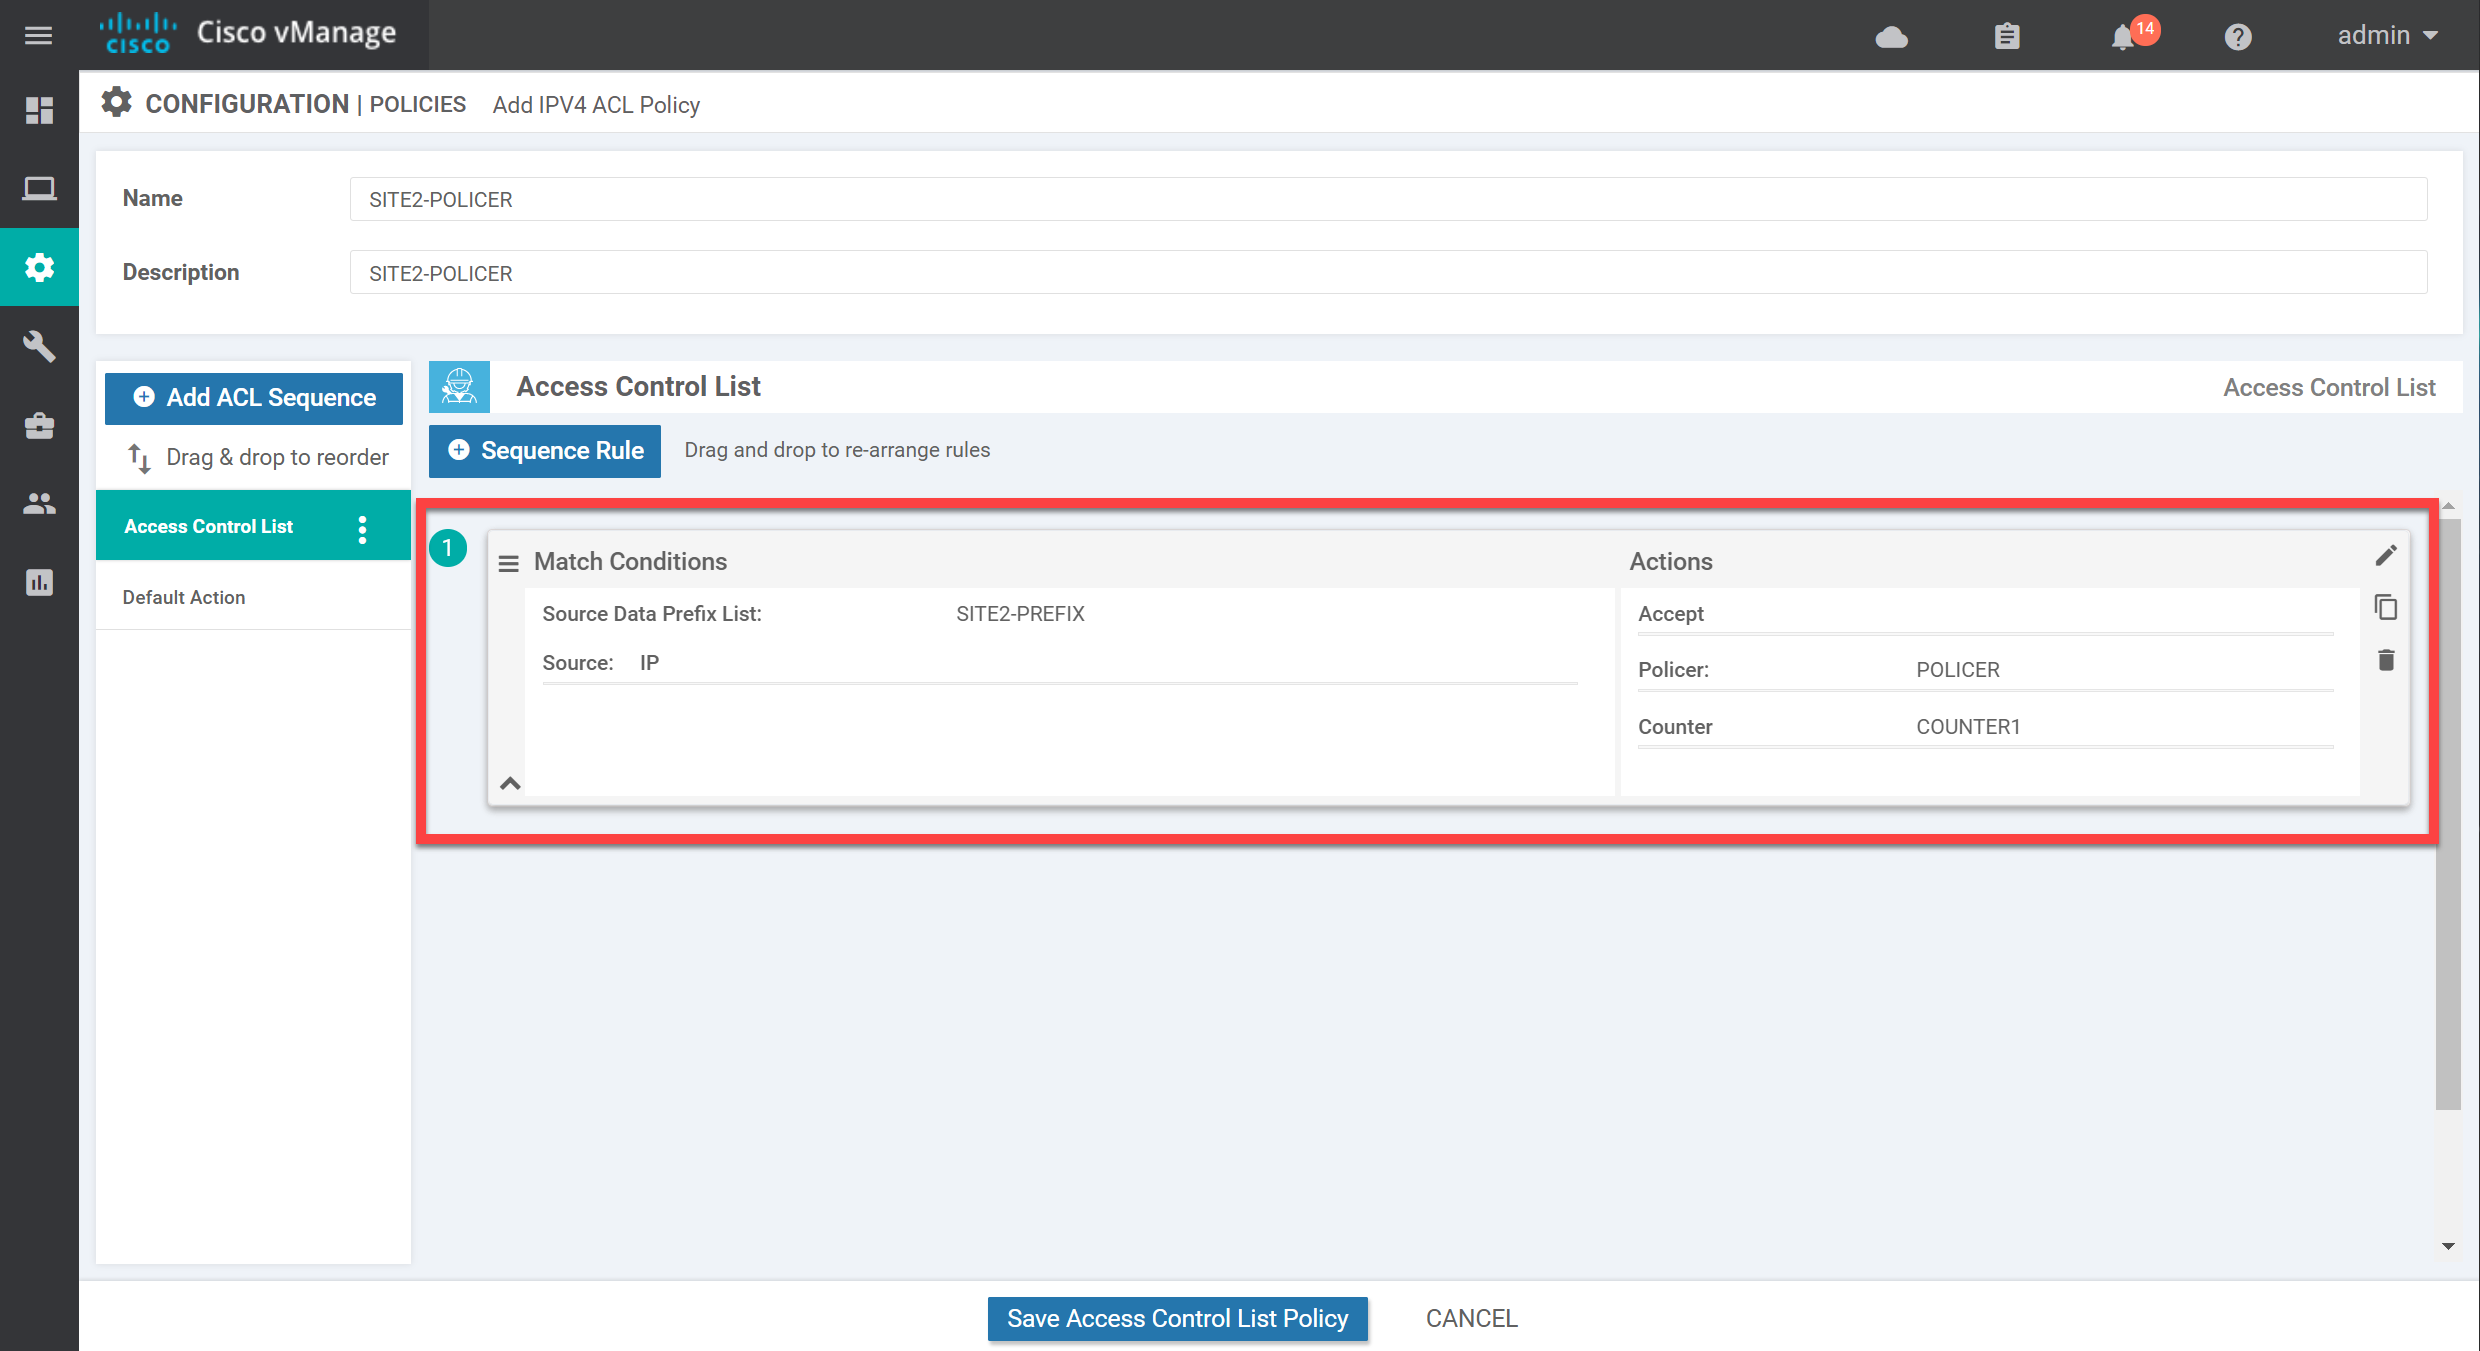
Below, you see the overview of what we configured:
We don’t want to drop any other traffic, so make sure you change the default action to Accept:
The policy is to police inbound traffic to ge0/3 of vEdge2 but why did you apply or enable it in the Egress direction under the ACL/QoS in the feature template?
Hi @edmundsiew71
I see I have the wrong screenshot here, it should show ingress. In the verification, you can see it is applied inbound.
Thanks for letting me know!
Rene
Hi Rene,
thanks once again for your great explanation. Just want to add some notes here.
I believe your configuration is correct. However with the rate of 15000 i didn’t get any drops.
I believe you also didn’t get any policy related drops as stated when you verified it with the commands:
and
... Continue reading in our forumHello Olli
Thanks for sharing your findings, this is very helpful. Can you also share version numbers of the SD-WAN you’re using? I’ll let Rene know to take a look at your findings and make any necessary adjustments.
I hope this has been helpful!
Laz
Hi, i am using 20.3.4 (except for vBond, which is on 19.2.4).
Rgds,
Olli