Lesson Contents
In the previous lesson, we onboarded a vEdge router. In this lesson, we’ll onboard a cEdge router. The steps are similar to how you onboard a vEdge router, but the configuration syntax is slightly different.
Configuration
Here is the topology we’ll use:
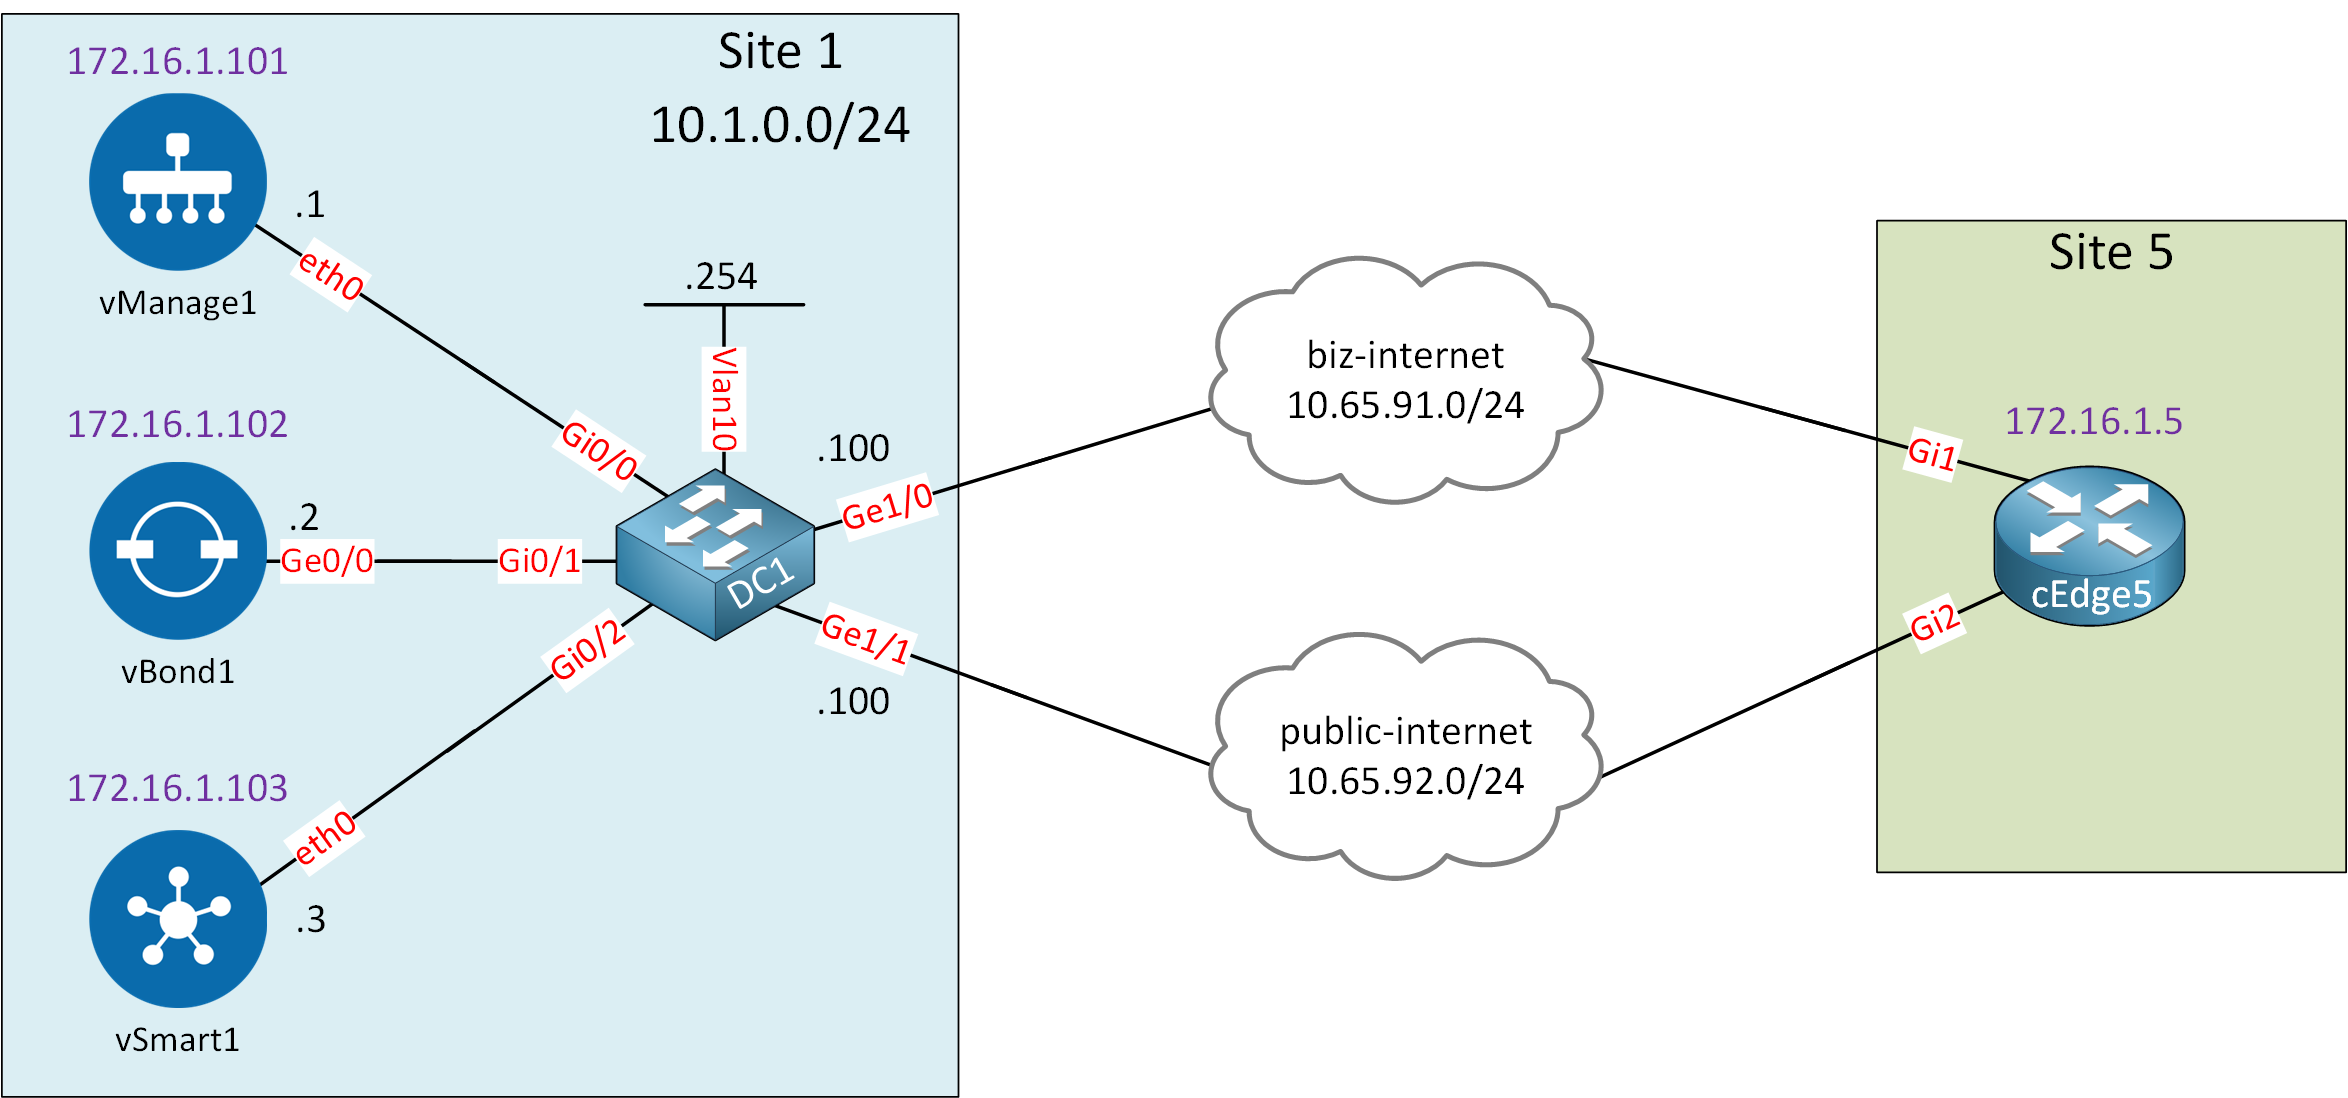
Let me explain what we have:
- On the left side, we have site 1 with the controllers we configured previously.
- On the right side, we have site 5 with one cEdge router.
- This router is connected to the “biz-internet” and “public-internet” clouds:
- I use these clouds to simulate two ISPs.
- In reality, these are two VLANs on my local network with Internet access.
We are going to use the “biz-internet” connection to onboard the cEdge5 router with the controllers. We will prepare the configuration of the “public-internet” connection so that we can use it in later lessons.
I’m using a Cisco CSR1000v running IOS XE SD-WAN. The exact image is Cisco IOS Software [Gibraltar], Virtual XE Software (X86_64_LINUX_IOSD-UCMK9-M), Version 16.12.4, RELEASE SOFTWARE (fc5). The filename is csr1000v-ucmk9.16.12.4-serial.qcow2.
This is what we need to configure:
- Create a basic configuration:
- System settings
- VPN0 (Underlay network)
- Certificates
- Install the root CA certificate on the vEdge router
- Create a CSR and sign a certificate for the vEdge router
When you try to access configure terminal, you’ll see this error:
Router#configure terminal
This command is not supported
On these IOS-XE SD-WAN routers, you have to use this command:
Router#config-transaction

admin connected from 127.0.0.1 using console on Router
Router(config)#
And to apply your configuration, don’t forget to use the commit command.
Basic Configuration
Before the cEdge router can join the controllers, we have to create a basic configuration. Let’s change the hostname:
Router(config)# hostname cEdge5
cEdge5(config)# commit
System
Let’s add the system configuration:
Router(config)# ip host vbond1 10.1.0.2
Router(config)# system
Router(config-system)# system-ip 172.16.1.5
Router(config-system)# site-id 5
Router(config-system)# organization-name nwl-lab-sdwan
Router(config-system)# vbond vbond1
Router(config-system)# commit
VPN0 (Underlay Network)
Let’s configure VPN 0, the underlay network:
- GigabitEthernet1 connects to the “biz-internet” cloud.
- GigabitEthernet2 connects to the “public-internet” cloud.
We’ll start with the interfaces:
Router(config)# interface GigabitEthernet 1
Router(config-if)# no shutdown
Router(config-if)# ip address 10.65.91.5 255.255.255.0
Router(config-if)# exit

Router(config)# interface GigabitEthernet 2
Router(config-if)# no shutdown
Router(config-if)# ip address 10.65.92.5 255.255.255.0
Router(config-if)# exit

Router(config)# ip route 10.1.0.0 255.255.255.0 10.65.91.100
The static route is required to reach the controllers. The tunnels are configured under sdwan:
cEdge5(config)# sdwan
cEdge5(config-sdwan)# interface GigabitEthernet1
cEdge5(config-interface-GigabitEthernet1)# tunnel-interface
cEdge5(config-tunnel-interface)# color biz-internet
cEdge5(config-tunnel-interface)# encapsulation ipsec
cEdge5(config-tunnel-interface)# allow-service all
cEdge5(config-tunnel-interface)# exit
cEdge5(config-interface-GigabitEthernet1)# exit

cEdge5(config-sdwan)# interface GigabitEthernet2
cEdge5(config-interface-GigabitEthernet2)# tunnel-interface
cEdge5(config-tunnel-interface)# color public-internet
cEdge5(config-tunnel-interface)# encapsulation ipsec
cEdge5(config-tunnel-interface)# allow-service all
cEdge5(config-tunnel-interface)# exit
cEdge5(config-interface-GigabitEthernet2)# exit

cEdge5(config-sdwan)# interface Tunnel 1
cEdge5(config-if)# ip unnumbered GigabitEthernet1
cEdge5(config-if)# tunnel source GigabitEthernet1
cEdge5(config-if)# tunnel mode sdwan
cEdge5(config-if)# exit

cEdge5(config)# interface Tunnel 2
cEdge5(config-if)# ip unnumbered GigabitEthernet2
cEdge5(config-if)# tunnel source GigabitEthernet2
cEdge5(config-if)# tunnel mode sdwan
cEdge5(config-if)# exit
cEdge5(config)# commit
This completes the configuration of the interfaces and tunnels.
interface Tunnel requires a capital T.Certificates
We need to do a couple of things to get our certificates in order:
- Install the root CA certificate on the cEdge router.
- Generate a CSR on the cEdge router.
- Sign the certificate on the vManage controller.
- Install the vEdge certificate on the cEdge router.
Let’s see how to do this.
Install Root CA Certificate
Find the contents of the ROOT-CA.pem certificate that we used earlier. You can look it up from vManage if you want:
vManage1# vshell
vManage1:~$ cat ROOT-CA.pem
-----BEGIN CERTIFICATE-----
MIIDczCCAlugAwIBAgIJAIfYUE6BdWXiMA0GCSqGSIb3DQEBCwUAMFAxCzAJBgNV
BAYTAk5MMQswCQYDVQQIDAJOTDEWMBQGA1UECgwNbndsLWxhYi1zZHdhbjEcMBoG
A1UEAwwTdm1hbmFnZTEubGFiLm53bC5haTAeFw0yMTA3MDkxMjA3MzlaFw0zMTA3
MDkxMjA3MzlaMFAxCzAJBgNVBAYTAk5MMQswCQYDVQQIDAJOTDEWMBQGA1UECgwN
bndsLWxhYi1zZHdhbjEcMBoGA1UEAwwTdm1hbmFnZTEubGFiLm53bC5haTCCASIw
DQYJKoZIhvcNAQEBBQADggEPADCCAQoCggEBANFHMnDmrn45oNZb9umn2d6W6VyF
4+VnaiKA7XxZ0UhCndQW+JYKDmrnIHEsrEZYVGrsJXmD/w2scLdVLWKUw9/qGwF3
fu77+/c1FjpW8KIuIr7zAWSTusC0PFEmSLqwHj0pM0rQPbTUlDbYrxP/j5FCaKyR
NkQKmDPZb4qYzY6IlIZOjRw2KxhxdQxMRZettyd/NhdrvgMwsgwL4GjOnVV4mFEH
CXgbVKW89eeFBmcGZcHY9I168eUf7Sl4A6Hm8A54fp2aLOBIy3Wp+9CDML/f0i0t
MKxmYhl01H9K8O3+4Z54O9PEP4aWN1SkwRV8ud5ZPQlEnR+KAywJSSNpsyMCAwEA
AaNQME4wHQYDVR0OBBYEFKwKyf6uvM2sDJlixr9L6VYenzb4MB8GA1UdIwQYMBaA
FKwKyf6uvM2sDJlixr9L6VYenzb4MAwGA1UdEwQFMAMBAf8wDQYJKoZIhvcNAQEL
BQADggEBADCghuDZ88wEEDv6nmBwNbRhY9GwR0B4V0fy39A+P14su8Rr8eg0fPqI
tDxQOovebz+RdNpQ9p59myooHsvGOziQ2rphXkZP0aSt7n+srp/HLVwvtO5yA80v
qf1tuhlseIMgYWz7nEZHE94ELp0Qsva2mNlSEfRubyuF8h0Mig0fWqcGfBmcuEYX
5qHj1wIDoQv9NpjzTvF+9ynDR0h6sf3evFOEqan0W/IyQpOLOZfAm89nWNn6FVxK
xibGfqO2vDPbbv/ytSxIX1k+ObqSfNGKHURhvYz0gBBDEt8d+R3QJkwwj+cR2ZkL
/C5oMc4ERLIADCFoblq6qSXHwJVeJqo=
-----END CERTIFICATE-----
The request download command is unavailable on a cEdge router. It is possible to paste certificates directly using tclsh though. Here’s how to do it:
cEdge5#tclsh
cEdge5(tcl)#puts [open "flash:ROOT-CA.pem" w+] {
[paste the certificate here]
}
You can check that the file has been created like this:
cEdge5#more bootflash:ROOT-CA.pem
-----BEGIN CERTIFICATE-----
MIIDczCCAlugAwIBAgIJAIfYUE6BdWXiMA0GCSqGSIb3DQEBCwUAMFAxCzAJBgNV
BAYTAk5MMQswCQYDVQQIDAJOTDEWMBQGA1UECgwNbndsLWxhYi1zZHdhbjEcMBoG
A1UEAwwTdm1hbmFnZTEubGFiLm53bC5haTAeFw0yMTA3MDkxMjA3MzlaFw0zMTA3
MDkxMjA3MzlaMFAxCzAJBgNVBAYTAk5MMQswCQYDVQQIDAJOTDEWMBQGA1UECgwN
bndsLWxhYi1zZHdhbjEcMBoGA1UEAwwTdm1hbmFnZTEubGFiLm53bC5haTCCASIw
DQYJKoZIhvcNAQEBBQADggEPADCCAQoCggEBANFHMnDmrn45oNZb9umn2d6W6VyF
4+VnaiKA7XxZ0UhCndQW+JYKDmrnIHEsrEZYVGrsJXmD/w2scLdVLWKUw9/qGwF3
fu77+/c1FjpW8KIuIr7zAWSTusC0PFEmSLqwHj0pM0rQPbTUlDbYrxP/j5FCaKyR
NkQKmDPZb4qYzY6IlIZOjRw2KxhxdQxMRZettyd/NhdrvgMwsgwL4GjOnVV4mFEH
CXgbVKW89eeFBmcGZcHY9I168eUf7Sl4A6Hm8A54fp2aLOBIy3Wp+9CDML/f0i0t
MKxmYhl01H9K8O3+4Z54O9PEP4aWN1SkwRV8ud5ZPQlEnR+KAywJSSNpsyMCAwEA
AaNQME4wHQYDVR0OBBYEFKwKyf6uvM2sDJlixr9L6VYenzb4MB8GA1UdIwQYMBaA
FKwKyf6uvM2sDJlixr9L6VYenzb4MAwGA1UdEwQFMAMBAf8wDQYJKoZIhvcNAQEL
BQADggEBADCghuDZ88wEEDv6nmBwNbRhY9GwR0B4V0fy39A+P14su8Rr8eg0fPqI
tDxQOovebz+RdNpQ9p59myooHsvGOziQ2rphXkZP0aSt7n+srp/HLVwvtO5yA80v
qf1tuhlseIMgYWz7nEZHE94ELp0Qsva2mNlSEfRubyuF8h0Mig0fWqcGfBmcuEYX
5qHj1wIDoQv9NpjzTvF+9ynDR0h6sf3evFOEqan0W/IyQpOLOZfAm89nWNn6FVxK
xibGfqO2vDPbbv/ytSxIX1k+ObqSfNGKHURhvYz0gBBDEt8d+R3QJkwwj+cR2ZkL
/C5oMc4ERLIADCFoblq6qSXHwJVeJqo=
-----END CERTIFICATE-----
We created the file, but we still need to install it:
cEdge5#request platform software sdwan root-cert-chain install bootflash:ROOT-CA.pem
Uploading root-ca-cert-chain via VPN 0
Copying ... /bootflash/ROOT-CA.pem via VPN 0
Updating the root certificate chain..
Successfully installed the root certificate chain
You can verify that it is installed:
cEdge5#show sdwan certificate root-ca-cert
Certificate:
    Data:
        Version: 3 (0x2)
        Serial Number:
            87:d8:50:4e:81:75:65:e2
    Signature Algorithm: sha256WithRSAEncryption
        Issuer: C=NL, ST=NL, O=nwl-lab-sdwan, CN=vmanage1.lab.nwl.ai
        Validity
            Not Before: Jul  9 12:07:39 2021 GMT
            Not After : Jul  9 12:07:39 2031 GMT
        Subject: C=NL, ST=NL, O=nwl-lab-sdwan, CN=vmanage1.lab.nwl.ai
        Subject Public Key Info:
            Public Key Algorithm: rsaEncryption
                Public-Key: (2048 bit)
                Modulus:
                    00:d1:47:32:70:e6:ae:7e:39:a0:d6:5b:f6:e9:a7:
                    d9:de:96:e9:5c:85:e3:e5:67:6a:22:80:ed:7c:59:
                    d1:48:42:9d:d4:16:f8:96:0a:0e:6a:e7:20:71:2c:
                    ac:46:58:54:6a:ec:25:79:83:ff:0d:ac:70:b7:55:
                    2d:62:94:c3:df:ea:1b:01:77:7e:ee:fb:fb:f7:35:
                    16:3a:56:f0:a2:2e:22:be:f3:01:64:93:ba:c0:b4:
                    3c:51:26:48:ba:b0:1e:3d:29:33:4a:d0:3d:b4:d4:
                    94:36:d8:af:13:ff:8f:91:42:68:ac:91:36:44:0a:
                    98:33:d9:6f:8a:98:cd:8e:88:94:86:4e:8d:1c:36:
                    2b:18:71:75:0c:4c:45:97:ad:b7:27:7f:36:17:6b:
                    be:03:30:b2:0c:0b:e0:68:ce:9d:55:78:98:51:07:
                    09:78:1b:54:a5:bc:f5:e7:85:06:67:06:65:c1:d8:
                    f4:8d:7a:f1:e5:1f:ed:29:78:03:a1:e6:f0:0e:78:
                    7e:9d:9a:2c:e0:48:cb:75:a9:fb:d0:83:30:bf:df:
                    d2:2d:2d:30:ac:66:62:19:74:d4:7f:4a:f0:ed:fe:
                    e1:9e:78:3b:d3:c4:3f:86:96:37:54:a4:c1:15:7c:
                    b9:de:59:3d:09:44:9d:1f:8a:03:2c:09:49:23:69:
                    b3:23
                Exponent: 65537 (0x10001)
        X509v3 extensions:
            X509v3 Subject Key Identifier:
                AC:0A:C9:FE:AE:BC:CD:AC:0C:99:62:C6:BF:4B:E9:56:1E:9F:36:F8
            X509v3 Authority Key Identifier:
                keyid:AC:0A:C9:FE:AE:BC:CD:AC:0C:99:62:C6:BF:4B:E9:56:1E:9F:36:F8

            X509v3 Basic Constraints:
                CA:TRUE
    Signature Algorithm: sha256WithRSAEncryption
         30:a0:86:e0:d9:f3:cc:04:10:3b:fa:9e:60:70:35:b4:61:63:
         d1:b0:47:40:78:57:47:f2:df:d0:3e:3f:5e:2c:bb:c4:6b:f1:
         e8:34:7c:fa:88:b4:3c:50:3a:8b:de:6f:3f:91:74:da:50:f6:
         9e:7d:9b:2a:28:1e:cb:c6:3b:38:90:da:ba:61:5e:46:4f:d1:
         a4:ad:ee:7f:ac:ae:9f:c7:2d:5c:2f:b4:ee:72:03:cd:2f:a9:
         fd:6d:ba:19:6c:78:83:20:61:6c:fb:9c:46:47:13:de:04:2e:
         9d:10:b2:f6:b6:98:d9:52:11:f4:6e:6f:2b:85:f2:1d:0c:8a:
         0d:1f:5a:a7:06:7c:19:9c:b8:46:17:e6:a1:e3:d7:02:03:a1:
         0b:fd:36:98:f3:4e:f1:7e:f7:29:c3:47:48:7a:b1:fd:de:bc:
         53:84:a9:a9:f4:5b:f2:32:42:93:8b:39:97:c0:9b:cf:67:58:
         d9:fa:15:5c:4a:c6:26:c6:7e:a3:b6:bc:33:db:6e:ff:f2:b5:
         2c:48:5f:59:3e:39:ba:92:7c:d1:8a:1d:44:61:bd:8c:f4:80:
         10:43:12:df:1d:f9:1d:d0:26:4c:30:8f:e7:11:d9:99:0b:fc:
         2e:68:31:ce:04:44:b2:00:0c:21:68:6e:5a:ba:a9:25:c7:c0:
         95:5e:26:aa
The root certificate is now installed.
cEdge Certificate
Time for a device certificate. Let’s create a CSR:
cEdge5#request platform software sdwan csr upload bootflash:cedge5_csr
Uploading CSR via VPN 0
Enter organization-unit name            : nwl-lab-sdwan
Re-enter organization-unit name          : nwl-lab-sdwan
Generating private/public pair and CSR for this vedge device
Generating CSR for this vedge device   ........[DONE]
Copying ... /bootflash/cedge5_csr via VPN 0
CSR upload successful
We can view the CSR like this:
cEdge5#more bootflash:cedge5_csr
-----BEGIN CERTIFICATE REQUEST-----
MIIDTzCCAjcCAQAwgc4xCzAJBgNVBAYTAlVTMRMwEQYDVQQIEwpDYWxpZm9ybmlh
MREwDwYDVQQHEwhTYW4gSm9zZTEWMBQGA1UECxMNbndsLWxhYi1zZHdhbjEUMBIG
A1UEChMLVmlwdGVsYSBMTEMxRTBDBgNVBAMTPHZlZGdlLUNTUi0xNWY5MzU5My0y
Y2EyLTQ4NmQtYTljMi0wY2Y2MzgyMGI0ODItMS52aXB0ZWxhLmNvbTEiMCAGCSqG
SIb3DQEJARYTc3VwcG9ydEB2aXB0ZWxhLmNvbTCCASIwDQYJKoZIhvcNAQEBBQAD
ggEPADCCAQoCggEBAKkTTIFn07swoKkifHzdqp1/6Pz421jpVJ12D0tRL2hL6qWA
gUaV5auVmNaVUxszqK67VugCgxpShrZM1O8mVjwQwuzeHcY5kMpUO8uiK/167WLI
wSlCKDmNE6W04aPwqHLJvCJ3iF72vu0eWZz96lPNfQnBCVI7VWPhQZxU15WqoixB
/mF8ddi9Ltmjt3O+NYZpE81DCVU41JsfDccMV7cve/fR6xRVA9482jK+wTmMxCWf
61nDlGRxI9iIuhdcn2rnNPYD3PUs1d1drozKQxBZLBLXQwlRn4fqSdaLXLNLJbcZ
vK0esF6C8mzW6GLp2X6zDUaCD8ieVzqB4STMNsUCAwEAAaA7MDkGCSqGSIb3DQEJ
DjEsMCowCQYDVR0TBAIwADAdBgNVHQ4EFgQU97E/SgLaQrmfspxAdxslMtb3sEcw
DQYJKoZIhvcNAQELBQADggEBADfvEcV9+DQgR17PSHMemac1N+985oU/ZxVvWdFY
o8wU8efa/3B2Kfl3crknkMzH0UCBs7/O26hVyEtcoj56Juu8lV5nB3Rz2ilOhmoU
gLPSKlbpYVZmEB0o9A5I4KpshcH5lanjMyF3TzscNOcZ5JxEsn2ftVz31F2Q1fL8
kiWXwa6el3tYELdptM5NZeRuk42xgNzG9g2T9RJ4jhHgaJsChbeCxoyBPCOSGb9w
c9+wC3s5QpQTcFOaIhdeIxx7ts64ce9qmSmBLwAlpS0ihOJLjBfj2T59hzedpMIR
lmP9RUKNjReZy2ykTdYq8vGfeYJy/QJ9W5uhHobsGB0OIYg=
-----END CERTIFICATE REQUEST-----
Copy the CSR content and leave it in your clipboard. We’ll need to add this in a file on the vManage controller. Let’s create a new file:
vManage1# vshell
vManage1:~$ vim cedge5.csr
Paste the contents and save the file. Now we can create a cEdge device certificate based on this CSR:
vManage1:~$ openssl x509 -req -in cedge5.csr \
-CA ROOT-CA.pem -CAkey ROOT-CA.key -CAcreateserial \
-out cedge5.crt -days 2000 -sha256
Signature ok
subject=/C=US/ST=California/L=San Jose/OU=nwl-lab-sdwan/O=Viptela LLC/CN=vedge-CSR-15f93593-2ca2-486d-a9c2-0cf63820b482-1.viptela.com/emailAddress=support@viptela.com
Getting CA Private Key
The device certificate is created. You can see the contents here:
vManage1:~$ cat cedge5.crt
-----BEGIN CERTIFICATE-----
MIIDmzCCAoMCCQCFs6t5a8AlszANBgkqhkiG9w0BAQsFADBQMQswCQYDVQQGEwJO
TDELMAkGA1UECAwCTkwxFjAUBgNVBAoMDW53bC1sYWItc2R3YW4xHDAaBgNVBAMM
E3ZtYW5hZ2UxLmxhYi5ud2wuYWkwHhcNMjMwNzI1MDg0NjU4WhcNMjkwMTE0MDg0
NjU4WjCBzjELMAkGA1UEBhMCVVMxEzARBgNVBAgTCkNhbGlmb3JuaWExETAPBgNV
BAcTCFNhbiBKb3NlMRYwFAYDVQQLEw1ud2wtbGFiLXNkd2FuMRQwEgYDVQQKEwtW
aXB0ZWxhIExMQzFFMEMGA1UEAxM8dmVkZ2UtQ1NSLTE1ZjkzNTkzLTJjYTItNDg2
ZC1hOWMyLTBjZjYzODIwYjQ4Mi0xLnZpcHRlbGEuY29tMSIwIAYJKoZIhvcNAQkB
FhNzdXBwb3J0QHZpcHRlbGEuY29tMIIBIjANBgkqhkiG9w0BAQEFAAOCAQ8AMIIB
CgKCAQEAqRNMgWfTuzCgqSJ8fN2qnX/o/PjbWOlUnXYPS1EvaEvqpYCBRpXlq5WY
1pVTGzOorrtW6AKDGlKGtkzU7yZWPBDC7N4dxjmQylQ7y6Ir/XrtYsjBKUIoOY0T
pbTho/Cocsm8IneIXva+7R5ZnP3qU819CcEJUjtVY+FBnFTXlaqiLEH+YXx12L0u
2aO3c741hmkTzUMJVTjUmx8NxwxXty9799HrFFUD3jzaMr7BOYzEJZ/rWcOUZHEj
2Ii6F1yfauc09gPc9SzV3V2ujMpDEFksEtdDCVGfh+pJ1otcs0sltxm8rR6wXoLy
bNboYunZfrMNRoIPyJ5XOoHhJMw2xQIDAQABMA0GCSqGSIb3DQEBCwUAA4IBAQBY
auc4frqKea8VV+4ysdMq9UQ620K1K+FdQaG0YBc5hn12LLBx1OfesWHjvPsrzYbK
HhxmTMCY/x/VPxJJzJXA+ufebRitXDZUKOSIyOdNXr5IwzHFrfLU7tdX0HoAoZYP
JgKUjNwO1yFROvZezSkgMzauwh2y5NOUFAY7q+1inMR5szyLiam3ji0QnQhC7rSA
gDYWBi/L5G5QSgQtGiSiveBEVlArAgMkuyhv4Rti0qD+cVVXA1A7pyHIghkv8XCb
rJhtpWuc9DmyiT3wOAR9x1QGHaBj8IsPEEpak5qnfxypt3Jgr1mrZUFCOCQDSdMZ
MuCvAm1p3I0pJ6iAisZf
-----END CERTIFICATE-----
Select the content of the certificate and copy it to your clipboard. We’ll use tclsh on the cEdge router to create the device certificate file:
cEdge5#tclsh
cEdge5(tcl)#puts [open "flash:CEDGE5.crt" w+] {
[paste certificate here]
}
cEdge5(tcl)#exit
You can check that the file has been created:
cEdge5#more bootflash:CEDGE5.crt
-----BEGIN CERTIFICATE-----
MIIDmzCCAoMCCQCFs6t5a8AlszANBgkqhkiG9w0BAQsFADBQMQswCQYDVQQGEwJO
TDELMAkGA1UECAwCTkwxFjAUBgNVBAoMDW53bC1sYWItc2R3YW4xHDAaBgNVBAMM
E3ZtYW5hZ2UxLmxhYi5ud2wuYWkwHhcNMjMwNzI1MDg0NjU4WhcNMjkwMTE0MDg0
NjU4WjCBzjELMAkGA1UEBhMCVVMxEzARBgNVBAgTCkNhbGlmb3JuaWExETAPBgNV
BAcTCFNhbiBKb3NlMRYwFAYDVQQLEw1ud2wtbGFiLXNkd2FuMRQwEgYDVQQKEwtW
aXB0ZWxhIExMQzFFMEMGA1UEAxM8dmVkZ2UtQ1NSLTE1ZjkzNTkzLTJjYTItNDg2
ZC1hOWMyLTBjZjYzODIwYjQ4Mi0xLnZpcHRlbGEuY29tMSIwIAYJKoZIhvcNAQkB
FhNzdXBwb3J0QHZpcHRlbGEuY29tMIIBIjANBgkqhkiG9w0BAQEFAAOCAQ8AMIIB
CgKCAQEAqRNMgWfTuzCgqSJ8fN2qnX/o/PjbWOlUnXYPS1EvaEvqpYCBRpXlq5WY
1pVTGzOorrtW6AKDGlKGtkzU7yZWPBDC7N4dxjmQylQ7y6Ir/XrtYsjBKUIoOY0T
pbTho/Cocsm8IneIXva+7R5ZnP3qU819CcEJUjtVY+FBnFTXlaqiLEH+YXx12L0u
2aO3c741hmkTzUMJVTjUmx8NxwxXty9799HrFFUD3jzaMr7BOYzEJZ/rWcOUZHEj
2Ii6F1yfauc09gPc9SzV3V2ujMpDEFksEtdDCVGfh+pJ1otcs0sltxm8rR6wXoLy
bNboYunZfrMNRoIPyJ5XOoHhJMw2xQIDAQABMA0GCSqGSIb3DQEBCwUAA4IBAQBY
auc4frqKea8VV+4ysdMq9UQ620K1K+FdQaG0YBc5hn12LLBx1OfesWHjvPsrzYbK
HhxmTMCY/x/VPxJJzJXA+ufebRitXDZUKOSIyOdNXr5IwzHFrfLU7tdX0HoAoZYP
JgKUjNwO1yFROvZezSkgMzauwh2y5NOUFAY7q+1inMR5szyLiam3ji0QnQhC7rSA
gDYWBi/L5G5QSgQtGiSiveBEVlArAgMkuyhv4Rti0qD+cVVXA1A7pyHIghkv8XCb
rJhtpWuc9DmyiT3wOAR9x1QGHaBj8IsPEEpak5qnfxypt3Jgr1mrZUFCOCQDSdMZ
MuCvAm1p3I0pJ6iAisZf
-----END CERTIFICATE-----
Now we can install the certificate:
cEdge5#request platform software sdwan certificate install bootflash:CEDGE5.crt
Installing certificate via VPN 0
Copying ... /bootflash/CEDGE5.crt via VPN 0
Successfully installed the certificate
That takes care of the cEdge device certificate.
Add cEdge router to vManage
The certificates are in place but we still have to add the cEdge router to the vManage controller. Depending on your Cisco SD-WAN version, there are different options.
Before 20.x
This is the most simple method. We only need to add the cEdge router serial number and chassis number to the vManage and vBond controllers. Look up these values here:
cEdge5#show sdwan certificate serial
Chassis number: CSR-15f93593-2ca2-486d-a9c2-0cf63820b482 serial number: 85B3AB796BC025B3
Add them to the controllers like this:
vManage1# request vedge add chassis-num CSR-15f93593-2ca2-486d-a9c2-0cf63820b482 serial-num 85B3AB796BC025B3vBond1# request vedge add chassis-num CSR-15f93593-2ca2-486d-a9c2-0cf63820b482 serial-num 85B3AB796BC025B3Now, open the vManage GUI and log in:
Open Configuration > Certificates > WAN Edge List and click on Send to Controllers:
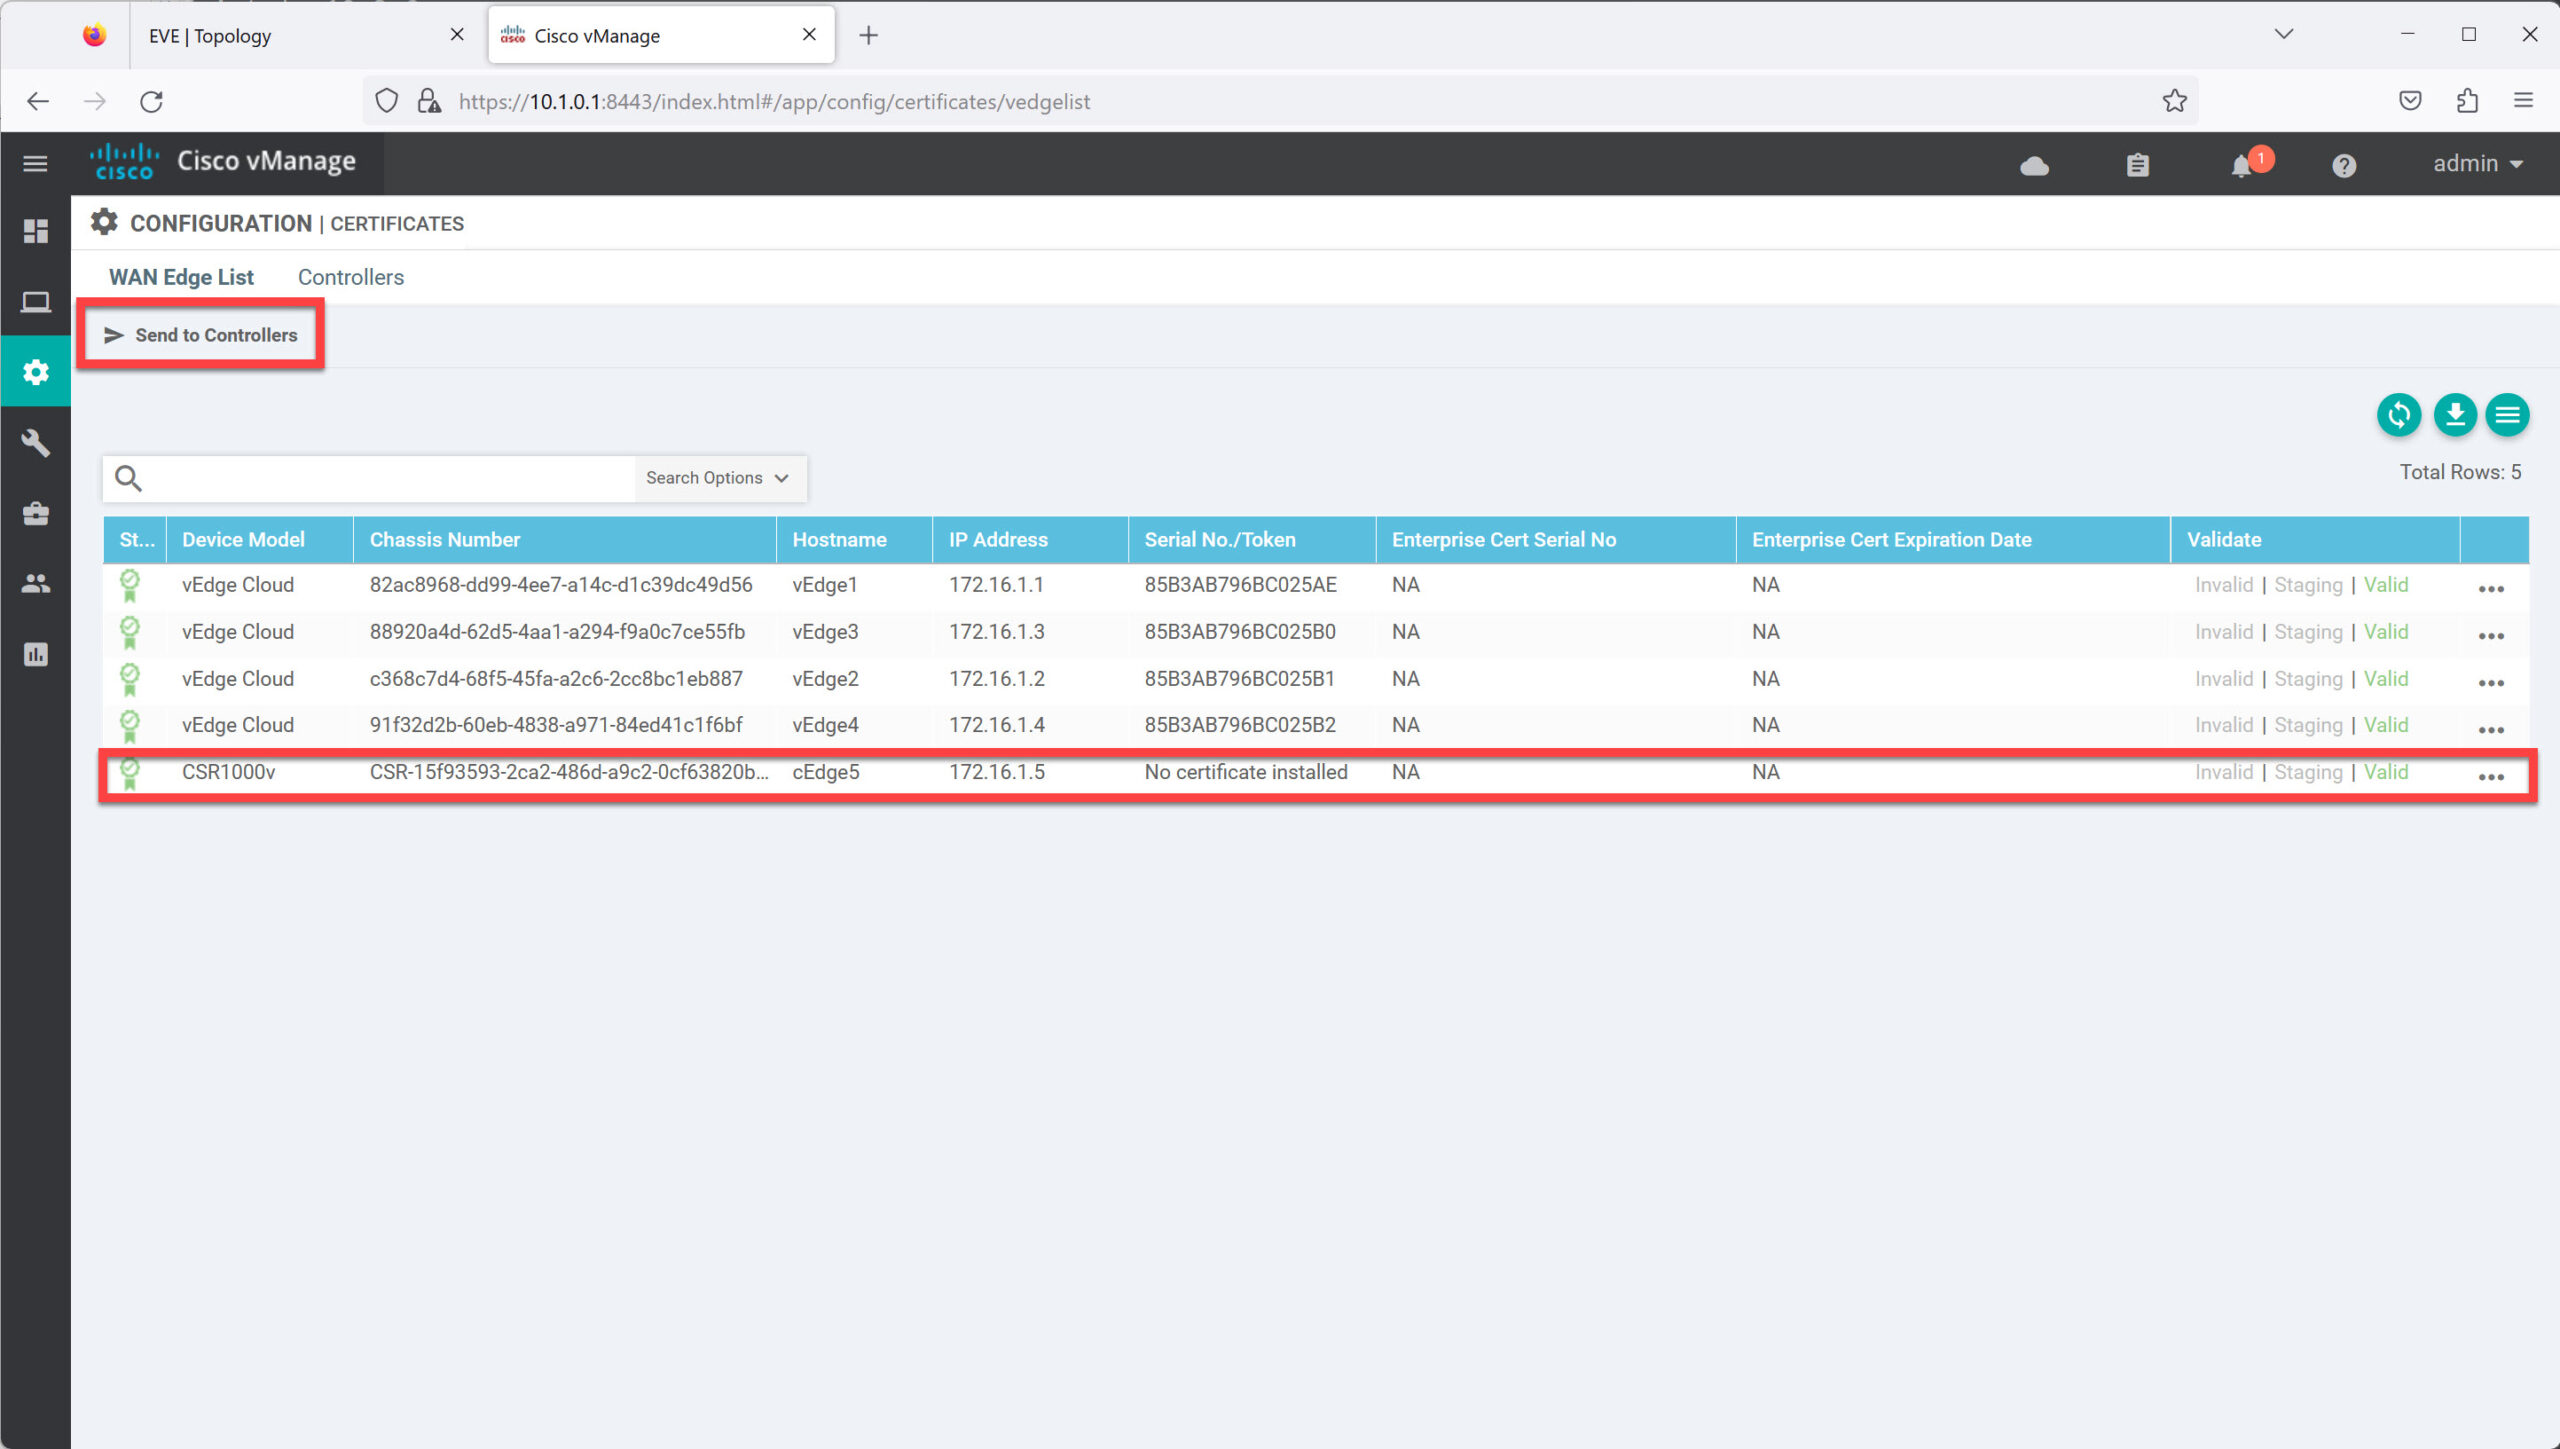
This pushes the list with serial numbers of our vEdge router(s) to the controllers. You can see the progress below:
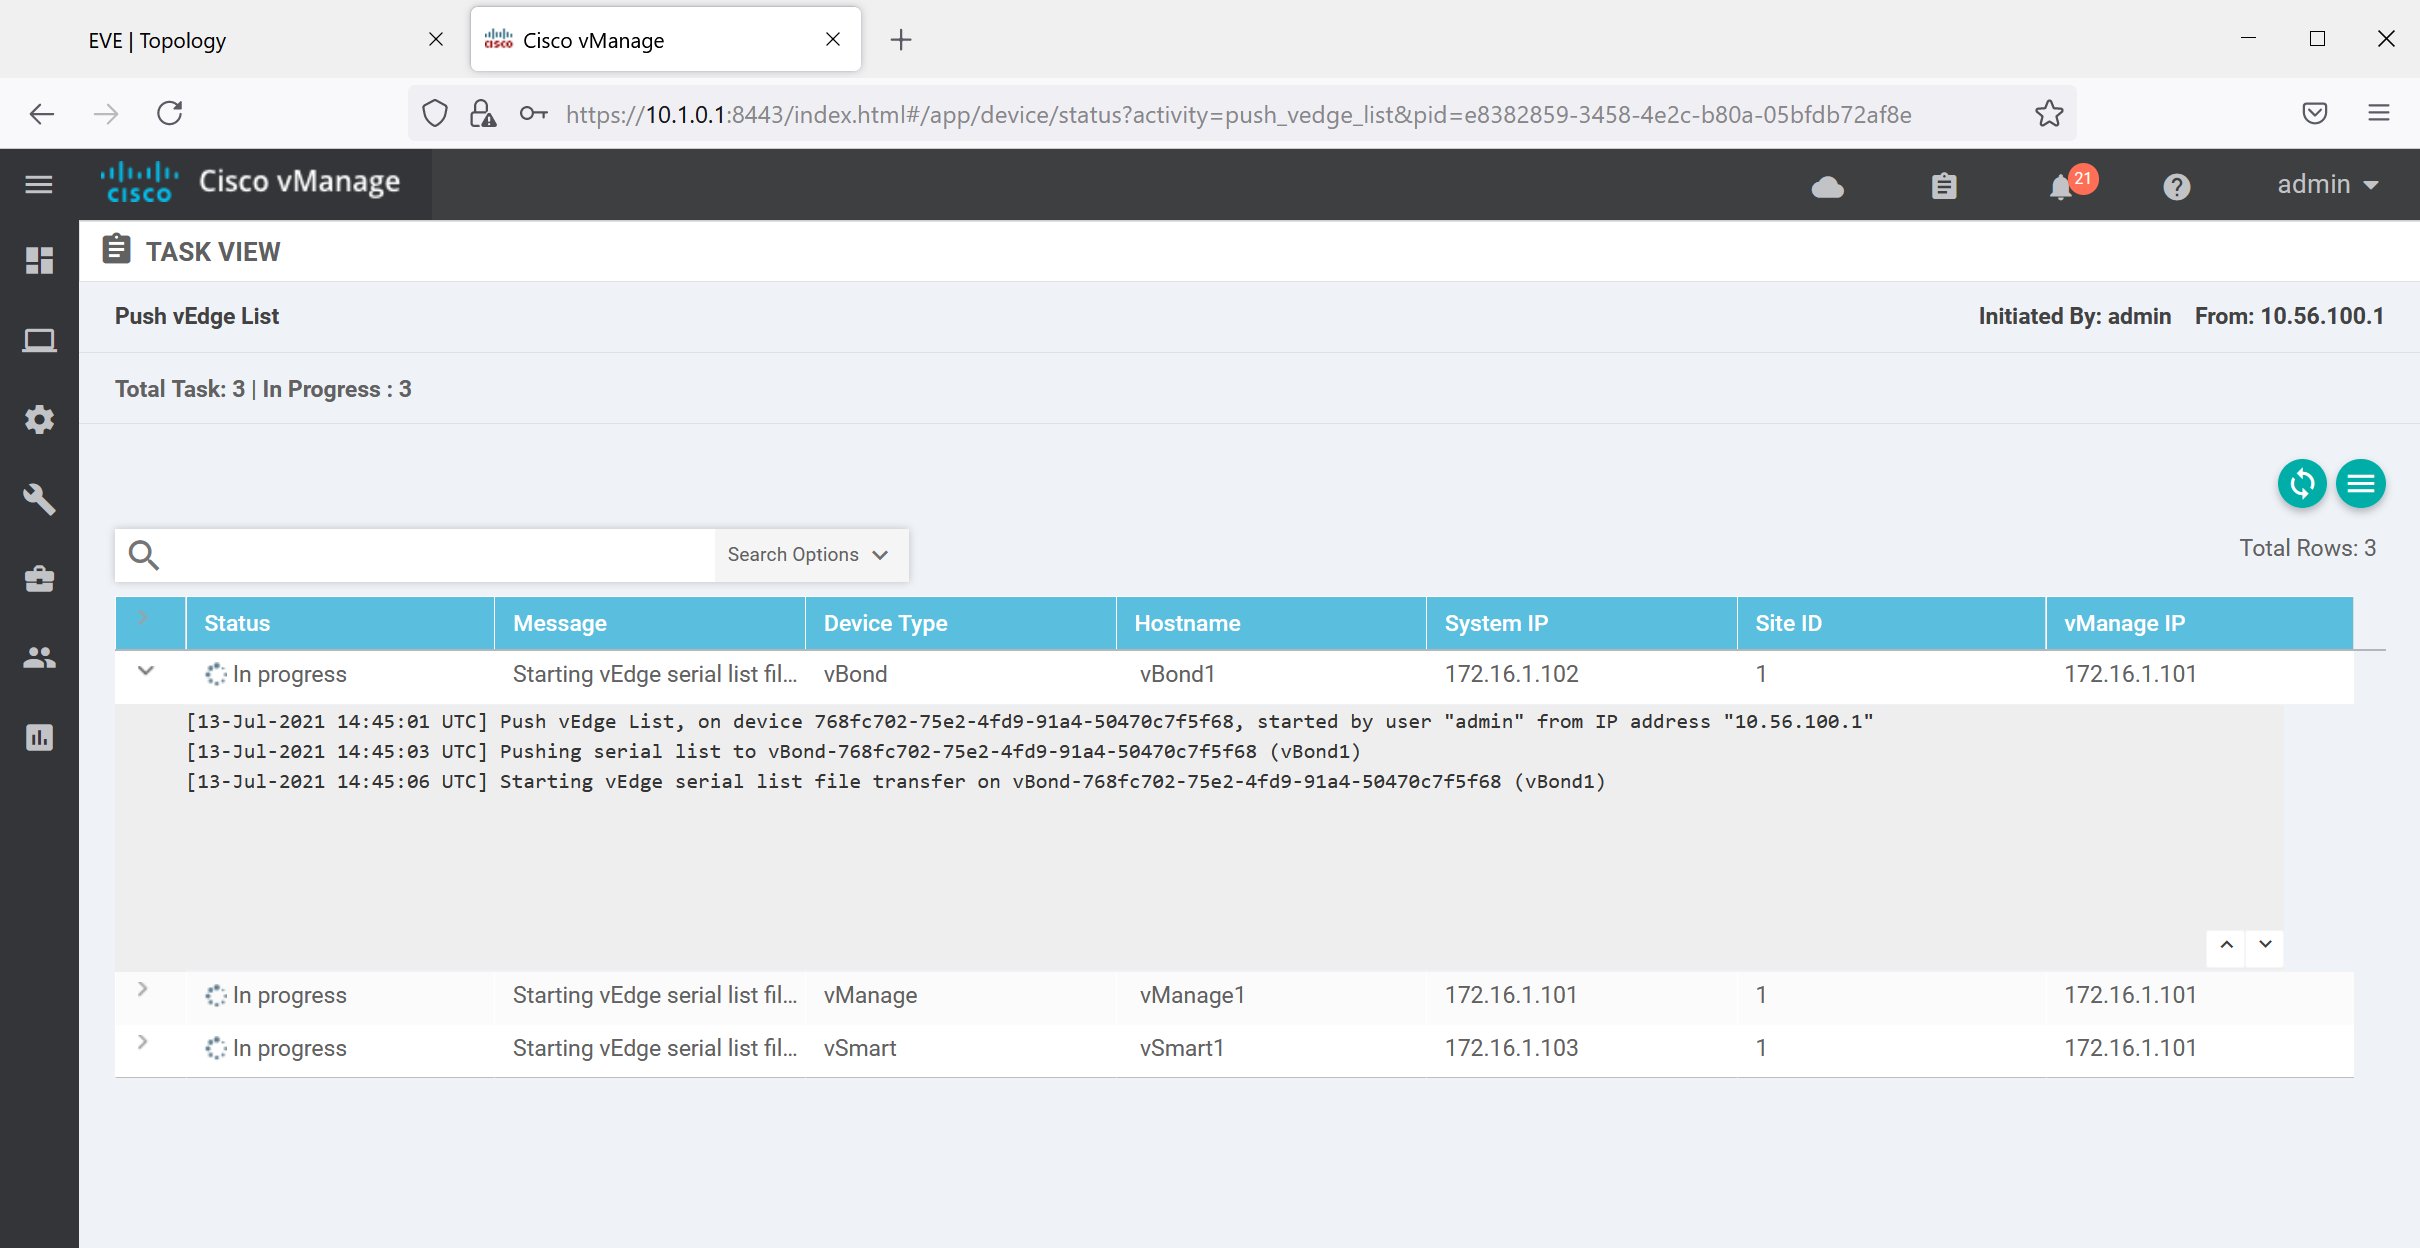
This takes a few seconds. When it’s ready you’ll see “Success” under the Status column:
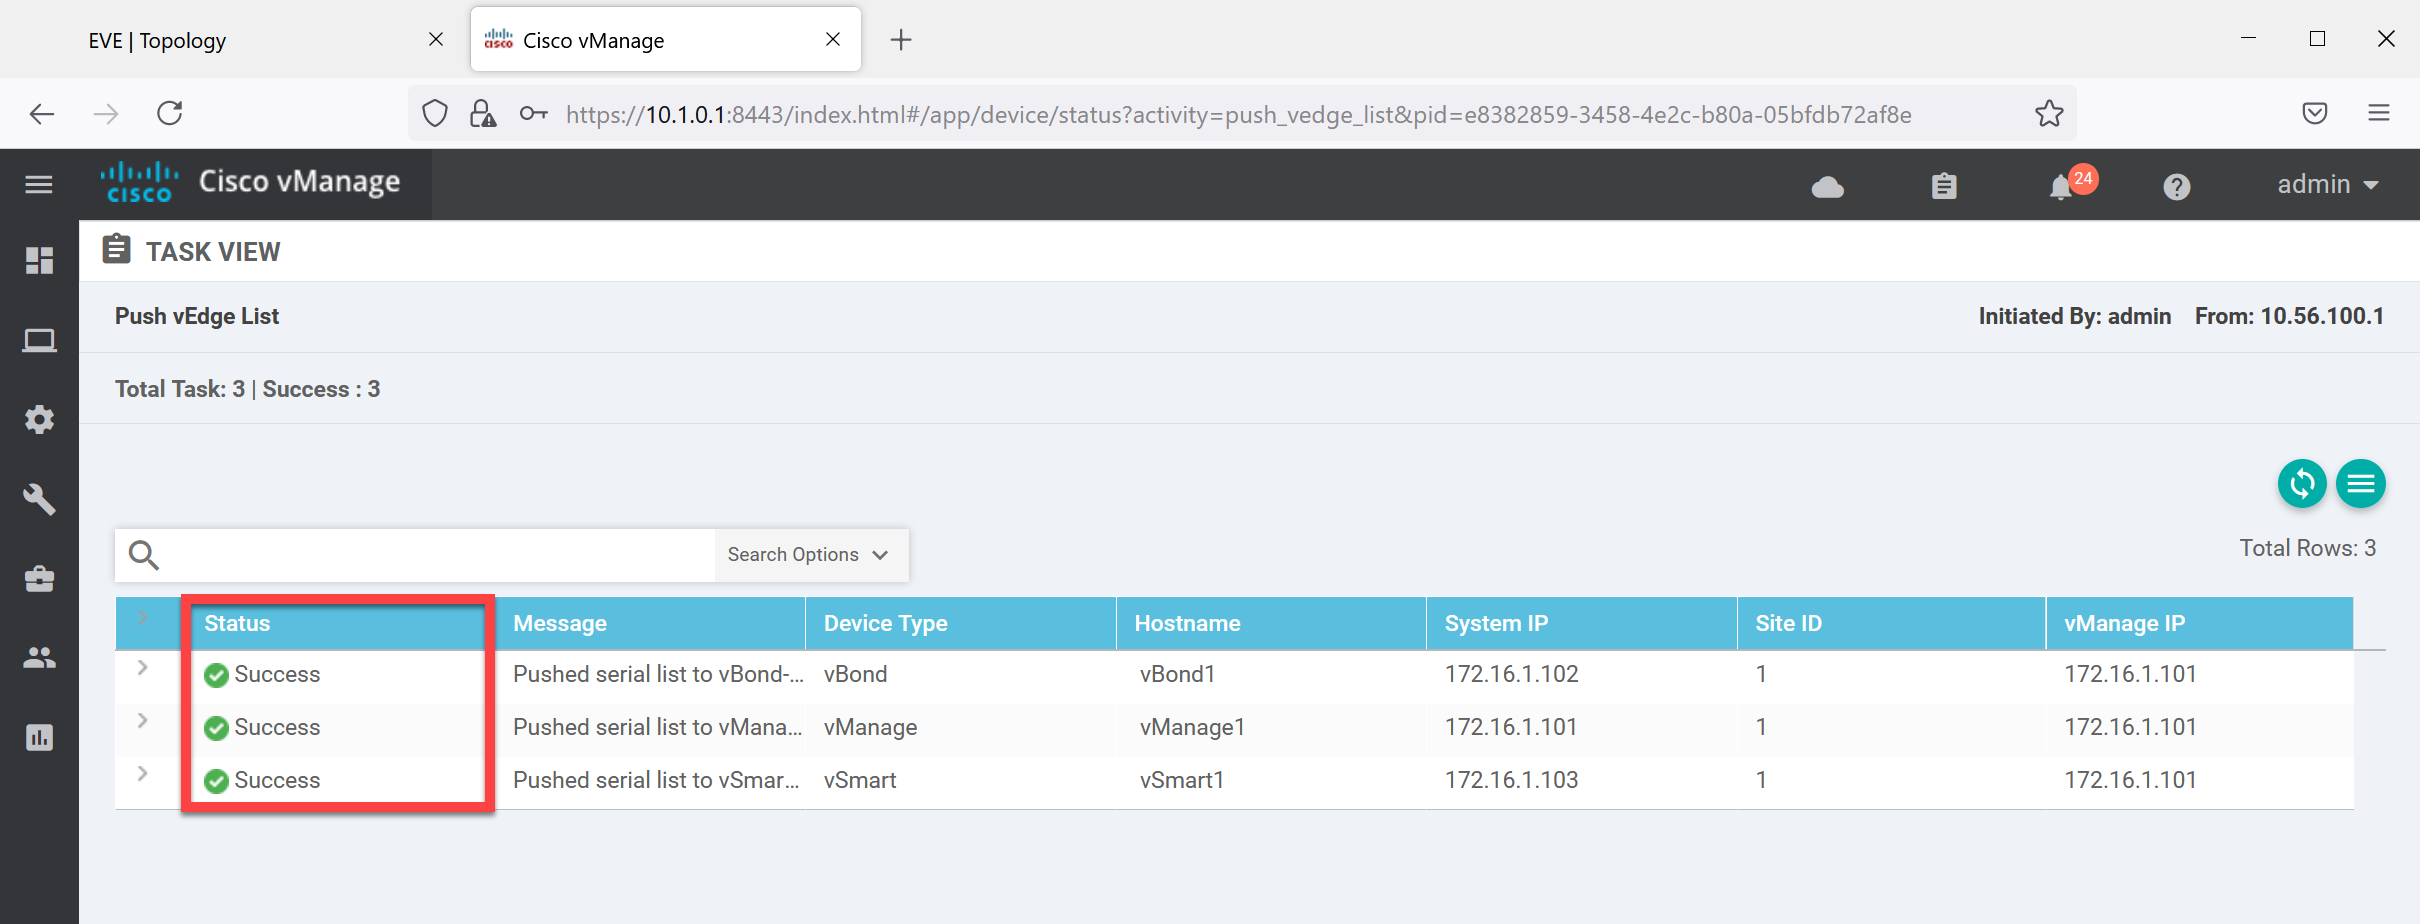
That’s all there is to it.
After 20.x
You need to create device “licenses” on cisco.com and add a WAN edge list to the vManage controller. See this example in the vEdge onboarding lesson how to do this.
Verification
Finally, let’s check if our router is connected to the controllers:
cEdge5#show sdwan control connections
                                                                                       PEER                                          PEER                                          CONTROLLER
PEER    PEER PEER            SITE       DOMAIN PEER                                    PRIV  PEER                                    PUB                                           GROUP
TYPE    PROT SYSTEM IP       ID         ID     PRIVATE IP                              PORT  PUBLIC IP                               PORT  LOCAL COLOR     PROXY STATE UPTIME      ID
----------------------------------------------------------------------------------------------------------------------------------------------------------------------------------------
vsmart  dtls 172.16.1.103    1          1      10.1.0.3                                12446 10.1.0.3                                12446 biz-internet    No    up     0:00:00:52  0
vbond   dtls 0.0.0.0         0          0      10.1.0.2                                12346 10.1.0.2                                12346 biz-internet    -     up     0:00:02:24  0
vbond   dtls 0.0.0.0         0          0      10.1.0.2                                12346 10.1.0.2                                12346 public-internet -     connect            0
vmanage dtls 172.16.1.101    1          0      10.1.0.1                                12646 10.1.0.1                                12646 biz-internet    No    up     0:00:02:20  0
The output above shows that we have a connection with all controllers.
Hello Sycor
I have been unable to find any definitive information about this particular error in specific Cisco documentation. However, my understanding is that the
... Continue reading in our forumtclshcommand is only available in non-controller devices. Controller devices are the vManage, vBond, and the vSmart devices. The “controller mode” here I assume referrs to the fact that the device detects that it is in one of these three other modes, which don’t support the TCL shell. Make sure that the rest of your configurations are set up as in the lesson to ensure that the device is not runHello Jason
cEdge and vEdge devices are inherently different. cEdge devices are Cisco-based ISRs or ASRs while vEdge devices are purpose-built SD-WAN devices developed by Viptela (the company Cisco acquired that had SD-WAN solutions). So unavoidably, the method of implementation, syntax, and commands, will be somewhat different. For a more comprehensive outline of the differences between these two devices, take a look at this NetworkLessons note on the topic of vEdge vs cEdge.
Since the syntax is different the way that the VPN0 (underlay network) is configur
... Continue reading in our forumHello Srinivasan
Using Guestshell on a Cisco IOS XE-based cEdge device can be a useful workaround for handling certificates during SD-WAN onboarding. If the automated process is not feasible or the cEdge cannot directly reach the CA, Guestshell allows you to generate certificate signing requests (CSRs), store certificates locally, and transfer them manually. However, since Guestshell does not act as a CA, certificates still need to be signed externally before installation. This approach provides flexibility in certificate management when direct CA access is una
... Continue reading in our forumHello, I’ve followed the lesson but I’m unable to see my cEdge in vManage. I have connecitivity (I ping from cEdge to all controllers and vice versa) but they’re still not showing in vManage. I’m running Version 16.12.02r on the edges.
Can you please assist me?