Lesson Contents
If you want to learn Cisco SD-WAN and do some labs then you have two options:
- Use one of the free Cisco Devnet sandboxes.
- Build your own lab.
The sandboxes are great if you want to jump right into testing things like policies, templates, or the REST API. You don’t have to worry about building a topology and setting everything up.
However, if you are new to SD-WAN then building everything from scratch is a good idea. You’ll learn how everything works right from the beginning and once it’s up and running, it’s always available to you. You will also be able to connect devices to your lab that the sandboxes don’t provide. In this lesson, we’ll configure the required controllers:
- vManage
- vBond
- vSmart
You can learn more about what these controllers do in our introduction to SD-WAN lesson.
Once you finish this lesson, the controllers are up and running and you are ready to onboard vEdge routers.
Configuration
Let me give you an overview of what we are going to do. When you boot the vManage, vBond, or vSmart controllers for the first time, you will only have access to the CLI. On each controller, we have to configure two items:
- System configuration: A basic configuration where we specify things such as a hostname, organization name, and some other items.
- VPN0 interface: This is the overlay network.
With a basic configuration, the controllers will have network reachability and can talk to each other. The other thing we have to take care of are certificates. Cisco SD-WAN requires certificates on each and every device. To create certificates, we’ll set up a new root CA and sign certificates ourselves for all controllers (and vEdge routers once we finish the installation of the controllers).
Setting everything up is not too difficult once you understand the steps but it is time-consuming.
Here is the topology we’ll use:
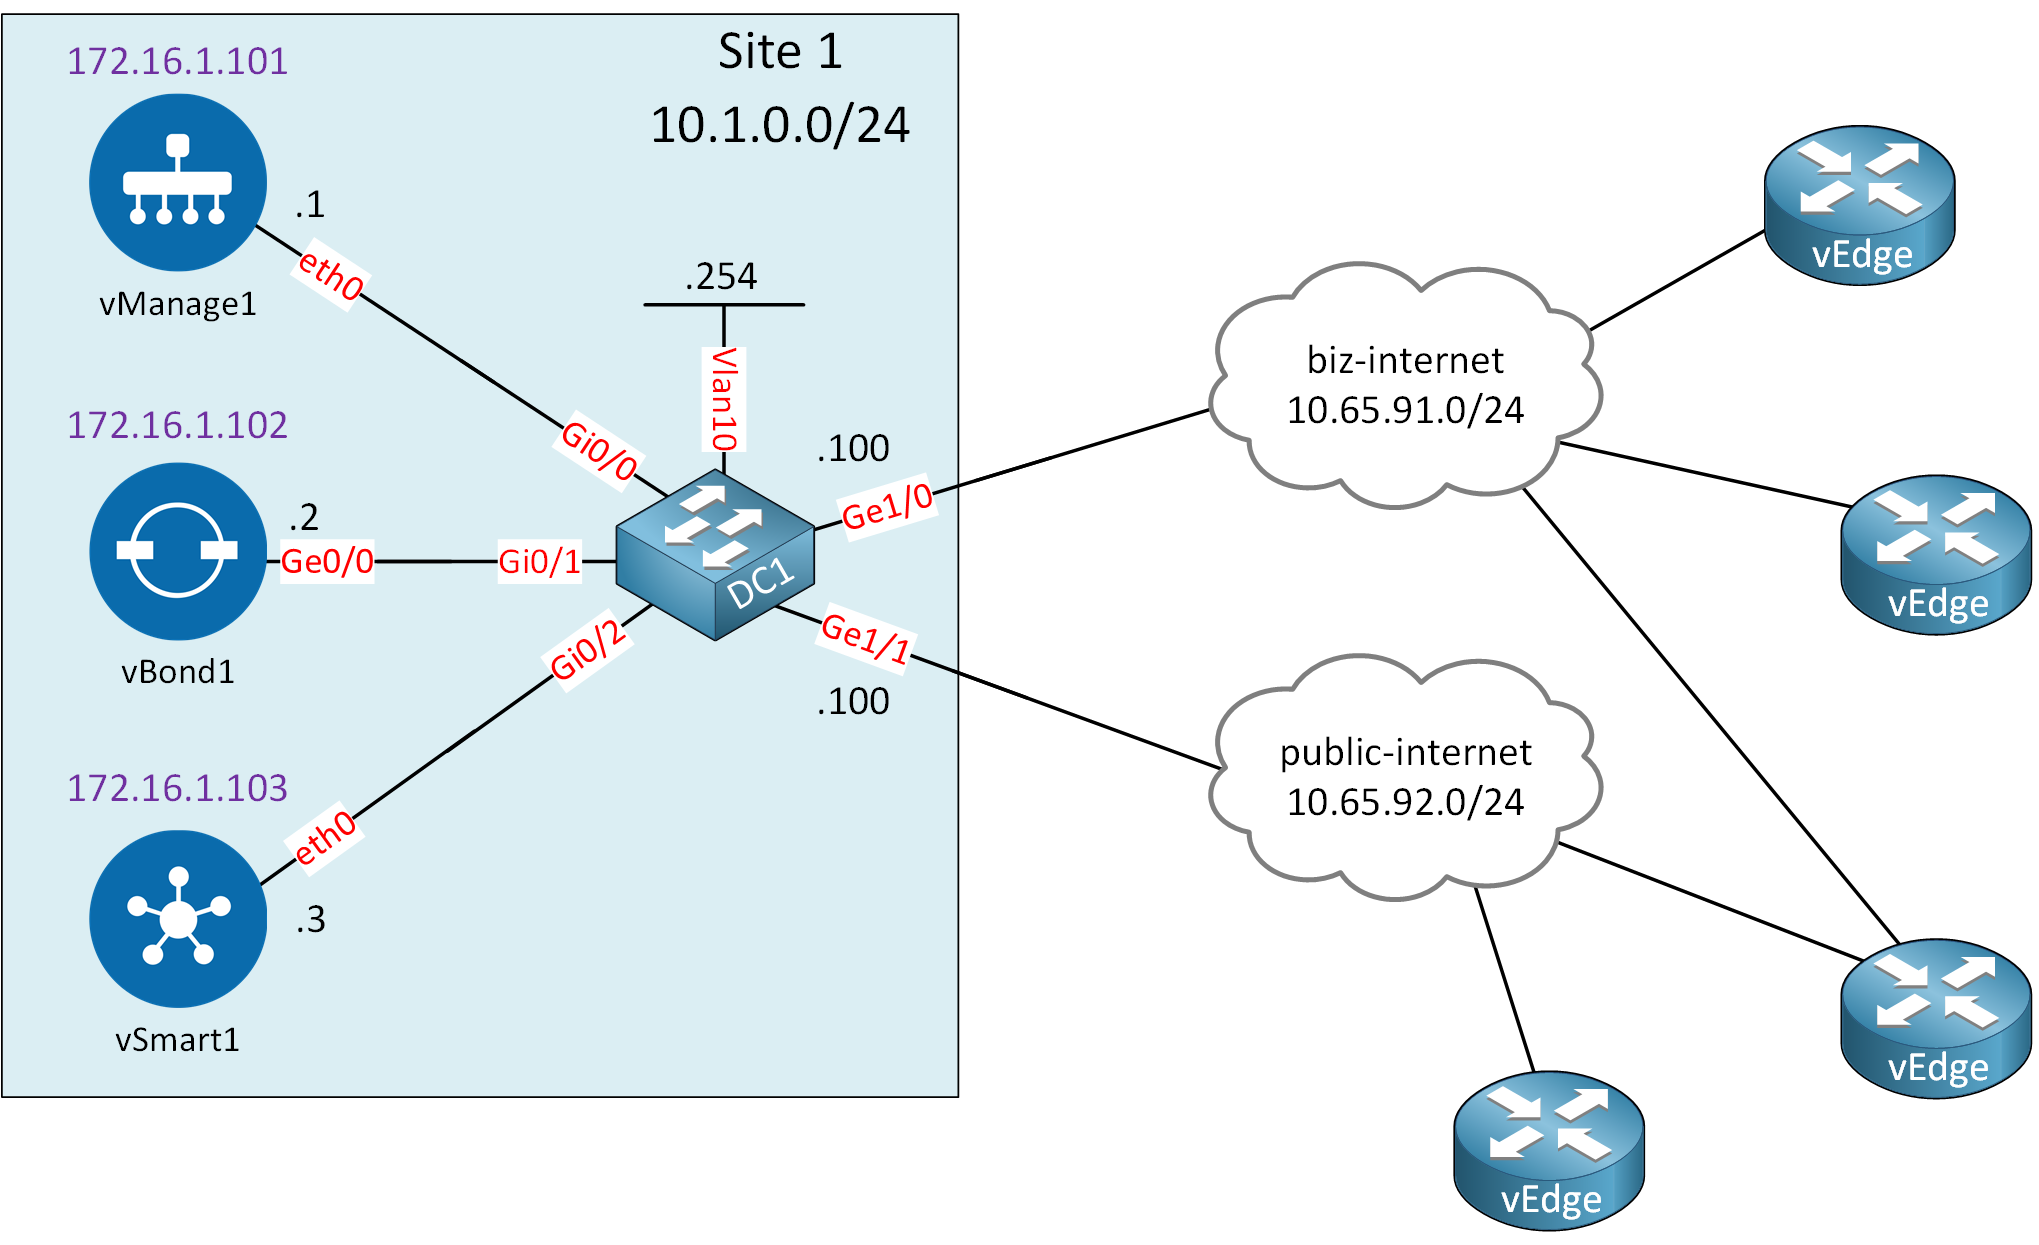
Let me explain what we have:
- Site 1:
- This is where we add our controllers:
- vManage
- vBond
- vSmart
- System IPs:
- The addresses in purple are not IP addresses but system IPs.
- Each Cisco SD-WAN requires a unique system IP that is similar to a router ID like you use in OSPF or BGP.
- You can’t use this address anywhere else, not even on a physical interface.
- DC1:
- This is an IOS switch I use to connect the controllers to the same VLAN (10).
- The switch connects to two different “clouds” to simulate two different ISPs.
- This is where we add our controllers:
- Internet connectivity:
- Clouds:
- biz-internet: This cloud simulates a “business class” Internet connection. In reality, it connects to a VLAN on my office network which provides Internet access.
- public-internet: This cloud simulates a “normal” Internet connection. In reality, it connects to another VLAN on my office network which provides Internet access.
- Clouds:
- vEdges: the vEdge routers connect through one of the two Internet connections to reach our controllers.
I’m using the Cisco SD-WAN Release 19.3.x images for this lab. Under the hood, I am using Eve-NG.
vManage
Let’s start with vManage. This is our NMS (Network Management System) where we control and monitor our SD-WAN network once everything is up and running.
Startup Configuration
Let’s log in. The default username and password is “admin”:
vmanage login: admin
Password:
Welcome to Viptela CLI
admin connected from 127.0.0.1 using console on vmanage
You must set an initial admin password.
Password:
Re-enter password:
The first time you log in you get a message that you have to select a storage device. I use the 100GB drive that I created when I built the entire topology in Eve-NG:
Available storage devices:
vdb     100GB
hdc     3GB
1) vdb
2) hdc
Select storage device to use: 1
Would you like to format vdb? (y/n): y
mke2fs 1.43.8 (1-Jan-2018)
Creating filesystem with 26214400 4k blocks and 6553600 inodes
Filesystem UUID: 55c71c51-4e3d-4f74-96cb-cee2c32917f2
Superblock backups stored on blocks:
        32768, 98304, 163840, 229376, 294912, 819200, 884736, 1605632, 2654208,
        4096000, 7962624, 11239424, 20480000, 23887872

Allocating group tables: done
Writing inode tables: done
Creating journal (131072 blocks): done
Writing superblocks and filesystem accounting information: done

wall: cannot get tty name: Success

Broadcast message from root@vmanage (somewhere) (Thu Jul  8 13:36:31 2021):

13:44:26.454 §Thu Jul  8 13:36:31 UTC 2021: The system is going down for reboot NOW!
Once it’s done formatting the drive, the vManage controller reboots. This can take a few minutes. Once you see the following message you can log in again:
System ReadyIf you don’t see this message then you will be able to log in but it throws an authentication failure:
viptela 19.3.0

vmanage login: admin
Password:

System Initializing. Please wait to login...


Authentication failure
Once you are logged in you see the # symbol. This tells us we are in the CLI mode:
vmanage#Let’s start with a basic system configuration:
vmanage(config)# system
vmanage(config-system)# host-name vManage1
vmanage(config-system)# system-ip 172.16.1.101
vmanage(config-system)# site-id 1
vmanage(config-system)# organization-name nwl-lab-sdwan
vmanage(config-system)# vbond 10.1.0.2
vmanage(config-system)# exit
And let’s configure the VPN0 interface:
vmanage(config)# vpn 0
vmanage(config-interface-eth0)# ip route 0.0.0.0/0 10.1.0.254
vmanage(config-vpn-0)# interface eth0
vmanage(config-interface-eth0)# ip address 10.1.0.1/24
vmanage(config-interface-eth0)# no shutdown
vmanage(config-interface-eth0)# tunnel-interface
vmanage(config-tunnel-interface)# allow-service all
vmanage(config-tunnel-interface)# exit
vmanage(config-interface-eth0)# exit
vmanage(config-vpn-0)# exit
vmanage(config)#
The VPN0 configuration requires some explanation:
- The
tunnel-interfacecommand configures the eth0 interface as a tunnel interface. - The
allow-service allcommand allows all traffic over the VPN0 interface. By default, only DTLS, TLS, and IPSec (for vEdges) traffic is allowed. This will be useful later in our lab.
Before the configuration becomes active, we have to commit it:
vmanage(config)# commit
Commit complete.
Certificates
As I explained at the beginning of this lesson, Cisco SD-WAN requires certificates on all devices. When you generate your own certificates you have different options. For example, some different options are:
- Cisco IOS router.
- Linux box.
- Windows server.
All Cisco SD-WAN controllers run Linux and come with some useful commands, including OpenSSL. I’m going to use the openssl command on the vManage controller to generate every certificate we need.
You can use the vshell command to access the Linux commands. For a detailed explanation of how to build your own CA, you can always check the openssl ca server lesson.
Root CA Certificate
First, we need to create a root CA and the first step is to generate a private key. Let’s open vshell:
vManage1# vshell
vManage1:~$
Notice how the # changes to a $. We are now in the home folder:
vManage1:~$ pwd
/home/admin
Let’s generate a private key and call it ROOT-CA.key:
vManage1:~$ openssl genrsa -out ROOT-CA.key 2048
Generating RSA private key, 2048 bit long modulus
.........
......
e is 65537 (0x10001)
Use the following one-liner to create a root CA certificate using the private key we just created:
vManage1:~$ openssl req -x509 -new -nodes -key ROOT-CA.key -sha256 -days 3652 \
-subj "https://cdn.networklessons.com/C=NL/ST=NL/O=nwl-lab-sdwan/CN=vmanage1.lab.nwl.ai" \
-out ROOT-CA.pem
This root certificate is valid for 10 years. You can set the subject if you want. In the output above I showed how you can do that but it’s not a requirement.
Let’s take a look at our certificate with the cat command:
vmanage:~$ cat ROOT-CA.pem
-----BEGIN CERTIFICATE-----
MIIDczCCAlugAwIBAgIJAL0YvJsnyG61MA0GCSqGSIb3DQEBCwUAMFAxCzAJBgNV
BAYTAk5MMQswCQYDVQQIDAJOTDEWMBQGA1UECgwNbndsLWxhYi1zZHdhbjEcMBoG
A1UEAwwTdm1hbmFnZTEubGFiLm53bC5haTAeFw0yMTA3MDgxMzUxMTNaFw0zMTA3
MDgxMzUxMTNaMFAxCzAJBgNVBAYTAk5MMQswCQYDVQQIDAJOTDEWMBQGA1UECgwN
bndsLWxhYi1zZHdhbjEcMBoGA1UEAwwTdm1hbmFnZTEubGFiLm53bC5haTCCASIw
DQYJKoZIhvcNAQEBBQADggEPADCCAQoCggEBALXqecoq4L19Stwbz92iDr7X0o20
Uq1sMKKsDVIKRrJW78kIP+tJD3qb9iuKSsViqlOY7nqT96306adKRJtcx002f4gN
ETiY/APhk3R5ryTuEPJ5dnDa2TYtjUbsK4/f54RBWjBeMvm8x2g+/xYMKaYrPU6+
VYY8HR2idPF/q5B7mg7Thpr16qbmDM5F2MxK8WZFqPjRg0fyIzK5T/tb82PuTJpE
+MFxv2BYsW/xZbfu1jXZnCj/6OaoaJ0j0ZYX0JGd8TnNglCSxjL5OpC2PKKwlqrr
1Xq/hg5L9NMRHCCFr0616HZkw9Okr47R2kmXsemP6y40ydm+XwkYPzHGJ4sCAwEA
AaNQME4wHQYDVR0OBBYEFBv1C14HVrF0H2kMrzfrjtr23fxKMB8GA1UdIwQYMBaA
FBv1C14HVrF0H2kMrzfrjtr23fxKMAwGA1UdEwQFMAMBAf8wDQYJKoZIhvcNAQEL
BQADggEBAFnwbs5RaUQs8d9SSGZ/YDCCxFf+T4QdQGhkH2E8gb5sKC/VW8bvTcjT
65ac0DUkhVnBWCShVCia5egzyqUzpYdrOcRPZh5RiLecU2ekvOHsm1PiQctnPehL
eDTw+Ft0IAuQMrHO7rwquV1JQyuPQEBIabSTwrDn3dQh61nuFk9qGb8mcwzqrQ7Z
sRXYOUwT9awMP5UKx3j6jt3vN5xvpeShd9H5scww0NyUew5ucd8raO4Jb/LKLIgJ
E9TuBX2Wv9RhM5Bcv1iznUe+hcvsHUrfRhysZetbftJ5Z80QIfcaLWLjPe6kASRr
q9JEcuKO1OoJOgDuWe8BqYVYruBn+cU=
-----END CERTIFICATE-----
Now it’s time to open the vManage GUI. This is where we need to install the certificate.
Open a web browser and enter the URL https://10.1.0.1:8443/. You’ll see the following screen:
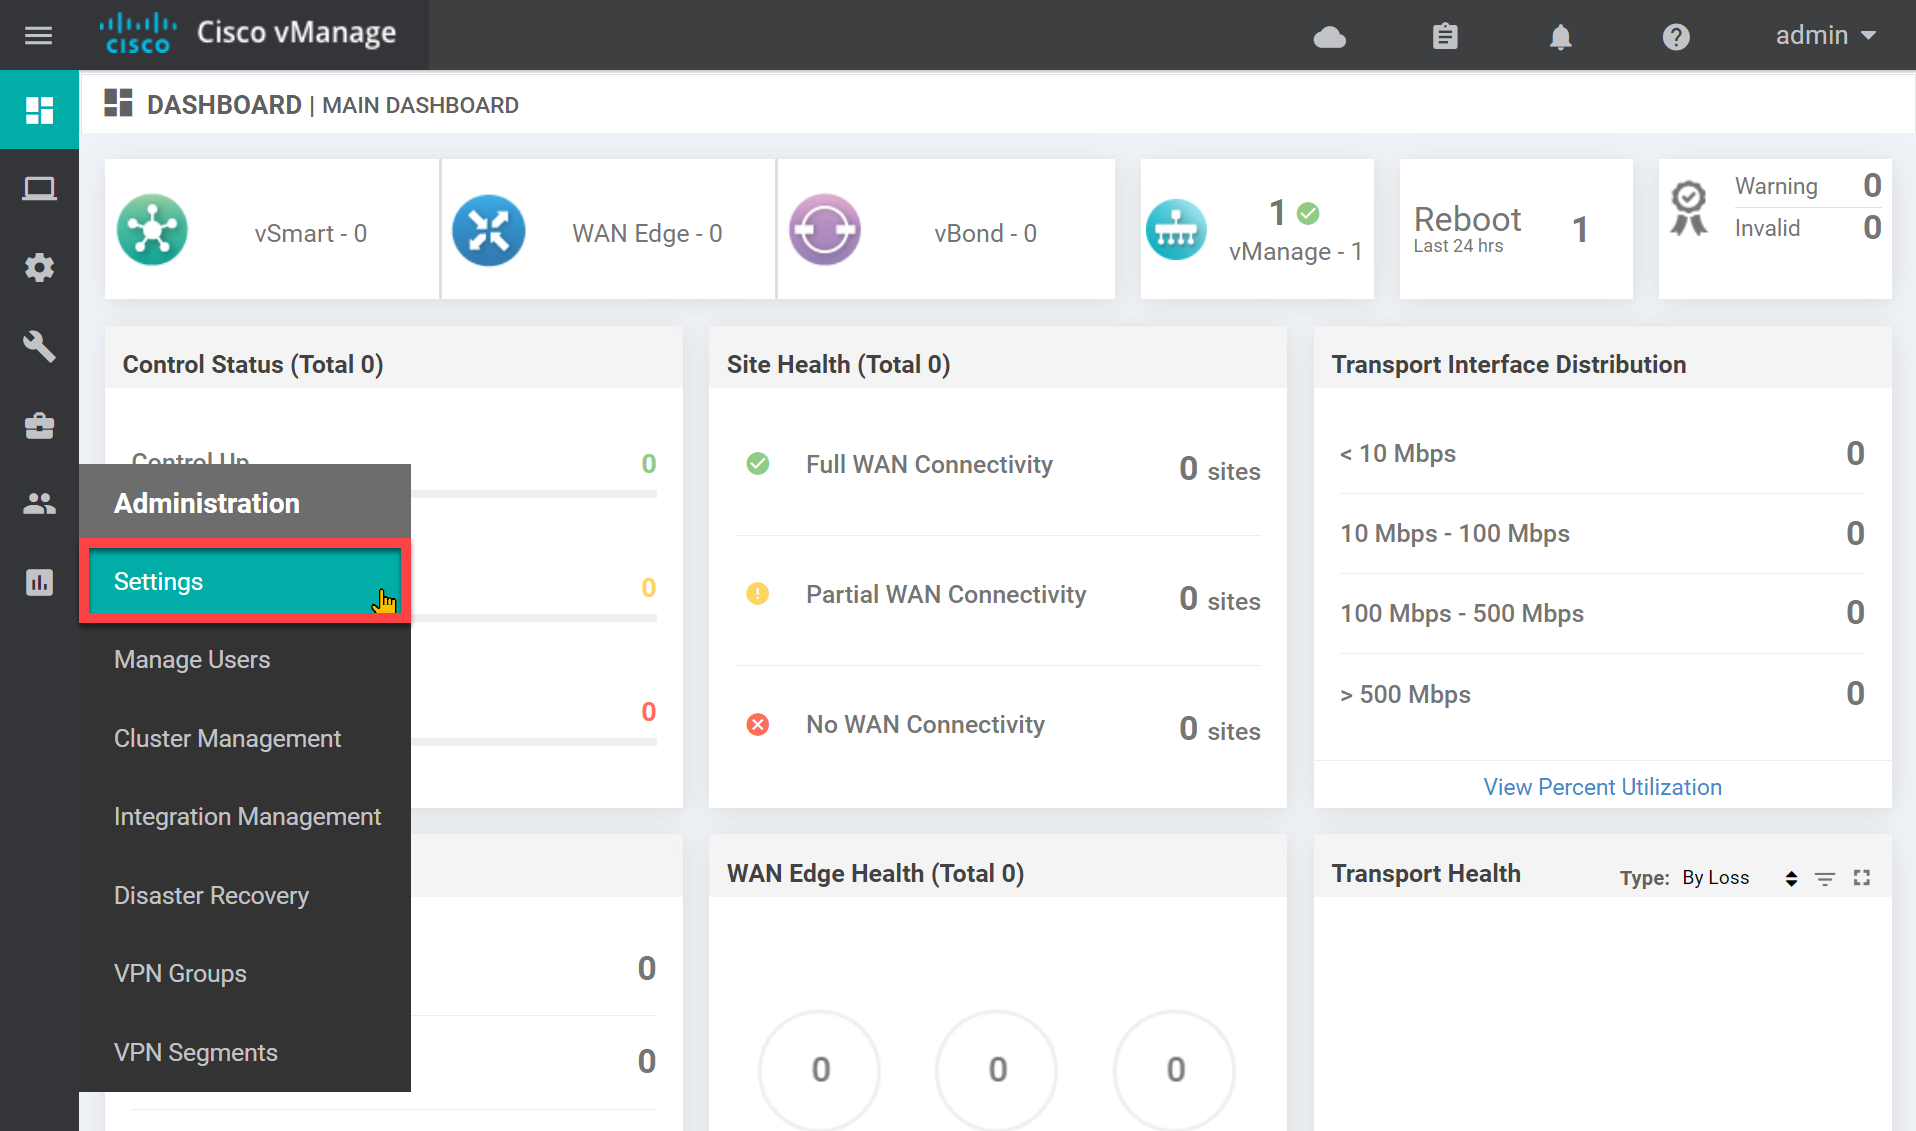
Log in with username and password “admin” and you’ll end up at the main dashboard. Go to Administration > Settings:
While we are here, we need to change two settings that don’t have anything to do with the root CA certificate but that we do have to change. Look for the organization name:
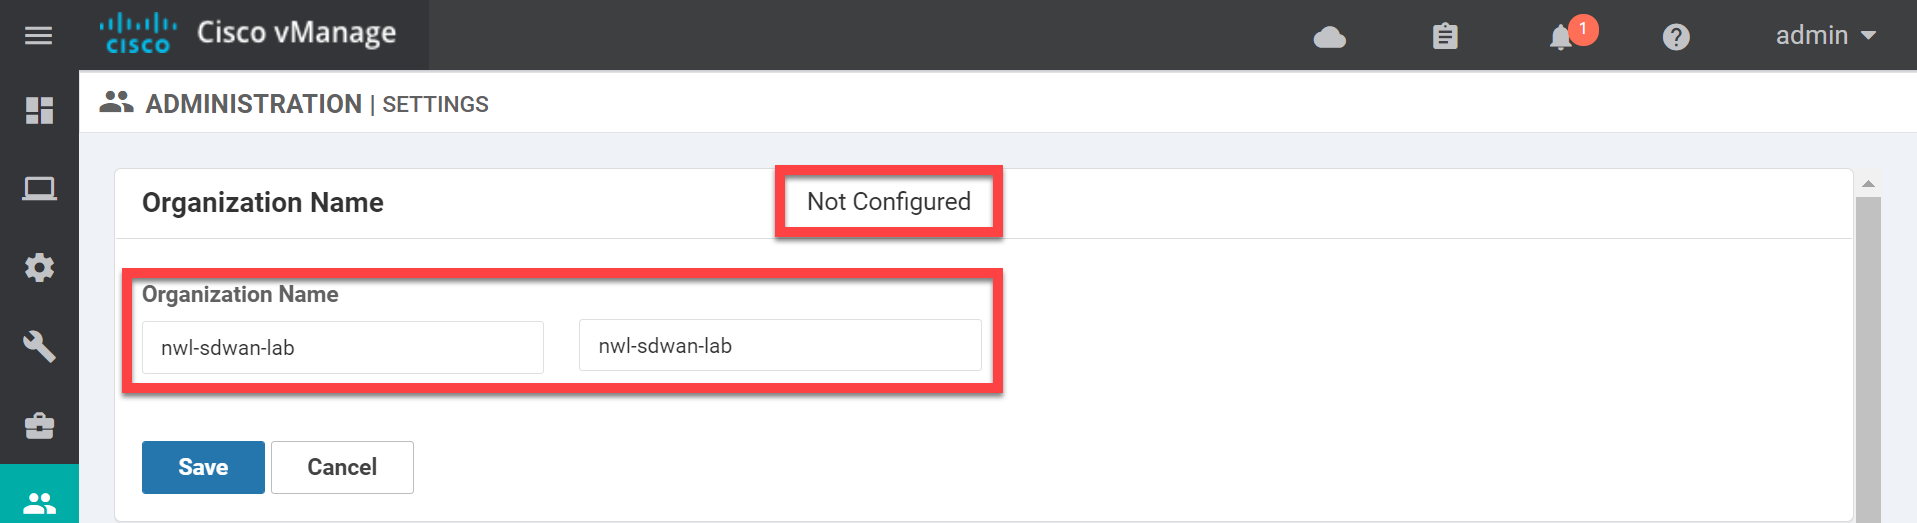
Set the Organization name and click on Save. Now open the vBond settings:
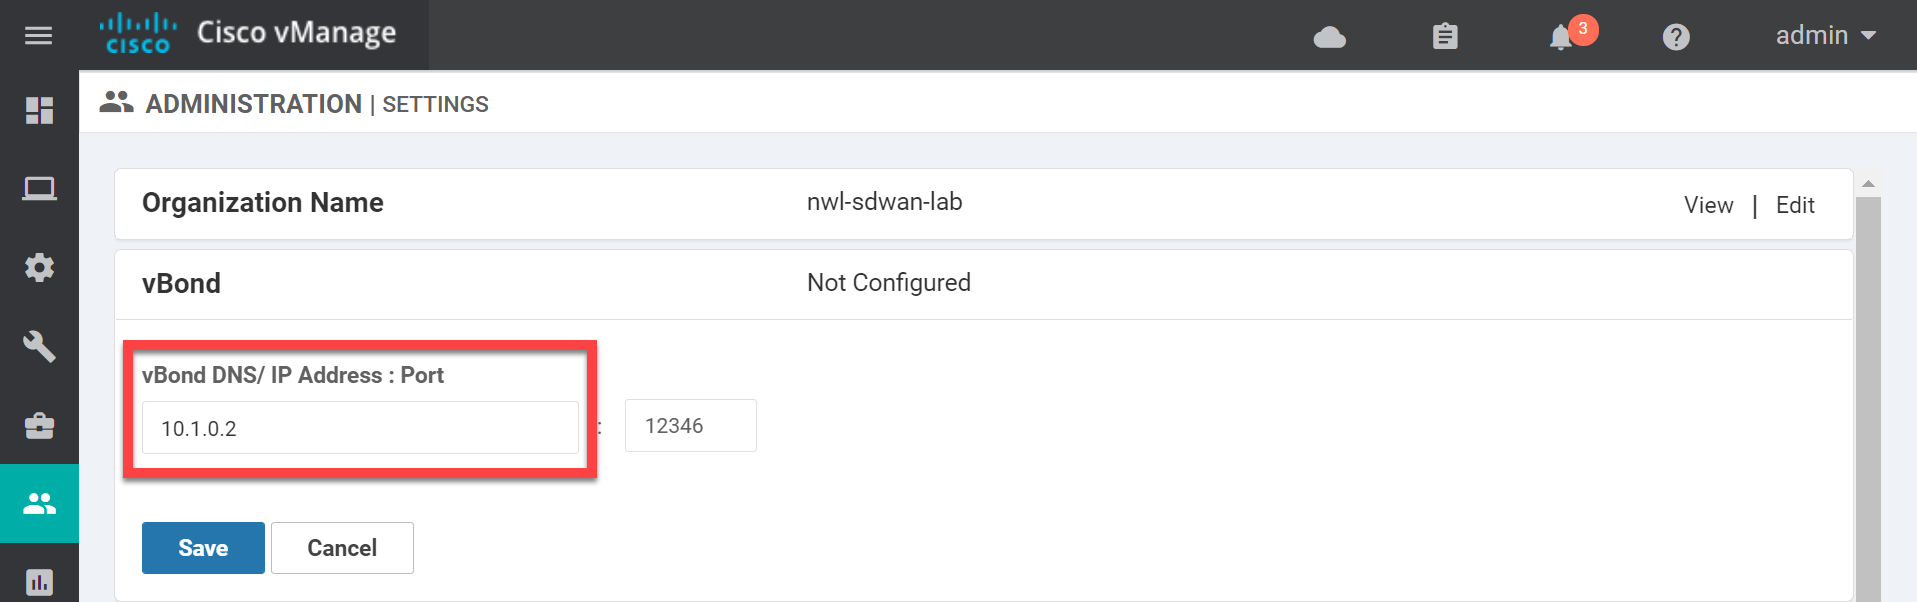
Enter the IP address of the vBond orchestrator and click on Save. Now look for Controller Certificate Authorization:
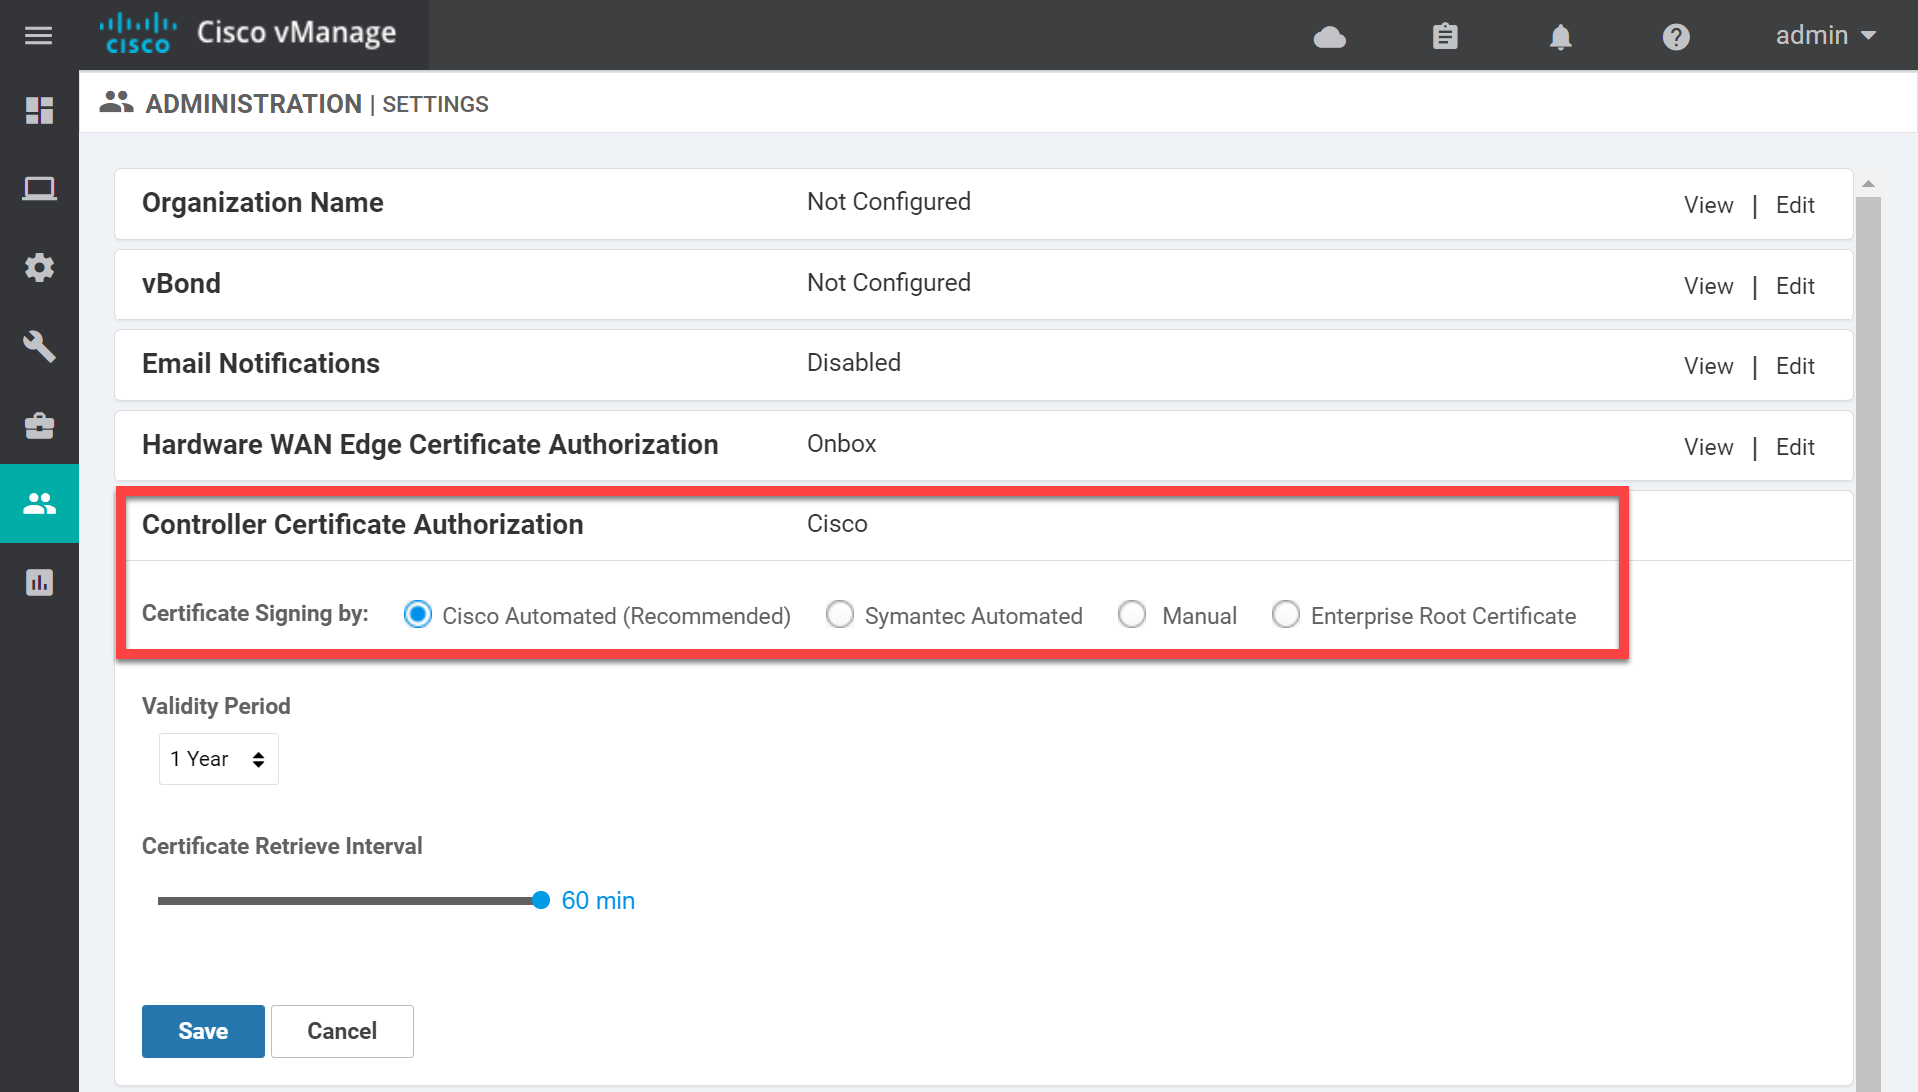
The default setting is Cisco Automated. If you use Cisco SD-WAN in a production network you can have all your certificates signed automatically. We are not so lucky for our home lab so change it to Enterprise Root Certificate and paste the contents of the ROOT-CA.pem file here:
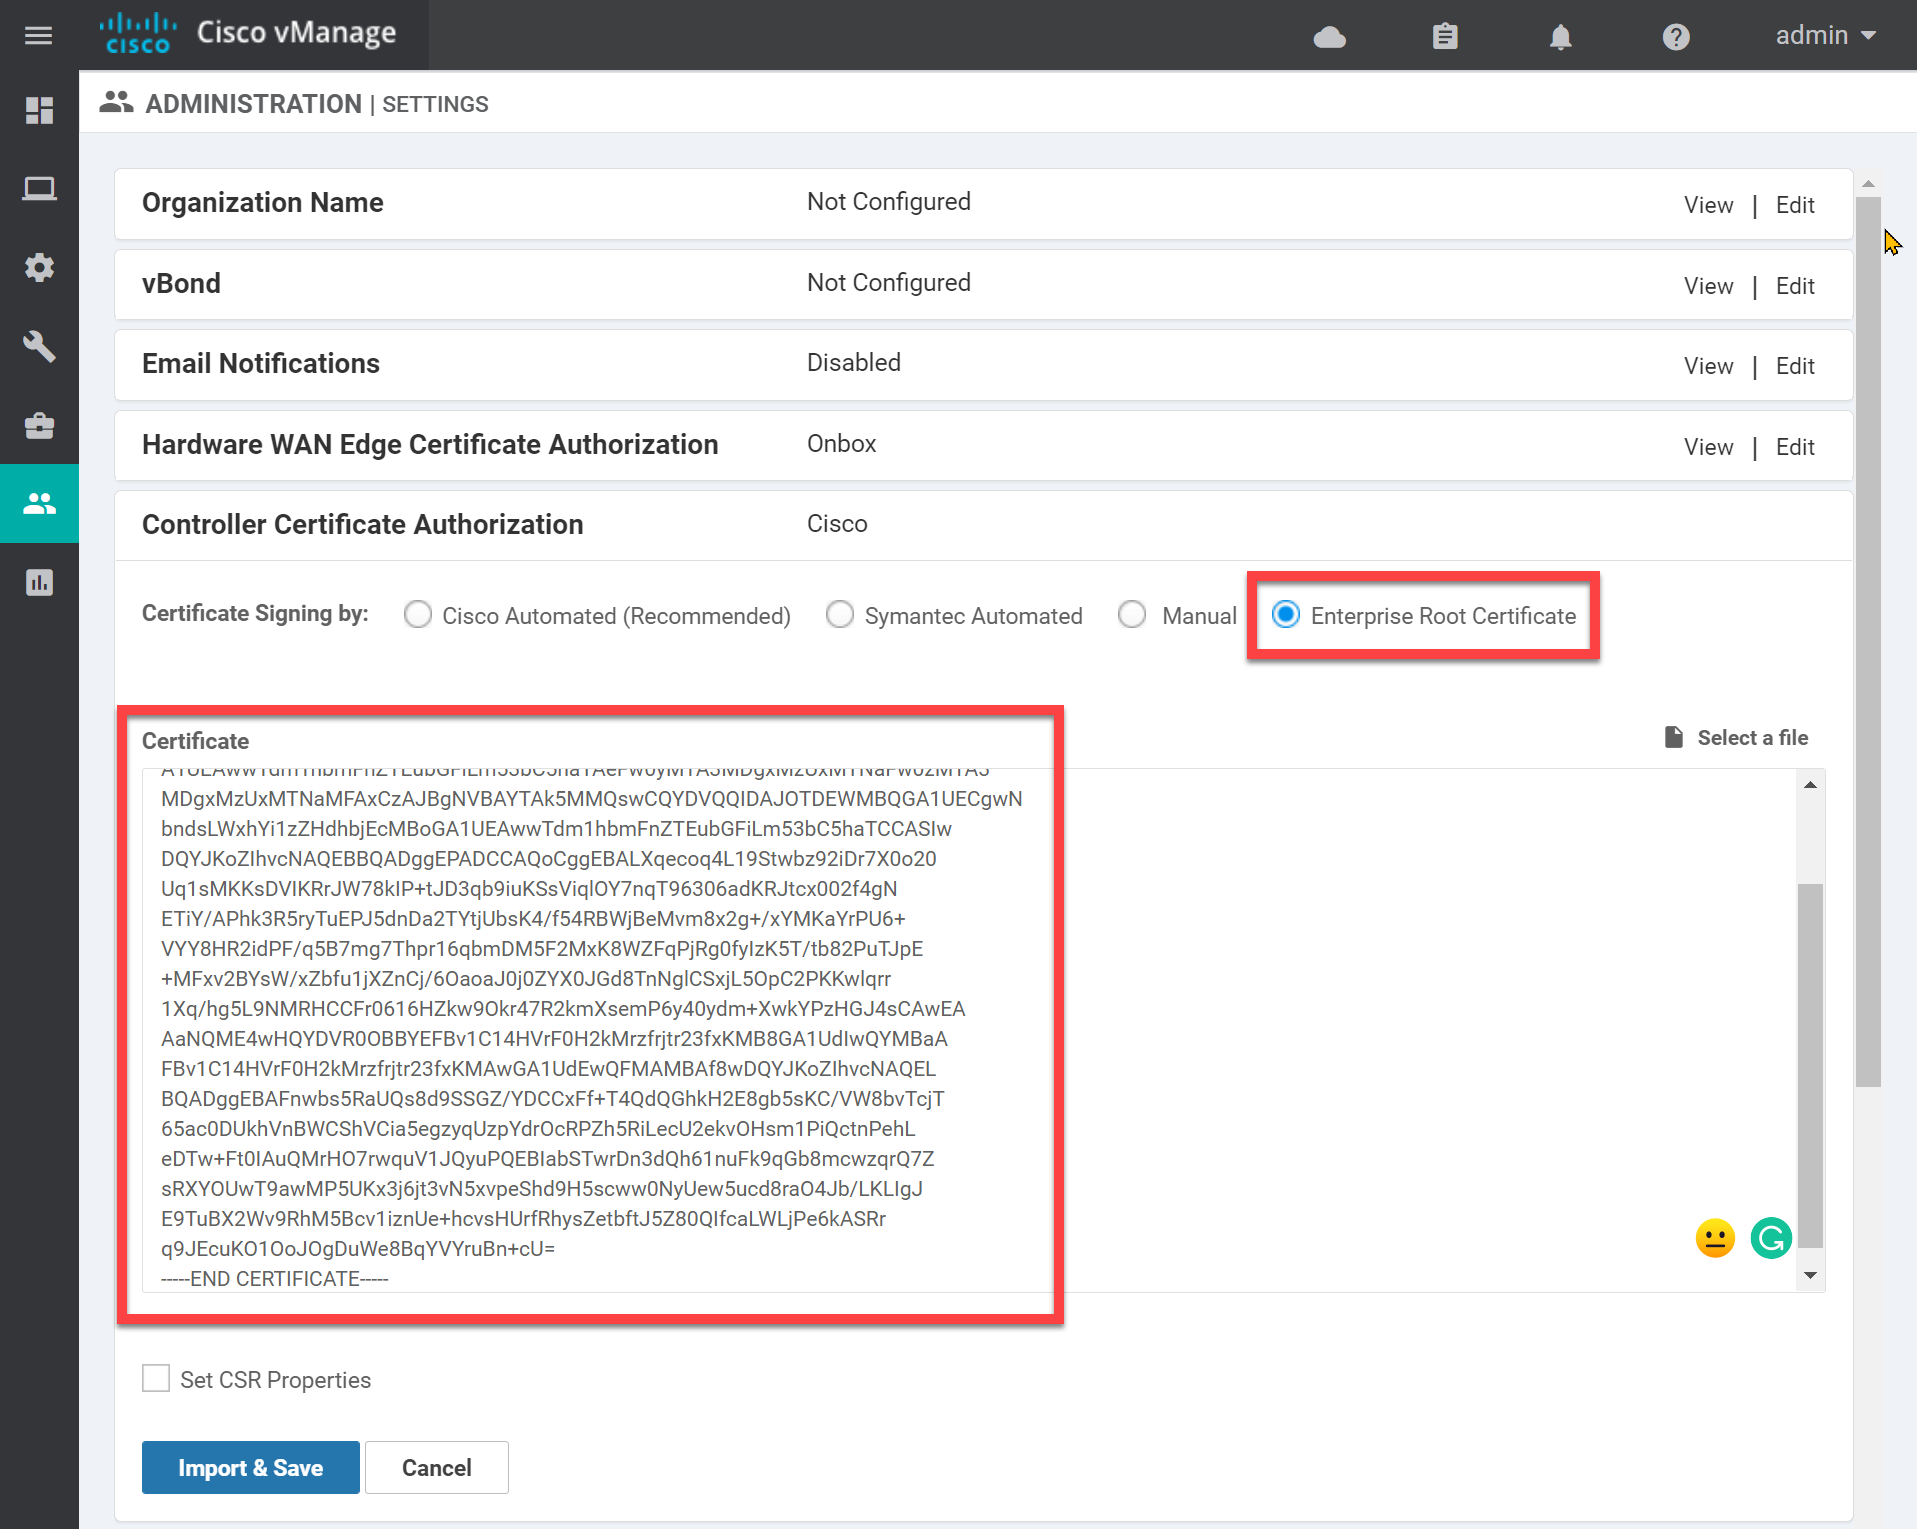
Click Import & Save.
vManage Certificate
Now it’s time for the vManage certificate. Head over to Configuration > Certificates > Controllers > vManage > Generate CSR:

You’ll see a pop-up which shows the CSR:
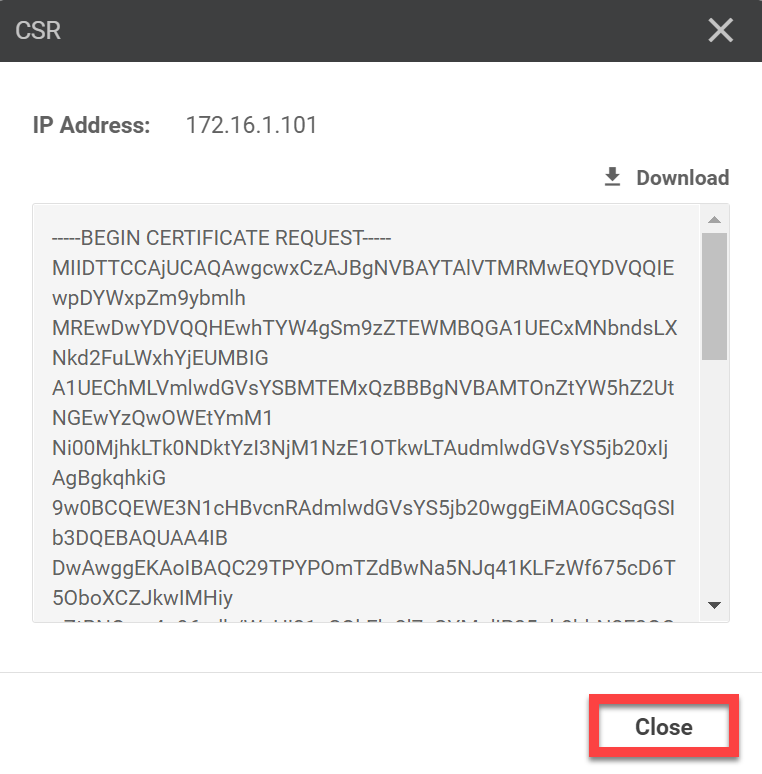
You don’t have to download or copy and paste to your clipboard because it’s saved locally automatically. Let me show you. We’ll open vshell on our vManage controller:
vManage1# vshellTake a look at the contents of our home folder:
vManage1:~$ ls -lh
total 16K
-rw-r--r-- 1 admin admin 1.7K Jul  8 13:50 ROOT-CA.key
-rw-r--r-- 1 admin admin 1.3K Jul  8 13:51 ROOT-CA.pem
-rw-r--r-- 1 admin admin  394 Jul  8 13:40 archive_id_rsa.pub
-rw-r--r-- 1 root  root  1.2K Jul  8 14:14 vmanage_csr
The CSR is saved automatically in /home/admin as vmanage_csr.
Let’s sign a certificate. You can use the following openssl command:
vManage1:~$ openssl x509 -req -in vmanage_csr \
>     -CA ROOT-CA.pem -CAkey ROOT-CA.key -CAcreateserial \
>     -out vmanage1.crt -days 1826 -sha256
Signature ok
subject=/C=US/ST=California/L=San Jose/OU=nwl-lab-sdwan/O=Viptela LLC/CN=vmanage-4a0c409a-bc56-428d-9449-c27635715990-0.viptela.com/emailAddress=support@viptela.com
Getting CA Private Key
In the output above, you can see it uses a default subject because I didn’t specify one. That’s no problem at all. We only care about a valid certificate.
Use cat to see the output:
vmanage:~$ cat vmanage1.crt
-----BEGIN CERTIFICATE-----
MIIDmTCCAoECCQCSxilWaQdcEjANBgkqhkiG9w0BAQsFADBQMQswCQYDVQQGEwJO
TDELMAkGA1UECAwCTkwxFjAUBgNVBAoMDW53bC1sYWItc2R3YW4xHDAaBgNVBAMM
E3ZtYW5hZ2UxLmxhYi5ud2wuYWkwHhcNMjEwNzA4MTQxOTAyWhcNMjYwNzA4MTQx
OTAyWjCBzDELMAkGA1UEBhMCVVMxEzARBgNVBAgTCkNhbGlmb3JuaWExETAPBgNV
BAcTCFNhbiBKb3NlMRYwFAYDVQQLEw1ud2wtc2R3YW4tbGFiMRQwEgYDVQQKEwtW
aXB0ZWxhIExMQzFDMEEGA1UEAxM6dm1hbmFnZS00YTBjNDA5YS1iYzU2LTQyOGQt
OTQ0OS1jMjc2MzU3MTU5OTAtMC52aXB0ZWxhLmNvbTEiMCAGCSqGSIb3DQEJARYT
c3VwcG9ydEB2aXB0ZWxhLmNvbTCCASIwDQYJKoZIhvcNAQEBBQADggEPADCCAQoC
ggEBALb1M9g86ZNl0HA1rk0mrjUosXNZ/rvlwPpPk5uhcJkmTAgweLKBm0E1DCri
j3qx1v9awePzX5JCQWWjeXvIZgyqWI/zmiHRts3cTxALWtsvI7ndjyW4njE4zqJs
d1X1LPgf4oMUhY21JhZKUbXwXLuyY7TSaIbVVcGG4pLb/pCZLQBTag98Lb2k5uOl
hntrH0R2m3uipGLmHmVIMd3fJune8toubRfqq8tvnhtzxWpRYiXIQ8+psvvO13Y+
TCs2Umy7ZgGMp+NyXhGHtV4ZhRQbHV2wBrELp6JOkiEzylPxf31FImPSf0PTNpsV
R2o7Y+JZ4u8ljx1kqprwk6Dr49UCAwEAATANBgkqhkiG9w0BAQsFAAOCAQEAoa4f
OaOe8qSzmHy4/KL0idDgq6mgz7KcW9fn2HJMMYqiRt02Lrl4VG3XczTe2OWVsmCD
COj4000laRyQqlt1d7m0zyKd+gBcJC9ZS0NVyRhfMqqFOTEfU1+XsB6ZCkIrkuOd
vPGUpdwZqb5FewYUDSTZ+LG6Sr69TmP0ZfLIkckGwr178/TiSJgP8s9UVIoO0hvs
ffLroq5Aoa9unkKJIcsZ/vMgMJcaR8mCkuv0J9jk7uPpORvTbMaxpPq8TX4IbTZ9
cjNAPrheD9CtmUPzCC/1DAVbbQYGhIlw3ka04mdN+l7RwIOuokR9m1tCHBNUompL
H3Y1/nuTytOAar5Fig==
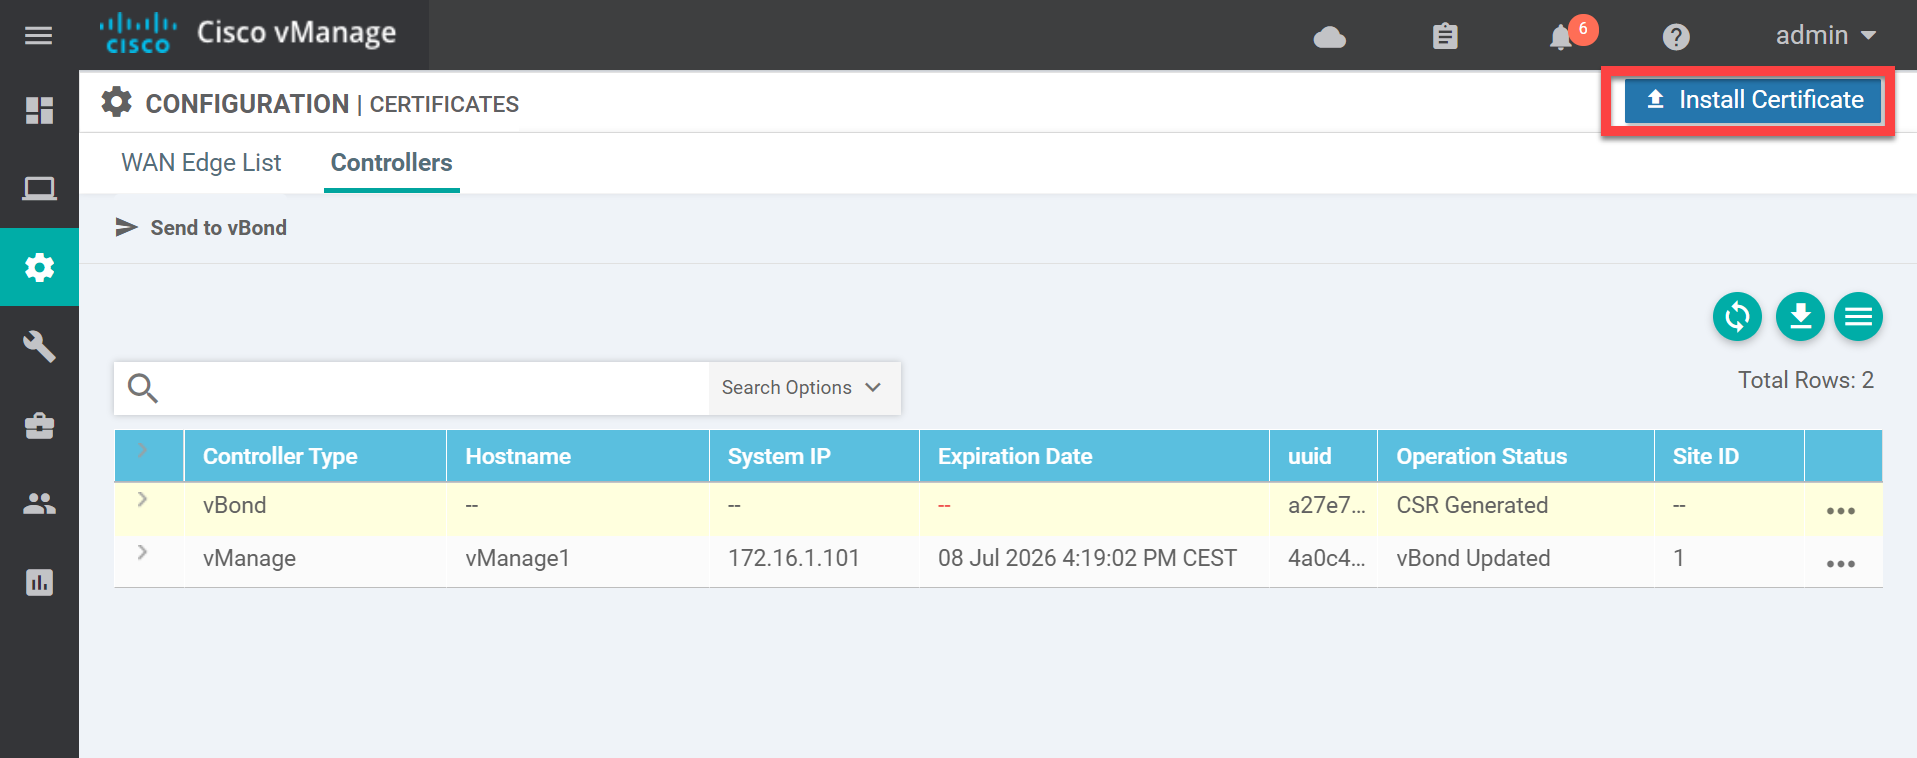
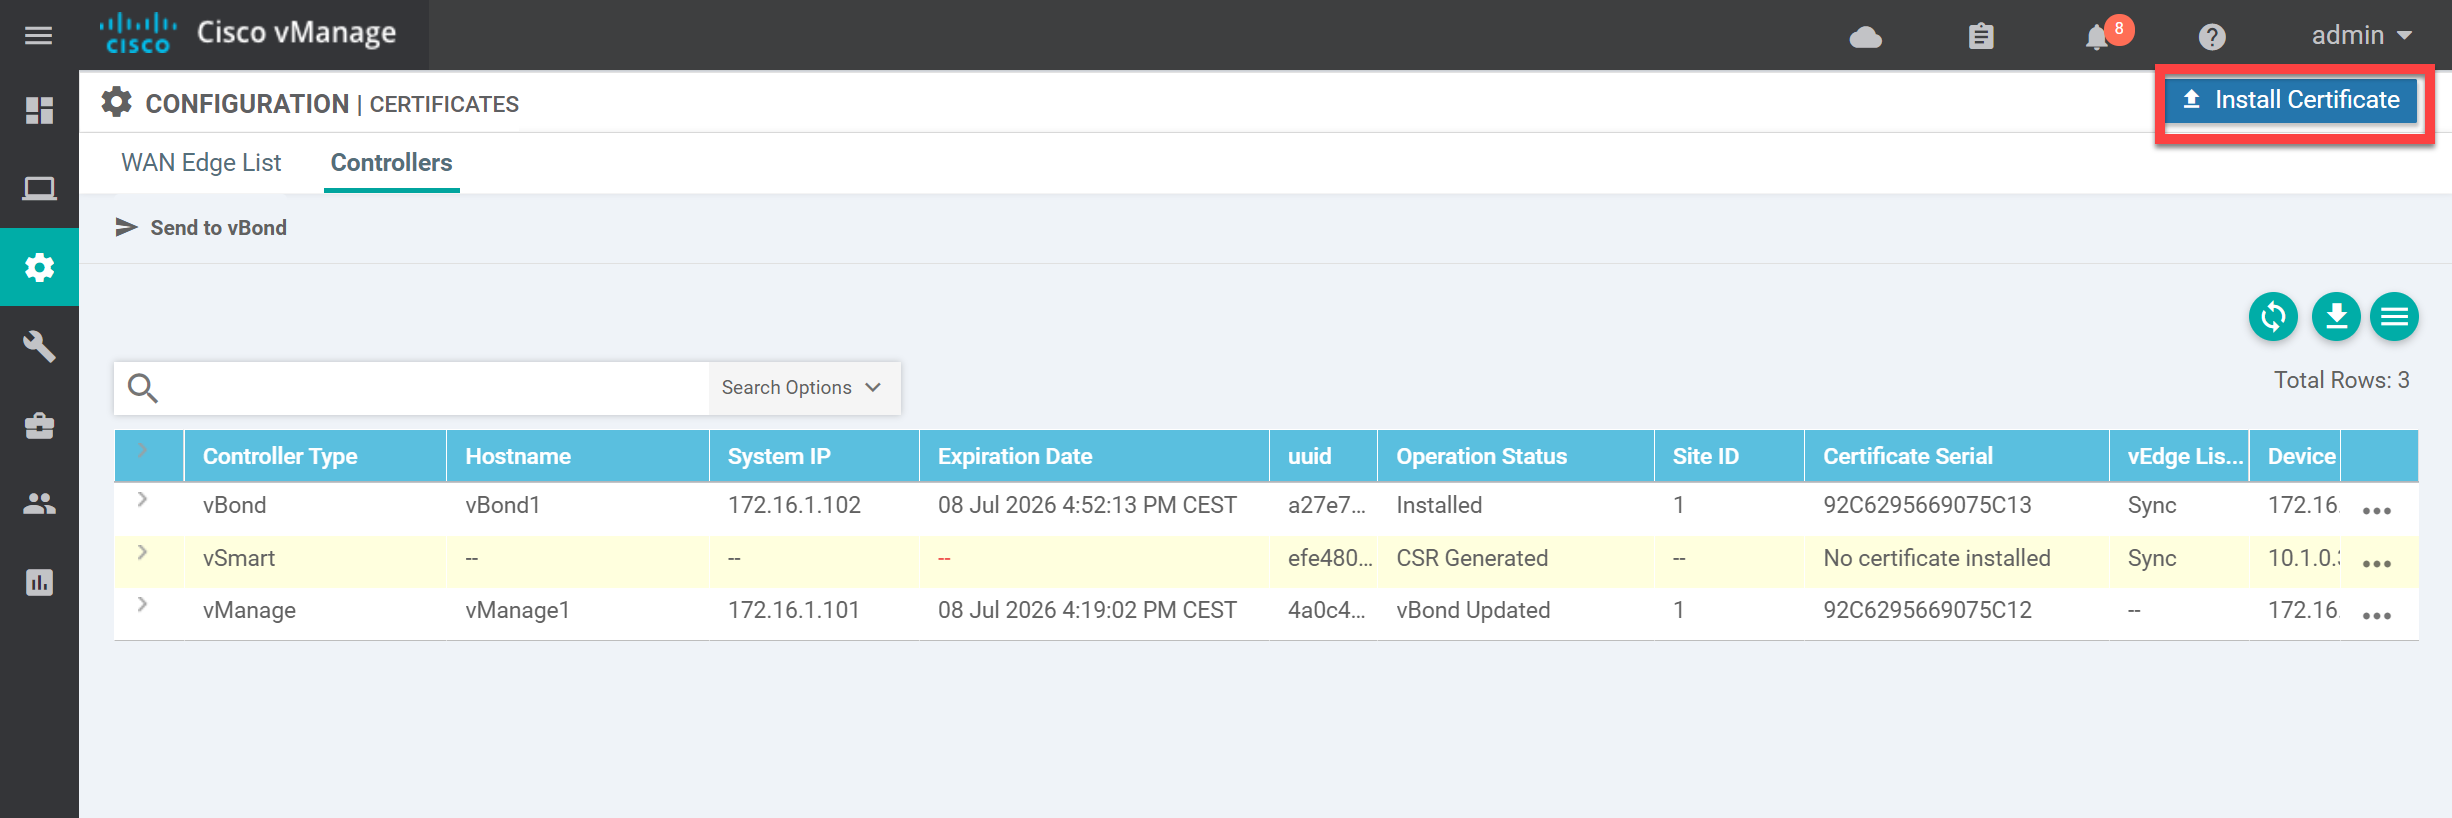
-----END CERTIFICATE-----Go back to the vManage GUI and click on Install Certificate. Paste the contents of the vmanage1.crt file here:
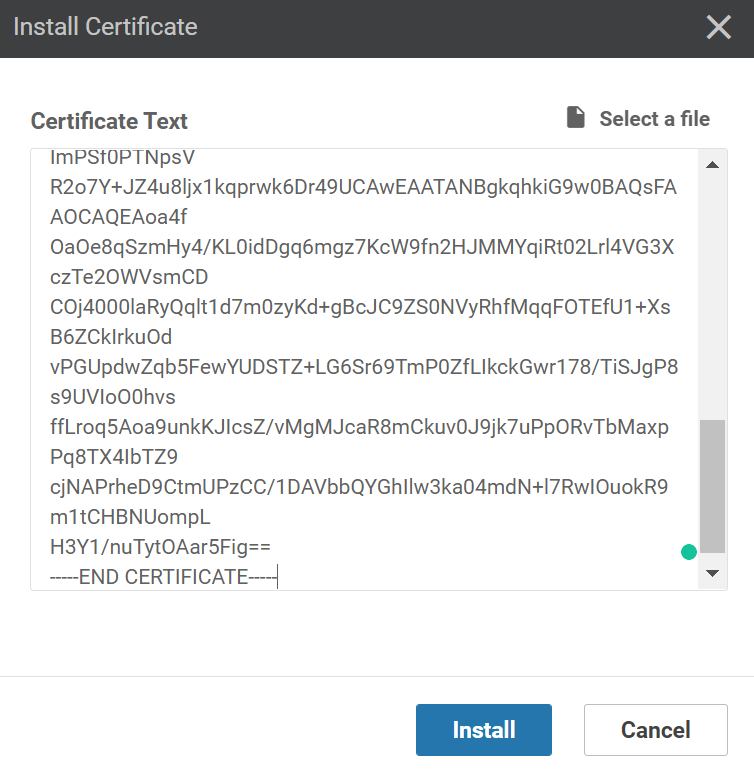
Click on Install. It might take a few seconds to install the certificate but once it does, you’ll see the Success message:
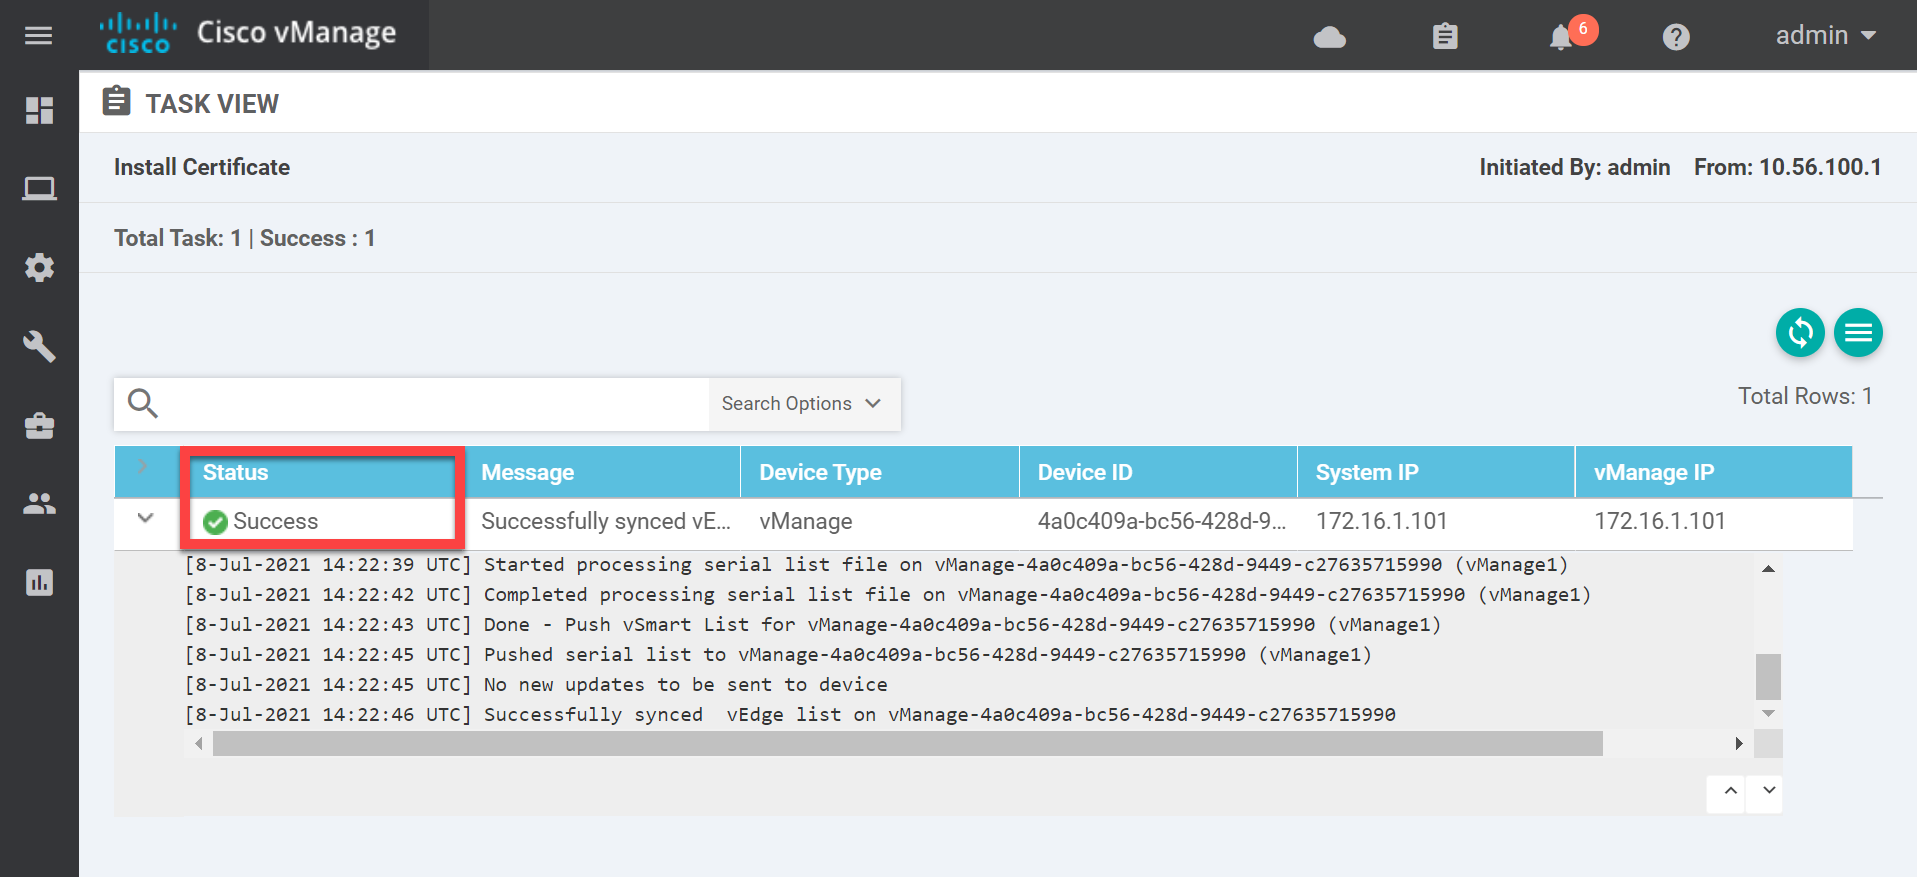
This completes the configuration of the vManage controller. Let me summarize what we just did:
- We created a new root CA:
- Generated a private key.
- Generated a root CA certificate.
- We created a certificate for the vManage controller:
- Generated a CSR.
- Signed the certificate on the CLI.
- Installed the certificate through the GUI.
One down, two to go. We have the vBond and vSmart controllers left!
vBond
vBond is the orchestrator in our SD-WAN network.
Startup Configuration
Let’s log in for the first time:
viptela 19.3.0

vedge login: admin
Password:
Welcome to Viptela CLI
admin connected from 127.0.0.1 using console on vedge
You must set an initial admin password.
Password:
Re-enter password:
The username and password is “admin”. If you look closely, you can see it shows “vedge”. This is because the vBond orchestrator and vEdge routers share the same image. We’ll start with the system configuration:
vedge(config)# system
vedge(config-system)# host-name vBond1
vedge(config-system)# system-ip 172.16.1.102
vedge(config-system)# site-id 1
vedge(config-system)# organization-name nwl-lab-sdwan
vedge(config-system)# vbond 10.1.0.2 local
vedge(config-system)# exit
The configuration above is similar to the vManage controller configuration except for the vbond command. We have to add the local parameter. This tells vBond that the local device is the vBond orchestrator.
Let’s continue with the VPN0 interface:
vedge(config)# vpn 0
vedge(config-vpn-0)# ip route 0.0.0.0/0 10.1.0.254
vedge(config-vpn-0)# interface ge0/0
vedge(config-interface-ge0/0)# ip address 10.1.0.2/24
vedge(config-interface-ge0/0)# tunnel-interface
vedge(config-tunnel-interface)# encapsulation ipsec
vedge(config-tunnel-interface)# allow-service all
vedge(config-tunnel-interface)# no shutdown
vedge(config-tunnel-interface)# exit
vedge(config-interface-ge0/0)# exit
vedge(config-vpn-0)# exit
vedge(config)# commit
Commit complete.
The VPN0 configuration is similar to the one on the vManage controller. One difference is that we have to specify the encapsulation type (GRE or IPSec) with the encapsulation command.
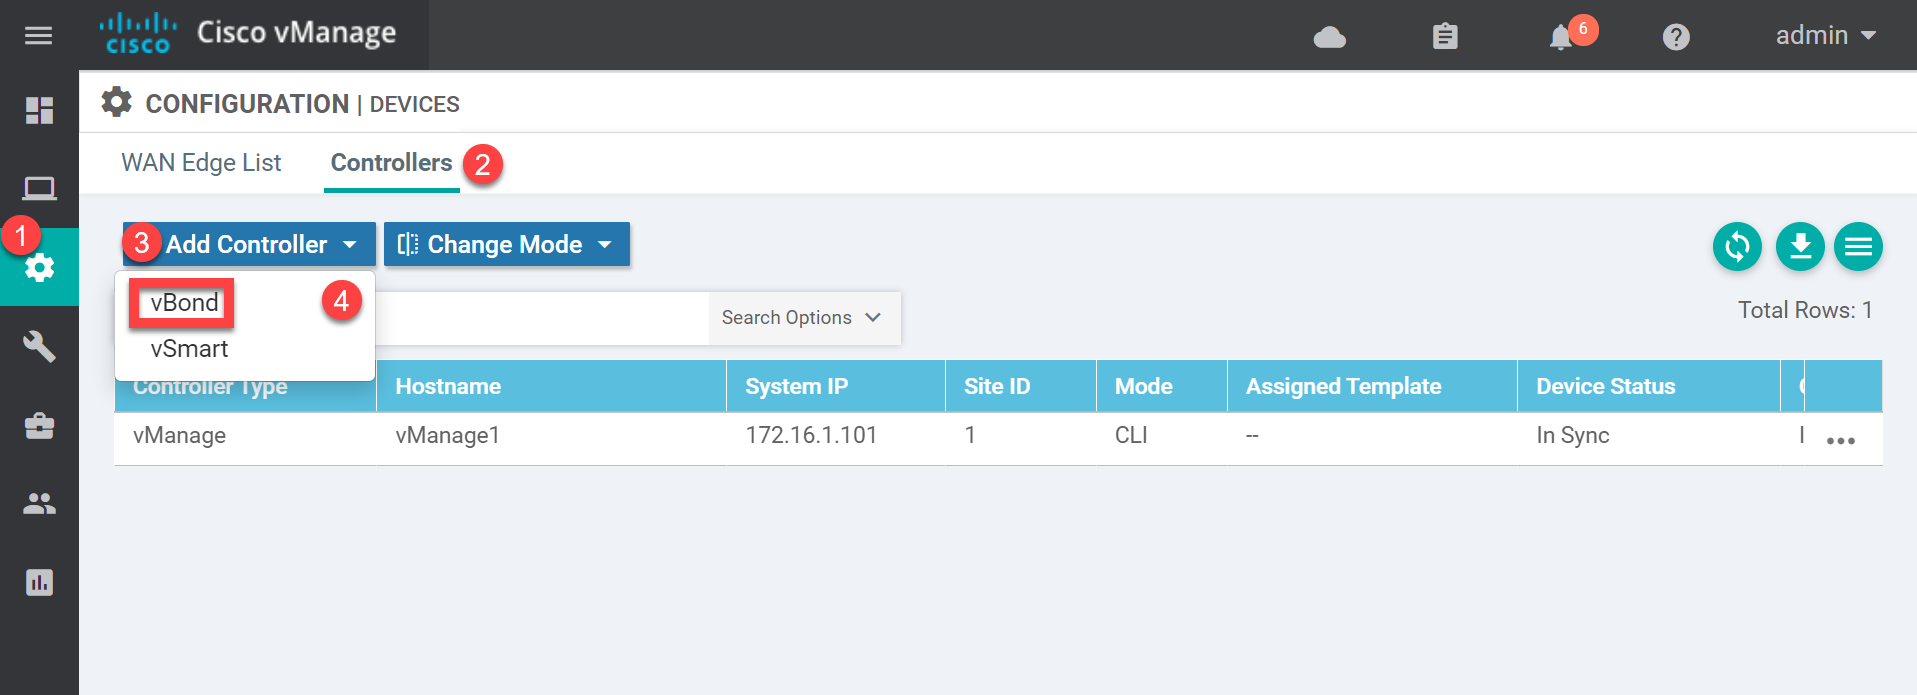
With the above configuration, the vBond orchestrator should be able to reach the vManage controller. Open the vManage GUI and go to Configuration > Devices > Controllers > Add controller > Add vBond:
Enter the IP address, username, and password. Keep the “Generate CSR” checkbox marked:
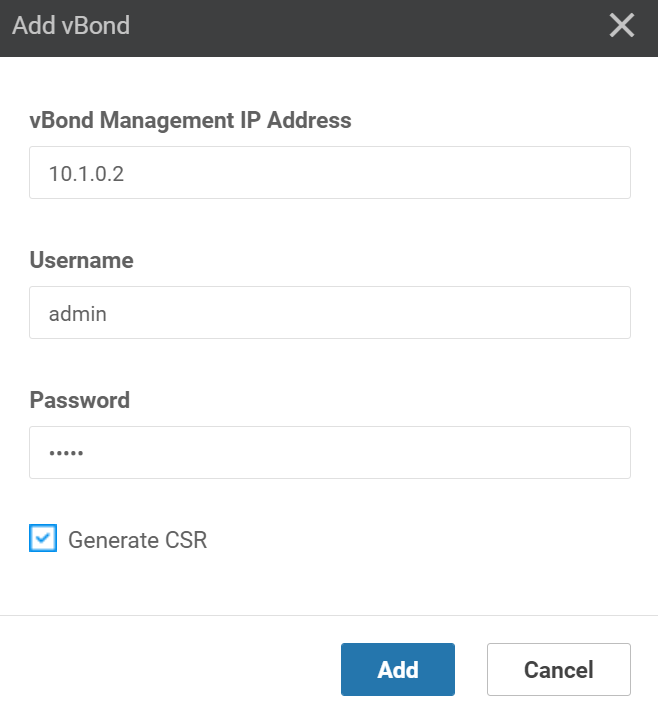
Click on Add. The vManage controller will now add the vBond orchestrator.
Certificate
The vBond orchestrator has been added in vManage and the CSR is created. We still have to do some “certificate work”:
- Import the root CA certificate on the vBond orchestrator.
- Sign a certificate using the vBond CSR through the vManage shell.
- Import the certificate on the vBond orchestrator.
Let’s do it.
We can download the root certificate from the vManage controller using the request command. Here’s what it looks like:
vBond1# request download scp://admin@10.1.0.1:/home/admin/ROOT-CA.pem
/usr/bin/download: line 33: /proc/sys/kernel/hung_task_timeout_secs: Permission denied
The authenticity of host '10.1.0.1 (10.1.0.1)' can't be established.
ECDSA key fingerprint is SHA256:tDhYof1C8igzPm29fFlV5afe44qjJZAEDCNv9qQ2gPE.
Are you sure you want to continue connecting (yes/no)? yes
Warning: Permanently added '10.1.0.1' (ECDSA) to the list of known hosts.
viptela 19.3.0

admin@10.1.0.1's password:
ROOT-CA.pem                                   100% 1257    41.1KB/s   00:00
/usr/bin/download: line 33: /proc/sys/kernel/hung_task_timeout_secs: Permission denied
It throws an error but it does work. With another request command we can install the root CA certificate:
vBond1# request root-cert-chain install /home/admin/ROOT-CA.pem
Uploading root-ca-cert-chain via VPN 0
Copying ... /home/admin/ROOT-CA.pem via VPN 0
Updating the root certificate chain..
Successfully installed the root certificate chain
Our vBond orchestrator now trusts the certificates that our root CA signs.
When we added the vBond orchestrator a CSR was generated. This is stored in the home folder. You can see it here:
vBond1# vshell
vBond1:~$ ls -lh
total 40K
-rw-r--r-- 1 admin admin 1.3K Jul  8 14:46 ROOT-CA.pem
-rw-r--r-- 1 admin admin  392 Jul  8 13:22 archive_id_rsa.pub
-rw-r--r-- 1 admin admin  24K Jul  8 14:44 master_root.crt
-rw-r--r-- 1 admin admin   43 Jul  8 14:44 root_ca_uuid_list
-rw-r--r-- 1 root  root  1.2K Jul  8 14:45 vbond_csr
We need this CSR on the vManage controller so we can sign it there. You could use cat and copy/paste it but copying is easier. From vshell, use the scp command like this:
vManage1# vshell
vManage1:~$ scp admin@10.1.0.2:/home/admin/vbond_csr .
The authenticity of host '10.1.0.2 (10.1.0.2)' can't be established.
ECDSA key fingerprint is SHA256:w5eOq3Q6ZVdXvnTLq9k3lO8aU2x2uUu6bJIhuGsfngo.
Are you sure you want to continue connecting (yes/no)? yes
Warning: Permanently added '10.1.0.2' (ECDSA) to the list of known hosts.
viptela 19.3.0

admin@10.1.0.2's password:
vbond_csr                                     100% 1220    40.5KB/s   00:00
Let’s sign a certificate using the CSR as input:
vManage1:~$ openssl x509 -req -in vbond_csr \
>     -CA ROOT-CA.pem -CAkey ROOT-CA.key -CAcreateserial \
>     -out vbond.crt -days 1826 -sha256
Signature ok
subject=/C=US/ST=California/L=San Jose/OU=nwl-lab-sdwan/O=Viptela LLC/CN=vbond-a27e7e90-b266-448f-80be-942ee9a767b8-0.viptela.com/emailAddress=support@viptela.com
Getting CA Private Key
Use cat to see the certificate and copy the output:
vManage1:~$ cat vbond.crt
-----BEGIN CERTIFICATE-----
MIIDlzCCAn8CCQCSxilWaQdcEzANBgkqhkiG9w0BAQsFADBQMQswCQYDVQQGEwJO
TDELMAkGA1UECAwCTkwxFjAUBgNVBAoMDW53bC1sYWItc2R3YW4xHDAaBgNVBAMM
E3ZtYW5hZ2UxLmxhYi5ud2wuYWkwHhcNMjEwNzA4MTQ1MjEzWhcNMjYwNzA4MTQ1
MjEzWjCByjELMAkGA1UEBhMCVVMxEzARBgNVBAgTCkNhbGlmb3JuaWExETAPBgNV
BAcTCFNhbiBKb3NlMRYwFAYDVQQLEw1ud2wtc2R3YW4tbGFiMRQwEgYDVQQKEwtW
aXB0ZWxhIExMQzFBMD8GA1UEAxM4dmJvbmQtYTI3ZTdlOTAtYjI2Ni00NDhmLTgw
YmUtOTQyZWU5YTc2N2I4LTAudmlwdGVsYS5jb20xIjAgBgkqhkiG9w0BCQEWE3N1
cHBvcnRAdmlwdGVsYS5jb20wggEiMA0GCSqGSIb3DQEBAQUAA4IBDwAwggEKAoIB
AQChgD9FPhIbvsuDWF+YhTYayWYTA0mE/LHW1qizIebIXrTuBox6XLzrxYP0OwuK
U+bEfkbs3QAEPbzUzA51Pzjx0FpZfd0tP9byjGziyeq3fO0ol9NO6uMQ6RQPwzHS
SxAD96Qg2RwZpqA080H44XW0tGZEJVD/+5XK3LZeIYl6iWu5/i1z6kQ4iOdw4DfQ
0p2HolH0JdhNx+zCUK8zmBEhh/opmt1ZtcKBa2sCN2wPxiUkIUNdw0GMXbBBNXc9
RuwSkwAj6UWnG6omdwwNMVQthghT+QmHZjH5priQpkm9d9/gmIDGEdImqGXongLn
LfTJlXS881AeY/6mf8els2HpAgMBAAEwDQYJKoZIhvcNAQELBQADggEBAE2Jiuvt
D9uIbi79DLCBUKDjq3CAtlPiigj16lYEdH9d6AH+1L02cE83dzhoVsFRZCBuPLbt
7kmMNgEXeXACRCgMTMz7W8G2lv0PsgRs+1xRgJzna1FObubgd7p6DOT6/BI7CrmB
ArIaaIBh4BBtC00m0bZZIEvL6VIDL/GoaC5xIod/o79yGGQaUrlBkRJqvUVTvr9q
JAm/eUiO2WC8eZfxTJI69FySMs4gDpX1ChJDsdIjqcOpResTFGwcOuaJ0ms/oORE
tLDonZUmGNm0UyplISwrh0tRB92hTH9jHr/gxlcADMjIgieMJhZEPf/EOZD4hSAX
BQoSPe5vc8dbzfM=
-----END CERTIFICATE-----
Go back to vManage and click on the Install Certificate button:
Paste the vBond certificate here:
Click on Install and wait a few seconds.
Verification
The vBond and vManage controllers are now connected. You can verify this through the GUI or the CLI.
Using the GUI, go to Monitor > Network > WAN – Edge and click on vBond1. You’ll see this screen:
In the output above, we see the connection between the two controllers. You can also verify this from the CLI with the show control connections command on the vManage controller:
vManage1# show control connections

      PEER    PEER PEER            PEER
INDEX TYPE    PROT SYSTEM IP       PUBLIC IP   ORGANIZATION   STATE UPTIME
--------------------------------------------------------------------------------
0     vbond   dtls 172.16.1.102    10.1.0.2    nwl-lab-sdwan   up     0:00:00:22
1     vbond   dtls 0.0.0.0         10.1.0.2    nwl-lab-sdwan   up     0:00:00:22
2     vbond   dtls 0.0.0.0         10.1.0.2    nwl-lab-sdwan   up     0:00:00:10
3     vbond   dtls 0.0.0.0         10.1.0.2    nwl-lab-sdwan   up     0:00:00:10
Or you can use the show orchestrator connections command on the vBond orchestrator:
vBond1# show orchestrator connections

         PEER     PEER     PEER          PEER               ORGANIZATION
INSTANCE TYPE     PROTOCOL SYSTEM IP     PUBLIC IP  STATE   NAME             UPTIME
---------------------------------------------------------------------------------------
0        vmanage  dtls     172.16.1.101  10.1.0.1   up      nwl-lab-sdwan    0:00:06:38
0        vmanage  dtls     172.16.1.101  10.1.0.1   up      nwl-lab-sdwan    0:00:06:38
0        vmanage  dtls     172.16.1.101  10.1.0.1   up      nwl-lab-sdwan    0:00:06:57
0        vmanage  dtls     172.16.1.101  10.1.0.1   up      nwl-lab-sdwan    0:00:06:57
This completes the vBond configuration. Two down, one to go…
vSmart
The vSmart controller authenticates vEdge routers and pushes policies to vEdge routers. We take the same steps as we did on the vBond orchestrator.
Startup Configuration
Let’s log in:
viptela 19.3.0

vsmart login: admin
Password:
Welcome to Viptela CLI
admin connected from 127.0.0.1 using console on vsmart
You must set an initial admin password.
Password:
Re-enter password:
vsmart#
We’ll start with a system configuration:
vsmart(config)# system
vsmart(config-system)# host-name vSmart1
vsmart(config-system)# system-ip 172.16.1.103
vsmart(config-system)# site-id 1
vsmart(config-system)# organization-name nwl-lab-sdwan
vsmart(config-system)# vbond 10.1.0.2
vsmart(config-system)# exit
The configuration above is similar to what we did with the vManage controller. Let’s configure the VPN0 interface:
vsmart(config)# vpn 0
vsmart(config-vpn-0)# ip route 0.0.0.0/0 10.1.0.254
vsmart(config-vpn-0)# interface eth0
vsmart(config-interface-eth0)# ip address 10.1.0.3/24
vsmart(config-interface-eth0)# tunnel-interface
vsmart(config-tunnel-interface)# allow-service all
vsmart(config-tunnel-interface)# no shutdown
Commit everything and we are good to go:
vsmart(config-vpn-0)# commit
Commit complete.
Open the vManage GUI and go to Configuration > Devices > Controllers > Add Controller > vSmart:
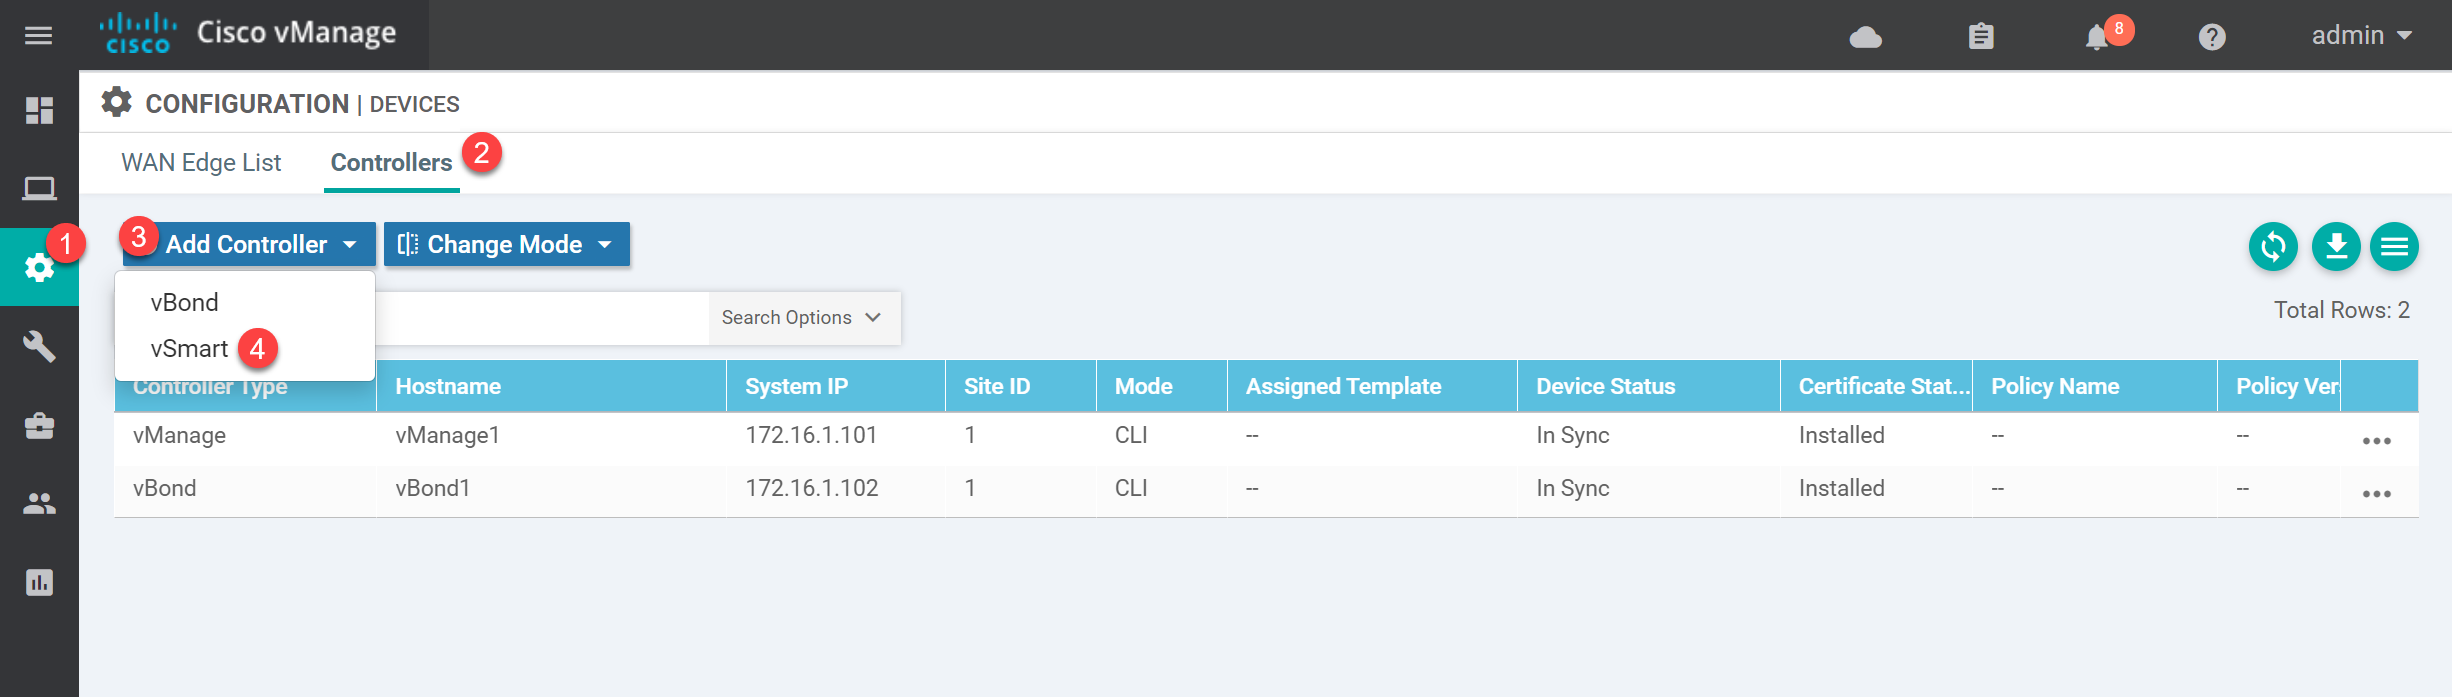
Type in the IP address, username, and password of the vSmart controller:
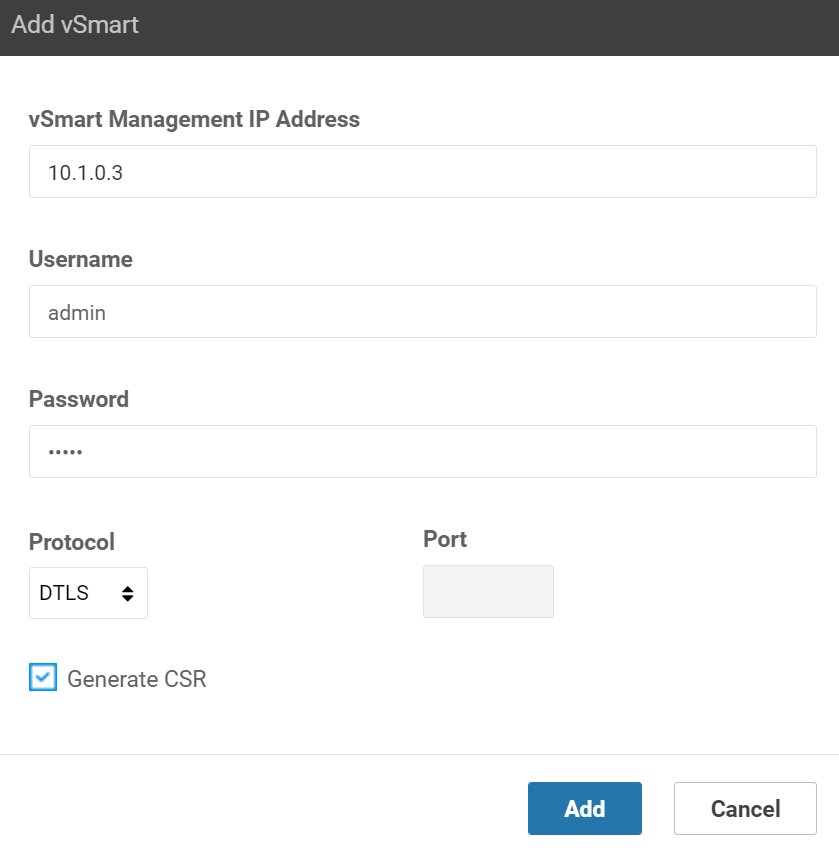
Leave the “Generate CSR” checkbox marked and click on Add.
Certificate
Let’s fix our certificates. First, we copy the root CA certificate from the vManage controller:
vSmart1# request download scp://admin@10.1.0.1:/home/admin/ROOT-CA.pem
/usr/bin/download: line 33: /proc/sys/kernel/hung_task_timeout_secs: Permission denied
The authenticity of host '10.1.0.1 (10.1.0.1)' can't be established.
ECDSA key fingerprint is SHA256:tDhYof1C8igzPm29fFlV5afe44qjJZAEDCNv9qQ2gPE.
Are you sure you want to continue connecting (yes/no)? yes
Warning: Permanently added '10.1.0.1' (ECDSA) to the list of known hosts.
viptela 19.3.0

admin@10.1.0.1's password:
ROOT-CA.pem                                   100% 1257    29.3KB/s   00:00
/usr/bin/download: line 33: /proc/sys/kernel/hung_task_timeout_secs: Permission denied
Then we install the root CA certificate:
vSmart1# request root-cert-chain install /home/admin/ROOT-CA.pem
Uploading root-ca-cert-chain via VPN 0
Copying ... /home/admin/ROOT-CA.pem via VPN 0
Updating the root certificate chain..
Successfully installed the root certificate chain
Let’s sign a certificate for the vSmart controller. The CSR is in the home folder:
vSmart1# vshell
vSmart1:~$ ls -lh
total 36K
-rw-r--r-- 1 admin admin 1.3K Jul  8 15:21 ROOT-CA.pem
-rw-r--r-- 1 admin admin  393 Jul  8 13:21 archive_id_rsa.pub
-rw-r--r-- 1 admin admin  24K Jul  8 15:20 master_root.crt
-rw-r--r-- 1 root  root  1.2K Jul  8 15:20 vsmart_csr
Let’s use scp to copy the CSR to the vManage controller:
vManage1# vshell
vManage1:~$ scp admin@10.1.0.3:/home/admin/vsmart_csr .
The authenticity of host '10.1.0.3 (10.1.0.3)' can't be established.
ECDSA key fingerprint is SHA256:gv8oQ54VKEW4Kvivxf2btphPiRidY1kF+LncAJO3Ioc.
Are you sure you want to continue connecting (yes/no)? yes
Warning: Permanently added '10.1.0.3' (ECDSA) to the list of known hosts.
viptela 19.3.0

admin@10.1.0.3's password:
vsmart_csr                                    100% 1220   208.8KB/s   00:00
And sign a certificate:
vManage1:~$ openssl x509 -req -in vsmart_csr \
>     -CA ROOT-CA.pem -CAkey ROOT-CA.key -CAcreateserial \
>     -out vsmart1.crt -days 1826 -sha256
Signature ok
subject=/C=US/ST=California/L=San Jose/OU=nwl-lab-sdwan/O=Viptela LLC/CN=vsmart-efe48082-e7f3-435d-8f96-d56f289e10be-0.viptela.com/emailAddress=support@viptela.com
Getting CA Private Key
Use cat to see the contents of the certificate:
vManage1:~$ cat vsmart1.crt
-----BEGIN CERTIFICATE-----
MIIDmDCCAoACCQCSxilWaQdcFTANBgkqhkiG9w0BAQsFADBQMQswCQYDVQQGEwJO
TDELMAkGA1UECAwCTkwxFjAUBgNVBAoMDW53bC1sYWItc2R3YW4xHDAaBgNVBAMM
E3ZtYW5hZ2UxLmxhYi5ud2wuYWkwHhcNMjEwNzA4MTUyNzI4WhcNMjYwNzA4MTUy
NzI4WjCByzELMAkGA1UEBhMCVVMxEzARBgNVBAgTCkNhbGlmb3JuaWExETAPBgNV
BAcTCFNhbiBKb3NlMRYwFAYDVQQLEw1ud2wtc2R3YW4tbGFiMRQwEgYDVQQKEwtW
aXB0ZWxhIExMQzFCMEAGA1UEAxM5dnNtYXJ0LWVmZTQ4MDgyLWU3ZjMtNDM1ZC04
Zjk2LWQ1NmYyODllMTBiZS0wLnZpcHRlbGEuY29tMSIwIAYJKoZIhvcNAQkBFhNz
dXBwb3J0QHZpcHRlbGEuY29tMIIBIjANBgkqhkiG9w0BAQEFAAOCAQ8AMIIBCgKC
AQEAx9QIKTy4rw2s5jDVD2HsjuB0yGbtX7sV2QUJNJijqZ+BlPBQPApFD8htYRYA
ykxnC3r2otBoxozQlekpz+vKxPnVC+FWt3e6FWqqLqlcyWxOEF5fRvzXZGqARXl5
SEfGQweiiBK0OHkMsDvLgBemNV8uU0ky/i0DZGHM2j15xdXLL7qHyloI3ASi8t0z
ydgm3MCYH/ZKU0kAo9oA8b60bgxgPRGQIMjoTfIx83pt1CUh98q5VV02eIMScZut
swMgTnWgpKg3NdBauxJcGkCyShYXr5ylHtu9kV4KYzkeohr9w9pns3EL6HjGoslg
PCASmr9bIOwciGz7Xnq9YaeP/QIDAQABMA0GCSqGSIb3DQEBCwUAA4IBAQCxWym3
+84ac7CHSN0ePhxnlSjF/bI/5RA0afxdnKMbBDYE9blZwmd89S+P3bNBzSJ1O1M+
y5bUKK3xDAoCpUuq+hYr9iDsaiNste7l1bnNkoaon/yp/I8ZyQ20PFbojGJB6Vch
zB1qSjRl4dxoZNhX2egV6tgZxjVqurnsxIe8yeK9oVjAZOuRA2ShEJUJM04gFDrZ
dFK0+sw+M7BDKCWDu1OSQLZQQJzmQzjjacI4TVQcUeGlTV3eCmcfBSSTieKterQM
O35dWiKAX/dDrVo7thc7NkKB2wcB/8+XSbIS1Pxzm0H0tqk1dyjMZ0p38Vp9VAHc
Vxl4KNmpfJuSlgsm
-----END CERTIFICATE-----
Go back to the vManage GUI and click on Install Certificate:
Paste the contents of the vsmart1.crt file:
and click on Install. This will take a few seconds.
Verification
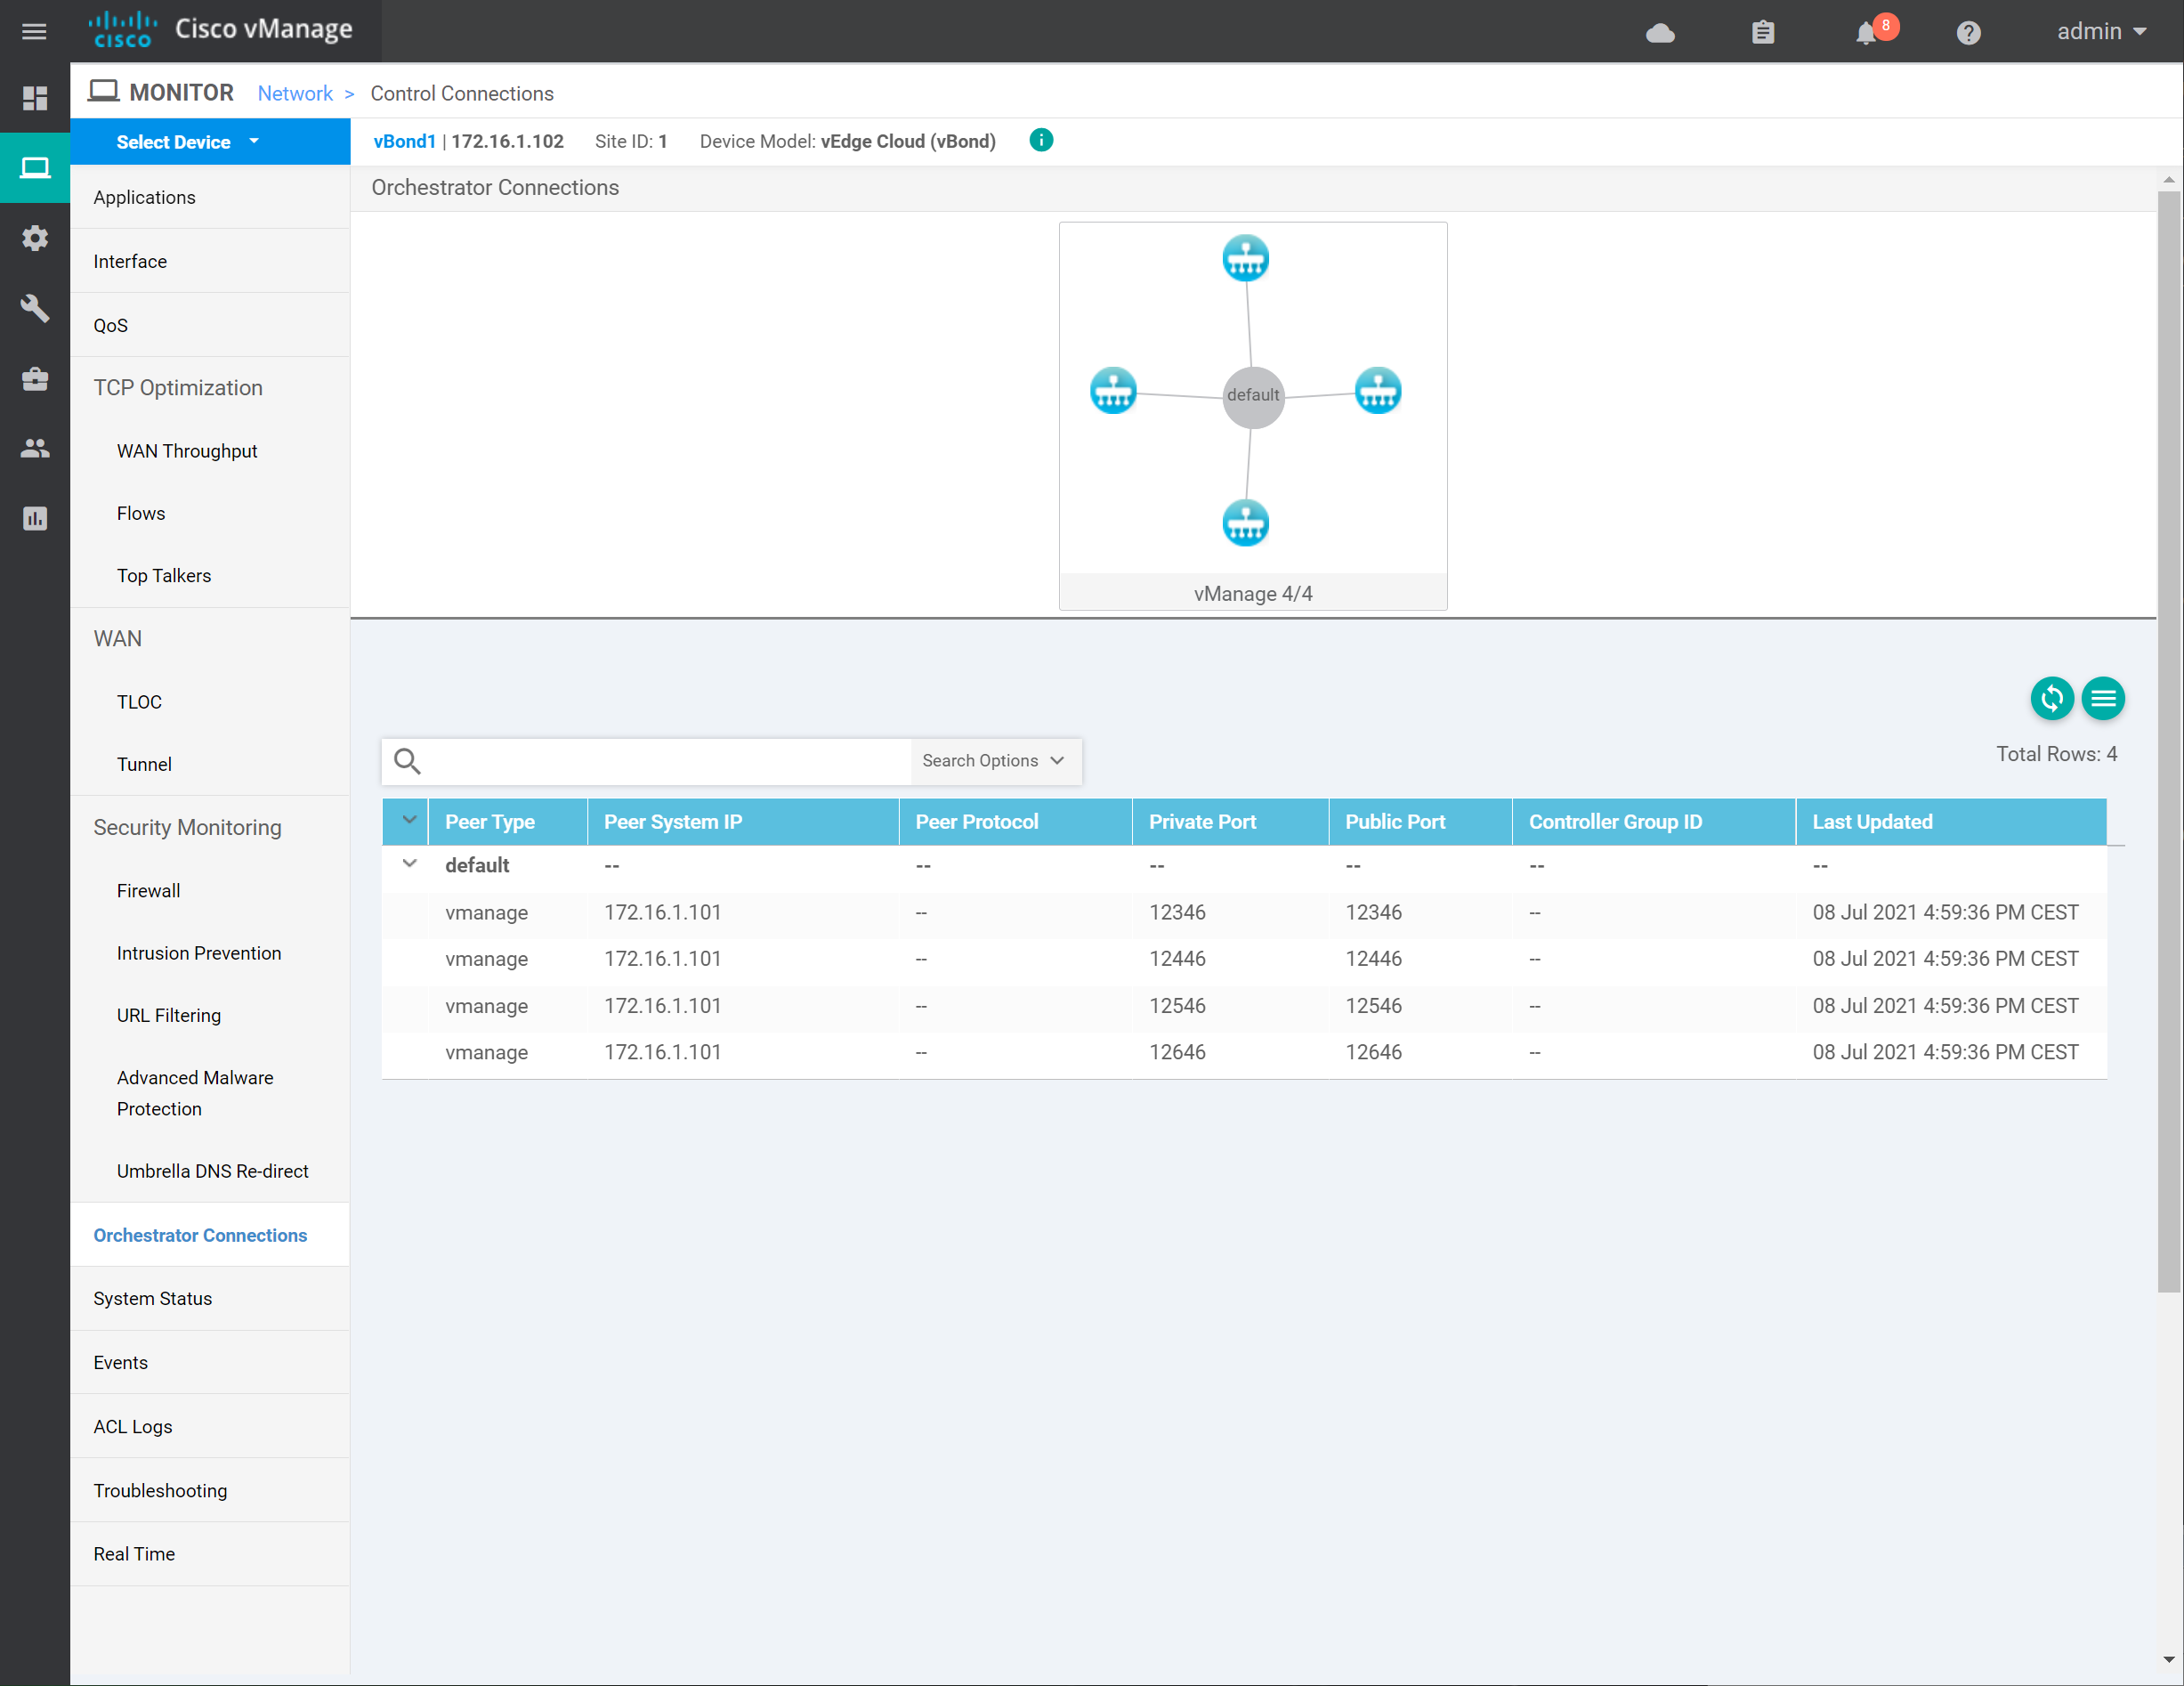
Let’s verify our work. In the vManage GUI, go to Monitor > Network > WAN – Edge and click on vSmart1. You’ll see this screen:
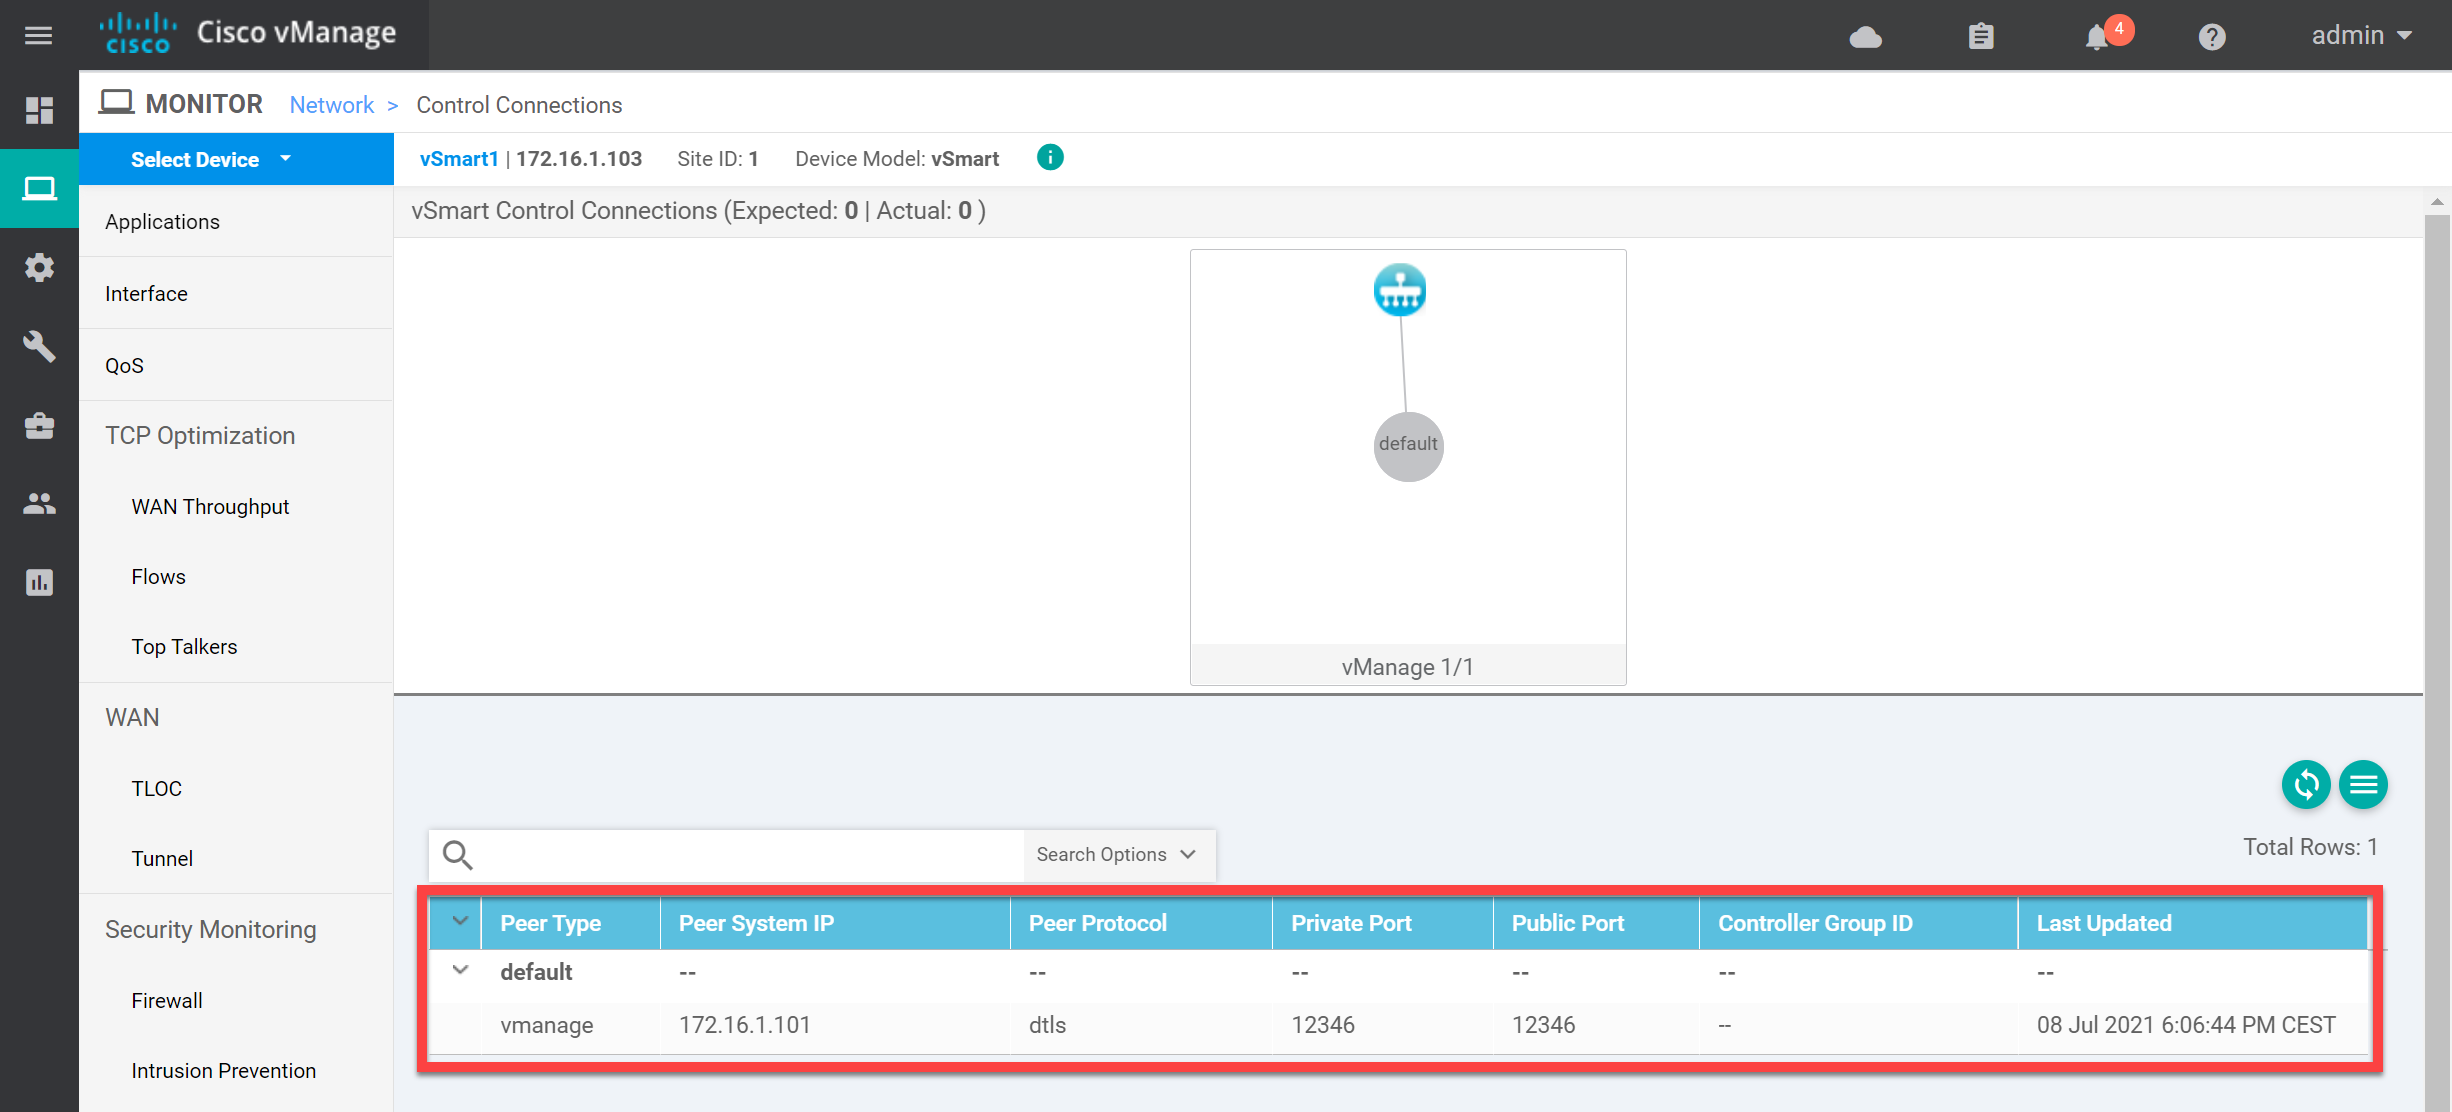
Above, you see the connection with the vSmart controller. You can also verify this from the CLI:
Hi Rene,
Thanks for this great lesson.
I have a question regarding the vBond configuration.
My understanding is that the vBond only creates permanent DTLS tunnels with the vSmart and vManage and temporary DTLS tunnels with Wan Edge routers for discovery and authentication purposes. So at no point does the vBond need an IPSec encapsulation in its tunnel interface since it will never use IPSec.
So what’s the point of the ipsec encapsulation configuration under the tunnel interface ?
Thanks
SB
Hello Said
Sorry for the late reply. It seems that you’ve already had an answer from the Cisco community which is great!
https://community.cisco.com/t5/sd-wan-and-cloud-networking/encapsulation-ipsec-on-vbond/td-p/4451149
It seems that the vBond orchestrator is the same image as the vEdge router. Technically, vBond doesn’t require the
encapsulation ipseccommand but this is just the way you are required to configure it.I hope this has been helpful!
Laz
Hi Laz,
Yes I got an acceptable answer in the Cisco Community.
Thanks
SB
Hi
i configured all devices from CLI and vmanage can reach vbond normally, but when i try to add vbon from GUI i am getting this err “Failed to add device
java.net.SocketTimeoutException: connect timed out”
plz advice
thx
I have tried to add vsmart controller as a device on vmanage however am getting errors SDWAN vSmart Failed to add device java.io. connection timeout. However i have added vbond successful and all controllers are reachable