Lesson Contents
In the previous lesson, we configured site 1 with the vManage, vBond, and vSmart controllers. This means we are now ready to onboard vEdge routers. That’s what we are going to do in this lesson.
Configuration
Here is the topology we’ll use:
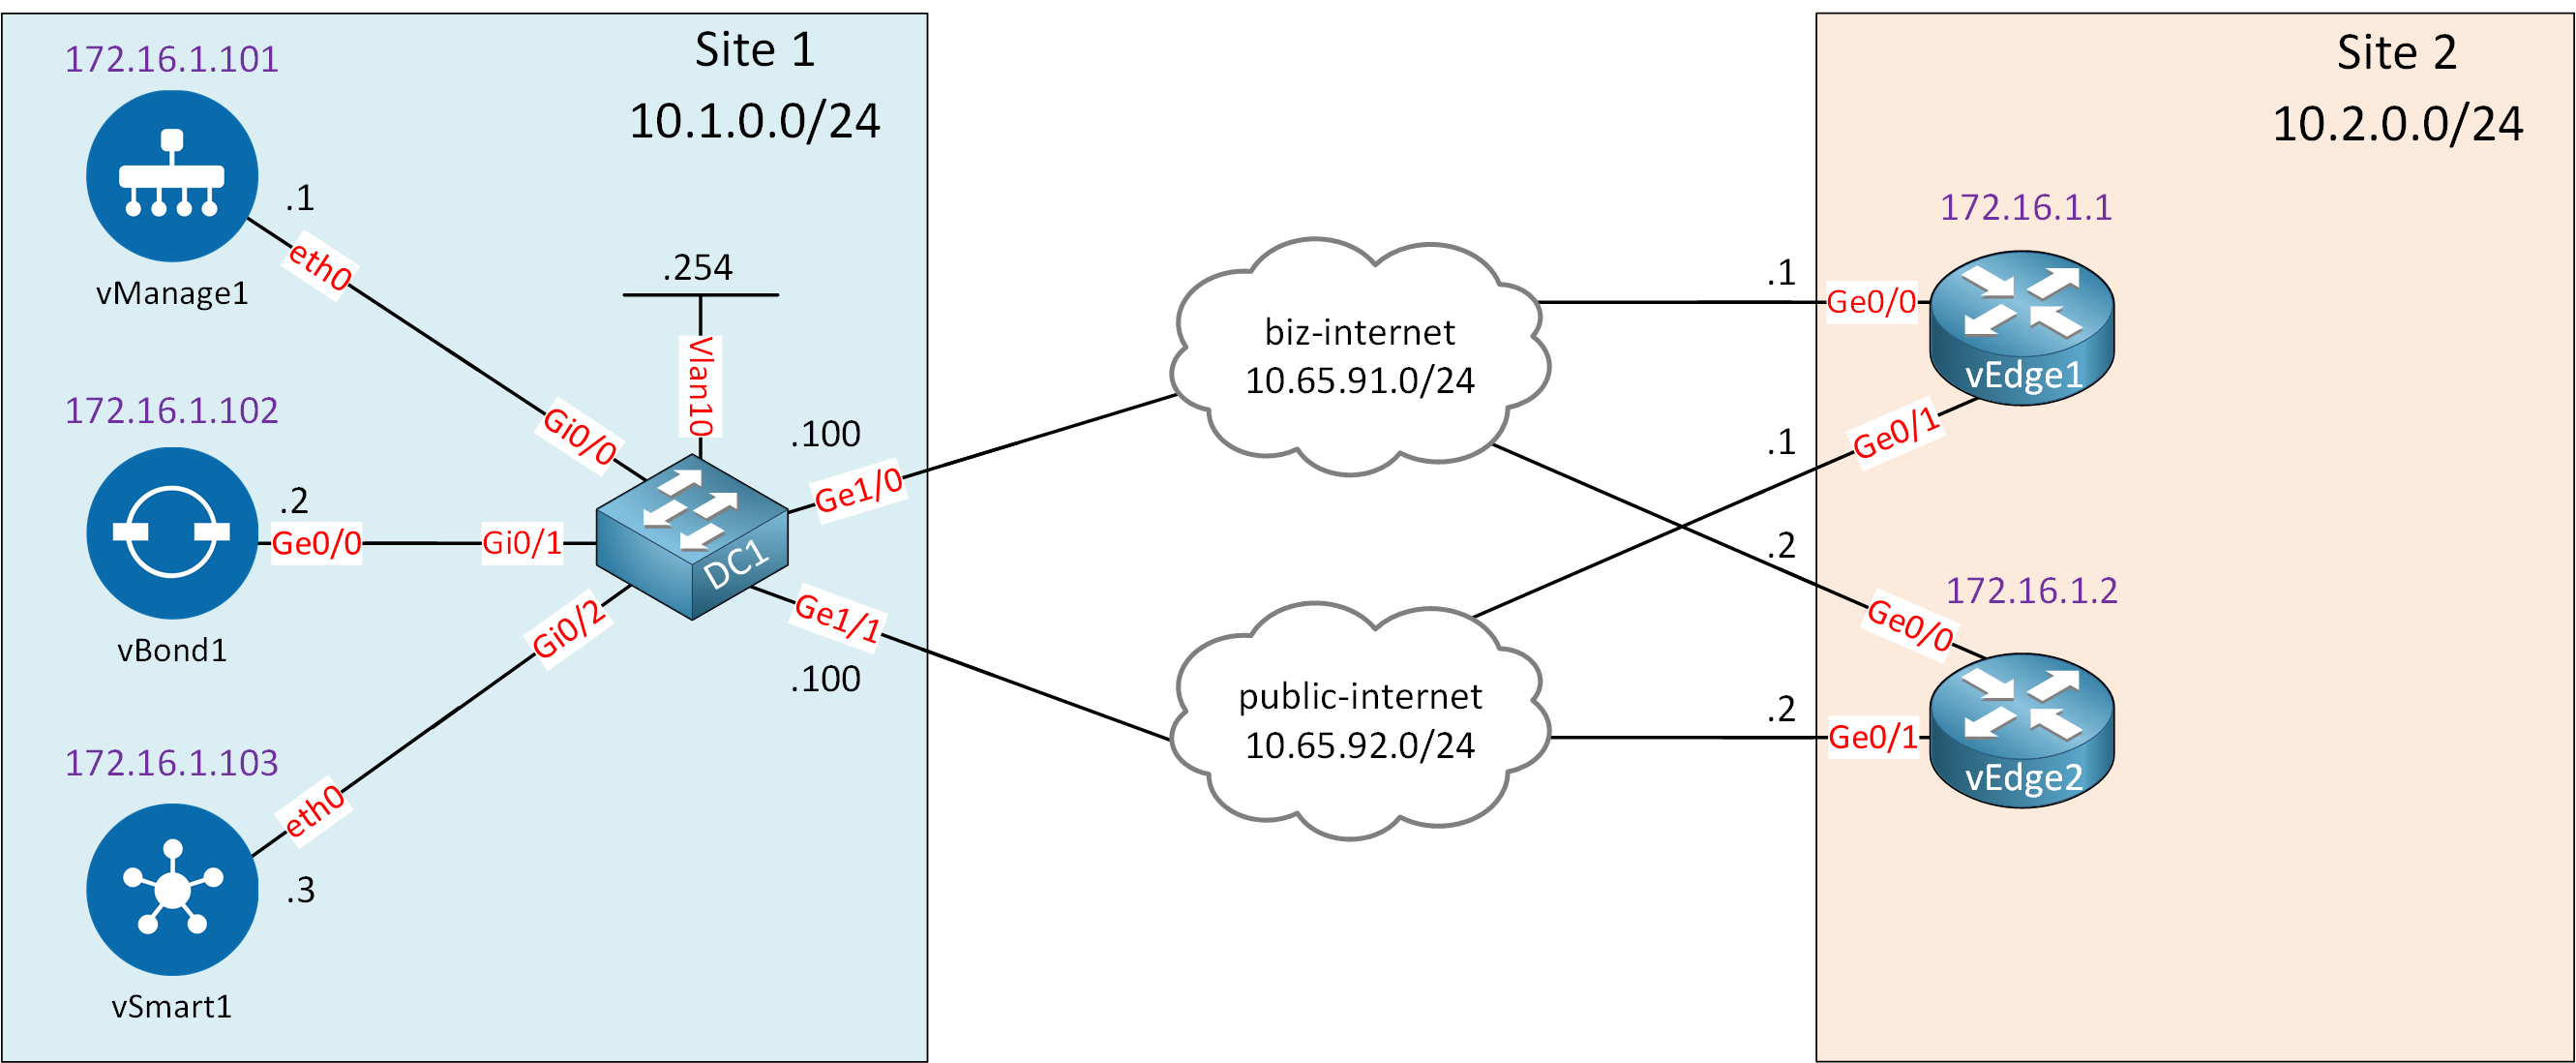
Let me explain what we have:
- On the left side, we have site 1 with the controllers we configured previously.
- On the right side, we have site 2 with two vEdge routers.
- These routers are connected to the “biz-internet” and “public-internet” clouds:
- I use these clouds to simulate two ISPs.
- In reality, these are two VLANs on my local network with Internet access.
We are going to use the “biz-internet” connection to onboard the vEdge1 router with the controllers. We will prepare the configuration of the “public-internet” connection so that we can use it in later lessons.
I’ll also only explain how to onboard the vEdge1 router. If you can onboard one router, you can onboard as many as you like. If you want to follow along with me, see if you can onboard the vEdge2 router. Later, we’ll build upon this topology and add even more devices to create a larger SD-WAN network.
This is what we have to do:
- Create a basic configuration:
- System settings
- VPN0 (Underlay network)
- Certificates
- Install the root CA certificate on the vEdge router
- Create a CSR and sign a certificate for the vEdge router
I’m using Cisco SD-WAN images version 19.3.0.
Let’s get started and open the console of the vEdge1 router:
viptela 19.3.0

vedge login: admin
Password:
Welcome to Viptela CLI
admin connected from 127.0.0.1 using console on vedge
You must set an initial admin password.
Password:
Re-enter password:
The first time you log in, you have to set a password. I’m using “admin” everywhere in my lab.
Basic Configuration
Before the vEdge router can join the controllers, we have to create a basic configuration. This is similar to what we configured on the controllers.
System
Let’s start with the system configuration:
vedge(config)# system
vedge(config-system)# host-name vEdge1
vedge(config-system)# system-ip 172.16.1.1
vedge(config-system)# site-id 2
vedge(config-system)# organization-name nwl-lab-sdwan
vedge(config-system)# vbond 10.1.0.2
vedge(config-system)# exit
[Box type=”note”]The site-id is unique to each site. If you want to create multiple sites, add a different value here.[/box]
VPN0 (Underlay Network)
The VPN0 configuration is slightly different. The main reason is that we have two physical interfaces to configure:
- Ge0/0 connects to the “biz-internet” cloud.
- Ge0/1 connects to the “public-internet” cloud.
Let’s take a look:
vedge(config)# vpn 0
vedge(config-vpn-0)# ip route 10.1.0.0/24 10.65.91.100
vedge(config-vpn-0)# interface ge0/0
vedge(config-interface-ge0/0)# ip address 10.65.91.1/24
vedge(config-interface-ge0/0)# tunnel-interface
vedge(config-interface-ge0/0)# encapsulation ipsec
The first part is the same as what we have seen before. There is a new command that we have to add under the tunnel-interface though:
vedge(config-tunnel-interface)# color ?
Description: Set color for TLOC
Possible completions:
  <3g biz-internet blue bronze custom1 custom2 custom3 default gold gre en lte metro-ethernet mpls public-internet red silver private1 private2 pri vate3 private4 private5 private6>[default]
The color command sets the “color” for the TLOC. This is required to differentiate the two WAN connections.
The ge0/0 interface connects to my “biz-internet” ISP so let’s set the color:
vedge(config-tunnel-interface)# color biz-internet
vedge(config-tunnel-interface)# allow-service all
vedge(config-tunnel-interface)# no shutdown
vedge(config-tunnel-interface)# exit
vedge(config-interface-ge0/0)# exit
We configure the ge0/1 interface the same way:
vedge(config-vpn-0)# interface ge0/1
vedge(config-interface-ge0/1)# ip address 10.65.92.1/24
vedge(config-interface-ge0/1)# tunnel-interface
vedge(config-tunnel-interface)# encapsulation ipsec
vedge(config-tunnel-interface)# color public-internet
vedge(config-tunnel-interface)# allow-service all
vedge(config-tunnel-interface)# no shutdown
vedge(config-tunnel-interface)# exit
vedge(config-interface-ge0/1)# exit
The only difference is that the ge0/1 interface is connected to the “public-internet” ISP. Let’s commit our configuration:
vedge(config-vpn-0)# commit
Commit complete.
Excellent. This is all we need for now.
Certificates
We need to do a couple of things to get our certificates in order:
- Install the root CA certificate on the vEdge router.
- Generate a CSR on the vEdge router.
- Sign the certificate on the vManage controller.
- Install the vEdge certificate on the vEdge router.
This process is almost the same as what we did with the controllers except for the CSR. Let me show you.
Install Root CA Certificate
We’ll start with the root CA certificate. First, we download it from the vManage controller to our vEdge router:
vEdge1# request download scp://admin@10.1.0.1:/home/admin/ROOT-CA.pem
/usr/bin/download: line 33: /proc/sys/kernel/hung_task_timeout_secs: Permission denied
viptela 19.3.0

vEdge1# admin@10.1.0.1's password:
ROOT-CA.pem                                   100% 1257    22.9KB/s   00:00
/usr/bin/download: line 33: /proc/sys/kernel/hung_task_timeout_secs: Permission denied
I’m not sure why it shows these errors. The file is copied anyway. Let’s install it:
vEdge1# request root-cert-chain install /home/admin/ROOT-CA.pem
Uploading root-ca-cert-chain via VPN 0
Copying ... /home/admin/ROOT-CA.pem via VPN 0
Updating the root certificate chain..
Successfully installed the root certificate chain
That takes care of the root CA certificate.
vEdge Certificate
Time for our vEdge certificate. We create a CSR on the vEdge router:
vEdge1# request csr upload home/admin/vedge1_csr
Uploading CSR via VPN 0
Enter organization-unit name            : nwl-lab-sdwan
Re-enter organization-unit name          : nwl-lab-sdwan
Generating CSR for this vedge device   ........[DONE]
Copying ... /home/admin/vedge1_csr via VPN 0
CSR upload successful
In the output above, you can see the vedge1_csr file is stored in the /home/admin folder. We need to copy this file to the vManage controller:
vManage1# vshell
vManage1:~$ scp admin@10.65.91.1:/home/admin/vedge1_csr .
viptela 19.3.0

admin@10.65.91.1's password:
vedge1_csr                                    100% 1220     9.9KB/s   00:00
And we sign the certificate using the CSR:
vManage1:~$ openssl x509 -req -in vedge1_csr \
      -CA ROOT-CA.pem -CAkey ROOT-CA.key -CAcreateserial \
      -out vedge1.crt -days 2000 -sha256
Signature ok
subject=/C=US/ST=California/L=San Jose/OU=nwl-lab-sdwan/O=Viptela LLC/CN=vedge-82ac8968-dd99-4ee7-a14c-d1c39dc49d56-1.viptela.com/emailAddress=support@viptela.com
Getting CA Private Key
Let’s copy the vedge1.crt certificate file to the vEdge router:
Hi Rene,
We need more documents on SDWAN like creating policies/Templates (CLI/GUI) TLOC/TLOC Extensions/Local and Centralized Policies etc.,
When we can expect… Please update us…
HI Rene,
I have watched and read ur SD-Wan lectures till onboarding vedge
I have couple of doubts may sound dumb but asking anyway
Let me explain how i understood so u can clarify
1.Hardware level
In actual hardware the vEdge will be a actual hardware router which is compatible with the SDwan image
But what about vsmart, vbond and vmanage are they actually 3 seperate hardware we have to take console of in real life scenario
- Certificate
... Continue reading in our forum(ROOT CA is like a ideal certificate to compare with so that we can trust as it matches the private key we generated)-this is
Hello Athi
Rene is currently working on a series of lessons on SD-WAN. They’ll be coming out over the next couple of weeks. Some have already been published. Check back periodically at the following page to see all of the new lessons that are coming out:
https://networklessons.com/new-lessons
I hope this has been helpful!
Laz
Hello Anoop
The vEdge routers and the vBond orchestrator can be deployed as either hardware or VMs. The vManage and vSmart controllers are only available as VMs. The VMs can be run on-premises on ESXi or KVM, or they can be hosted on cloud providers like AWS or Azure. Take a look at the following lesson for more details:
https://networklessons.com/cisco/ccnp-encor-350-401/introduction-to-sd-wan
... Continue reading in our forumHey everyone I am stuck on the step to add vedge…
(vbond,vmanage,vsmart all seem to be up and recongnized…
I have went through the this adding vedge step 3 times… and stilll have come up short..
when i got into the vmanage GUI .. I dont see anything listed under WAN edge list !! please help !