Lesson Contents
If you want to run multicast between two routers that are connected through a network that doesn’t support multicast then a common solution is to use a GRE tunnel to transmit your multicast traffic. If you use the GRE tunnel only for multicast traffic, you will run into an RPF (Reverse Path Forwarding) problem. This lesson explains how to configure PIM sparse or dense mode on your GRE tunnel and how to fix your RPF problem.
Configuration
Here is the topology we will use:
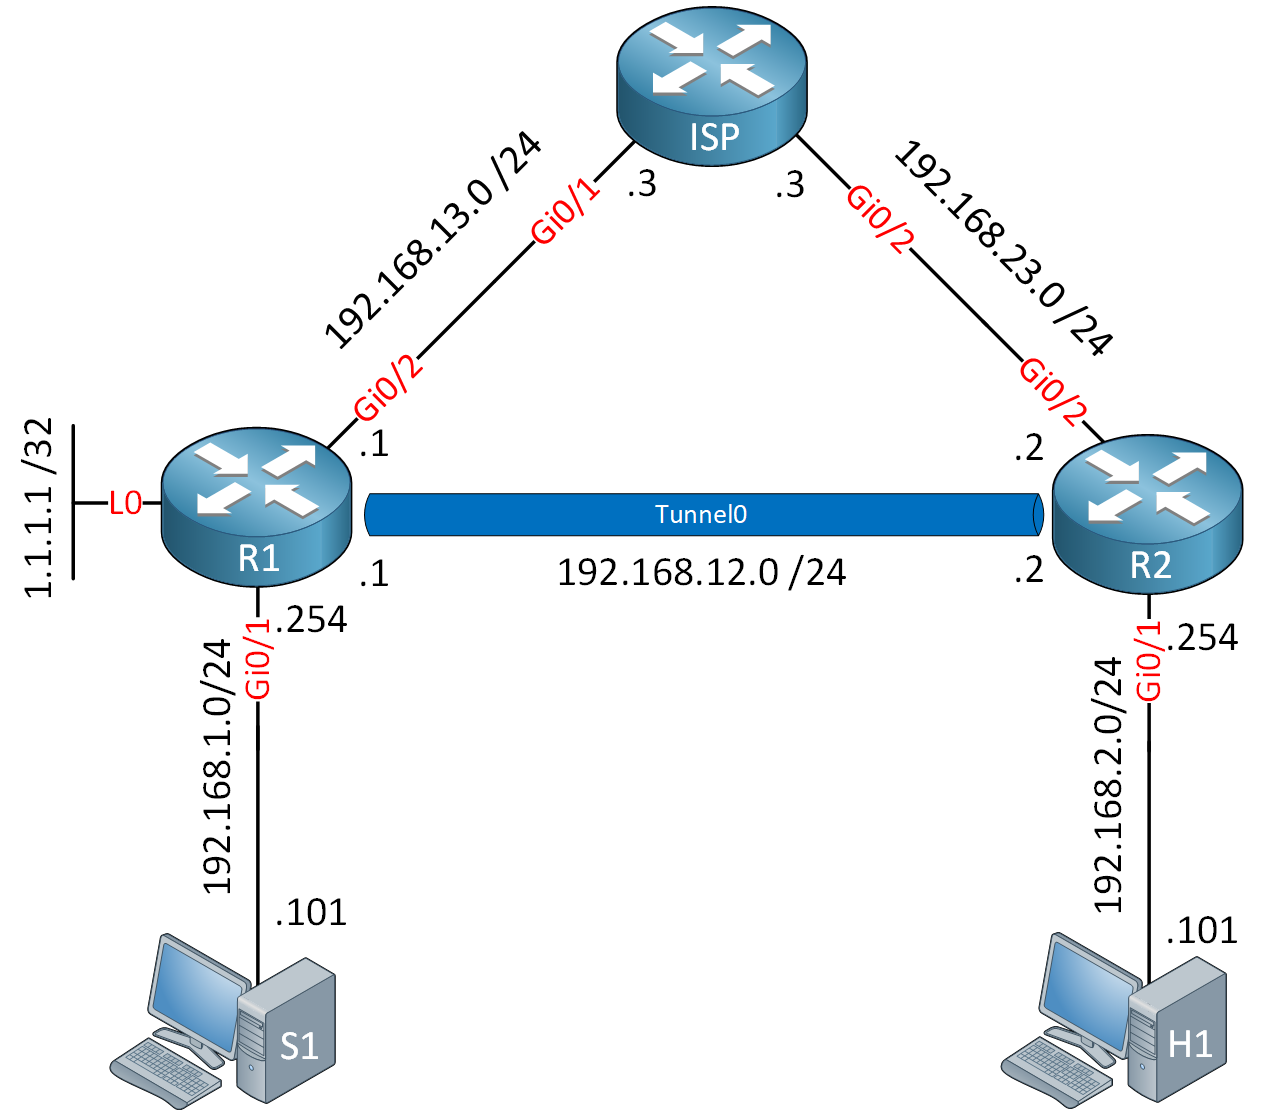
R1 and R2 are our multicast routers and connected to an ISP router. We use a default route on R1 and R2 and some static routes on the ISP router so that we have full connectivity. Since the ISP doesn’t support multicast, we use a GRE tunnel between these routers to send multicast traffic from our source (S1) to the receiver (H1).
Configurations
Want to take a look for yourself? Here you will find the startup configuration of each device.
S1
hostname S1
!
no ip routing
!
no ip cef
!
interface GigabitEthernet0/1
 ip address 192.168.1.101 255.255.255.0
!
ip default-gateway 192.168.1.254
!
end
R1
hostname R1
!
ip cef
!
interface Loopback0
 ip address 1.1.1.1 255.255.255.255
!
interface GigabitEthernet0/1
 ip address 192.168.1.254 255.255.255.0
!
interface GigabitEthernet0/2
 ip address 192.168.13.1 255.255.255.0
!
ip route 0.0.0.0 0.0.0.0 192.168.13.3
!
end
ISP
hostname ISP
!
ip cef
!
interface GigabitEthernet0/1
 ip address 192.168.13.3 255.255.255.0
!
interface GigabitEthernet0/2
 ip address 192.168.23.3 255.255.255.0
!
ip route 1.1.1.1 255.255.255.255 192.168.13.1
ip route 192.168.1.0 255.255.255.0 192.168.13.1
ip route 192.168.2.0 255.255.255.0 192.168.23.2
!
end
R2
hostname R2
!
ip cef
!
interface GigabitEthernet0/1
 ip address 192.168.2.254 255.255.255.0
!
interface GigabitEthernet0/2
 ip address 192.168.23.2 255.255.255.0
!
ip route 0.0.0.0 0.0.0.0 192.168.23.3
!
end
H1
hostname H1
!
no ip routing
!
no ip cef
!
interface GigabitEthernet0/1
 ip address 192.168.2.101 255.255.255.0
!
ip default-gateway 192.168.2.254
!
end
First, we need to enable multicast routing on both routers:
R1 & R2
(config)#ip multicast-routing
Let’s create the tunnel interfaces. Here’s R1:
R1(config)#interface Tunnel 0
R1(config-if)#ip address 192.168.12.1 255.255.255.0
R1(config-if)#tunnel source 192.168.13.1
R1(config-if)#tunnel destination 192.168.23.2
And R2:
R2(config)#interface Tunnel 0
R2(config-if)#ip address 192.168.12.2 255.255.255.0
R2(config-if)#tunnel source 192.168.23.2
R2(config-if)#tunnel destination 192.168.13.1
Dense Mode
Let’s start with PIM dense mode. We need to enable this on the GigabitEthernet 0/1 and Tunnel interfaces:
R1(config)#interface GigabitEthernet 0/1
R1(config-if)#ip pim dense-modeR1(config)#interface Tunnel 0
R1(config-if)#ip pim dense-modeHere’s R2:
R2(config)#interface GigabitEthernet 0/1
R2(config-if)#ip pim dense-modeR2(config)#interface Tunnel 0
R2(config-if)#ip pim dense-modeTo test our setup, I’ll let our receiver join a multicast group:
H1(config)#interface GigabitEthernet 0/1
H1(config-if)#ip igmp join-group 239.1.1.1
Let’s try a quick ping:
S1#ping 239.1.1.1 repeat 5000
Type escape sequence to abort.
Sending 5, 100-byte ICMP Echos to 239.1.1.1, timeout is 2 seconds:
.....
These pings will fail. Why? Let’s take a look at the multicast routing table. Here’s R1:
R1#show ip mroute 239.1.1.1
IP Multicast Routing Table
Flags: D - Dense, S - Sparse, B - Bidir Group, s - SSM Group, C - Connected,
       L - Local, P - Pruned, R - RP-bit set, F - Register flag,
       T - SPT-bit set, J - Join SPT, M - MSDP created entry, E - Extranet,
       X - Proxy Join Timer Running, A - Candidate for MSDP Advertisement,
       U - URD, I - Received Source Specific Host Report,
       Z - Multicast Tunnel, z - MDT-data group sender,
       Y - Joined MDT-data group, y - Sending to MDT-data group,
       G - Received BGP C-Mroute, g - Sent BGP C-Mroute,
       N - Received BGP Shared-Tree Prune, n - BGP C-Mroute suppressed,
       Q - Received BGP S-A Route, q - Sent BGP S-A Route,
       V - RD & Vector, v - Vector, p - PIM Joins on route,
       x - VxLAN group
Outgoing interface flags: H - Hardware switched, A - Assert winner, p - PIM Join
 Timers: Uptime/Expires
 Interface state: Interface, Next-Hop or VCD, State/Mode

(*, 239.1.1.1), 00:00:04/stopped, RP 0.0.0.0, flags: D
  Incoming interface: Null, RPF nbr 0.0.0.0
  Outgoing interface list:
    Tunnel0, Forward/Dense, 00:00:04/stopped

(192.168.1.101, 239.1.1.1), 00:00:04/00:02:55, flags: T
  Incoming interface: GigabitEthernet0/1, RPF nbr 0.0.0.0
  Outgoing interface list:
    Tunnel0, Forward/Dense, 00:00:04/stopped
Above you can see that R1 is receiving the multicast traffic and is forwarding it on the tunnel interface. Let’s check R2:
R2#show ip mroute 239.1.1.1

(*, 239.1.1.1), 00:05:20/stopped, RP 0.0.0.0, flags: DC
  Incoming interface: Null, RPF nbr 0.0.0.0
  Outgoing interface list:
    GigabitEthernet0/1, Forward/Dense, 00:05:20/stopped
    Tunnel0, Forward/Dense, 00:05:20/stopped

(192.168.1.101, 239.1.1.1), 00:00:41/00:02:18, flags:
  Incoming interface: Null, RPF nbr 0.0.0.0
  Outgoing interface list:
    Tunnel0, Forward/Dense, 00:00:41/stopped
    GigabitEthernet0/1, Forward/Dense, 00:00:41/stopped
We see an entry on R2 but the incoming interface is “Null”. We know that R1 is forwarding the traffic so that’s a good indication that we have an RPF failure. There’s one quick command we can use to check if we are receiving traffic:
R2#show ip mroute count
Use "show ip mfib count" to get better response time for a large number of mroutes.

IP Multicast Statistics
3 routes using 1946 bytes of memory
2 groups, 0.50 average sources per group
Forwarding Counts: Pkt Count/Pkts per second/Avg Pkt Size/Kilobits per second
Other counts: Total/RPF failed/Other drops(OIF-null, rate-limit etc)

Group: 239.1.1.1, Source count: 1, Packets forwarded: 0, Packets received: 18
  Source: 192.168.1.101/32, Forwarding: 0/0/0/0, Other: 18/18/0

Group: 224.0.1.40, Source count: 0, Packets forwarded: 0, Packets received: 0
Above, you see that we are actually receiving multicast packets. This is a good indication that we have an RPF failure. If you want to see that the router is actually dropping multicast packets, we’ll have to enable a debug. There’s a different method, depending if you use IOS 12.4 or IOS 15:
IOS 12.4
You need to use the debug ip mpacket command and disable the mroute-cache:
R2#debug ip mpacket
IP multicast packets debugging is on

R2(config-if)#no ip mroute-cache
IOS 15
On IOS 15, it’s simpler. There is a single command to debug multicast packets:
R2#debug ip mfib pak
MFIB IPv4 pak debugging enabled for default IPv4 table
Once this is enabled, you will see a message like this:
R2#
MFIBv4(0x0): Pkt (192.168.1.101,239.1.1.1) from Tunnel0 (FS) Acceptance check failed - dropping
This is a nice and clear message telling us that traffic from 192.168.1.101 fails the RPF check. We can also verify this with the show ip rpf command:
R2#show ip rpf 192.168.1.101
 failed, no route exists
In our scenario, we use a default route towards the ISP router so our unicast routing doesn’t match our multicast routing. We can fix this with a static mroute for our source:
R2(config)#ip mroute 192.168.1.0 255.255.255.0 192.168.12.1Let’s look at the show ip rpf command again:
R2#show ip rpf 192.168.1.101
RPF information for ? (192.168.1.101)
  RPF interface: Tunnel0
  RPF neighbor: ? (192.168.12.1)
  RPF route/mask: 192.168.1.0/24
  RPF type: multicast (static)
  Doing distance-preferred lookups across tables
  RPF topology: ipv4 multicast base
We now see an entry for our source. Let’s try those pings again:
S1#ping 239.1.1.1 repeat 5
Type escape sequence to abort.
Sending 5, 100-byte ICMP Echos to 239.1.1.1, timeout is 2 seconds:

Reply to request 0 from 192.168.2.101, 8 ms
Reply to request 1 from 192.168.2.101, 8 ms
Reply to request 2 from 192.168.2.101, 8 ms
Reply to request 3 from 192.168.2.101, 11 ms
Reply to request 4 from 192.168.2.101, 11 ms
Excellent, this is working.
Configurations
Want to take a look for yourself? Here you will find the startup configuration of each device.
S1
hostname S1
!
no ip routing
!
no ip cef
!
interface GigabitEthernet0/1
 ip address 192.168.1.101 255.255.255.0
!
ip default-gateway 192.168.1.254
!
end
R1
hostname R1
!
ip multicast-routing
ip cef
!
interface Loopback0
 ip address 1.1.1.1 255.255.255.255
!
interface Tunnel0
 ip address 192.168.12.1 255.255.255.0
 ip pim dense-mode
 tunnel source 192.168.13.1
 tunnel destination 192.168.23.2
!
interface GigabitEthernet0/1
 ip address 192.168.1.254 255.255.255.0
 ip pim dense-mode
!
interface GigabitEthernet0/2
 ip address 192.168.13.1 255.255.255.0
!
ip route 0.0.0.0 0.0.0.0 192.168.13.3
!
end
ISP
hostname ISP
!
ip cef
!
interface GigabitEthernet0/1
 ip address 192.168.13.3 255.255.255.0
!
interface GigabitEthernet0/2
 ip address 192.168.23.3 255.255.255.0
!
ip route 1.1.1.1 255.255.255.255 192.168.13.1
ip route 192.168.1.0 255.255.255.0 192.168.13.1
ip route 192.168.2.0 255.255.255.0 192.168.23.2
!
end
R2
hostname R2
!
ip multicast-routing
ip cef
!
interface Tunnel0
 ip address 192.168.12.2 255.255.255.0
 ip pim dense-mode
 tunnel source 192.168.23.2
 tunnel destination 192.168.13.1
!
interface GigabitEthernet0/1
 ip address 192.168.2.254 255.255.255.0
 ip pim dense-mode
!
interface GigabitEthernet0/2
 ip address 192.168.23.2 255.255.255.0
!
ip mroute 192.168.1.0 255.255.255.0 192.168.12.1
ip route 0.0.0.0 0.0.0.0 192.168.23.3
!
end
H1
hostname H1
!
no ip routing
!
no ip cef
!
interface GigabitEthernet0/1
 ip address 192.168.2.101 255.255.255.0
 ip igmp join-group 239.2.2.2
 ip igmp join-group 239.1.1.1
!
ip default-gateway 192.168.2.254
!
end
Sparse Mode
Now let’s try sparse mode. I’ll need to change the PIM mode and configure an RP. Let’s use the loopback interface of R1 as the RP address. Let’s enable PIM sparse mode on R1:
R1(config)#interface GigabitEthernet 0/1
R1(config-if)#ip pim sparse-mode

R1(config)#int Tunnel 0
R1(config-if)#ip pim sparse-mode

R1(config)#int Loopback 0
R1(config-if)#ip pim sparse-mode
And configure the RP address:
R1(config)#ip pim rp-address 1.1.1.1Let’s do the same thing on R2:
R2(config)#interface GigabitEthernet 0/1
R2(config-if)#ip pim sparse-mode

R2(config)#interface Tunnel 0
R2(config-if)#ip pim sparse-mode

R2(config)#ip pim rp-address 1.1.1.1
To test our setup, let’s configure our receiver to join another multicast group:
H1(config)#interface GigabitEthernet 0/1
H1(config-if)#ip igmp join-group 239.2.2.2
And we’ll send some pings…
S1#ping 239.1.1.1 repeat 5
Type escape sequence to abort.
Sending 5, 100-byte ICMP Echos to 239.1.1.1, timeout is 2 seconds:
.....
Our pings are failing, even though I do have a static mroute for our source (192.168.1.101). Let’s take a closer look at the multicast routing table:
Will this issue not arise in tunnel intended to pass both Unicast and Multicast?
Hello Deep
First of all, one major difference between unicast and multicast routing is that for unicast routing, we only care about the destination and how to get there. For multicast routing, we care about the source as well. PIM uses the unicast routing table to check what interface will be used to reach the source. More on this can be found at this lesson.
https://networklessons.com/cisco/ccie-routing-switching-written/multicast-rpf-reverse-path-forwarding
Now to your question. If a GRE tunnel is used only for multicast traffic, then there will be no un
... Continue reading in our forumPIM sparse solution:
In R2 conf you have:
If you wouldn’t have “ip mroute 192.168.1.0 255.255.255.0 192.168.12.1” your unicast would go by the traditional path instead of the tunnel. Isn’t it? And in that way it wouldn’t work, am I right?
Then in R1 you don’t have any
ip mroute. Should we also route the unicast traffic by the tunnel?If we have a bidir multicast implementation with a GRE tunnel, would it work? But in that case
... Continue reading in our forumHello Miguel
First of all, remember that the
mroutecommands refer only to multicast traffic, so whether you implement theip mroute 192.168.1.0 255.255.255.0 192.168.12.1command or not will not affect the unicast traffic.This command is implemented in order to verify that the RPF check is passed. The RPF check essentially checks to see if the source IP address of the multicast traffic is reachable via a routing entry in the routing table that matches the interface via which the packet entered the router. If this check is not passed, the packet is dropped.
... Continue reading in our forumThanks for your explanation.
I understand better the use of
ip mroute.But I still have 2 questions:
In the case you have R1-R2-R3*(RP)-R4-R5, with senders and receivers in all R%, would you have to configure ip mroute in R1,R2,R4 and R5?
In the case you have many senders and receivers in both sides R1 and R2, and a tunnel between them, would you recommend to implement pim sparse-dense mode or bidir multicat implementation?
I have in the lab 2 L3 in this config:
... Continue reading in our forumSW-R1-R2-SW2
I have R1 and R2 with pim sparse-dense-mode + ip routing
I used: