Lesson Contents
Dynamic Multipoint VPN (DMVPN) is a Cisco technology to create hub-and-spoke VPN networks with automatic tunnels so you don’t have to manually configure tunnels between all routers. Direct spoke-to-spoke communication is possible without sending traffic through the hub router. DMVPN uses GRE for tunneling and Next Hop Resolution Protocol (NHRP) to discover IP addresses of routers. Encryption is supported through IPsec, which makes DMVPN a popular choice for connecting different sites using regular Internet connections. It’s a great backup or alternative to private networks like MPLS VPN.
There are four main components to understand DMVPN:
- Multipoint GRE (mGRE)
- NHRP (Next Hop Resolution Protocol)
- Routing (RIP, EIGRP, OSPF, BGP, etc.)
- IPsec (not required but recommended)
In this lesson, I’ll explain how DMVPN and its four main components work.
Key Takeaways
- DMVPN uses multipoint GRE to allow one tunnel interface to connect multiple sites.
- NHRP maps tunnel IP addresses to public IP addresses, enabling dynamic spoke-to-spoke tunnels.
- Phase 1 only supports hub-and-spoke traffic (no direct spoke-to-spoke traffic).
- Phase 2 enables direct spoke-to-spoke tunnels but requires specific routes.
- Phase 3 allows spoke-to-spoke tunnels with summarization on the hub.
- IPsec encryption is often used to run DMVPN over public networks like the Internet.
Prerequisites
To understand the basics of DMVPN, you should be familiar with:
- Basic VPN concepts and how tunnels work
- GRE (Generic Routing Encapsulation)
- Hub-and-spoke network topology
Main Components
Let’s walk through each component one by one.
Multipoint GRE
Our “regular” GRE tunnels are point-to-point and don’t scale well. For example, let’s say we have a company network with some sites that we want to connect to each other using regular Internet connections:
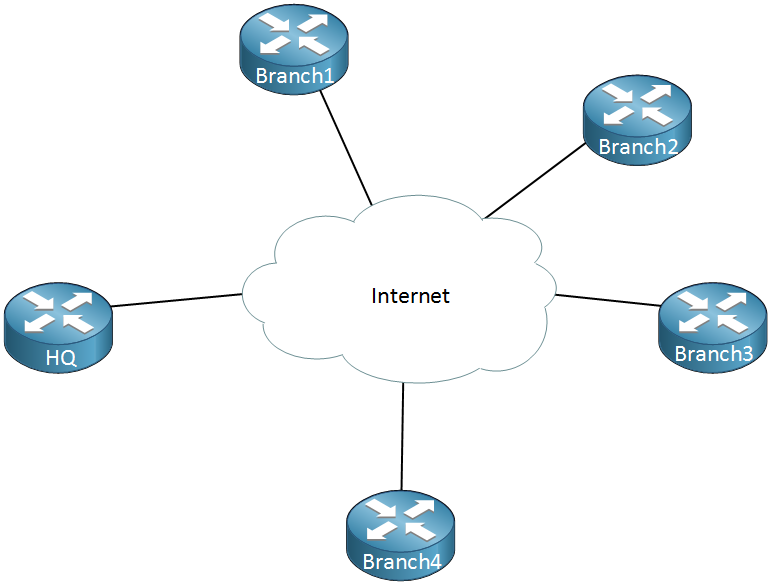
Above we have one router that represents the HQ and there are four branch offices. Let’s say that we have the following requirements:
- Each branch office has to be connected to the HQ.
- Traffic between Branch 1 and Branch 2 has to be tunneled directly.
- Traffic between Branch 3 and Branch 4 has to be tunneled directly.
To accomplish this we will have to configure a bunch of GRE tunnels which will look like this:
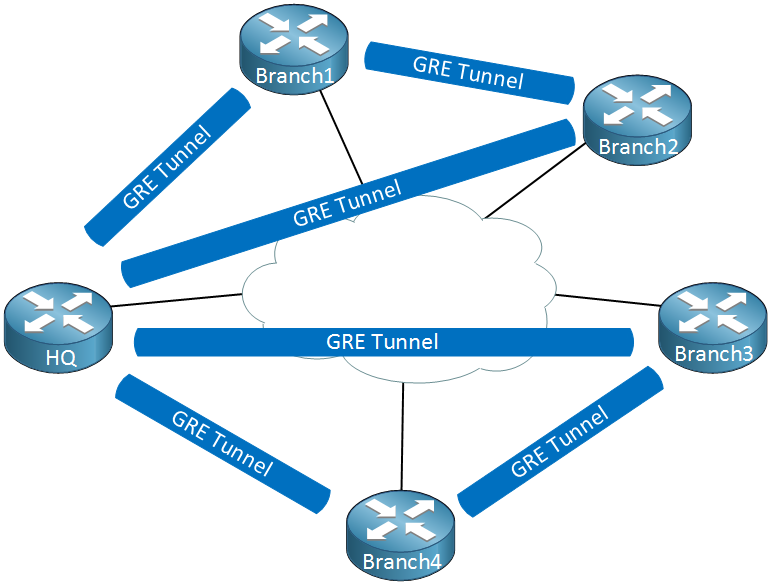
Thing will get messy quickly…we have to create multiple tunnel interfaces, set the source/destination IP addresses etc. It will work but it’s not a very scalable solution. Multipoint GRE, as the name implies allows us to have multiple destinations. When we use them, our picture could look like this:
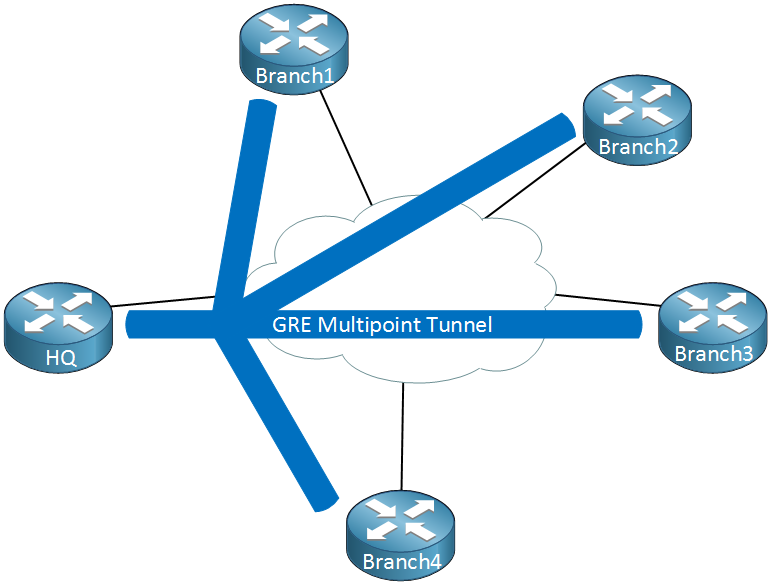
When we use GRE Multipoint, there will be only one tunnel interface on each router. The HQ for example has one tunnel with each branch office as its destination. Now you might be wondering, what about the requirement where branch office 1/2 and branch office 3/4 have a direct tunnel?
Right now we have a hub and spoke topology. The cool thing about DMVPN is that we use multipoint GRE so we can have multiple destinations. When we need to tunnel something between branch office 1/2 or 3/4, we automatically “build” new tunnels:
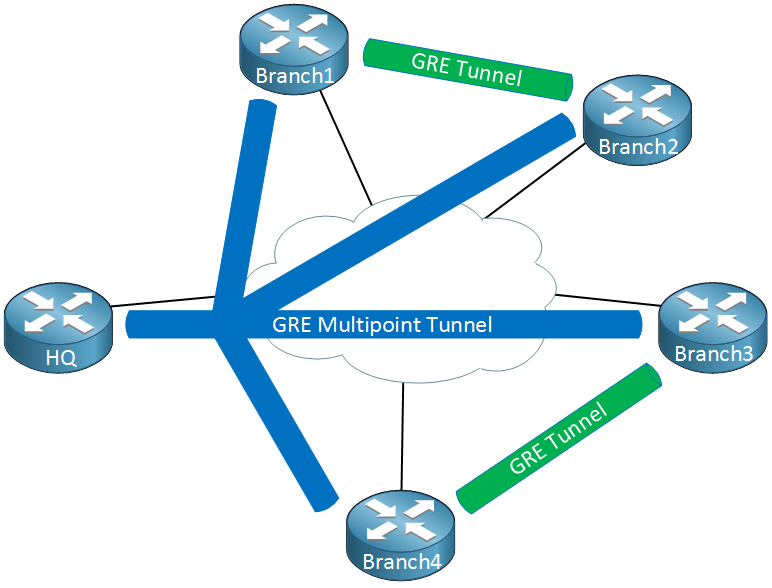
When there is traffic between the branch offices, we can tunnel it directly instead of sending it through the HQ router. This sounds pretty cool but it introduces some problems…
When we configure point-to-point GRE tunnels we have to configure a source and destination IP address that are used to build the GRE tunnel. When two branch routers want to tunnel some traffic, how do they know what IP addresses to use? Let me show you what I’m talking about:
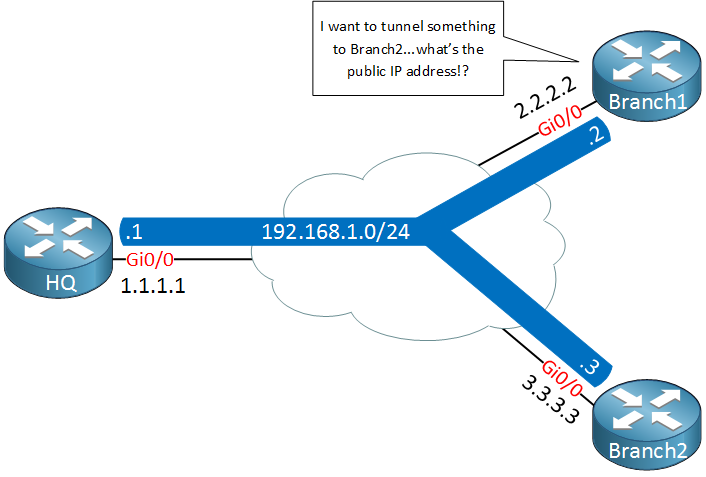
Above we have our HQ and two branch routers, branch1 and branch2. Each router is connected to the Internet and has a public IP address:
- HQ: 1.1.1.1
- Branch1: 2.2.2.2
- Branch2: 3.3.3.3
On the GRE multipoint tunnel interface we use a single subnet with the following private IP addresses:
- HQ: 192.168.1.1
- Branch1: 192.168.1.2
- Branch2: 192.168.1.3
Let’s say that we want to send a ping from branch1’s tunnel interface to the tunnel interface of branch2. Here’s what the GRE encapsulated IP packet will look like:

The “inner” source and destination IP addresses are known to use, these are the IP address of the tunnel interfaces. We encapsulate this IP packet, put a GRE header in front of it and then we have to fill in the “outer” source and destination IP addresses so that this packet can be routed on the Internet. The branch1 router knows it’s own public IP address but it has no clue what the public IP address of branch2 is…
To fix this problem, we need some help from another protocol…
NHRP (Next Hop Resolution Protocol)
We need something that helps our branch1 router figure out what the public IP address is of the branch2 router, we do this with a protocol called NHRP (Next Hop Resolution Protocol). Here’s an explanation of how NHRP works:
- One router will be the NHRP server.
- All other routers will be NHRP clients.
- NHRP clients register themselves with the NHRP server and report their public IP address.
- The NHRP server keeps track of all public IP addresses in its cache.
- When one router wants to tunnel something to another router, it will request the NHRP server for the public IP address of the other router.
Since NHRP uses this server and clients model, it makes sense to use a hub and spoke topology for multipoint GRE. Our hub router will be the NHRP server and all other routers will be the spokes.
Here’s an an illustration of how NHRP works with multipoint GRE:
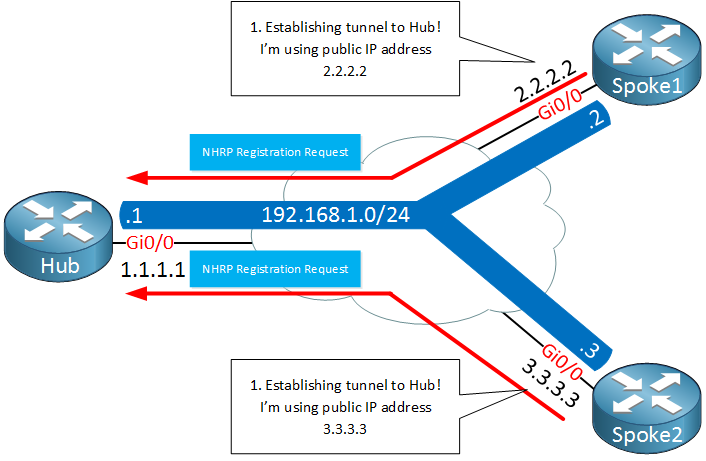
Above we have two spoke routers (NHRP clients) which establish a tunnel to the hub router. Later once we look at the configurations you will see that the destination IP address of the hub router will be statically configured on the spoke routers. The hub router will dynamically accept spoke routers. The routers will use a NHRP registration request message to register their public IP addresses to the hub.
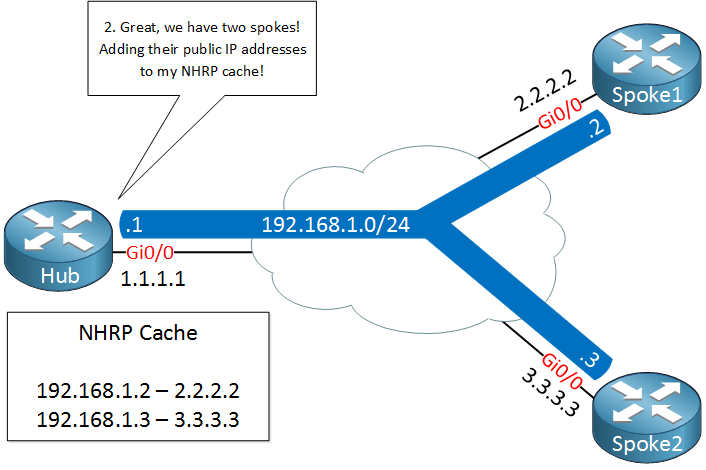
The hub, our NHRP server will create a mapping between the public IP addresses and the IP addresses of the tunnel interfaces.
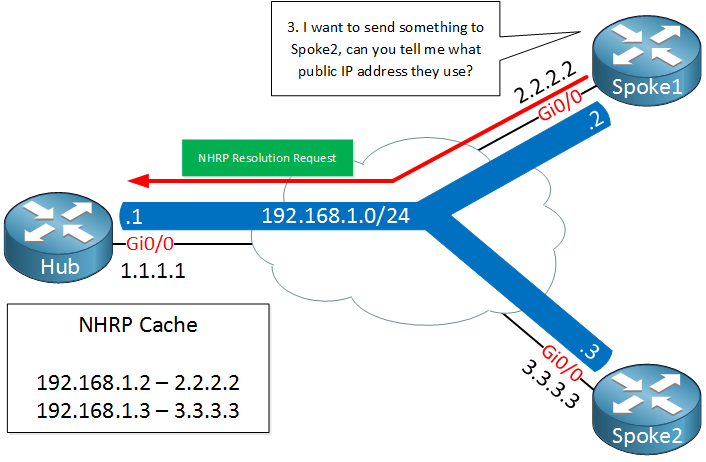
A few seconds later, spoke1 decides that it wants to send something to spoke2. It needs to figure out the destination public IP address of spoke2 so it will send a NHRP resolution request, asking the Hub router what the public IP address of spoke 2 is.

The Hub router checks its cache, finds an entry for spoke 2 and sends the NHRP resolution reply to spoke1 with the public IP address of spoke2.
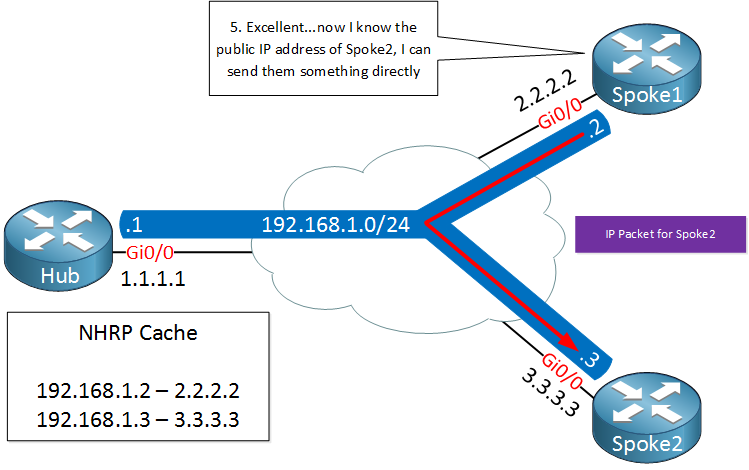
Spoke1 now knows the destination public IP address of spoke2 and is able to tunnel something directly. This is great, we only required the hub to figure out what the public IP address is and all traffic can be sent from spoke to spoke directly.
When we talk about DMVPN, we often refer to an underlay and overlay network:
- The underlay network is the network we use for connectivity between the different routers, for example the Internet.
- The overlay network is our private network with GRE tunnels.
DMVPN has different versions which we call phases, there’s three of them:
- Phase 1
- Phase 2
- Phase 3
Let me give you an overview of the three phases:
Phase 1
With phase 1 we use NHRP so that spokes can register themselves with the hub. The hub is the only router that is using a multipoint GRE interface, all spokes will be using regular point-to-point GRE tunnel interfaces. This means that there will be no direct spoke-to-spoke communication, all traffic has to go through the hub!
Since our traffic has to go through the hub, our routing configuration will be quite simple. Spoke routers only need a summary or default route to the hub to reach other spoke routers.
Phase 2
The disadvantage of phase 1 is that there is no direct spoke to spoke tunnels. In phase 2, all spoke routers use multipoint GRE tunnels so we do have direct spoke to spoke tunneling. When a spoke router wants to reach another spoke, it will send an NHRP resolution request to the hub to find the NBMA IP address of the other spoke.
There are two requirements to make spoke to spoke tunnels work:
Rene,
When would we choose to use Phase 1, 2, or 3, and why? I understand the differences between the three, but do we gain any benefit from implementing one or the other that is noticeable to end users?
It seems to me that perhaps allowing spoke routers to talk to each other may decrease latency in the real world, as they would not have to hop through the hub router, but other than that I’m not sure.
Thanks,
Patrick
Hi Patrick,
The different versions are like an evolution of DMVPN. We don’t really use phase 1 anymore unless you have a really good reason why you want to force all traffic through the hub (security perhaps?). Otherwise, it’s more effective to allow spoke-to-spoke traffic.
Both phase 2 and 3 allow spoke-to-spoke traffic, the advantage of phase 3 is that we use the “shortcuts” so you don’t need specific entries anymore in the routing tables of the spoke routers. I can’t think of any advantages right now that phase 2 has over phase 3 so if you implement this, yo
... Continue reading in our forumGood point on passing traffic through hub for security purposes. Some organizations may require snooping of traffic. Phase 1 sounds like it would be a very limited use case, and phase 3 is the ideal and more often seen implementation.
Thank you for the quick response!
Great explanation Rene, this is the clearest example of DMVPN I’ve ever read and it was easy to read.
Great lab so far. I was able to configure one spoke to the hub.. I got stumped trying to add Spoke 2. Help me understand… Is there only one physical interface on the HUB that I will use to connect to both Spoke routers?? How will I connect to Spoke 2 from the Hub router. It’s just a matter of understanding the Lab diagram and the underlay network. I appreciate your time.. Thanks.