Lesson Contents
FlexVPN also allows us to configure remote-access VPNs which is useful for remote workers. This works with a Cisco proprietary AnyConnect-EAP method. All EAP communication terminates on the FlexVPN server. This is different from standards-based EAP methods such as EAP-MD5 or EAP-GTC, which pass through to an AAA server.
Both local and remote user authentication is possible. Local authentication is a great option for small networks because you don’t need an AAA server.
The FlexVPN server presents a certificate to the remote user so they can check the validity of the FlexVPN server. The clients can authenticate themselves to the FlexVPN server with a username and password or a certificate.
In this lesson, I’ll show you how to configure the FlexVPN server on a router and how to create an AnyConnect profile for our client. By default, Anyconnect uses SSL instead of IPSec so we need a custom profile.
Configuration
Here is the topology we’ll use:
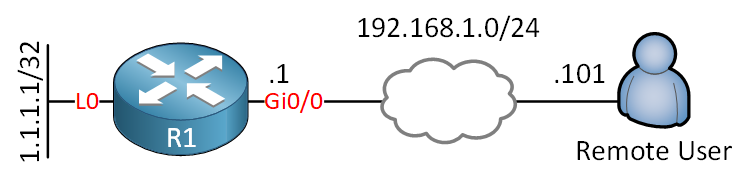
The router runs IOSv version 15.9(3)M2. The client is a Windows 10 computer with AnyConnect Client version 4.8.03052.
PKI
In this example, I will use a self-signed certificate on the router as we did in the FlexVPN PKI authentication lesson.
Certificate Authority (CA)
To communicate with the CA, we need to enable the HTTP server:
R1(config)#ip http server I’ll turn R1 into a CA:
R1(config)#crypto pki server R1-CA
R1(cs-server)#issuer-name cn="R1-CA"
R1(cs-server)#grant auto
R1(cs-server)#no shutdown
%Some server settings cannot be changed after CA certificate generation.

Password:

Re-enter password:
% Generating 1024 bit RSA keys, keys will be non-exportable...
[OK] (elapsed time was 0 seconds)

% Certificate Server enabled.
R1 is now a CA and ready to create certificates.
ID Trustpoint
We are going to create a client certificate for R1. First, we need to set a domain name:
R1(config)#ip domain name NWL.LABWe configure a new trustpoint and set the enrollment URL and subject name:
R1(config)#crypto pki trustpoint R1-CLIENT
R1(ca-trustpoint)#enrollment url http://192.168.1.1
R1(ca-trustpoint)#subject-name cn=R1-CLIENT.LAB.NWL
Let’s accept the certificate from the CA:
R1(config)#crypto pki authenticate R1-CLIENT
Certificate has the following attributes:
       Fingerprint MD5: 41AD31E8 DE034F0C 0F4415EA 37165620
      Fingerprint SHA1: AB9EC15F FBBF7C9A 2F85C44F 654FE42C 3EF77A8E

% Do you accept this certificate? [yes/no]: yes
Trustpoint CA certificate accepted.
Now we can request a client certificate for R1:
R1(config)#crypto pki enroll R1-CLIENT
%
% Start certificate enrollment ..
% Create a challenge password. You will need to verbally provide this
   password to the CA Administrator in order to revoke your certificate.
   For security reasons your password will not be saved in the configuration.
   Please make a note of it.

Password:
Re-enter password:

% The subject name in the certificate will include: cn=R1-CLIENT.LAB.NWL
% The subject name in the certificate will include: R1.NWL.LAB
% Include the router serial number in the subject name? [yes/no]: no
% Include an IP address in the subject name? [no]: no
Request certificate from CA? [yes/no]: yes
% Certificate request sent to Certificate Authority
% The '
' commandwill show the fingerprint.
Excellent, we now have a certificate.
AAA
We are going to use local authentication and local network authorization. I’ll create two lists and a user account that we’ll use for the client:
R1(config)#aaa new-model

R1(config)#aaa authentication login AAA_AUTHENTICATION_LOGIN local
R1(config)#aaa authorization network AAA_AUTHORIZATION_NETWORK local

R1(config)#username test password cisco123
IKEv2
Let’s configure our IKEv2 settings. With some of these settings, you could use smart defaults but I prefer to configure this myself. It’s possible that with new versions of the AnyConnect client, certain protocols don’t work anymore. When this happens, you want to be able to quickly update your configuration.
IKEv2 Authorization Policy
We’ll start with an authorization policy. This is where we configure the pool of IP addresses that we want to use for our clients. I’ll also configure some default settings like a domain name, DNS server, and the remote routes that the client can reach:
R1(config)#crypto ikev2 authorization policy IKEV2_AUTHORIZATION_POLICY
R1(config-ikev2-author-policy)#pool VPN_POOL
R1(config-ikev2-author-policy)#def-domain NWL.LAB
R1(config-ikev2-author-policy)#route set remote ipv4 1.1.1.1 255.255.255.255
R1(config-ikev2-author-policy)#dns 1.1.1.1
Let’s create that pool:
R1(config)#ip local pool VPN_POOL 192.168.10.5 192.168.10.10IKEv2 Proposal
Let’s create an IKEv2 proposal:
R1(config)#crypto ikev2 proposal IKEV2_PROPOSAL
R1(config-ikev2-proposal)#encryption aes-cbc-256
R1(config-ikev2-proposal)#integrity sha256
R1(config-ikev2-proposal)#group 15
IKEv2 Policy
Let’s create an IKEv2 policy:
R1(config)#crypto ikev2 policy default
R1(config-ikev2-policy)#proposal IKEV2_PROPOSAL
IKEv2 Profile
We also need an IKEv2 profile. Here is the configuration:
R1(config)#crypto ikev2 profile IKEV2_PROFILE
R1(config-ikev2-profile)#match identity remote key-id *$AnyConnectClient$*
R1(config-ikev2-profile)#authentication local rsa-sig
R1(config-ikev2-profile)#authentication remote anyconnect-eap aggregate
R1(config-ikev2-profile)#pki trustpoint R1-CLIENT
R1(config-ikev2-profile)#aaa authentication anyconnect-eap AAA_AUTHENTICATION_LOGIN
R1(config-ikev2-profile)#aaa authorization group anyconnect-eap list AAA_AUTHORIZATION_NETWORK IKEV2_AUTHORIZATION_POLICY
R1(config-ikev2-profile)#virtual-template 1
Let me explain what you see above:
match identity remote key id: *$AnyConnectClient$* is the default KEY ID that the AnyConnect client uses.authentication local rsa-sig: The client will authenticate the router through the router’s certificate.authentication remote: The router will authenticate the client using Cisco’s proprietary AnyConnect-EAP method.aaa authentication anyconnect-eap: We refer to the AAA authentication list we want to use for authentication.pki trustpoint: The certificate we want to use.aaa authorization group anyconnect-eap: We refer to the AAA authorization list we want to use for network authorization.virtual-template 1: We attach the IKEv2 profile to a virtual-template that we’ll create in a minute.
IPSec
We need an IPSec transform-set and an IKEv2 profile. I’ll create both:
Hi Rene and the NWL Team,
I managed to resolve nearly all issues by using the same anyconnect version utilised in the lesson (4.8.03052)
However once I click connect anyway after the self-signed certificate warning, anyconnect requests the local AAA credentials upon entering those credentials
“The IPsec VPN connection was terminated due to an authentication failure or timeout”?
Any help would be much appreciated.
P.S I am using IOS 15.7(3)(M3)
Hello Taha
Keep in mind that the AnyConnect client depending upon its version can support various different configurations. You may have configured the ASA exactly the same way as in the lesson, but the client may or may not support certain configurations.
You may also find that depending upon your operating system or connecting device (Windows 10, Windows 7/8, Android, iOS, Mac etc…) you will have different capabilities. The following Cisco community thread describes some of these issues that have resulted in the same error as you are getting here. Hopeful
... Continue reading in our forumAfter consistently spending time in the lab troubleshooting/reading/learning the fundamentals of IKEV2. I was able to use the false positive debug information to track the root cause of this “passed authentication and failed authorization” issue.
I have finally managed to resolve this issue and I hope this small write-up will help others in future too.
I was using the same version of anyconnect 4.8 in the article and IOS 15.7.
Authorization Failure:
The article really helped! however it left out a small issue:
https://networklessons.com/vpn/flexvpn-site-to-sit
... Continue reading in our forumHello Taha
I suggest you go into the device and take a look at the syslogs. They should tell you the reason for the failure. If it is credentials, if it is a mismatch in authentication parameters, or if it is actually a timeout. Looking at the logs will give you a clearer picture so that you can more correctly approach the troubleshooting process…
I hope this has been helpful!
Laz
Hi Lazaros
I have been using debug crypto ikev2.
This really helped, unfortunately didn’t point me in the right direction, but it made a difference. I could see the client was replying back to the server with authen credentials! It gave me the exact line that was failing. So I knew where to start
Taha