Lesson Contents
Manually creating and launching VMs, containers, and network devices is not the way to go. There are three main reasons why you shouldn’t do this:
- It takes too much time.
- It’s easy to make errors.
- It’s not scalable.
Instead, we should use network automation and orchestration tools. What is this about?
Network automation, in its most simple form, is automating a task, so it runs on its own without human intervention. Here are three examples of tasks that you could automate:
- Reset the OSPF process on three routers.
- Create a new VLAN on all your switches.
- Create a new loopback interface on five routers.
You can automate these tasks with scripts or tools. You could write scripts with:
- Bash: the default login shell on most Linux distributions supports scripting.
- TCL: a scripting language that works on Cisco IOS routers.
- Python: programming language you can use from simple scripts to complex programs.
There are also (open-source) tools you can use for network automation. For example:
- Ansible
- Chef
- Puppet
Ansible is a great tool to start with if you are new to network automation. It’s easy to get started with and very powerful.
What about orchestration? Wikipedia has a good one-liner:
Orchestration is the automated configuration, coordination, and management of computer systems and software.
What does this mean exactly?
With orchestration, we describe what we want, not how we want it. Figuring out how is the orchestration tool’s job.
We can tell the orchestrator what we want through the CLI, GUI, or send YAML/JSON files with our specifications. The orchestrator then takes care of everything, including:
- Translate our request into configuration tasks for our network devices to execute.
- Check which hardware devices have enough resources to meet our request.
- Send the configuration tasks to the hardware device.
- Monitor progress of the tasks we sent to the hardware device.
- Rollback in case of failure.
Other than the initial communication with the orchestrator, there is no human intervention in the entire process. In this lesson, you will see how you can use Ansible for network automation and I’ll demonstrate the Kubernetes orchestrator.
Ansible
Ansible is a network automation or orchestration tool that lets you turn tasks into repeatable playbooks. You can use it for Linux, MacOS, Windows, and Network Devices. There are three types of tasks you can automate:
- Provisioning
- Configuration management
- Application deployment
It’s a great tool to start with to automate repetitive tasks.
Configuration
Let’s look at Ansible in action.
I’ll show you an example of how to manage an Ubuntu server and a Cisco IOS device.
Linux (Ubuntu)
Even if you have never worked with Linux before, you will be able to follow this example.
I have a brand new Ubuntu server with SSH configured. That’s it. I want to manage this server with Ansible from my computer. The only requirement for Ansible on the remote server is Python so let’s install that:
sudo apt-get update && sudo apt-get install python -yAnsible requires an inventory file where we add the IP address, username, password, and sudo password of the server we want to manage. You can find all the files I use in this lesson in our git repository.
Here’s my inventory file:
ubuntu-test-server ansible_host=10.56.101.21

[all:vars]
ansible_connection=ssh
ansible_user=vmware
ansible_password=vmware
ansible_sudo_pass=vmware
To perform an action on the server, we need to create playbooks. A playbook is a YAML file. Let’s create one to update all packages on the server:
- hosts: ubuntu-servers
  become: yes
  tasks:
  - name: upgrade packages
    apt:
      upgrade: yes
      update_cache: yes
Let me walk you through this file:
- We target all “ubuntu-servers” hosts. This matches the entry in my inventory file.
- “become: yes” means we use the sudo command.
- Tasks are the commands we want to run. In this case, we want to upgrade all packages.
Let’s run the playbook:
ansible-playbook -i ./inventory/hosts playbooks/update_upgrade_packages.yml

PLAY [ubuntu-servers]
****************************

TASK [Gathering Facts]
****************************
ok: [ubuntu-test-server]

TASK [upgrade packages]
****************************
[WARNING]: Could not find aptitude. Using apt-get instead.

changed: [ubuntu-test-server]

PLAY RECAP
****************************
ubuntu-test-server         : ok=2    changed=1    unreachable=0    failed=0
Ansible tells me it ran the playbook and the “ok=2” tells me there are no errors. Let’s look at another example. What if I want to install a package? For example, the Apache webserver. Let’s create another playbook:
# Install Apache Webserver
- hosts: ubuntu-servers
  become: yes
  tasks:
  - name: Install Apache
    package:
      name: apache2
      state: present
Let’s run the playbook:
ansible-playbook -i ./inventory/hosts playbooks/install_apache.yml

PLAY [ubuntu-servers]
****************************

TASK [Gathering Facts]
****************************
ok: [ubuntu-test-server]

TASK [Install Apache]
****************************
changed: [ubuntu-test-server]

PLAY RECAP
****************************
ubuntu-test-server         : ok=2    changed=1    unreachable=0    failed=0
Ansible tells me that it went OK and also shows “changed=1” which means it successfully ran the playbook. Ansible checks if a package is already installed. If I run the playbook again, you can see it won’t try to install the package again:
ansible-playbook -i ./inventory/hosts playbooks/install_apache.yml

PLAY [ubuntu-servers]
****************************

TASK [Gathering Facts]
****************************

ok: [ubuntu-test-server]

TASK [Install Apache]
****************************

ok: [ubuntu-test-server]

PLAY RECAP
****************************
ubuntu-test-server         : ok=2    changed=0    unreachable=0    failed=0
In the output above, you see that the number of changes is now 0. Let’s copy a test HTML file to our web server:
ansible-playbook -i ./inventory/hosts playbooks/copy_html_file.yml
PLAY [ubuntu-servers]
****************************

TASK [Gathering Facts]
****************************
ok: [ubuntu-test-server]

TASK [Copy index.html to /var/www/html]

****************************
changed: [ubuntu-test-server]

PLAY RECAP
****************************
ubuntu-test-server         : ok=2    changed=1    unreachable=0    failed=0
Ansible was able to copy our HTML file. Let’s request that webpage:
curl http://10.56.101.21/index.html
<!DOCTYPE html PUBLIC "-//IETF//DTD HTML 2.0//EN">
<HTML>
   <HEAD>
      <TITLE>
         A Small Hello
      </TITLE>
   </HEAD>
<BODY>
   <H1>Hi</H1>
   <P>This is very minimal "hello world" HTML document.</P>
</BODY>
</HTML>
Excellent. Our web server is up and running and we are able to request our test HTML page.
Cisco
What about Cisco devices? Let’s try Ansible in combination with four Cisco Catalyst IOS switches.
Here is my inventory file:
[distribution]
DSW1 ansible_host=172.16.1.101
DSW2 ansible_host=172.16.1.102

[access]
ASW1 ansible_host=172.16.1.103
ASW2 ansible_host=172.16.1.104

[campus:children]
distribution
access

[all:vars]
ansible_user=admin
ansible_password=cisco
I have two distribution layer switches called DSW1 and DSW2. We also have two access layer switches called ASW1 and ASW2. The four switches together make up the campus network. To keep it simple, I specify the SSH username and password in my inventory file. This is fine for a lab but don’t use this on a production network.
Let’s see if I can run the show ip interface brief command through Ansible on all switches. Here is the playbook:
---
- hosts: campus
  gather_facts: no
  connection: local

  tasks:
  - name: Configure credentials
    set_fact:
      provider:
        host: "{{ ansible_host }}"
        username: "{{ ansible_user }}"
        password: "{{ ansible_password }}"

  - name: RUN 'show ip interface brief'
    ios_command:
      provider: "{{ provider }}"
      commands:
        - show ip interface brief
    register: ip_interfaces

  - debug: var=ip_interfaces.stdout_lines
Let’s run it:
ansible-playbook -i ./inventory/hosts playbooks/show_ip_interface_brief.yml

PLAY [campus]
****************************

TASK [Configure credentials]
****************************

ok: [DSW1]
ok: [DSW2]
ok: [ASW1]
ok: [ASW2]

TASK [RUN 'show ip interface brief']
****************************

ok: [ASW1]
ok: [ASW2]
ok: [DSW2]
ok: [DSW1]

TASK [debug]
****************************

ok: [DSW1] => {
    "ip_interfaces.stdout_lines": [
        [
    "Interface              IP-Address      OK? Method Status                Protocol",
    "GigabitEthernet0/0     172.16.1.101    YES NVRAM  up                    up      ",
    "GigabitEthernet0/1     unassigned      YES unset  up                    up      ",
    "GigabitEthernet0/2     unassigned      YES unset  up                    up      ",
    "GigabitEthernet0/3     unassigned      YES unset  up                    up      ",
    "GigabitEthernet1/0     unassigned      YES unset  up                    up      ",
    "GigabitEthernet1/1     unassigned      YES unset  up                    up      ",
    "GigabitEthernet1/2     unassigned      YES unset  up                    up      ",
    "Loopback0              unassigned      YES unset  up                    up"
        ]
    ]
}
ok: [DSW2] => {
    "ip_interfaces.stdout_lines": [
        [
    "Interface              IP-Address      OK? Method Status                Protocol",
    "GigabitEthernet0/0     172.16.1.102    YES NVRAM  up                    up      ",
    "GigabitEthernet0/1     unassigned      YES unset  up                    up      ",
    "GigabitEthernet0/2     unassigned      YES unset  up                    up      ",
    "GigabitEthernet0/3     unassigned      YES unset  up                    up      ",
    "GigabitEthernet1/0     unassigned      YES unset  up                    up      ",
    "GigabitEthernet1/1     unassigned      YES unset  up                    up      ",
    "GigabitEthernet1/2     unassigned      YES unset  up                    up      ",
    "Loopback0              unassigned      YES unset  up                    up"
        ]
    ]
}
ok: [ASW1] => {
    "ip_interfaces.stdout_lines": [
        [
    "Interface              IP-Address      OK? Method Status                Protocol",
    "GigabitEthernet0/0     172.16.1.103    YES NVRAM  up                    up      ",
    "GigabitEthernet0/1     unassigned      YES unset  up                    up      ",
    "GigabitEthernet0/2     unassigned      YES unset  up                    up      ",
    "GigabitEthernet0/3     unassigned      YES unset  up                    up      ",
    "GigabitEthernet1/0     unassigned      YES unset  up                    up"
        ]
    ]
}
ok: [ASW2] => {
    "ip_interfaces.stdout_lines": [
        [
    "Interface              IP-Address      OK? Method Status                Protocol",
    "GigabitEthernet0/0     172.16.1.104    YES NVRAM  up                    up      ",
    "GigabitEthernet0/1     unassigned      YES unset  up                    up      ",
    "GigabitEthernet0/2     unassigned      YES unset  up                    up      ",
    "GigabitEthernet0/3     unassigned      YES unset  up                    up      ",
    "GigabitEthernet1/0     unassigned      YES unset  up                    up      ",
    "Loopback0              unassigned      YES unset  up                    up"
        ]
    ]
}

PLAY RECAP
****************************

ASW1                       : ok=3    changed=0    unreachable=0    failed=0
ASW2                       : ok=3    changed=0    unreachable=0    failed=0
DSW1                       : ok=3    changed=0    unreachable=0    failed=0
DSW2                       : ok=3    changed=0    unreachable=0    failed=0
Very nice. We see the output of the show ip interface brief command on all four switches. Let’s try something more advanced. How about a playbook that does three things:
- Create a backup of the running-configuration and save it to a local folder on our computer.
- Configure the Google DNS servers.
- Configure an NTP server.
Here’s the playbook:
- hosts: campus
  gather_facts: no
  connection: local

  tasks:

  - name: Configure credentials
    set_fact:
      provider:
        host: "{{ ansible_host }}"
        username: "{{ ansible_user }}"
        password: "{{ ansible_password }}"

  - name: Backup Configuration
    ios_config:
      provider: "{{ provider }}"
      backup: yes

  - name: RUN 'Set DNS'
    ios_config:
      provider: "{{ provider }}"
      lines:
        - ip name-server 8.8.8.8
        - ip name-server 8.8.4.4

  - name: RUN 'Set NTP'
    ios_config:
      provider: "{{ provider }}"
      lines:
        - ntp server nl.pool.ntp.org
Let’s run this playbook:
ansible-playbook -i ./inventory/hosts playbooks/configure_ntp_dns.yml

PLAY [campus]
****************************

TASK [Configure credentials]
****************************

ok: [DSW1]
ok: [DSW2]
ok: [ASW1]
ok: [ASW2]

TASK [Backup Configuration]
****************************

ok: [ASW1]
ok: [ASW2]
ok: [DSW1]
ok: [DSW2]

TASK [RUN 'Set DNS']
****************************

changed: [ASW1]
changed: [DSW2]
changed: [ASW2]
changed: [DSW1]

TASK [RUN 'Set NTP']
****************************

changed: [ASW1]
changed: [DSW2]
changed: [ASW2]
changed: [DSW1]

PLAY RECAP
****************************

ASW1                       : ok=4    changed=2    unreachable=0    failed=0
ASW2                       : ok=4    changed=2    unreachable=0    failed=0
DSW1                       : ok=4    changed=2    unreachable=0    failed=0
DSW2                       : ok=4    changed=2    unreachable=0    failed=0
Ansible tells us it changed all four switches. Let’s verify this:
DSW1#show run | include server
ip name-server 8.8.8.8
ip name-server 8.8.4.4
ntp server nl.pool.ntp.org
Excellent. We see the commands we ran through our playbook.
You have now seen some simple examples of how you can use Ansible. You don’t have to build your playbooks from scratch. There are many pre-built roles that you can add to your playbooks.
In my Ubuntu web server example we installed the Apache web server and uploaded an HTML file. That’s only part of the story though. There are many steps required to run a web server in production. Instead of building your own playbook, you can try one of the apache roles.
Kubernetes
Google uses containers for pretty much everything they run: Gmail, Google Apps, GSuite, YouTube, etc. At Google’s scale, they really need orchestration.
Google published a paper in 2015 about Borg, their internal orchestration system for containers.
Kubernetes is an open-source orchestration platform for containers. It’s built from the ground up with the best ideas from Borg. You can use Kubernetes in the cloud or bare metal environments.
There are other container orchestration platforms like Docker Swarm but Kubernetes has won the battle. Even Docker Desktop nowadays includes support for Kubernetes.
Nodes and Pods
Let’s look at an overview of how Kubernetes works. Take a look at the following picture:
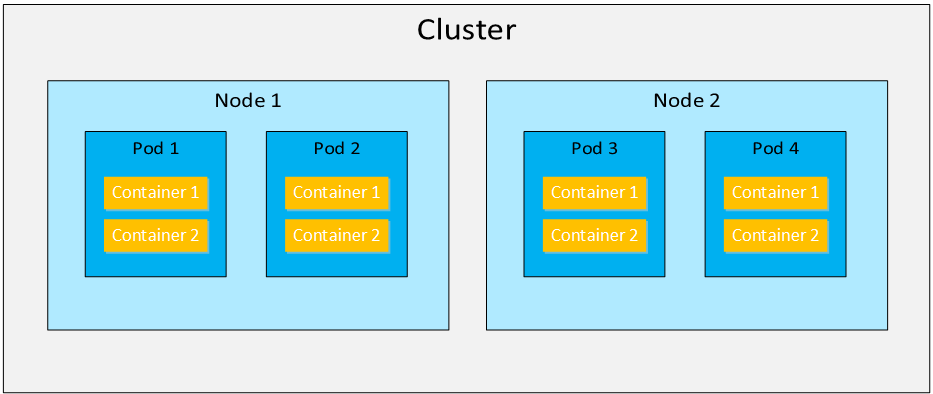
A Kubernetes cluster is a collection of nodes. A node is a physical server or VM. A pod is a collection of one or more containers. The containers in the pod together make up an application. For example, a simple website could use two containers in one pod:
- nginx: web server software to process HTTP requests.
- php-fpm: software to process PHP files.
A pod is the smallest entity that Kubernetes can schedule. Even if you use a single container, it will always be in a pod. Each pod has a single IP address and containers in the pod communicate with each other with the localhost (127.0.0.1) IP address. We can start, stop, or replicate pods.
Services
Kubernetes pods are replaceable. When a pod crashes, we don’t resurrect it but we replace it instead. When a node crashes, the Kubernetes cluster creates new pods on other nodes to return to the desired cluster state. We can also replicate pods to scale up our application. This is useful for a website application that suddenly receives more user traffic.
Each pod has a unique IP address ,but how do we figure out what pods are available and what their IP addresses are?
A Kubernetes service defines a set of pods and a policy how we can access the pods. Here is a picture to help you visualize this:
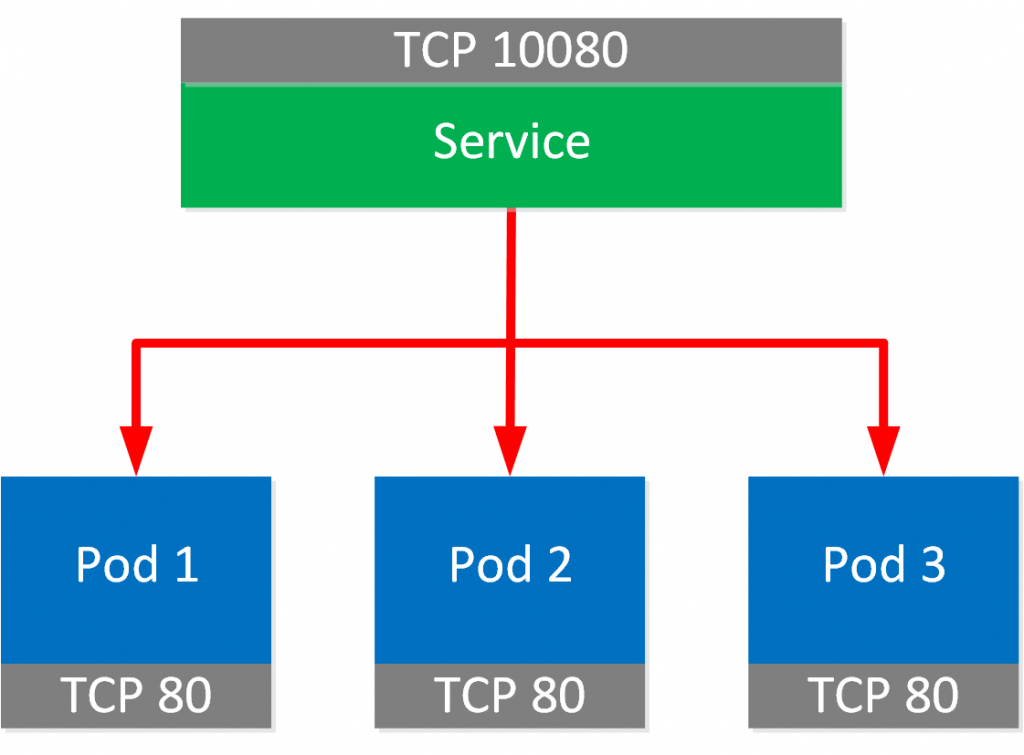 A service is linked to a set of pods. We can connect through the service on TCP port 10080 and the traffic is forwarded to the pods that listen on TCP port 80.
Cluster
A Kubernetes cluster consists of multiple components. Here is an overview picture:
Hi Rene. Its been a very long time since we spoke. Still a huge fan of your website. You helped me through my CCNP/CCIE(written) studies. I will always be eternally grateful
That being said I am entering the phase in my career will automation through Python is a great interest. Will you write an article about Python for Network Engs? Im thinking about Python + REST apis + Postman. If the article can be written like this network automation and orchestration article I think it will greatly help alot of people. No in depth knowledge of Python or REST is even needed. What do you think?
Hi Michael,
You are very welcome, it’s good to hear my work has been so useful to you. I’m definitely going to add some python material in the future. The “evolving technologies” blueprint also has REST APIs so I’m going to write some articles what REST APIs are and how to play around with postman or python.
It doesn’t take too long to learn python and use it to talk with APIs or manage network devices. It’s a lot of fun too.
Rene
Seems like the Network Automation and Orchestration link is broken. getting 403 error message.
Did the topic link has moved to other location.
Hi Ankit
I tried it out now and it seems to work. Can you tell me from which page you are trying to link? The page may be up but the link may be incorrect. Let us know and we’ll fix it.
Thanks!
Laz
page timed out error was related to my vpn connection..thanks.