Lesson Contents
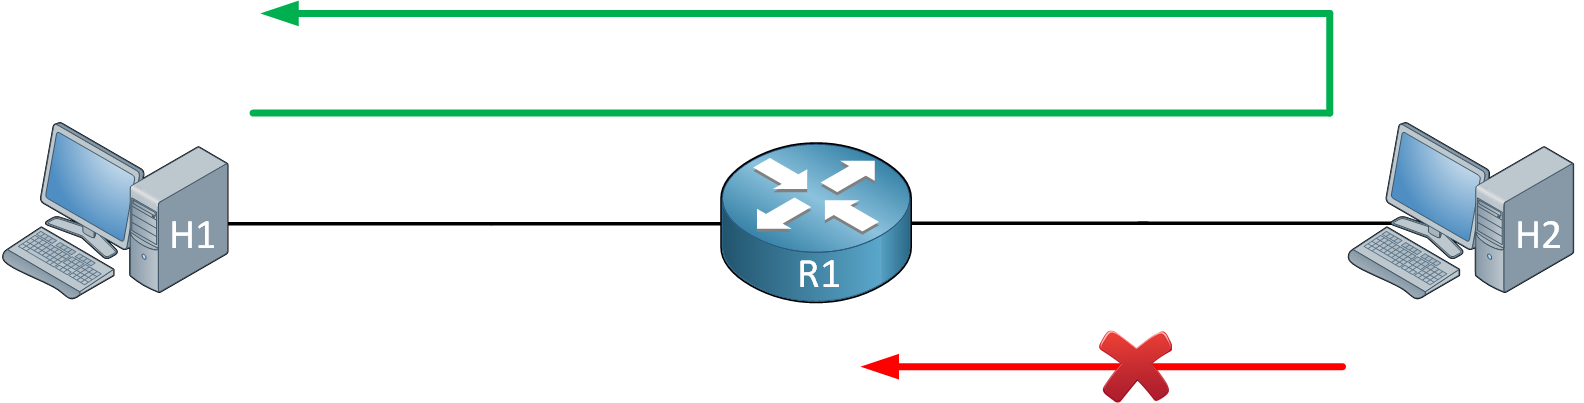
Cisco IOS access-lists allow you to use the established parameter to check for “established” connections. You can use this if you want to allow one side to initiate connections and permit the return traffic while denying connections that are initiated from the other side. Here is a visualization:
The established parameter looks for the Acknowledge (ACK) or Reset (RST) flags in a TCP packet. To understand how this works, take a look at the following capture file:
Packet Capture: H1 H2 Telnet Traffic
The first three packets contain the TCP three-way handshake:
- Packet 1: H1 initiates a connection and sets the SYN flag.
- Packet 2: H2 replies and sets the ACK and SYN flags.
- Packet 3: H1 replies with the ACK flag set.
If we only want H1 to be able to initiate a connection with H2, we can create an inbound access-list on R1’s interface that connects to H2 which looks for the ACK flag in that second packet. Everything else will be denied. If H2 tries to initiate a connection, the first packet will have the SYN flag set which isn’t permitted in the access-list.
Configuration
Let’s try this in action. This is the topology we’ll use:

We’ll make sure that H1 can initiate a connection with H2 but not the other way around. I am using IOS Version 15.9(3)M2.
Configurations
Want to take a look for yourself? Here you will find the startup configuration of each device.
H1
hostname H1
!
no ip routing
!
no ip cef
!
interface GigabitEthernet0/0
 ip address 192.168.1.1 255.255.255.0
!
ip default-gateway 192.168.1.254
!
line vty 0 4
 login
 transport input telnet
!
end
H2
hostname H2
!
no ip routing
!
no ip cef
!
interface GigabitEthernet0/0
 ip address 192.168.2.2 255.255.255.0
!
ip default-gateway 192.168.2.254
!
line vty 0 4
 login
 transport input telnet
!
end
R1
hostname R1
!
ip cef
!
interface GigabitEthernet0/0
 ip address 192.168.1.254 255.255.255.0
!
interface GigabitEthernet0/1
 ip address 192.168.2.254 255.255.255.0
!
end
We’ll create an access-list where we check for TCP traffic that uses source port 23 (telnet) and which has the ACK or RST flag set:
R1(config)#ip access-list extended ESTABLISHED
R1(config-ext-nacl)#permit tcp any eq telnet any established
And we’ll apply it inbound on the interface that connects to H2:
R1(config)#interface GigabitEthernet 0/1
R1(config-if)#ip access-group ESTABLISHED in
This completes our configuration.
Verification
To see our packet drop(s) in action, I’ll enable a debug:
R1#debug ip packet
IP packet debugging is on
Let’s try to telnet from H1 to H2:
H1#telnet 192.168.2.2
Trying 192.168.2.2 ... Open
This is working as it should. We can see the hits on our access-list:
R1#show access-lists
Extended IP access list ESTABLISHED
    10 permit tcp any eq telnet any established (8 matches)
Let’s try to telnet from H2 to H1:
H2#telnet 192.168.1.1
Trying 192.168.1.1 ...
% Destination unreachable; gateway or host down
This is not working, excellent. You’ll see these debug packets on R1:
R1#
IP: s=192.168.2.2 (GigabitEthernet0/1), d=192.168.1.1, len 44, access denied
IP: s=192.168.2.2 (GigabitEthernet0/1), d=192.168.1.1, len 44, input feature, packet consumed, Access List(47), rtype 0, forus FALSE, sendself FALSE, mtu 0, fwdchk FALSE
These packets are denied by our access-list. Mission accomplished.
Configurations
Want to take a look for yourself? Here you will find the final configuration of each device.
H1
hostname H1
!
no ip routing
!
no ip cef
!
interface GigabitEthernet0/0
 ip address 192.168.1.1 255.255.255.0
!
ip default-gateway 192.168.1.254
!
 login
 transport input telnet
!
end
H2
hostname H2
!
no ip routing
!
no ip cef
!
interface GigabitEthernet0/0
 ip address 192.168.2.2 255.255.255.0
!
ip default-gateway 192.168.2.254
!
 login
 transport input telnet
!
end
R1
hostname R1
!
ip cef
!
interface GigabitEthernet0/0
 ip address 192.168.1.254 255.255.255.0
!
interface GigabitEthernet0/1
 ip address 192.168.2.254 255.255.255.0
 ip access-group ESTABLISHED in
!
ip access-list extended ESTABLISHED
 permit tcp any eq telnet any established
!
end
Conclusion
You have now learned how to configure an access-list that permits established connections by looking for the TCP ACK or RST flags.
Great lesson thank you.