Lesson Contents
There are different reasons why things go wrong on our networks. Humans make errors in their configurations, hardware can fail, software updates may include bugs, and changing traffic patterns might cause congestion on our networks. To troubleshoot these errors there are different approaches and some are more effective than others.
Troubleshooting consists of 3 steps:

It all starts when someone or something reports a problem. Often this will be a user that calls the helpdesk because something is not working as expected but it’s also possible that you find issues because of network monitoring (you do monitor your network right?). The next step is to diagnose the problem, and it’s important to find the root of the problem. Once you have found out the problem you will implement a (temporary) solution.
Diagnosing the problem is one of the most important steps to do because we need to find the root cause of the problem. Here’s what we do to diagnose the problem:
- Collect information: Most of the time a problem report doesn’t give us enough information. Users are very good at reporting “network is down” or “my computer doesn’t work” but this doesn’t tell us anything. We need to collect information by asking our users detailed questions or we use network tools to gather information.
- Analyze information: Once we have gathered all information, we will analyze it to see what is wrong. We can compare our information to previously collected information or other devices with similar configurations.
- Eliminate possible causes: We need to think about the possible causes and eliminate the potential causes of the problem. This requires thorough knowledge of the network and all the protocols that are involved.
- Hypothesize: After eliminating possible causes you will end up with a couple of possible causes that could be the problem. We will select the most likely cause of the problem.
- Verify hypothesis: We will test our hypothesis to see if we are right or wrong. If we are right, we have a victory…if we are wrong, we try our other possible causes.
If you don’t use a structured approach for troubleshooting, you might “follow your gut feeling” and get confused because you forget what you already tried. It’s also easier if you work together with other network engineers because you can share the steps you already went through.
Structured Troubleshooting Approach
Here are the steps in a nice flowchart:
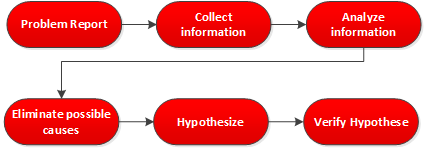
We call this the structured troubleshooting approach. However, if you have a lot of experience with the network you are working on and as you become better at troubleshooting, this approach might be too time-consuming.
Shoot from the hip
Instead of walking through all the different steps in the structured troubleshooting approach, we can also jump from the “collect information” step directly to the “hypothesize” step and skip the “analyze information” and “eliminate possible causes” steps. If you are inexperienced with troubleshooting it’s best to use the structured troubleshooting approach. As you become better at troubleshooting, you might want to skip some of the steps…we call this the shoot-from-the-hip approach:
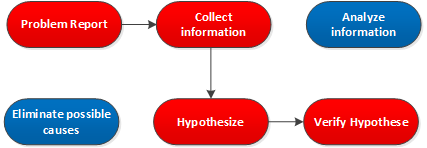
Here’s the shoot from the hip model. The steps that we skip are in blue. If your instincts are wrong, you won’t lose your life, but you will lose valuable time. If you are right, however, you’ll save a lot of time (or become the new sheriff in town).
Troubleshooting approaches
Eliminating possible causes is an important step in the troubleshooting process, and there are a couple of approaches to how you can do this. Here they are:
- Top-down.
- Bottom-up.
- Divide and conquer.
- Follow the traffic path.
- Spot the difference.
- Replace components.
Let’s walk through the different approaches one by one!
Top-Down

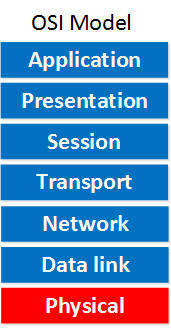
Top-down means we start at the top of the OSI model (application layer) and work our way further down to the bottom. The idea is that we will check the application to see if it’s working and assume that if a certain layer is working that all the layers below are also working. If you send a ping from one computer to another (ICMP) you can assume that layers 1,2 and 3 are operational. The downside of this approach is that you need access to the application you are troubleshooting.
Bottom-Up
Bottom-up means we start at the bottom of the OSI model, and we’ll work our way up. We will start with the physical layer, which means we check our cables and connectors, move up to the data link layer to see if Ethernet is working, Spanning tree is working ok, port security is not causing issues, VLANs are configured properly, and then move onto the network layer. Here we will check our IP addresses, access-lists, routing protocols and so on. This approach is very thorough but also time-consuming. If you are new to troubleshooting, I would recommend using this method because you will eliminate all the possible causes for problems.
Divide and conquer
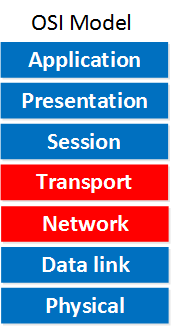
Divide and conquer means we start in the middle of the OSI model.
You can use this model if you are not sure if top-down or bottom-up is more effective. The idea is that you’ll try to send a ping from one device to another. If the ping works, you know that layers 1-3 are operational, and you can work your way up in the OSI model. If the ping fails, you know something is not right, and you’ll work your way to the bottom of the OSI model.
Follow the traffic path

The follow the traffic path is very useful. First, we’ll try to send a ping from H1 to H2. If it fails, we’ll check all the devices in its path. First, we’ll verify if SW1 is configured correctly, it it’s looking good, we’ll move on to SW2, verify it, and then move on to R1.
Spot the difference

You’ve probably done one of these before. Spotting the difference in configurations or the output of show commands can be useful, but it’s very easy to miss something. If you have a number of branch routers with a similar configuration and only one is not working, you can see if there’s a difference in the configuration. Network engineers that don’t have a lot of experience usually use this approach. You might be able to solve the problem, but there’s a risk that you don’t really know what you are doing.
great blog … thanks
So Good and very helpful for me.Thanks you RENE!!! Your are very good for us.
I wanted to add some details about the “Collect Information” step:
Those are some good pointers Tristan, thanks for sharing!
I really enjoyed this lesson so much I memorized the main topics as I like letter groupings so I did CAE HV and TBD FSR don’t ask me why that is easy for me to remember but something about those stick in my memory. Just like
E ACE WNI D for the log messages. I sometimes forget a letters meaning but a quick look puts it back in my memory for weeks if not longer. The grouping is also important for me remember… weird huh lol…
Anyway I really liked this lesson it stood out for me as one of my favorites.