Lesson Contents
Like any other routing protocol, IS-IS supports authentication. You can choose between plain text or HMAC-MD5 authentication, and there are some different options that define which packets will be authenticated. In this lesson, I’ll walk you through the different options.
Configuration
Here’s the topology I will use:
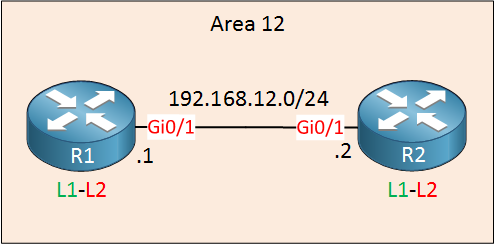
We have two routers in the same area. Both routers are configured as level 1-2 routers (the default).
Configurations
Want to take a look for yourself? Here you will find the startup configuration of each device.
R1
hostname R1
!
ip cef
!
interface GigabitEthernet0/1
 ip address 192.168.12.1 255.255.255.0
 ip router isis
!
router isis
 net 49.0012.0000.0000.0001.00
 log-adjacency-changes
!
end
R2
hostname R2
!
ip cef
!
interface GigabitEthernet0/1
 ip address 192.168.12.2 255.255.255.0
 ip router isis
!
router isis
 net 49.0012.0000.0000.0002.00
 log-adjacency-changes
!
end
Clear Text Authentication
Let’s start with clear text (plain text) authentication. There are three options to choose from:
- Interface authentication
- Area authentication
- Domain authentication
As the names imply, you can enable authentication on the interface level, per area or domain. However, these three options also define which packets will be authenticated! These commands that I’m about to show you are the “old” method of configuring IS-IS authentication.
Let’s take a look at each authentication method, and you will see what I’m talking about.
Interface Authentication
Let’s go to the interface. We use the isis password command here to set a password for authentication:
R1(config)#interface GigabitEthernet 0/1
R1(config-if)#isis password MY_PASSWORD ?
level-1 Specify password for level-1 PDUs
level-2 Specify password for level-2 PDUs
<cr>Optionally, you can choose for which level you want to enable authentication. If you don’t add this, then it will be applied to both level 1 and 2 neighbor adjacencies. Let’s do this on both routers:
R1(config)#interface GigabitEthernet 0/1
R1(config-if)#isis password MY_PASSWORD

R2(config)#interface GigabitEthernet 0/1
R2(config-if)#isis password MY_PASSWORD
Once you enable this, authentication is only enabled for hello packets. LSPs and SNPs are still unauthenticated. Here’s an example of an authenticated hello packet:
Frame 1483: 1514 bytes on wire (12112 bits), 1514 bytes captured (12112 bits) on interface 0
IEEE 802.3 Ethernet
Logical-Link Control
ISO 10589 ISIS InTRA Domain Routeing Information Exchange Protocol
ISIS HELLO
    .... ..11 = Circuit type: Level 1 and 2 (0x3)
    0000 00.. = Reserved: 0x00
    SystemID {Sender of PDU}: 0000.0000.0001
    Holding timer: 10
    PDU length: 1497
    .100 0000 = Priority: 64
    0... .... = Reserved: 0
    SystemID {Designated IS}: 0000.0000.0001.01
    Authentication (t=10, l=12)
        Type: 10
        Length: 12
        clear text (1), password (length 11) = MY_PASSWORD
    Protocols Supported (t=129, l=1)
    Area address(es) (t=1, l=4)
    IP Interface address(es) (t=132, l=4)
    Restart Signaling (t=211, l=3)
    IS Neighbor(s) (t=6, l=6)
    Padding (t=8, l=255)
    Padding (t=8, l=255)
    Padding (t=8, l=255)
    Padding (t=8, l=255)
    Padding (t=8, l=255)
    Padding (t=8, l=141)
As you can see above, the password is sent in clear text.
Packet Capture: IS-IS Plain Text Authentication Hello Packet
Area Authentication
This enabled authentication for the area. In my example, R1 and R2 are in area 0012. This option will authenticate LSPs that are exchanged and optionally, SNPs. Hello packets are not authenticated.
Here’s how to configure it:
R1(config)#router isis
R1(config-router)#area-password MY_PASSWORD ?
  authenticate  Authentication
  <cr>
Above you can see that I have set a password. The authenticate parameter has one option:
R1(config-router)#area-password MY_PASSWORD authenticate ?
  snp  SNP PDUs
This is how you can include SNPs. I’ll stick to LSPs for now. Let’s configure this on both routers:
R1(config)#router isis
R1(config-router)#area-password MY_PASSWORDR2(config)#router isis
R2(config-router)#area-password MY_PASSWORDAfter enabling area authentication, you will see that LSPs are now authenticated:
Frame 638: 117 bytes on wire (936 bits), 117 bytes captured (936 bits) on interface 0
IEEE 802.3 Ethernet
Logical-Link Control
ISO 10589 ISIS InTRA Domain Routeing Information Exchange Protocol
ISO 10589 ISIS Link State Protocol Data Unit
    PDU length: 100
    Remaining lifetime: 1199
    LSP-ID: 0000.0000.0001.00-00
    Sequence number: 0x00000002
    Checksum: 0xffd5 [correct]
    [Checksum Status: Good]
    Type block(0x03): Partition Repair:0, Attached bits:0, Overload bit:0, IS type:3
    Authentication (t=10, l=12)
        Type: 10
        Length: 12
        clear text (1), password (length 11) = MY_PASSWORD
    Area address(es) (t=1, l=4)
    Protocols supported (t=129, l=1)
    Hostname (t=137, l=2)
    IS Reachability (t=2, l=12)
    IP Interface address(es) (t=132, l=4)
    IP Internal reachability (t=128, l=24)
As expected, the password shows up in clear text.
IS-IS plain text authentication LSP
If you want your SNPs to be authenticated as well, then we can enable that extra parameter. There is one more option, however:
R1(config)#router isis
R1(config-router)#area-password MY_PASSWORD authenticate snp ?
  send-only  Send but do not check PDUs on receiving
  validate   Send and check PDUs on receiving
You can choose if you want to send authenticated packets but accept unauthenticated packets. This can be useful if you are migrating from a non-authenticated scenario to an authenticated scenario. In our lab, we’ll validate everything right away:
R1(config)#router isis
R1(config-router)#area-password MY_PASSWORD authenticate snp validateR2(config)#router isis
R2(config-router)#area-password MY_PASSWORD authenticate snp validateFrom now on, SNPs will be authenticated. Here’s an example of a CSNP:
Frame 173: 114 bytes on wire (912 bits), 114 bytes captured (912 bits) on interface 0
IEEE 802.3 Ethernet
Logical-Link Control
ISO 10589 ISIS InTRA Domain Routeing Information Exchange Protocol
ISO 10589 ISIS Complete Sequence Numbers Protocol Data Unit
    PDU length: 97
    Source-ID: 0000.0000.0001.00
    Start LSP-ID: 0000.0000.0000.00-00
    End LSP-ID: ffff.ffff.ffff.ff-ff
    Authentication (t=10, l=12)
        Type: 10
        Length: 12
        clear text (1), password (length 11) = MY_PASSWORD
    LSP entries (t=9, l=48)
        Type: 9
        Length: 48
        LSP Entry
            LSP-ID: 0000.0000.0001.00-00
        LSP Entry
            LSP-ID: 0000.0000.0001.01-00
        LSP Entry
            LSP-ID: 0000.0000.0002.00-00
Packet Capture: IS-IS Plain Text Authentication CSNP
Domain Authentication
The last option for plain text authentication is domain authentication. This works similar to area authentication expect it is all applied to all routers in the same IS-IS domain. In my case, I’m using the private domain 49. If you do this, authentication will be applied to all routers in the 49 domain. Let’s try this:
R1(config)#router isis
R1(config-router)#domain-password MY_PASSWORDR2(config)#router isis
R2(config-router)#domain-password MY_PASSWORDThe behavior is the same as area authentication. Hello packets are unauthenticated, LSPs will be authenticated. If you also want to authenticate SNPs, you’ll have to include the authenticate snp validate parameter.
HMAC-MD5 Authentication
Clear text authentication is fun but not very safe. A quick Wireshark capture shows us the password. Instead, we can use HMAC-MD5 authentication. It is similar to clear text authentication, but there are only two options:
- Interface authentication
- Instance authentication
There is no area or domain authentication. Instead, authentication can be applied to the IS-IS routing instance. The password is not configured directly, but we use a key-chain instead. I’ll create one on both routers:
R1 & R2
(config)#key chain ISIS_AUTH
(config-keychain)#key 1
(config-keychain-key)#key-string MY_PASSWORD
The name of the keychain and key number can be different (unlike most protocols, the key number is not checked in IS-IS). The key string has to match on both ends.
Interface Authentication
Let’s start with interface authentication. We have to use the isis authentication mode command:
R1(config)#interface GigabitEthernet 0/1
R1(config-if)#isis authentication mode ?
  md5   Keyed message digest
  text  Clear text password
As you can see above, this command is the “new” way of configuring authentication, and it also supports clear text authentication. We are going to use HDMAC-MD5 however:
R1(config-if)#isis authentication mode md5The next thing we have to do is to tell the router which keychain we want to use. Optionally, you can decide if you want to use HMAC-MD5 authentication for level 1, level 2 or both:
R1(config-if)#isis authentication key-chain ISIS_AUTH ?
  level-1  ISIS authentication for level-1 PDUs
  level-2  ISIS authentication for level-2 PDUs
  <cr>
I’ll go for the default option which means authentication is enabled for both level 1 and level 2 adjacencies:
R1(config-if)#isis authentication key-chain ISIS_AUTH Let’s do the same thing on R2:
R2(config)#interface GigabitEthernet 0/1
R2(config-if)#isis authentication mode md5
R2(config-if)#isis authentication key-chain ISIS_AUTH
Once you configure this, only hello packets will be authenticated. Here’s a capture of an authenticated hello packet:
Frame 4330: 1514 bytes on wire (12112 bits), 1514 bytes captured (12112 bits) on interface 0
IEEE 802.3 Ethernet
Logical-Link Control
ISO 10589 ISIS InTRA Domain Routeing Information Exchange Protocol
ISIS HELLO
    .... ..11 = Circuit type: Level 1 and 2 (0x3)
    0000 00.. = Reserved: 0x00
    SystemID {Sender of PDU}: 0000.0000.0001
    Holding timer: 10
    PDU length: 1497
    .100 0000 = Priority: 64
    0... .... = Reserved: 0
    SystemID {Designated IS}: 0000.0000.0001.01
    Authentication (t=10, l=17)
        Type: 10
        Length: 17
        hmac-md5 (54), password (length 16) = 972f9df50547c4df13d9e32a6b0e2df6
    Protocols Supported (t=129, l=1)
    Area address(es) (t=1, l=4)
    IP Interface address(es) (t=132, l=4)
    Restart Signaling (t=211, l=3)
    IS Neighbor(s) (t=6, l=6)
    Padding (t=8, l=255)
    Padding (t=8, l=255)
    Padding (t=8, l=255)
    Padding (t=8, l=255)
    Padding (t=8, l=255)
    Padding (t=8, l=136)
Packet Capture: IS-IS HMAC MD5 Authentication Hello Packet
Instance Authentication
The second option is instance authentication. Here’s how to configure this:
R1(config)#router isis
R1(config-router)#authentication mode md5
R1(config-router)#authentication key-chain ISIS_AUTHR2(config)#router isis
R2(config-router)#authentication mode md5
R2(config-router)#authentication key-chain ISIS_AUTHThe authentication key-chain command allows you to choose if you want to activate this for level 1, level 2 or both. If you don’t supply it as I did, then it will be applied to both levels.
Once you enable this, your LSPs and SNPs will be authenticated. Not your hello packets! Here’s an example of a CSNP that is now authenticated:
Frame 79: 119 bytes on wire (952 bits), 119 bytes captured (952 bits) on interface 0
    Interface id: 0 (-)
    Encapsulation type: Ethernet (1)
    Arrival Time: Jun 12, 2017 14:34:11.759419000 W. Europe Summer Time
    [Time shift for this packet: 0.000000000 seconds]
    Epoch Time: 1497270851.759419000 seconds
    [Time delta from previous captured frame: 0.147104000 seconds]
    [Time delta from previous displayed frame: 0.000000000 seconds]
    [Time since reference or first frame: 56.730426000 seconds]
    Frame Number: 79
    Frame Length: 119 bytes (952 bits)
    Capture Length: 119 bytes (952 bits)
    [Frame is marked: False]
    [Frame is ignored: False]
    [Protocols in frame: eth:llc:osi:isis:isis.csnp]
    [Coloring Rule Name: Broadcast]
    [Coloring Rule String: eth[0] & 1]
IEEE 802.3 Ethernet
Logical-Link Control
ISO 10589 ISIS InTRA Domain Routeing Information Exchange Protocol
ISO 10589 ISIS Complete Sequence Numbers Protocol Data Unit
    PDU length: 102
    Source-ID: 0000.0000.0001.00
    Start LSP-ID: 0000.0000.0000.00-00
    End LSP-ID: ffff.ffff.ffff.ff-ff
    Authentication (t=10, l=17)
        Type: 10
        Length: 17
        hmac-md5 (54), password (length 16) = 1bfbb5b0afe9658f0ee861c397e81ca5
    LSP entries (t=9, l=48)
Packet Capture: IS-IS HMAC MD5 Authentication CSNP
If you want all packets to be authenticated, you should combine interface and instance authentication.
Conclusion
In this lesson, you have learned how to authenticate IS-IS packets:
Thx Rene. Clear & Concise …
I tried the instance authentication but I keep seeing this message:
*Mar 1 00:07:13.255: %CLNS-4-AUTH_FAIL: ISIS: CSNP authentication failedwhat could be missing in my configuration?
Hello Kacem
If you’re running this on GNS3 it could be an issue with the resources being allocated to dynamips. It has been known to create such error messages when the PC doesn’t have sufficient resources to provide for the emulator. This is especially the case when using MD5 as this takes up more resources.
Despite the error, is everything else working correctly? Are you getting a neighbor relationship and is the routing table being populated? If so, this seems to indicate that the issue is with resources.
If you’re sure your configs are correct, try to re
... Continue reading in our forumHello, everyone.
I need someone to help me confirm this.
https://cdn-forum.networklessons.com/uploads/default/original/2X/9/9e721ffd76aa26020077d97b46f595de823ab3db.png
https://cdn-forum.networklessons.com/uploads/default/original/2X/8/8ae9761ee3e1f5ac365e4b369ccf09afea815092.png
https://cdn-forum.networklessons.com/uploads/default/original/2X/1/143e4e34f904fd205faf7d30b5bc58c629b38840.png
The passwords are mismatched yet P2 is still installing P4’s L2 routes which it shouldn’t…
https://cdn-forum.networklessons.com/uploads/default/original/2X/f/f1bbc12000cb486f
... Continue reading in our forumHello David
Hmm, that’s interesting. The only thing I can think of is that P2 is still installing P4’s Level-2 routes because IS-IS domain/area authentication does not affect Hellos. On some IOS XE/CML images, received LSPs are not strictly validated unless explicit validation is enforced, so mismatched passwords can still result in accepted L2 LSPs.
This looks more like an image or platform-specific behavior rather than an IS-IS rule. If you want deterministic behavior where a mismatch blocks routing, use interface or Hello authentication or explicit LSP val
... Continue reading in our forum