Lesson Contents
We use (REST) APIs to communicate with external applications or network devices. This communication should be secure, so one of the things we should use is authentication. There are many different authentication options for REST APIs. We’ll focus on three common options:
- Basic Authentication
- API Key Authentication
- Token Authentication
We’ll need a REST API (server) to talk with and a client to test these authentication options. We have some options here:
- CLI: tools such as
wgetorcurlare an option because you can specify the header. - GUI: tools such as Postman offer a graphical interface to interact with (REST) APIs.
- Programming language: you could use something such as Python.
I prefer Python for this. Postman is great for interacting with an API and testing different things, but if you ever need to work with an API for a production solution, you’ll likely need to write some code.
In this lesson, I’ll explain the authentication methods mentioned above and give you some examples in Python.
Basic Authentication
With basic authentication (RFC 7617), we send a base64 encoded string of the username and password in the HTTP request header. It’s a simple solution but not very secure.
Base64 encodes a string but doesn’t have any encryption. You can easily encode and decode something with base64. You’ll have the username and password if you can capture the traffic between the client and REST API.
To demonstrate this, I’ll use httpbin.org. It’s a simple HTTP request & response service that supports basic authentication. If you want to test this, you have to use the following URL:
https://httpbin.org/basic-auth/<your username>/<your password>
Where “your username” and “your password” are the username and password you want to use. This URL is not how you authenticate. It’s only a test URL. You have to supply the username and password in the header; if it matches the URL, authentication is successful; otherwise, it fails. You can use httpbin.org without having to register on the website which makes it a good tool for testing.
Let’s try this in Python. We can use the requests library for this. This library can take a username and password, automatically encode it with base64, and add it to the header. Let’s try the following:
- Manually encode the username and password with base64 and print it to see what it looks like.
- Use the requests library to send an HTTP GET request to httpbin.org with the username and password in the header.
- Compare the manually created base64 encoded string with the header that the requests library set.
- Check if we can authenticate with the server.
Here’s my Python code:
import requests
import base64

# Define your credentials
username = 'my_username'
password = 'my_password'

# Combine username and password into a single bytes-like object
credentials = f'{username}:{password}'.encode('utf-8')

# Encode the credentials into Base64
encoded_credentials = base64.b64encode(credentials).decode('utf-8')

# Print the Base64-encoded credentials
print('Base64-encoded credentials:', encoded_credentials)

# Use the httpbin endpoint that requires basic authentication
url = 'https://httpbin.org/basic-auth/my_username/my_password'

# Make a HTTP GET request with basic authentication
response = requests.get(url, auth=(username, password))

# Print the Authorization header sent in the request
sent_authorization_header = response.request.headers.get('Authorization')
print('Authorization header sent:', sent_authorization_header)

# Check the status code and print the response
if response.status_code == 200:
    print('Authentication successful!')
    print('Response JSON:', response.json())
else:
    print('Authentication failed!')
    print('Status Code:', response.status_code)
    print('Response Text:', response.text)
When you run this code, you’ll see this:
Base64-encoded credentials: bXlfdXNlcm5hbWU6bXlfcGFzc3dvcmQ=
Authorization header sent: Basic bXlfdXNlcm5hbWU6bXlfcGFzc3dvcmQ=
Authentication successful!
Response JSON: {'authenticated': True, 'user': 'my_username'}
The base64 encoded string we created is the same as the one made by the requests library. Authentication is successful.
API Key Authentication
With API key authentication, the application provider provides a unique API key for the client. The client has to include the API key in each request with the server. The API key can be included in the header, request body, or query parameters. This depends on the implementation of the REST API.
It’s similar to basic authentication, but the key is a long random string instead of a username and password. This makes it somewhat more secure than basic authentication because you can’t identify a specific user. However, the API key is a static value and doesn’t change until you regenerate the key.
Some applications allow you to set an expiration date or scopes for API keys. With scopes, you can restrict what the API key is allowed to do. For example, it might have read or read-write access. It’s also possible that the API key can only access specific API endpoints.
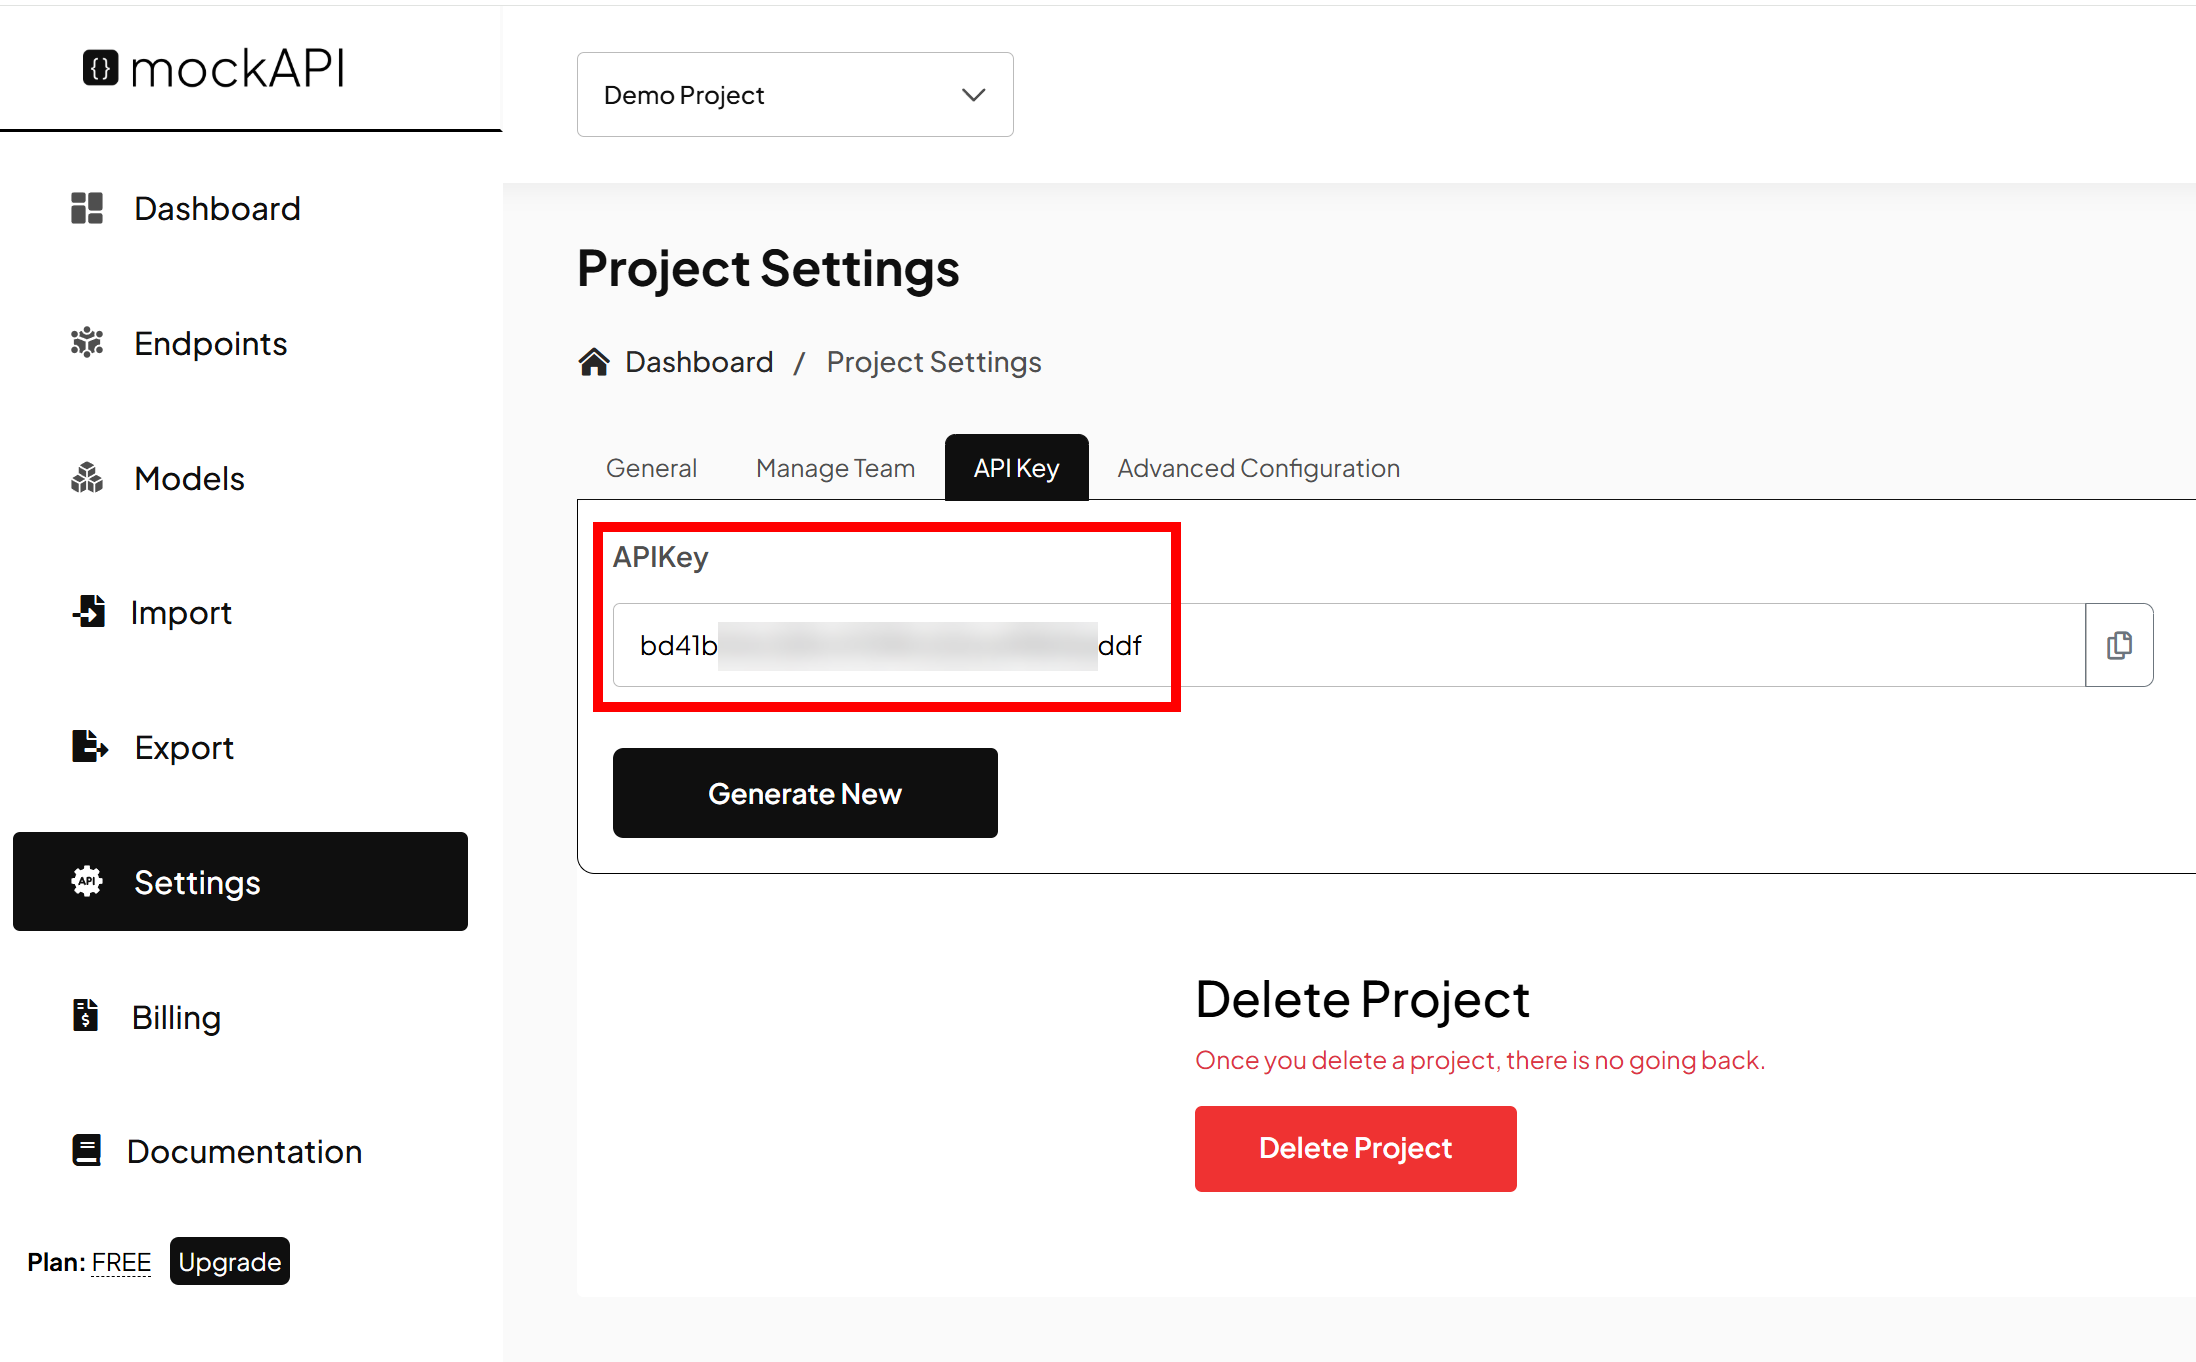
To test API key authentication, we’ll use mockapi.com. With mockAPI, you can create an API with test data, and it supports API key authentication. It’s also free for 500 API calls per month. Once you have registered, you can create an API key from the dashboard:
Let’s create a Python script that communicates with mockAPI. Our code will add the API key in the header and request information about a (fake) user through the REST API. Here’s the code:
import requests

user_id = 123

response = requests.request("GET", "https://api.mockapi.com/api/v1/user/{user_id}",
    headers={"x-api-key": "bd41b04c329chkjkj59f98454545"})

# Print the header sent in the request
print(response.request.headers)

print(response.text)
This script sets the API key in the header under the x-api-key field and prints the header and response. When you run this code, you’ll see what the header looks like:
{'User-Agent': 'python-requests/2.28.2', 'Accept-Encoding': 'gzip, deflate', 'Accept': '*/*', 'Connection': 'keep-alive', 'x-api-key': 'bd41b04c329chkjkj59f98454545'}This output is the actual header. You can see the API key here. The response contains some random data for a fictional user:
{"Id":"53ea71fc-c65c-442a-a8a7-16af28dca62b","FirstName":"Ronny","LastName":"VonRueden","DateOfBirth":"2024-12-04T13:12:15.947Z","Address":{"HouseNumber":"807","Street":"28627 Dannie Island","State":"South Dakota","ZipCode":"67560","Country":"Tajikistan"}}That’s all there is to it.
Token Authentication
With token authentication, the client needs to authenticate with a token. Usually, you can get this token through a web portal or with an API call to the server where you initially use another authentication type, such as basic authentication. Once you have the token, you use it for all subsequent API calls you make.
Tokens have an expiration time. This can be minutes, hours, days, or even years. When the token expires, you must generate a new token. Sometimes, this can be done with a refresh token. The expiration time makes tokens more secure than basic or API key authentication. When a token is intercepted, it might have expired by the time an attacker wants to use the token.
There are different token-based authentication options. A popular one is JSON Web Token (JWT).
JSON Web Token (JWT)
JWT is an open standard (RFC 7519) for sharing security information between two parties. This is a JSON object that contains all authentication information. It’s self-contained, which means it includes everything required for authentication. If someone captures the token, they can access resources granted to it. In the token, you’ll find claims. A claim is a piece of information about a subject.
A JWT string consists of three parts, separated by dots, and uses base64 encoding. When decoded, it contains these strings:
- Header: contains the type of token (JWT) and the signing algorithm.
- Payload: contains the claims.
- Signature: ensures data integrity by ensuring the token hasn’t been altered.
The first time, a client has to authenticate with the server, which generates a JWT for the client. The client stores the JWT in cookies or local storage.
When the client wants to access a resource, the JWT is included in the authorization header of the HTTP request. The server verifies the JWT by checking the signature. If the JWT is ok, the server returns the requested resources.
Let’s look at this in action with some Python code. I’ll use Cisco CML, which uses JWT for its REST API. This code does a couple of things:
- Authenticate with username and password to get a JWT.
- Print the encoded JWT.
- Execute subsequent API calls with the JWT to get a list of all labs on Cisco CML.
Here’s the code:
import requests
import urllib3
import jwt

urllib3.disable_warnings(urllib3.exceptions.InsecureRequestWarning)

# Setup basic variables
cml_url = "https://cml.nwl.lab/api"
cml_username = "admin"     # replace with your username
cml_password = "Cisco123"     # replace with your password

# Authentication credentials
auth_payload = {
    "username": cml_username,
    "password": cml_password
}

# Authentication header
auth_headers = {
    'Content-Type': 'application/json',
    'accept': 'application/json'
}

# Get authentication token
auth_token = requests.post(f"{cml_url}/v0/authenticate",
                         headers=auth_headers,
                         json=auth_payload,
                         verify=False).json()

# Show encoded JWT token
print("Encoded JWT token")
print(auth_token)

# Get list of labs
labs_headers = {
    'accept': 'application/json',
    'Authorization': f'Bearer {auth_token}'
}
labs = requests.get(f"{cml_url}/v0/labs",
                   headers=labs_headers,
                   verify=False).json()

print(f"Found {len(labs)} labs:")

# Get details for each lab
for lab_id in labs:
    lab_details = requests.get(f"{cml_url}/v0/labs/{lab_id}",
                             headers=labs_headers,
                             verify=False).json()
    print(f"Title: {lab_details['lab_title']}")
    print(f"State: {lab_details['state']}")
    print(f"Created: {lab_details['created']}")
    print(f"URL: {cml_url.replace('/api', '')}/lab/{lab_id}")
    print("-" * 80)
When you run this code, it prints the encoded JWT token:
Encoded JWT token
--------------------------------------------------------------------------------
eyJhbGciOiJIUzI1NiIsInR5cCI6IkpXVCJ9.eyJpc3MiOiJjb20uY2lzY28udmlybCIsImlhdCI6MTczNjE2OTg0OSwiZXhwIjoxNzM2MjU2MjQ5LCJzdWIiOiIwMDAwMDAwMC0wMDAwLTQwMDAtYTAwMC0wMDAwMDAwMDAwMDAifQ.v_vn4l-x-j2LkEqFxcM0cDyw7eWC96fDnR0fHkyZ0CQ
--------------------------------------------------------------------------------
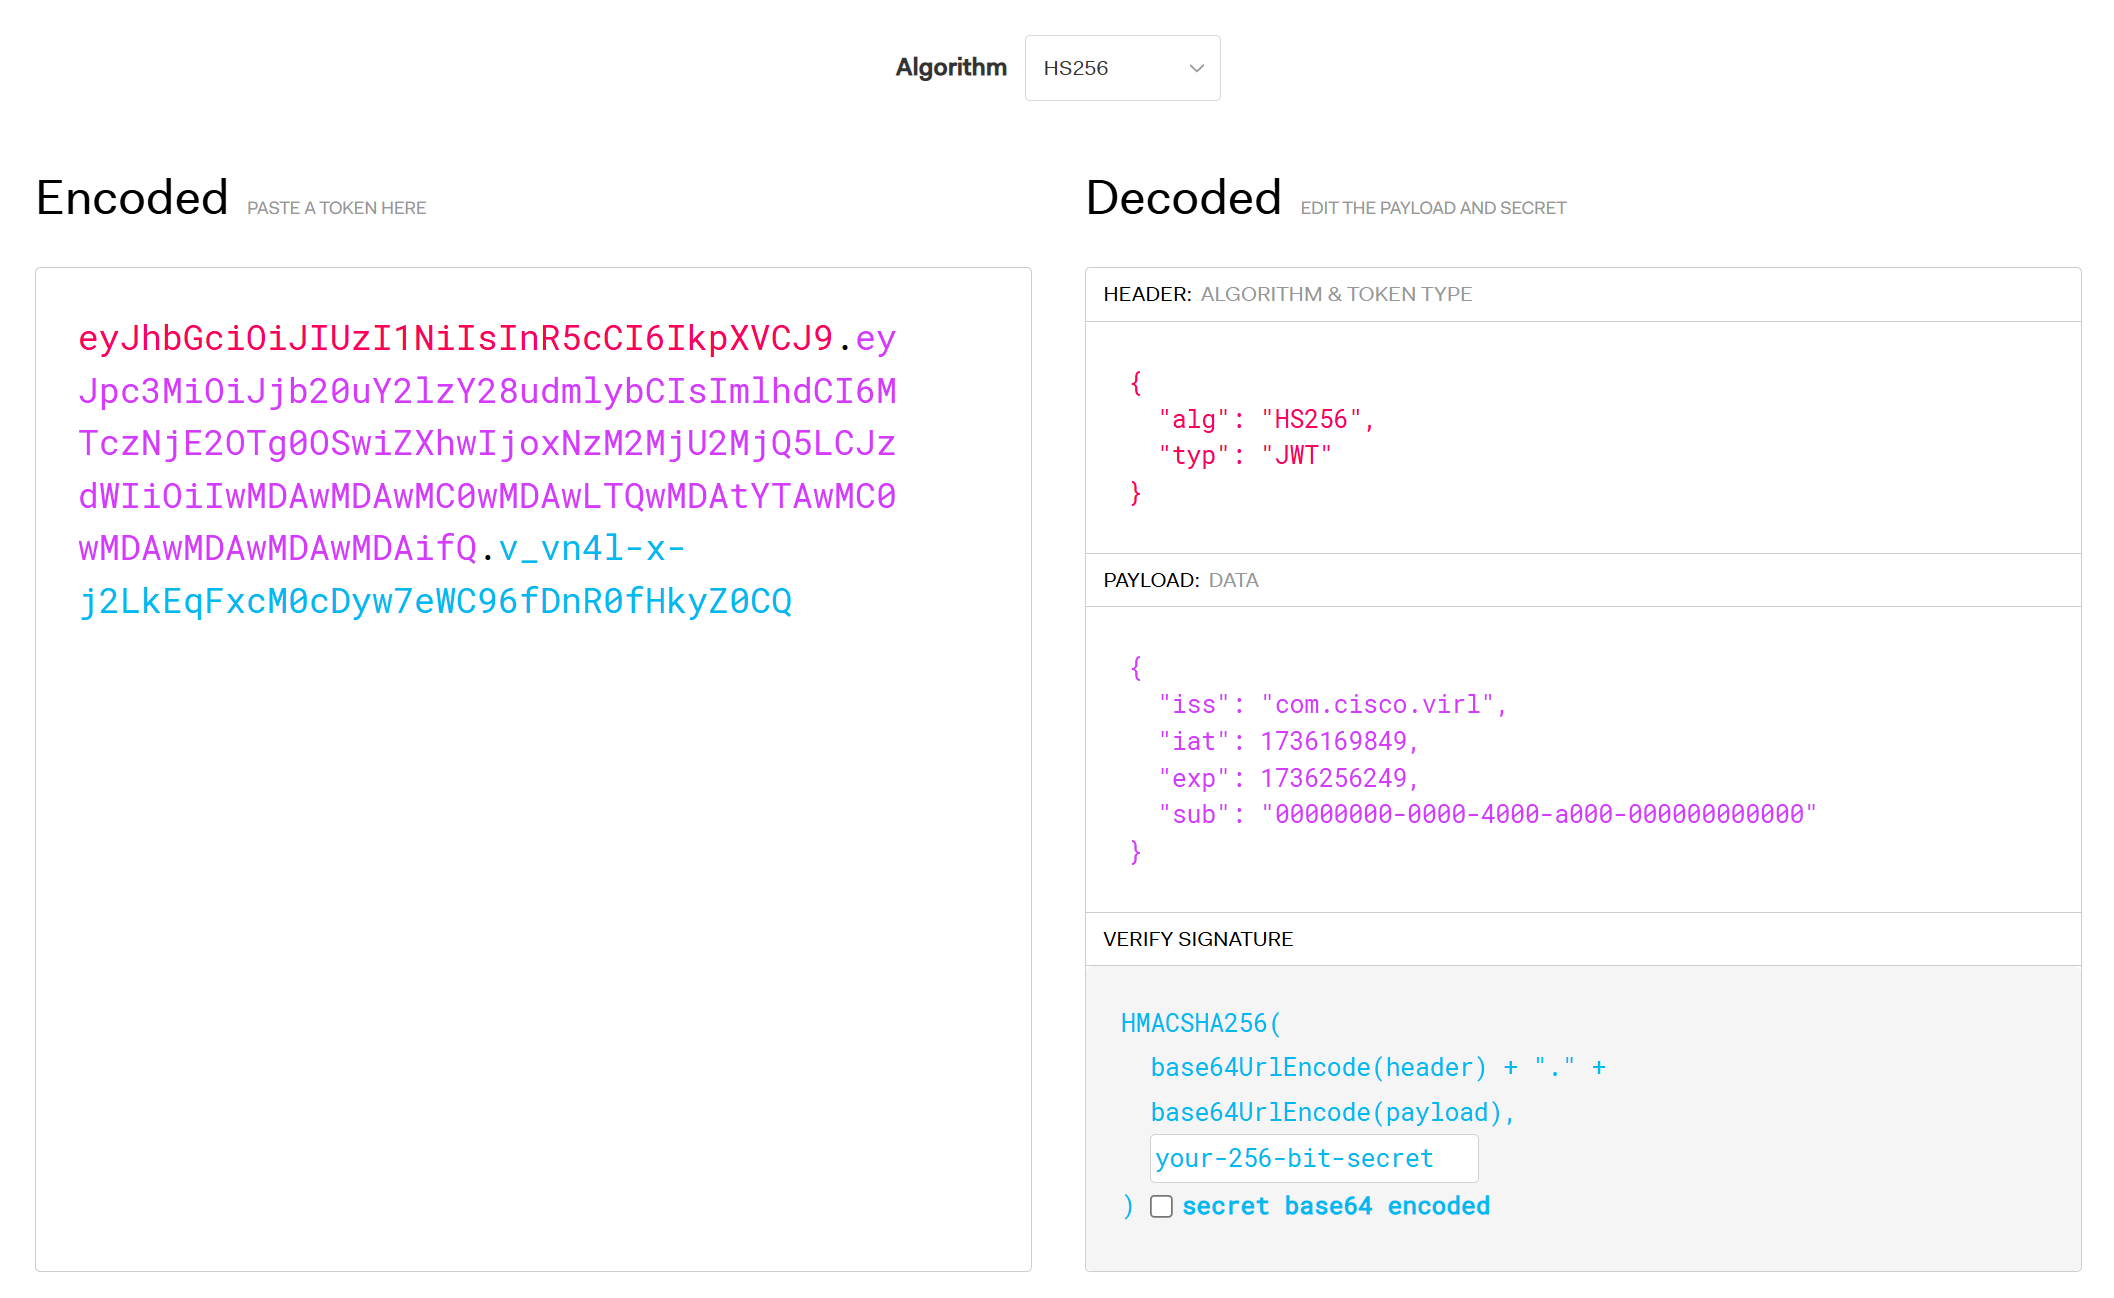
We could break down this encoded JWT token in Python and print the different items, but we can also use the JWT.io debugger to see its contents. You only have to copy and paste the encoded string. Here’s what you get:
Here’s what the decoded JWT token items mean:
- iss (Issuer): This claim identifies who issued the JWT (com.cisco.virl).
- iat (Issued at): A Unix timestamp representing when the token was issued.
- exp (Expiration time): A Unix timestamp representing when the token expires.
- sub (Subject): This is a UUID (Universal Unique Identifier) and is filled with zeroes.
This token is valid for 24 hours. It was issued on Mon Jan 06, 2025, 13:24:09 GMT+0000 and expires on Tue Jan 07, 2025, 13:24:09 GMT+0000.
The remaining part of the code uses the token to request and print some information about the labs:


