Lesson Contents
PKI (Public Key Authentication) is an authentication method that uses a key pair for authentication instead of a password. Two keys are generated:
- Public key
- Private key
Anyone (or any device) that has the public key is able to encrypt data that can only be decrypted by the private key. This means you can share the public key with anyone you want, and they will be able to send you encrypted messages. The private key has to be protected…make sure it doesn’t leave your computer.
In this lesson, we will generate a public and private key on a Windows and Linux computer. We will then add the public key to a Cisco IOS router and use it for SSH authentication. The router will send us encrypted messages, that only we can decrypt because we have the private key. This proves that we are the user that we claim we are, which allows access to the router.
Configuration
First, we have to generate an RSA public / private keypair. I will show you how to do this on Windows and Linux.
Windows
PuTTY is the most common choice as a SSH client on Windows so that’s what we will use. Putty itself can’t generate any RSA keys but we can do this with PuTTY
Once you start it, you will see the main screen:
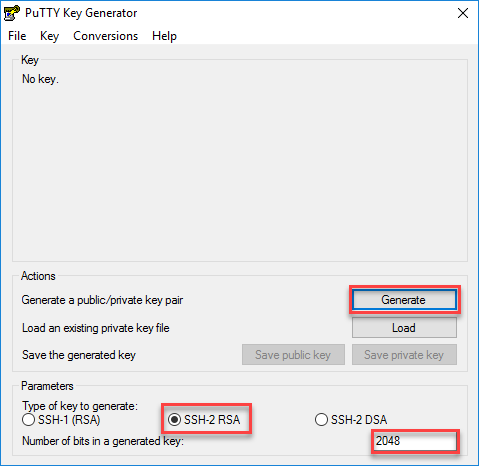
The default settings are fine, we will generate a 2048 bit RSA keypair. Hit the generate button and you will see this:
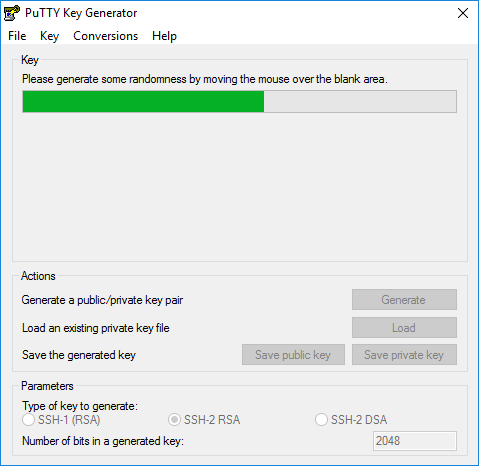
To generate a random key, PuTTY key generator uses the input of your mouse movement. Swing it around a bit until the keys are ready. You’ll see them here:
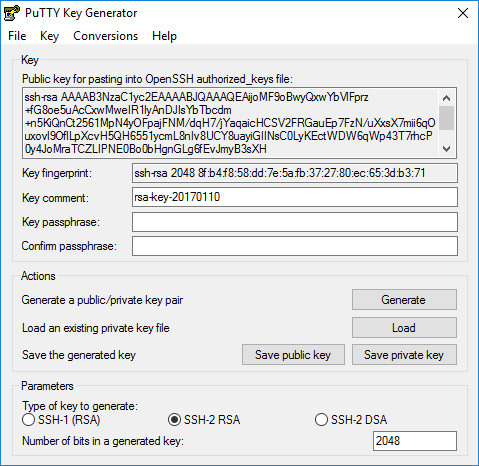
Once you close the application, your keys are gone so make sure to save them. Optionally, you can add a key comment.
You have to protect your private key carefully, it should never leave your computer. It is advised to set a key passphrase to protect it, to keep it simple, I won’t do it in this lesson.
Hit the save public key and save private key buttons:
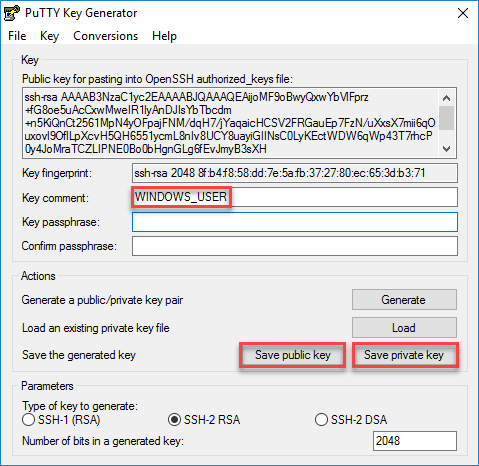
I will use the following filenames:
- public key: windows_user.pub
- private key: windows_user.ppk
That’s all we have to do. Before we can test this, we have to configure our Cisco IOS router (or switch) first.
Linux
Most Linux distributions come with SSH, I will use Ubuntu for this example.
First, we have to generate a 2048 bit RSA keypair:
$ ssh-keygen -b 2048 -t rsa
Generating public/private rsa key pair.
Enter file in which to save the key (/home/ubuntu/.ssh/id_rsa):
Created directory 'https://cdn.networklessons.com/home/ubuntu/.ssh'.
Enter passphrase (empty for no passphrase):
Enter same passphrase again:
Your identification has been saved in /home/ubuntu/.ssh/id_rsa.
Your public key has been saved in /home/ubuntu/.ssh/id_rsa.pub.
The key fingerprint is:
39:97:0c:ab:33:ea:bb:8b:e3:9f:4f:db:9a:fe:cf:fe ubuntu@HOST1
The key's randomart image is:
+--[ RSA 2048]----+
|                 |
|                 |
|        .        |
|         = .     |
|        S +      |
|       . o       |
|      =          |
|  .. + * .       |
| .o+O**ooo+.E    |
+-----------------+
The filenames are:
- public key: id_rsa.pub
- private key: id_rsa
You can see them here:
$ ls -lh /home/ubuntu/.ssh
total 8,0K
-rw------- 1 ubuntu ubuntu 1,7K jan 10 19:41 id_rsa
-rw-r--r-- 1 ubuntu ubuntu  394 jan 10 19:41 id_rsa.pub
That’s all we have to do for now. Time to configure the Cisco IOS router / switch.
Cisco IOS
Let’s start with a basic SSH configuration. First, we configure a hostname:
Router(config)#hostname R1And a domain name:
R1(config)#ip domain-name NETWORKLESSONS.LOCALLet’s generate a 2048 bit RSA key pair:
R1(config)#crypto key generate rsa modulus 2048
The name for the keys will be: R1.NETWORKLESSONS.LOCAL

% The key modulus size is 2048 bits
% Generating 2048 bit RSA keys, keys will be non-exportable...
[OK] (elapsed time was 24 seconds)

%SSH-5-ENABLED: SSH 1.99 has been enabled
And enable SSH version 2:
R1(config)#ip ssh version 2And configure the VTY lines to accept only SSH and local authentication:
R1(config)#line vty 0 4
R1(config-line)#transport input ssh
R1(config-line)#login local
Optionally, you can configure the router to disable SSH password authentication:
R1(config)#no ip ssh server authenticate user password
R1(config)#no ip ssh server authenticate user keyboard
Now we can import the public keys from our windows and Linux users.
Windows
You can open the public key file (windows_user.pub) in your favorite text editor. It will look like this:
---- BEGIN SSH2 PUBLIC KEY ----
Comment: "WINDOWS_USER"
AAAAB3NzaC1yc2EAAAABJQAAAQEAijoMF9oBwyQxwYbVlFprz+fG8oe5uAcCxwMw
eIR1lyAnDJIsYbTbcdm+n5KiQnCt2561MpN4yOFpajFNM/dqH7/jYaqaicHCSV2F
RGauEp7FzN/uXxsX7mii6qOuxovl9OflLpXcvH5QH6551ycmL8nIv8UCY8uayiGI
INsC0LyKEctWDW6qWp43T7rhcP0y4JoMraTCZLIPNE0Bo0bHgnGLg6fEvJmyB3sX
H+7BaxHdYKg2OcIgVqYzclWhDwxj32kqd1BCq089iBMrb4QppDU2eM/t22iK29mn
eqOGTiCkxB80ix+KULT9okmqkj3TbhCpunTfuPCCRNrjqndBsw==
---- END SSH2 PUBLIC KEY ----
We can strip the “begin”, “end” and “comment” so that we only have the public key left. It will look like this:
AAAAB3NzaC1yc2EAAAABJQAAAQEAijoMF9oBwyQxwYbVlFprz+fG8oe5uAcCxwMw
eIR1lyAnDJIsYbTbcdm+n5KiQnCt2561MpN4yOFpajFNM/dqH7/jYaqaicHCSV2F
RGauEp7FzN/uXxsX7mii6qOuxovl9OflLpXcvH5QH6551ycmL8nIv8UCY8uayiGI
INsC0LyKEctWDW6qWp43T7rhcP0y4JoMraTCZLIPNE0Bo0bHgnGLg6fEvJmyB3sX
H+7BaxHdYKg2OcIgVqYzclWhDwxj32kqd1BCq089iBMrb4QppDU2eM/t22iK29mn
eqOGTiCkxB80ix+KULT9okmqkj3TbhCpunTfuPCCRNrjqndBsw==
We can add the public key for a username we choose. I’ll call this user “WINDOWS_USER”. Once you enter the key-string command, you can keep adding lines until you type exit:
R1(config)#ip ssh pubkey-chain
R1(conf-ssh-pubkey)#username WINDOWS_USER
R1(conf-ssh-pubkey-user)#key-string
R1(conf-ssh-pubkey-data)#AAAAB3NzaC1yc2EAAAABJQAAAQEAijoMF9oBwyQxwYbVlFprz+fG8oe5uAcCxwMw
R1(conf-ssh-pubkey-data)#eIR1lyAnDJIsYbTbcdm+n5KiQnCt2561MpN4yOFpajFNM/dqH7/jYaqaicHCSV2F
R1(conf-ssh-pubkey-data)#RGauEp7FzN/uXxsX7mii6qOuxovl9OflLpXcvH5QH6551ycmL8nIv8UCY8uayiGI
R1(conf-ssh-pubkey-data)#INsC0LyKEctWDW6qWp43T7rhcP0y4JoMraTCZLIPNE0Bo0bHgnGLg6fEvJmyB3sX
R1(conf-ssh-pubkey-data)#H+7BaxHdYKg2OcIgVqYzclWhDwxj32kqd1BCq089iBMrb4QppDU2eM/t22iK29mn
R1(conf-ssh-pubkey-data)#eqOGTiCkxB80ix+KULT9okmqkj3TbhCpunTfuPCCRNrjqndBsw==
R1(conf-ssh-pubkey-data)#exit
R1(conf-ssh-pubkey-user)#exit
R1(conf-ssh-pubkey)#exit
Our router now knows the public key of our windows users.
Linux
Let’s do the same thing for our Linux user. Let’s take a look at the public key:
$ cat /home/ubuntu/.ssh/id_rsa.pub
ssh-rsa AAAAB3NzaC1yc2EAAAADAQABAAABAQC80DsOF4nkk15V0V2U7r4Q2MyAwIbgQX/7rqdUyNCTulliYZWdxnQHaI0WpvcEHQTrSXCauFOBqUrLZglI2VExOgu0TmmWCajW/vnp8J5bArzwIk83ct35IHFozPtl3Rj79U58HwMlJ2JhBTkyTrZYRmsP+r9VF7pYMVcuKgFS+gDvhbuxM8DNLmS1+eHDw9DNHYBA+dIaEIC+ozxDV7kF6wKOx59E/Ni2/dT9TJ5Qge+Rw7zn+O0i1Ib95djzNfVdHq+174mchGx3zV6l/6EXvc7G7MyXj89ffLdXIp/Xy/wdWkc1P9Ei8feFBVLTWijXiilbYWwdLhrk7L2EQv5x ubuntu@HOST
The key is printed on a single line, that’s fine but Cisco IOS only supports a maximum of 254 characters on a single line so you won’t be able to paste this in one go. There’s a useful Linux command you can use to break the public key in multiple parts:
$ fold -b -w 72 /home/ubuntu/.ssh/id_rsa.pub
ssh-rsa AAAAB3NzaC1yc2EAAAADAQABAAABAQC80DsOF4nkk15V0V2U7r4Q2MyAwIbgQX/7
rqdUyNCTulliYZWdxnQHaI0WpvcEHQTrSXCauFOBqUrLZglI2VExOgu0TmmWCajW/vnp8J5b
ArzwIk83ct35IHFozPtl3Rj79U58HwMlJ2JhBTkyTrZYRmsP+r9VF7pYMVcuKgFS+gDvhbux
M8DNLmS1+eHDw9DNHYBA+dIaEIC+ozxDV7kF6wKOx59E/Ni2/dT9TJ5Qge+Rw7zn+O0i1Ib9
5djzNfVdHq+174mchGx3zV6l/6EXvc7G7MyXj89ffLdXIp/Xy/wdWkc1P9Ei8feFBVLTWijX
iilbYWwdLhrk7L2EQv5x ubuntu@HOST1
We can remove the “ssh-rsa” part at the beginning and the comment at the end. This is just the public key:
AAAAB3NzaC1yc2EAAAADAQABAAABAQC80DsOF4nkk15V0V2U7r4Q2MyAwIbgQX/7
rqdUyNCTulliYZWdxnQHaI0WpvcEHQTrSXCauFOBqUrLZglI2VExOgu0TmmWCajW/vnp8J5b
ArzwIk83ct35IHFozPtl3Rj79U58HwMlJ2JhBTkyTrZYRmsP+r9VF7pYMVcuKgFS+gDvhbux
M8DNLmS1+eHDw9DNHYBA+dIaEIC+ozxDV7kF6wKOx59E/Ni2/dT9TJ5Qge+Rw7zn+O0i1Ib9
5djzNfVdHq+174mchGx3zV6l/6EXvc7G7MyXj89ffLdXIp/Xy/wdWkc1P9Ei8feFBVLTWijX
iilbYWwdLhrk7L2EQv5x
Let’s add it to the router, I will use the username “LINUX_USER”:
R1(config)#ip ssh pubkey-chain
R1(conf-ssh-pubkey)#username LINUX_USER
R1(conf-ssh-pubkey-user)#key-string
R1(conf-ssh-pubkey-data)#AAAAB3NzaC1yc2EAAAADAQABAAABAQC80DsOF4nkk15V0V2U7r4Q2MyAwIbgQX/7
R1(conf-ssh-pubkey-data)#rqdUyNCTulliYZWdxnQHaI0WpvcEHQTrSXCauFOBqUrLZglI2VExOgu0TmmWCajW/vnp8J5b
R1(conf-ssh-pubkey-data)#ArzwIk83ct35IHFozPtl3Rj79U58HwMlJ2JhBTkyTrZYRmsP+r9VF7pYMVcuKgFS+gDvhbux
R1(conf-ssh-pubkey-data)#M8DNLmS1+eHDw9DNHYBA+dIaEIC+ozxDV7kF6wKOx59E/Ni2/dT9TJ5Qge+Rw7zn+O0i1Ib9
R1(conf-ssh-pubkey-data)#5djzNfVdHq+174mchGx3zV6l/6EXvc7G7MyXj89ffLdXIp/Xy/wdWkc1P9Ei8feFBVLTWijX
R1(conf-ssh-pubkey-data)#iilbYWwdLhrk7L2EQv5x
R1(conf-ssh-pubkey-data)#exit
R1(conf-ssh-pubkey-user)#exit
R1(conf-ssh-pubkey)#exit
Our work is finished, let’s figure out if it works or not.
Verification
We will try our Windows user first, the the Linux user.
Windows
Once you added the public key to the router, Cisco IOS will calculate a key hash:
R1#show running-config | begin pubkey
ip ssh pubkey-chain
  username WINDOWS_USER
   key-hash ssh-rsa 8FB4F858DD7E5AFB372780EC653DB371
  quit
We can verify if it’s the same, the PuTTY Key Generator also shows it:
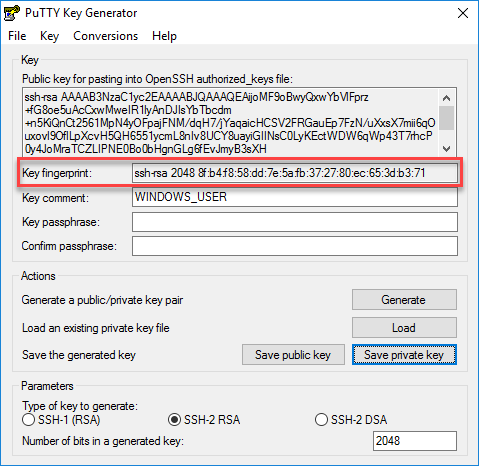
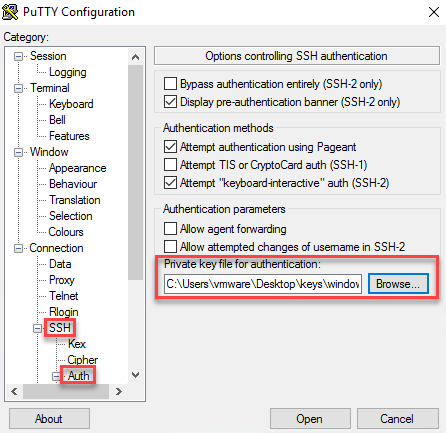
The key hash (fingerprint) matches so at least we know our router has the correct public key. Time to configure PuTTY. Open PuTTY and look for the Connection > SSH setting.
Click on the browse button and select your private key file (windows_user.ppk):
Now go to the Connection > Data setting, add the username here:
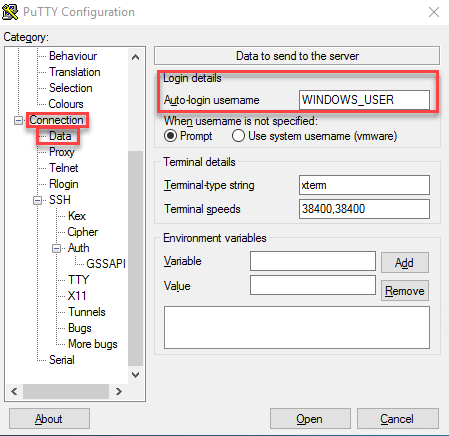
Go to the main screen and if you don’t want to lose these settings, save your session.
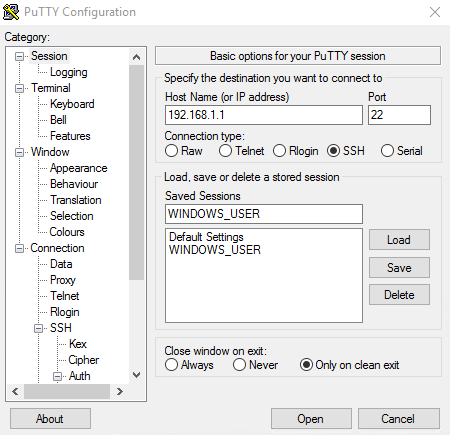
Hit the Open button and you will see this:
Using username "WINDOWS_USER".
Authenticating with public key "WINDOWS_USER"

R1>
Great! We now have access to the router.
Linux
Let’s see if our Linux user is able to connect. Let’s verify the public key fingerprint / hash first:
R1#show running-config | begin pubkey
ip ssh pubkey-chain
  username WINDOWS_USER
   key-hash ssh-rsa 8FB4F858DD7E5AFB372780EC653DB371
  quit
  username LINUX_USER
   key-hash ssh-rsa 39970CAB33EABB8BE39F4FDB9AFECFFE
  quit
You can see the fingerprint on Linux with the following command:
$ ssh-keygen -l -f /home/ubuntu/.ssh/id_rsa.pub
2048 39:97:0c:ab:33:ea:bb:8b:e3:9f:4f:db:9a:fe:cf:fe ubuntu@HOST1 (RSA)
The key fingerprints match, let’s see if we can connect:
$ ssh LINUX_USER@192.168.1.1
R1>
There we go, we are now connected!
This is a GREAT walkthrough , however I see in the url that it sits in “uncatagorized”, do you have a quick way to browse to this location to locate this walkthrough? I only happened across it via a link in another comment.
Hello Edgar
Thanks for pointing that out, I’ll give a shout out to Rene to see if it can be located somewhere more accessible.
Thanks again!
Laz
Hi Rene and staff,
i was doing a basic lab ipv6 with GNS3 and SSH came in front of the scene (no matter ipv4 or ipv6 in this post)
This is the lab
https://cdn-forum.networklessons.com/uploads/default/original/2X/1/1ed1247d4d05d2ff35f2f39a51941064d60694ae.png
and opening SSH session from HostA to R1 led me to review crypto keys with cisco (just to remind)
R1 configuration is
https://cdn-forum.networklessons.com/uploads/default/original/2X/3/3cddb9fa219925dc3053076c7c5c323d6698405d.png
Host A is toolbox
https://cdn-forum.networklessons.com/uploads/default/origina
... Continue reading in our forumHello Dominique
The key data in the router and that found within the known_hosts file do appear different, and this is simply because of the method of encoding. Within the router, the key data is displayed in Hexadecimal while in the known_hosts file, in what is known as Base64 encoding which represents binary data in ASCII (and this is why you see all the letters of the alphabet as well as many symbols). This Ubuntu man page includes a description of the format of the known_hosts file format.
I hope this has been helpful!
Laz
Hi!
This is a great walkthrough but I have an older 3560 in my lab and the
ip ssh pubkey-chaincommand doesn’t exist. Is there a different method to accomplish this on older switches? Here’s the image it’s running:Second question: How can we setup authorization so that successfully authenticating with radius puts you in priv exec mode?