Lesson Contents
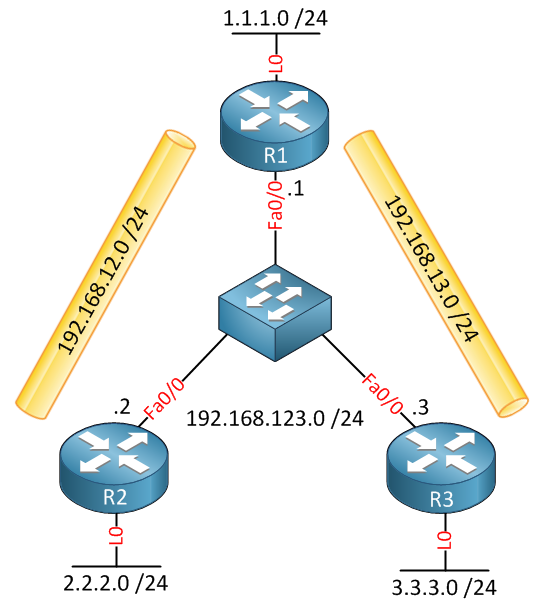
This lesson explains how to configure GRE over IPSEC routing with a hub and two remote sites. Each router has a loopback interface that represents a remote network and we will use OSPF as the routing protocol on the GRE tunnels and remote networks. Here’s what our topology looks like:

R1 is the hub, and R2 / R3 are spoke routers. Let’s start with the configuration on R1.
R1 Configuration
First, we will configure the GRE tunnel interfaces towards R2 and R3. We’ll use subnet 192.168.12.0/24 on for R1/R2 and 192.168.13.0/24 for R1/R3. The tunnel source and destination IP addresses are the outside interfaces of the routers.
R1(config)#interface Tunnel12
R1(config-if)#ip address 192.168.12.1 255.255.255.0
R1(config-if)#tunnel source FastEthernet0/0
R1(config-if)#tunnel destination 192.168.123.2

R1(config-if)#interface Tunnel13
R1(config-if)#ip address 192.168.13.1 255.255.255.0
R1(config-if)#tunnel source FastEthernet0/0
R1(config-if)#tunnel destination 192.168.123.3
Now we can configure OSPF. We’ll advertise the networks on the tunnel interfaces and the loopback interface:
R1(config)#router ospf 1
R1(config-router)#network 1.1.1.0 0.0.0.255 area 0
R1(config-router)#network 192.168.12.0 0.0.0.255 area 0
R1(config-router)#network 192.168.13.0 0.0.0.255 area 0
Now we can move on to the VPN settings. First, we’ll do the ISAKMP policy:
R1(config)#crypto isakmp policy 10
R1(config-isakmp)#encr aes 256
R1(config-isakmp)#authentication pre-share
R1(config-isakmp)#group 5
R1(config-isakmp)#lifetime 3600
In this example, I’m using AES 256-bit encryption, pre-shared key authentication, and diffie-hellman group 5. We still have to configure the keys for the remote peers:
R1(config)#crypto isakmp key R1R2 address 192.168.123.2
R1(config)#crypto isakmp key R1R3 address 192.168.123.3
I’ll use different keys between R1/R2 and R1/R3. If you want to use the same key for all peers, you can also use the destination address 0.0.0.0.This means that the router will accept any remote peer.
For the IPSEC parameters, we’ll use the transform-set. This tells the router to use ESP (Encapsulating Security Payload):
R1(config)#crypto ipsec transform-set TRANSFORMSET esp-aes 256 esp-sha-hmacTo tell the router what to encrypt, we need to use a crypto-map. I’ll use a single crypto-map for both remote sites with two sequence numbers:
R1(config)#crypto map CRYPTOMAP 10 ipsec-isakmp
R1(config-crypto-map)#set peer 192.168.123.2
R1(config-crypto-map)#set transform-set TRANSFORMSET
R1(config-crypto-map)#match address 102

R1(config)#crypto map CRYPTOMAP 20 ipsec-isakmp
R1(config-crypto-map)#set peer 192.168.123.3
R1(config-crypto-map)#set transform-set TRANSFORMSET
R1(config-crypto-map)#match address 103
In the crypto map, you’ll find the specific peer and an access-list. The access-list tells the router what traffic to encrypt. Here’s what it looks like:
R1(config)#access-list 102 permit gre host 192.168.123.1 host 192.168.123.2
R1(config)#access-list 103 permit gre host 192.168.123.1 host 192.168.123.3
Each access-list is configured to permit GRE traffic between the tunnel source and destination IP addresses.
Last but not least, we’ll activate the crypto map on the interface:
R1(config)#interface FastEthernet 0/0
R1(config-if)#crypto map CRYPTOMAP
Our hub router is now configured. We’ll use a similar configuration on R2 and R3.
R2 Configuration
interface Tunnel12
 ip address 192.168.12.2 255.255.255.0
 tunnel source FastEthernet0/0
 tunnel destination 192.168.123.1

router ospf 1
 log-adjacency-changes
 network 2.2.2.0 0.0.0.255 area 0
 network 192.168.12.0 0.0.0.255 area 0

crypto isakmp policy 10
 encr aes 256
 authentication pre-share
 group 5
 lifetime 3600
crypto isakmp key R1R2 address 192.168.123.1

crypto ipsec transform-set TRANSFORMSET esp-aes 256 esp-sha-hmac

crypto map CRYPTOMAP 10 ipsec-isakmp
 set peer 192.168.123.1
 set transform-set TRANSFORMSET
 match address 102

access-list 102 permit gre host 192.168.123.2 host 192.168.123.1

interface FastEthernet0/0
crypto map CRYPTOMAP
R3 Configuration
interface Tunnel13
 ip address 192.168.13.3 255.255.255.0
 tunnel source FastEthernet0/0
 tunnel destination 192.168.123.1

router ospf 1
 log-adjacency-changes
 network 3.3.3.0 0.0.0.255 area 0
 network 192.168.13.0 0.0.0.255 area 0

crypto isakmp policy 10
 encr aes 256
 authentication pre-share
 group 5
 lifetime 3600
crypto isakmp key R1R3 address 192.168.123.1

crypto ipsec transform-set TRANSFORMSET esp-aes 256 esp-sha-hmac

crypto map CRYPTOMAP 10 ipsec-isakmp
 set peer 192.168.123.1
 set transform-set TRANSFORMSET
 match address 103

access-list 103 permit gre host 192.168.123.3 host 192.168.123.1

interface FastEthernet0/0
crypto map CRYPTOMAP
This concludes the configuration of all routers, the only thing left to do is to verify our work.
Verification
We’ll start with a quick ping to see if we can reach the remote loopback interfaces. Usually it’s best to do this before configuring ISAKMP and IPSEC.
R1#ping 2.2.2.2 source loopback 0

Type escape sequence to abort.
Sending 5, 100-byte ICMP Echos to 2.2.2.2, timeout is 2 seconds:
Packet sent with a source address of 1.1.1.1
!!!!!
Success rate is 100 percent (5/5), round-trip min/avg/max = 4/4/8 msR1#ping 3.3.3.3 source loopback 0
Type escape sequence to abort.
Sending 5, 100-byte ICMP Echos to 3.3.3.3, timeout is 2 seconds:
Packet sent with a source address of 1.1.1.1
!!!!!
Success rate is 100 percent (5/5), round-trip min/avg/max = 4/4/4 msOur pings are working…but do we have encryption? Let’s take a look:


Hi Rene! Your articles are awesome!!! You are doing a great job! Thank you. I have a question about this article. In this topology we have three routers with interfaces in one subnet, what is the point of having gre tunnel in this topology? We can run ospf (or other protocol) without gre tunnel.
Hi Niko,
Thanks! I used a switch for simplicity, just imagine there’s not a switch in the middle but the routers are only connected to each other through the Internet…then you have a useful example.
Rene
Hey Rene, I like your articles, however, with regards to the Interfaces, i suppose in real life there will have to be public interfaces on the routers. My question is, can one use private addressing for the tunnel interface tunnels?
Hi Wilson,
That’s right, the interfaces facing the Internet will use public IP addresses but you can use private addresses on the tunnels. Nobody on the outside sees what the tunnel is encapsulating (if you have encryption).
Rene
Thanks Rene. Great work.