Lesson Contents
In the FlexVPN spoke to spoke lesson, you learned how to configure a FlexVPN hub and spoke topology where spoke routes can communicate with each other directly. In that lesson, I used static IP addresses and IKEv2 routing to keep things simple and so we could focus on the “spoke to spoke” part.
In this lesson, we’ll improve the hub and spoke topology to something you could use in a production network. Instead of static IP addresses on the tunnel interfaces of the spoke routers, we’ll let the hub router assign tunnel IP addresses to the spoke routers.
We do this by configuring a pool on the hub router. Instead of IKEv2 routing, we’ll use BGP. IKEv2 routing works great but one of the advantages of BGP over IKEv2 routing is that you can implement routing policies.
Let’s take a look at the configuration.
Configuration
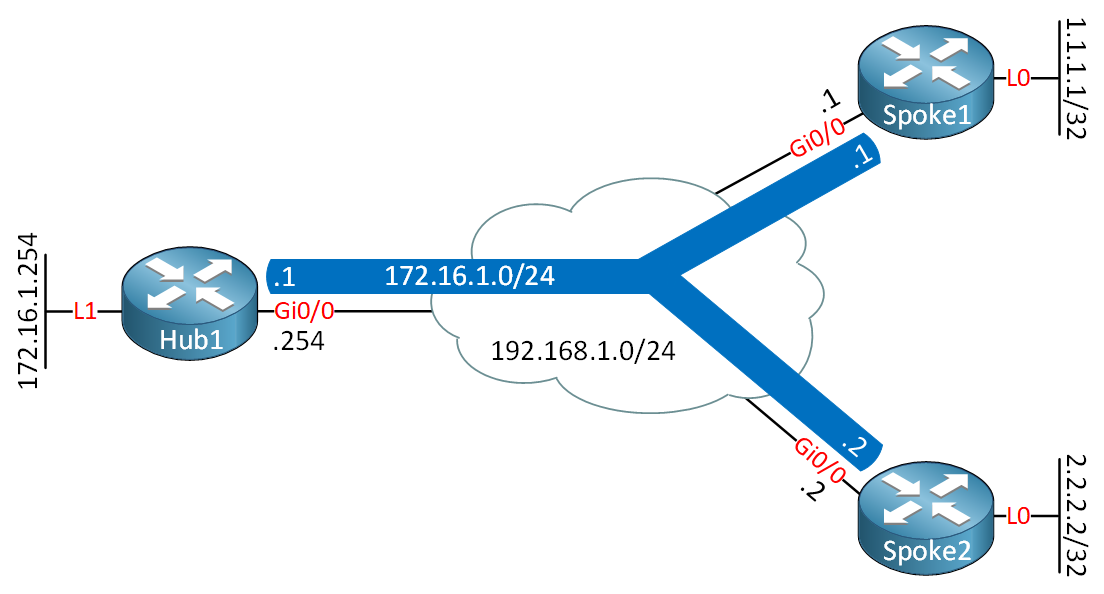
Here’s the topology that we will use:
Hub1
hostname Hub1
!
ip cef
!
interface Loopback1
 ip address 172.16.1.254 255.255.255.255
!
interface GigabitEthernet0/0
 ip address 192.168.1.254 255.255.255.0
!
end
Spoke1
hostname Spoke1
!
ip cef
!
interface Loopback0
 ip address 1.1.1.1 255.255.255.255
!
interface GigabitEthernet0/0
 ip address 192.168.1.1 255.255.255.0
!
end
Spoke2
hostname Spoke2
!
ip cef
!
interface Loopback0
 ip address 2.2.2.2 255.255.255.255
!
interface GigabitEthernet0/0
 ip address 192.168.1.2 255.255.255.0
!
end
This is the same topology that we used in the FlexVPN spoke to spoke lesson. In the configuration, I’ll focus on the items that are different compared to our previous spoke to spoke example. I used IOSv Software (VIOS-ADVENTERPRISEK9-M), Version 15.9(3)M2 for this example.
Hub1
Let’s start with the hub router.
IKEv2 Keyring
We start with an IKEv2 keyring. I’ll configure it so that it applies to all spoke routers:
Hub1(config)#crypto ikev2 keyring IKEV2_KEYRING
Hub1(config-ikev2-keyring)#peer SPOKE_ROUTERS
Hub1(config-ikev2-keyring-peer)#address 0.0.0.0 0.0.0.0
Hub1(config-ikev2-keyring-peer)#pre-shared-key local CISCO
Hub1(config-ikev2-keyring-peer)#pre-shared-key remote CISCO
IKEv2 Authorization Policy
In the IKEv2 authorization policy, there are two important items:
- We refer to a pool named “FLEXVPN_POOL”. The hub will assign IP addresses to spoke routers from this pool.
- We only advertise the tunnel IP address through IKEv2 with the
route set interfacecommand.
Hub1(config)#aaa new-model
Hub1(config)#aaa authorization network FLEXVPN_LOCAL localHub1(config)#crypto ikev2 authorization policy IKEV2_AUTHORIZATION
Hub1(config-ikev2-author-policy)#pool FLEXVPN_POOL
Hub1(config-ikev2-author-policy)#route set interfaceLet’s create that pool:
Hub1(config)#ip local pool FLEXVPN_POOL 172.16.1.1 172.16.1.20IKEv2 Profile
Let’s configure the IKEv2 profile:
Hub1(config)#crypto ikev2 profile IKEV2_PROFILE
Hub1(config-ikev2-profile)#match identity remote fqdn domain FLEXVPN.LAB
Hub1(config-ikev2-profile)#identity local fqdn HUB.FLEXVPN.LAB
Hub1(config-ikev2-profile)#authentication remote pre-share
Hub1(config-ikev2-profile)#authentication local pre-share
Hub1(config-ikev2-profile)#keyring local IKEV2_KEYRING
Hub1(config-ikev2-profile)#aaa authorization group psk list FLEXVPN_LOCAL IKEV2_AUTHORIZATION
Hub1(config-ikev2-profile)#virtual-template 1
IPSec Profile
Here’s the IPSec profile:
Hub1(config)#crypto ipsec profile IPSEC_PROFILE
Hub1(ipsec-profile)#set ikev2-profile IKEV2_PROFILE
Dynamic VTI
We need a dynamic VTI:
Hub1(config)#interface Virtual-template 1 type tunnel
Hub1(config)#ip unnumbered Loopback1
Hub1(config)#ip nhrp network-id 1
Hub1(config)#ip nhrp redirect
Hub1(config)#tunnel protection ipsec profile IPSEC_PROFILE
BGP
Last but not least, the BGP configuration. There are a number of items I configure here:
- We use a peer group for all spoke routers.
- We use the passive connection-mode so that the hub router accepts TCP connections for BGP, but does not initiate them.
- We accept BGP neighbors on the entire 172.16.1.0/24 subnet. This way, we don’t have to manually configure BGP neighbors.
- We advertise a default route to all spoke routers.
- We don’t accept a default route from spoke routers but do accept any other route. This is a safety measure to prevent the hub router from installing a default route that a spoke router might accidentally advertise.
Here’s the configuration:
Hub1(config)#router bgp 1
Hub1(config-router)#bgp router-id 172.16.1.254
Hub1(config-router)#bgp listen range 172.16.1.0/24 peer-group FLEXVPN_SPOKES
Hub1(config-router)#neighbor FLEXVPN_SPOKES peer-group
Hub1(config-router)#neighbor FLEXVPN_SPOKES remote-as 1
Hub1(config-router)#neighbor FLEXVPN_SPOKES transport connection-mode passive
Hub1(config-router)#neighbor FLEXVPN_SPOKES update-source Loopback1

Hub1(config-router)#address-family ipv4
Hub1(config-router-af)#neighbor FLEXVPN_SPOKES activate
Hub1(config-router-af)#neighbor FLEXVPN_SPOKES default-originate
Hub1(config-router-af)#neighbor FLEXVPN_SPOKES prefix-list DENY_DEFAULT in

Hub1(config)#ip prefix-list DENY_DEFAULT seq 5 deny 0.0.0.0/0
Hub1(config)#ip prefix-list DENY_DEFAULT seq 10 permit 0.0.0.0/0 le 32
This completes the hub configuration.
Spoke1
Let’s configure the spoke router.
IKEv2 Keyring
We need an IKEv2 keyring. I’ll create two entries here, one for the hub router, and another one for the spoke2 router:
Spoke1(config)#crypto ikev2 keyring IKEV2_KEYRING
Spoke1(config-ikev2-keyring)#peer HUB1
Spoke1(config-ikev2-keyring-peer)#address 192.168.1.254
Spoke1(config-ikev2-keyring-peer)#pre-shared-key local CISCO
Spoke1(config-ikev2-keyring-peer)#pre-shared-key remote CISCO

Spoke1(config-ikev2-keyring-peer)#peer SPOKE2
Spoke1(config-ikev2-keyring-peer)#address 192.168.1.2
Spoke1(config-ikev2-keyring-peer)#pre-shared-key local CISCO
Spoke1(config-ikev2-keyring-peer)#pre-shared-key remote CISCO
With the configuration above, you’ll have to configure a new entry for every spoke router you want to communicate with. The advantage of doing it this way is that you can decide which spoke routers are allowed to communicate with each other directly.
The disadvantage of this solution is that it does not scale. You have to create an entry for each spoke router you want to communicate with. If you want all your spoke routers to be able to communicate with each other directly, you can use an entry like this:
Spoke1(config-ikev2-keyring-peer)#peer SPOKE_ROUTERS
Spoke1(config-ikev2-keyring-peer)#address 0.0.0.0
Spoke1(config-ikev2-keyring-peer)#pre-shared-key local CISCO
Spoke1(config-ikev2-keyring-peer)#pre-shared-key remote CISCO
This will authenticate all spoke routers using the same PSK.
IKEv2 Authorization Policy
In the IKEv2 authorization policy, we only advertise our tunnel interface with IKEv2:
Spoke1(config)#aaa new-model
Spoke1(config)#aaa authorization network FLEXVPN_LOCAL local

Spoke1(config)#crypto ikev2 authorization policy IKEV2_AUTHORIZATION
Spoke1(config-ikev2-author-policy)#route set interface
IKEv2 Profile
Let’s create the IKEv2 profile:
Spoke1(config)#crypto ikev2 profile IKEV2_PROFILE
Spoke1(config-ikev2-profile)#match identity remote fqdn HUB.FLEXVPN.LAB
Spoke1(config-ikev2-profile)#match identity remote fqdn SPOKE2.FLEXVPN.LAB
Spoke1(config-ikev2-profile)#identity local fqdn SPOKE1.FLEXVPN.LAB
Spoke1(config-ikev2-profile)#authentication remote pre-share
Spoke1(config-ikev2-profile)#authentication local pre-share
Spoke1(config-ikev2-profile)#keyring local IKEV2_KEYRING
Spoke1(config-ikev2-profile)#aaa authorization group psk list FLEXVPN_LOCAL IKEV2_AUTHORIZATION
Like the IKEv2 keyring, I have a specific entry here for the spoke2 router. If you want all spoke routers to be able to communicate with each other without creating manual entries, you could also use this:
Spoke1(config-ikev2-profile)#match identity remote fqdn domain FLEXVPN.LABThis tells the spoke router to only check the domain part of the identity. In other words, everyone within the “FLEXVPN.LAB” domain is allowed to communicate with each other.
IPSec Profile
Let’s configure an IPSec profile:
Spoke1(config)#crypto ipsec profile IPSEC_PROFILE
Spoke1(ipsec-profile)#set ikev2-profile IKEV2_PROFILE
Static VTI
The spoke router requires a static VTI to communicate with the hub router. Note that we use the ip address negotiated command instead of a static IP address:
Spoke1(config)#interface Tunnel0
Spoke1(config-if)#ip address negotiated
Spoke1(config-if)#ip nhrp network-id 1
Spoke1(config-if)#ip nhrp shortcut virtual-template 1
Spoke1(config-if)#tunnel source GigabitEthernet0/0
Spoke1(config-if)#tunnel destination 192.168.1.254
Spoke1(config-if)#tunnel protection ipsec profile IPSEC_PROFILE
Dynamic VTI
Let’s configure the dynamic VTI for spoke to spoke communication:
Spoke1(config)#interface Virtual-Template1 type tunnel
Spoke1(config-if)#ip unnumbered Tunnel0
Spoke1(config-if)#ip nhrp network-id 1
Spoke1(config-if)#ip nhrp shortcut virtual-template 1
Spoke1(config-if)#tunnel source GigabitEthernet0/0
Spoke1(config-if)#tunnel protection ipsec profile IPSEC_PROFILE
BGP
And, finally, the BGP configuration. We’ll configure the IP address of the hub router and advertise our network on the loopback 0 interface:
Spoke1(config)#router bgp 1
Spoke1(config-router)#bgp router-id 1.1.1.1
Spoke1(config-router)#neighbor 172.16.1.254 remote-as 1
Spoke1(config-router)#neighbor 172.16.1.254 update-source Tunnel0

Spoke1(config-router)#address-family ipv4
Spoke1(config-router-af)#network 1.1.1.1 mask 255.255.255.255
Spoke1(config-router-af)#neighbor 172.16.1.254 activate
This completes the spoke1 router configuration.
Spoke2
Here is the entire configuration of the spoke2 router:
Spoke2(config)#crypto ikev2 keyring IKEV2_KEYRING
Spoke2(config-ikev2-keyring)#peer HUB1
Spoke2(config-ikev2-keyring-peer)#address 192.168.1.254
Spoke2(config-ikev2-keyring-peer)#pre-shared-key local CISCO
Spoke2(config-ikev2-keyring-peer)#pre-shared-key remote CISCO

Spoke2(config-ikev2-keyring-peer)#peer SPOKE1
Spoke2(config-ikev2-keyring-peer)#address 192.168.1.1
Spoke2(config-ikev2-keyring-peer)#pre-shared-key local CISCO
Spoke2(config-ikev2-keyring-peer)#pre-shared-key remote CISCO

Spoke2(config)#aaa new-model

Spoke2(config)#aaa authorization network FLEXVPN_LOCAL local

Spoke2(config)#crypto ikev2 authorization policy IKEV2_AUTHORIZATION
Spoke2(config-ikev2-author-policy)#route set interface

Spoke2(config)#crypto ikev2 profile IKEV2_PROFILE
Spoke2(config-ikev2-profile)#match identity remote fqdn HUB.FLEXVPN.LAB
Spoke2(config-ikev2-profile)#match identity remote fqdn SPOKE1.FLEXVPN.LAB
Spoke2(config-ikev2-profile)#identity local fqdn SPOKE2.FLEXVPN.LAB
Spoke2(config-ikev2-profile)#authentication remote pre-share
Spoke2(config-ikev2-profile)#authentication local pre-share
Spoke2(config-ikev2-profile)#keyring local IKEV2_KEYRING
Spoke2(config-ikev2-profile)#aaa authorization group psk list FLEXVPN_LOCAL IKEV2_AUTHORIZATION

Spoke2(config)#crypto ipsec profile IPSEC_PROFILE
Spoke2(ipsec-profile)#set ikev2-profile IKEV2_PROFILE

Spoke2(config)#interface Tunnel0
Spoke2(config-if)#ip address negotiated
Spoke2(config-if)#ip nhrp network-id 1
Spoke2(config-if)#ip nhrp shortcut virtual-template 1
Spoke2(config-if)#tunnel source GigabitEthernet0/0
Spoke2(config-if)#tunnel destination 192.168.1.254
Spoke2(config-if)#tunnel protection ipsec profile IPSEC_PROFILE

Spoke2(config)#interface Virtual-Template1 type tunnel
Spoke2(config-if)#ip unnumbered Tunnel0
Spoke2(config-if)#ip nhrp network-id 1
Spoke2(config-if)#ip nhrp shortcut virtual-template 1
Spoke2(config-if)#tunnel source GigabitEthernet0/0
Spoke2(config-if)#tunnel protection ipsec profile IPSEC_PROFILE

Spoke2(config)#router bgp 1
Spoke2(config-router)#bgp router-id 2.2.2.2
Spoke2(config-router)#neighbor 172.16.1.254 remote-as 1
Spoke2(config-router)#neighbor 172.16.1.254 update-source Tunnel0

Spoke2(config-router)#address-family ipv4
Spoke2(config-router-af)#network 2.2.2.2 mask 255.255.255.255
Spoke2(config-router-af)#neighbor 172.16.1.254 activate
This completes the spoke2 configuration.
Verification
Let’s verify our work.
IKEv2 SA and IPSec SA
First, I’ll check if we have an IKEv2 SA and IPSec SA:
Hello David!
There is no lesson on NetworkLessons that covers this scenario, but you can take a look at this Cisco documentation that, for the most part, deals with the situation you describe:
https://www.cisco.com/c/en/us/support/docs/security/flexvpn/116412-configure-flexvpn-00.html
Let us know how you get along and if you have any further questions, you know where to find us!
I hope this has been helpful!
Laz
Good Afternoon.
If I am trying to replicate this lab on CML, how do the Hub and spoke routers physically connect? The cloud icon is featured in the topology but I am not sure how to set this up in CML.
Thank you.
Hello Zahary
You will notice that all three routers are on the same subnet of 192.168.1.0/24 for the underlay network (the network configured for the physical interfaces. You can simply connect all three to an L2 switch to replicate the behavior of the cloud.
I hope this has been helpful!
Laz
Hello Lazaros!
Thank you so much for your response. I am still a little confused. I am assuming the cloud represents an ISP in the topology, so would you not just use a dummy router to mimic this in a lab environment?
If not, I just do not understand how the hub and spokes will be able to communicate/ learn routes over the L2 switch. Additionally, what would I need to configure on the switch for this to work?
Thank you for your time.
Hello Zachary
Take a look at the diagram of the topology once again:
https://cdn-forum.networklessons.com/uploads/default/original/2X/f/f3dd0810527bd3db5cddb533aea853f214c511c7.png
In order to get the FlexVPN network up and running between the Hub and spokes, the only prerequisite is that these routes must have connectivity to each other. This can be across a single switch, across several routers, or it can be across the Internet. Now in the case of a production network where this would typically be over the Internet, many routers would intervene between the
... Continue reading in our forum