In this lesson, we’ll take a look at how to extend your Linux LVM volumes. This isn’t very difficult to do, but before we start, let me explain some terminology about LVM:
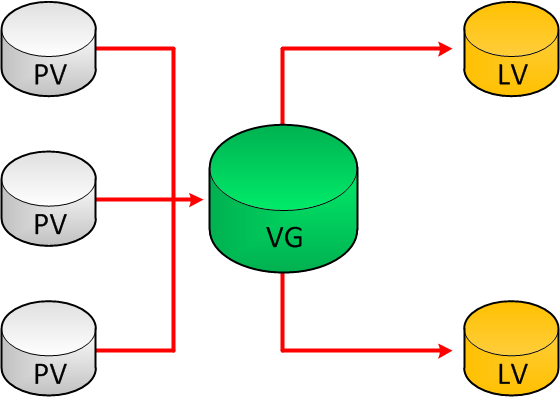
On the left side, we see our PV (Physical Volume). These are partitions on your physical harddisks that are available to LVM. In the middle is the VG (Volume Group), which is a group of physical volumes. The LV on the right side is our logical volume. This is a “piece” of the volume group that we can use as a partition for our operating system. Now you know about the terminology, let’s look at an actual example where we expand the size of our logical volume.
In short, here are the steps to extend the size of your logical volume:
- Create a new partition on hard disk.
- Add the partition you just created as a physical volume.
- Add the new physical volume to the volume group.
- Assign space from the volume group to the logical volume.
- Resize the filesystem.
I’m using a virtual machine that has a 30GB hard disk at the moment. We can verify this with the fdisk command:
# fdisk -l

Disk /dev/sda: 32.2 GB, 32212254720 bytes
255 heads, 63 sectors/track, 3916 cylinders
Units = cylinders of 16065 * 512 = 8225280 bytes
Sector size (logical/physical): 512 bytes / 512 bytes
I/O size (minimum/optimal): 512 bytes / 512 bytes
Disk identifier: 0x000d78cd

   Device Boot      Start         End      Blocks   Id  System
/dev/sda1   *           1          64      512000   83  Linux
Partition 1 does not end on cylinder boundary.
/dev/sda2              64        3917    30944256   8e  Linux LVM

Disk /dev/mapper/vg_vmware-lv_root: 29.6 GB, 29569843200 bytes
255 heads, 63 sectors/track, 3594 cylinders
Units = cylinders of 16065 * 512 = 8225280 bytes
Sector size (logical/physical): 512 bytes / 512 bytes
I/O size (minimum/optimal): 512 bytes / 512 bytes
Disk identifier: 0x00000000

Disk /dev/mapper/vg_vmware-lv_swap: 2113 MB, 2113929216 bytes
255 heads, 63 sectors/track, 257 cylinders
Units = cylinders of 16065 * 512 = 8225280 bytes
Sector size (logical/physical): 512 bytes / 512 bytes
I/O size (minimum/optimal): 512 bytes / 512 bytes
Disk identifier: 0x00000000
As you can see above there’s a single volume group called “vmware” which has two logical volumes (lv_root and lv_swap). The idea is to extend the size of lv_root so that we have more space to use. If you want to take a closer look at the partitions, then you need to use the df command:
[root@vmware ~]# df -lh
Filesystem Size Used Avail Use% Mounted on
/dev/mapper/vg_vmware-lv_root
28G 15G 12G 57% /
tmpfs 495M 0 495M 0% /dev/shm
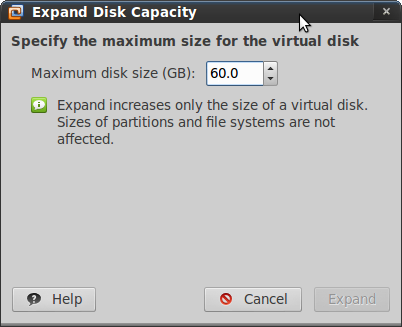
/dev/sda1 485M 53M 407M 12% /bootHere you can see that the lv_root logical volume is 28G and has 12G available. To increase the “physical” size of our disk, I will power off this machine and extend the size of the harddisk in VMWare to 60GB:
After starting the virtual machine, here’s what fdisk looks like:
# fdisk -l
Disk /dev/sda: 64.4 GB, 64424509440 bytes
255 heads, 63 sectors/track, 7832 cylinders
Units = cylinders of 16065 * 512 = 8225280 bytes
Sector size (logical/physical): 512 bytes / 512 bytes
I/O size (minimum/optimal): 512 bytes / 512 bytes
Disk identifier: 0x000d78cd

   Device Boot      Start         End      Blocks   Id  System
/dev/sda1   *           1          64      512000   83  Linux
Partition 1 does not end on cylinder boundary.
/dev/sda2              64        3917    30944256   8e  Linux LVM

Disk /dev/mapper/vg_vmware-lv_root: 29.6 GB, 29569843200 bytes
255 heads, 63 sectors/track, 3594 cylinders
Units = cylinders of 16065 * 512 = 8225280 bytes
Sector size (logical/physical): 512 bytes / 512 bytes
I/O size (minimum/optimal): 512 bytes / 512 bytes
Disk identifier: 0x00000000

Disk /dev/mapper/vg_vmware-lv_swap: 2113 MB, 2113929216 bytes
255 heads, 63 sectors/track, 257 cylinders
Units = cylinders of 16065 * 512 = 8225280 bytes
Sector size (logical/physical): 512 bytes / 512 bytes
I/O size (minimum/optimal): 512 bytes / 512 bytes
Disk identifier: 0x00000000
Great! Our physical disk is now 60GB (64GB actually…), but no changes were made to our physical volume and logical volumes. That’s something we have to do ourselves. The first thing to do is to create a new partition on the hard disk and tell LVM that it can be used as a physical volume:
# fdisk /dev/sda

WARNING: DOS-compatible mode is deprecated. It's strongly recommended to
         switch off the mode (command 'c') and change display units to
         sectors (command 'u').

Command (m for help): n
Command action
   e   extended
   p   primary partition (1-4)
p
Partition number (1-4): 3
First cylinder (3917-7832, default 3917):
Using default value 3917
Last cylinder, +cylinders or +size{K,M,G} (3917-7832, default 7832):
Using default value 7832

Command (m for help): w
The partition table has been altered!

Calling ioctl() to re-read partition table.

WARNING: Re-reading the partition table failed with error 16: Device or resource busy.
The kernel still uses the old table. The new table will be used at
the next reboot or after you run partprobe(8) or kpartx(8)
Syncing disks.
I just created a new primary partition on the hard disk and assigned all available free space to it. Reboot your computer and take a look at fdisk:
# fdisk -l

Disk /dev/sda: 64.4 GB, 64424509440 bytes
255 heads, 63 sectors/track, 7832 cylinders
Units = cylinders of 16065 * 512 = 8225280 bytes
Sector size (logical/physical): 512 bytes / 512 bytes
I/O size (minimum/optimal): 512 bytes / 512 bytes
Disk identifier: 0x000d78cd

   Device Boot      Start         End      Blocks   Id  System
/dev/sda1   *           1          64      512000   83  Linux
Partition 1 does not end on cylinder boundary.
/dev/sda2              64        3917    30944256   8e  Linux LVM
/dev/sda3            3917        7832    31453260   83  Linux
Above, you see the newly created /dev/sda3 Linux partition.
Now we can add it to our physical volume. Here’s what it looks like right now:
# pvdisplay
  --- Physical volume ---
  PV Name               /dev/sda2
  VG Name               vg_vmware
  PV Size               29.51 GiB / not usable 3.00 MiB
  Allocatable           yes (but full)
  PE Size               4.00 MiB
  Total PE              7554
  Free PE               0
  Allocated PE          7554
  PV UUID               rxHFrq-a1p1-8woW-1Vr2-4C6w-zLQt-IdTgFk
Use the pvdisplay command to see the current state of the physical volume. Right now, only the /dev/sda2 partition is a physical volume, so we’ll tell LVM that our /dev/sda3 partition is a PV as well with the pvcreate command:
# pvcreate /dev/sda3
  Physical volume "/dev/sda3" successfully created
Run the pvdisplay command again so see the results:
# pvdisplay
  --- Physical volume ---
  PV Name               /dev/sda2
  VG Name               vg_vmware
  PV Size               29.51 GiB / not usable 3.00 MiB
  Allocatable           yes (but full)
  PE Size               4.00 MiB
  Total PE              7554
  Free PE               0
  Allocated PE          7554
  PV UUID               rxHFrq-a1p1-8woW-1Vr2-4C6w-zLQt-IdTgFk

  "/dev/sda3" is a new physical volume of "30.00 GiB"
  --- NEW Physical volume ---
  PV Name               /dev/sda3
  VG Name
  PV Size               30.00 GiB
  Allocatable           NO
  PE Size               0
  Total PE              0
  Free PE               0
  Allocated PE          0
  PV UUID               JRdnMd-4bm1-ahFI-6FtR-Opzl-4SBL-OXmKFQ
Our /dev/sda3 partition has been added as a physical volume. Now we can add it to the volume group. Use the vgdisplay command to check for the name of your volume group:
# vgdisplay | grep Name
  VG Name               vg_vmware
In my example, it’s called “vg_vmware”. Let’s add the /dev/sda3 partition to this volume group:
# vgextend vg_vmware /dev/sda3
  Volume group "vg_vmware" successfully extended
The vgextend command adds it to the volume group, let’s look at the volume group again to see our changes:
# vgdisplay
  --- Volume group ---
  VG Name               vg_vmware
  System ID
  Format                lvm2
  Metadata Areas        2
  Metadata Sequence No  4
  VG Access             read/write
  VG Status             resizable
  MAX LV                0
  Cur LV                2
  Open LV               2
  Max PV                0
  Cur PV                2
  Act PV                2
  VG Size               59.50 GiB
  PE Size               4.00 MiB
  Total PE              15232
  Alloc PE / Size       7554 / 29.51 GiB
  Free  PE / Size       7678 / 29.99 GiB
  VG UUID               NIQaYT-WSin-0FSk-LBeE-g7RP-9cOV-ru5Vza
Excellent…our volume group is now close to 60GB. We still have to assign this space to our logical volume…let’s use lvdisplay to see the name of our logical volumes:
# lvdisplay | grep Path
  LV Path                /dev/vg_vmware/lv_root
  LV Path                /dev/vg_vmware/lv_swap
I want to use all the free space from my volume group and add it to the lv_root logical volume. We can use the lvextend command for this:
# lvextend -l +100%FREE /dev/vg_vmware/lv_root
  Extending logical volume lv_root to 57.53 GiB
  Logical volume lv_root successfully resized
There we go; lv_root is now almost 60GB. Let’s verify our work:
# lvdisplay
  --- Logical volume ---
  LV Path                /dev/vg_vmware/lv_root
  LV Name                lv_root
  VG Name                vg_vmware
  LV UUID                lgK13r-CdZ3-TW6R-VvVg-d8lK-S3iF-FhqgbY
  LV Write Access        read/write
  LV Creation host, time vmware.networklessons.local, 2013-03-28 18:07:43 +0100
  LV Status              available
  # open                 1
  LV Size                57.53 GiB
  Current LE             14728
  Segments               2
  Allocation             inherit
  Read ahead sectors     auto
  - currently set to     256
  Block device           253:0
We are almost done, but we still have to resize the actual filesystem. Otherwise your operating system can still only use 30GB. I’ll use resize2fs for this:
# resize2fs /dev/vg_vmware/lv_root
resize2fs 1.41.12 (17-May-2010)
Filesystem at /dev/vg_vmware/lv_root is mounted on /; on-line resizing required
old desc_blocks = 2, new_desc_blocks = 4
Performing an on-line resize of /dev/vg_vmware/lv_root to 15081472 (4k) blocks.
The filesystem on /dev/vg_vmware/lv_root is now 15081472 blocks long
This process can be done without rebooting. If everything went OK, you now have more free space to use:
# df -lh
Filesystem            Size  Used Avail Use% Mounted on
/dev/mapper/vg_vmware-lv_root
                       57G   15G   40G  27% /
tmpfs                 495M     0  495M   0% /dev/shm
/dev/sda1             485M   53M  407M  12% /boot
Great! Our operating system has more free space to use now. Hopefully, this lesson has been useful for you to expand your logical volume(s) and perhaps to understand Linux LVM a little bit more. If you have any questions feel free to leave a comment!
Hmm, there should be more comments! In any case, I have needed such a simple primer.
Thanks,
Ryan