Lesson Contents
RIP has a simple metric, the hop count. It’s common to see that your router has multiple paths for the same network, with the same metric.
What does RIP do in this case? If the metric is the same, then it will use all possible paths and load balance over them. This is called equal cost load balancing.
Let’s take a closer look to see this in action.
Configuration
This is the topology we will use:
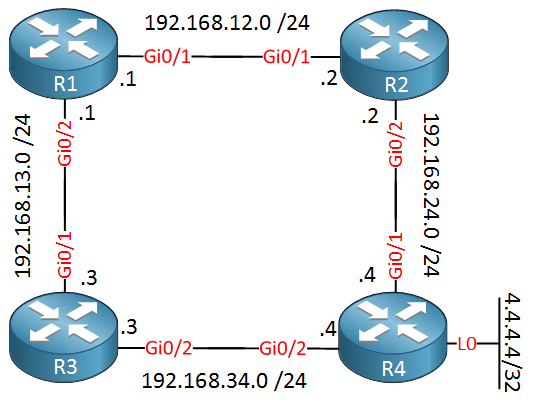
We have four routers, R4 has a loopback interface with 4.4.4.4/32. We will enable RIP on all interfaces and advertise this network. R1 will learn two equal cost paths for 4.4.4.4/32.
Here’s the RIP configuration we will use:
R1(config)#router rip
R1(config-router)#no auto-summary
R1(config-router)#version 2
R1(config-router)#network 192.168.12.0
R1(config-router)#network 192.168.13.0R2(config)#router rip
R2(config-router)#no auto-summary
R2(config-router)#version 2
R2(config-router)#network 192.168.12.0
R2(config-router)#network 192.168.24.0R3(config)#router rip
R3(config-router)#no auto-summary
R3(config-router)#version 2
R3(config-router)#network 192.168.13.0
R3(config-router)#network 192.168.34.0
R4(config)#router rip
R4(config-router)#no auto-summary
R4(config-router)#version 2
R4(config-router)#network 192.168.24.0
R4(config-router)#network 192.168.34.0
R4(config-router)#network 4.0.0.0
When we look at the routing table of R1, we find two entries:
R1#show ip route rip | begin 4.4.4.4
R        4.4.4.4 [120/2] via 192.168.13.3, 00:00:19, GigabitEthernet0/2
                 [120/2] via 192.168.12.2, 00:00:08, GigabitEthernet0/1
R1 will use both paths and will use load balancing to get to 4.4.4.4.
The number of paths that RIP will use is configured because of a default setting. You can find it in the running-config but you have to add the “all” parameter:
R1#show running-config all | begin router rip
router rip
 version 2
 validate-update-source
 timers basic 30 180 180 240
 network 192.168.12.0 mask 255.255.255.0
 network 192.168.13.0 mask 255.255.255.0
 maximum-paths 4
 input-queue 150
 distance 120
 no auto-summary
Above you can see that RIP will use a maximum of 4 paths. If we want, we can change this:
R1(config)#router rip
R1(config-router)#maximum-paths ?
  <1-32>  Number of paths
On this router, we can choose anywhere between 1 and 32. The maximum number of paths depends on your IOS version. Let’s set it to 1, this will disable load balancing:
R1(config)#router rip
R1(config-router)#maximum-paths 1
Let’s take a look at the routing table:
R1#show ip route rip | begin 4.4.4.4
R        4.4.4.4 [120/2] via 192.168.13.3, 00:00:07, GigabitEthernet0/2
There’s only one entry now, the path through R3. Why did it pick this one and not the path through R2? It could be that RIP prefers the highest next hop IP address, that’s something we can test. Let’s shut the path to R3:
R1(config)#interface GigabitEthernet 0/2
R1(config-if)#shutdown
The path to R3 is now gone so R1 will use R2 as the next hop:
R1#show ip route rip | begin 4.4.4.4
R        4.4.4.4 [120/2] via 192.168.12.2, 00:00:14, GigabitEthernet0/1
Now let’s see what happens when we open the interface to R3 again:
R1(config)#interface GigabitEthernet 0/2
R1(config-if)#no shutdown
R1 will keep using the path through R2, even though R3 is up and running again:
R1#show ip route rip | begin 4.4.4.4
R        4.4.4.4 [120/2] via 192.168.12.2, 00:00:05, GigabitEthernet0/1
So it seems RIP has a preference for the entry it first installed in its routing table, and that’s it.
Configurations
Want to take a look for yourself? Here you will find the final configuration of each device.
R1
hostname R1
!
ip cef
!
interface GigabitEthernet0/1
 ip address 192.168.12.1 255.255.255.0
!
interface GigabitEthernet0/2
 ip address 192.168.13.1 255.255.255.0
!
router rip
 network 192.168.12.0
 network 192.168.13.0
 maximum-paths 1
 no auto-summary
!
end
R2
hostname R2
!
ip cef
!
interface GigabitEthernet0/1
 ip address 192.168.12.2 255.255.255.0
!
interface GigabitEthernet0/2
 ip address 192.168.24.2 255.255.255.0
!
router rip
 network 192.168.12.0
 network 192.168.24.0
 no auto-summary
!
end
R3
hostname R3
!
ip cef
!
interface GigabitEthernet0/1
 ip address 192.168.13.3 255.255.255.0
!
interface GigabitEthernet0/2
 ip address 192.168.34.3 255.255.255.0
!
router rip
 network 192.168.13.0
 network 192.168.34.0
 no auto-summary
!
end
R4
hostname R4
!
ip cef
!
interface Loopback0
 ip address 4.4.4.4 255.255.255.255
!
interface GigabitEthernet0/1
 ip address 192.168.24.4 255.255.255.0
!
interface GigabitEthernet0/2
 ip address 192.168.34.4 255.255.255.0
!
router rip
 network 4.0.0.0
 network 192.168.24.0
 network 192.168.34.0
 no auto-summary
!
end
Conclusion
You have learned that RIP will load balance on all paths with same metric, the default setting (depending on your Cisco IOS version) is 4. You can change this with the maximum-paths command. The minimum is 1, which disables load balancing. The maximum value will depend on your IOS version. When you set it to 1, RIP prefers to use the first entry that it has installed in its routing table.
Hi Rene,
I have been trying to test the RIP load balancing with an ACL and seems like the source router is choosing one path although there is two same metric paths.
in this lab, R3 is choosing always the path trough R1 (90.0.0.2) instead of share the traffic with R2 (80.0.0.2). Do you know why?
For your information this is a GNS3 lab.
... Continue reading in our forumHello Jose
When a routing like RIP protocol determines that there are two equal cost routes to a destination, it employs load balancing. How that load balancing is managed depends not on the routing protocol but on the type of switching that is configured on the device. Specifically, it depends on whether process switching or fast switching has been enabled.
According to Cisco:
... Continue reading in our forumCrystal clear Laz!
Thank you for the full explanation.
BR,